Keras 中 TimeDistributed 和 TimeDistributedDense 理解
From the offical code:
class TimeDistributed(Wrapper):

    """This wrapper applies a layer to every temporal slice of an input.

    The input should be at least 3D, and the dimension of index one

    will be considered to be the temporal dimension.

    Consider a batch of 32 samples,

    where each sample is a sequence of 10 vectors of 16 dimensions.

    The batch input shape of the layer is then `(32, 10, 16)`,

    and the `input_shape`, not including the samples dimension, is `(10, 16)`.

    You can then use `TimeDistributed` to apply a `Dense` layer

    to each of the 10 timesteps, independently:

    ```python

        # as the first layer in a model

        model = Sequential()

        model.add(TimeDistributed(Dense(8), input_shape=(10, 16)))

        # now model.output_shape == (None, 10, 8)

    ```

    The output will then have shape `(32, 10, 8)`.

    In subsequent layers, there is no need for the `input_shape`:

    ```python

        model.add(TimeDistributed(Dense(32)))

        # now model.output_shape == (None, 10, 32)

    ```

    The output will then have shape `(32, 10, 32)`.

    `TimeDistributed` can be used with arbitrary layers, not just `Dense`,

    for instance with a `Conv2D` layer:

    ```python

        model = Sequential()

        model.add(TimeDistributed(Conv2D(64, (3, 3)),

                                  input_shape=(10, 299, 299, 3)))

    ```

    # Arguments

        layer: a layer instance.
So - basically the TimeDistributedDense was introduced first in early versions of Keras in order to apply a Dense layer stepwise to sequences. TimeDistributed is a Keras wrapper which makes possible to get any static (non-sequential) layer and apply it in a sequential manner. An example of such usage might be using a e.g. pretrained convolutional layer to a short video clip by applying TimeDistributed(conv_layer) where conv_layer is applied to each frame of a clip. It produces the sequence of outputs which might be then consumed by next recurrent or TimeDistributed layer.
It's good to know that usage of TimeDistributedDense is depreciated and it's better to use TimeDistributed(Dense) .
TimeDistributed
RNNs are capable of a number of different types of input / output combinations, as seen below
The TimeDistributedDense layer allows you to build models that do the one-to-many and many-to-many architectures. This is because the output function for each of the "many" outputs must be the same function applied to each timestep. The TimeDistributedDense layers allows you to apply that Dense function across every output over time. This is important because it needs to be the same dense function applied at every time step.
If you didn't not use this, you would only have one final output - and so you use a normal dense layer. This means you are doing either a one-to-one or a many-to-one network, since there will only be one dense layer for the output.
======================================================
As fchollet said ,
TimeDistributedDense applies a same Dense (fully-connected) operation to every timestep of a 3D tensor.
But I think you still don't catch the point. The most common scenario for using TimeDistributedDense is using a recurrent NN for tagging task.e.g. POS labeling or slot filling task.
In this kind of task:
For each sample, the input is a sequence (a1,a2,a3,a4...aN) and the output is a sequence (b1,b2,b3,b4...bN) with the same length. bi could be viewed as the label of ai.
Push a1 into a recurrent nn to get output b1. Than push a2 and the hidden output of a1 to get b2...
If you want to model this by Keras, you just need to used a TimeDistributedDense after a RNN or LSTM layer(with return_sequence=True) to make the cost function is calculated on all time-step output. If you don't use TimeDistributedDense ans set the return_sequence of RNN=False, then the cost is calculated on the last time-step output and you could only get the last bN.
I am also new to Keras, but I am trying to use it to do sequence labeling and I find this could only be done by using TimeDistributedDense. If I make something wrong, please correct me.
======================================================
It's quite easy to understand . Let's not think in terms of tensors and stuffs for a sec.
It all depends upon the "return_sequences" parameter of the LSTM function.
if return_sequence = false ( by default , it's always false ), then we get LSTM output corresponding only to THE LAST TIME STEP.
Now applying model.add(Dense( )) , what we are doing is connecting only LSTM output at last time step to Dense Layer. (This approach is in encoding the overall sequence into a compact vector .
Now given a sequence of 50 words , my LSTM will only output only one word )
Ques) WHEN NOT TO USE TIMEDISTRIBUTED ?
Ans) In my experience, for encoder decoder model.
if you want to squeeze all your input information into a single vector, we DONT use TIMEDISTRIBUTED.
Only final unrolled layer of LSTM layer will be the output. This final layer will holder the compact information of whole input sequence which is useful for task like classification , summarization etc.
-----------------------------------------------------------However !-----------------------------------------------------------------------
If return_sequence is set True , LSTM outputs at every time step . So , I must use TimeDistributed to ensure that the Dense layer is connected to LSTM output at each TimeStep. Otherwise , error occurs !
Also keep in mind , just like lstm is unrolled , so is the dense layer . i.e dense layer at each time step is the same one . It's not like there are 50 different dense layer for 50 time steps.
There's nothing to get confused.
This time , model will generate a sequence corresponding to length of Timestep. So, given set of 50 input word , LSTM will output 50 output word
Q) WHEN TO USE TIMEDISTRIBUTED ?
A) In case of word generation task (like shakespeare) , where given a sequence of words , we train model predict next set of words .
EXAMPLE : if nth training input to LSTM Network is : 'I want to ' AND output of netwok is "want to eat" . Here , each word ['want','to','eat'] are output of LSTM during each timestep.
======================================================
Let's say you have time-series data with NN rows and 700700 columns which you want to feed to a SimpleRNN(200, return_sequence=True) layer in Keras. Before you feed that to the RNN, you need to reshape the previous data to a 3D tensor. So it becomes a N×700×1N×700×1.
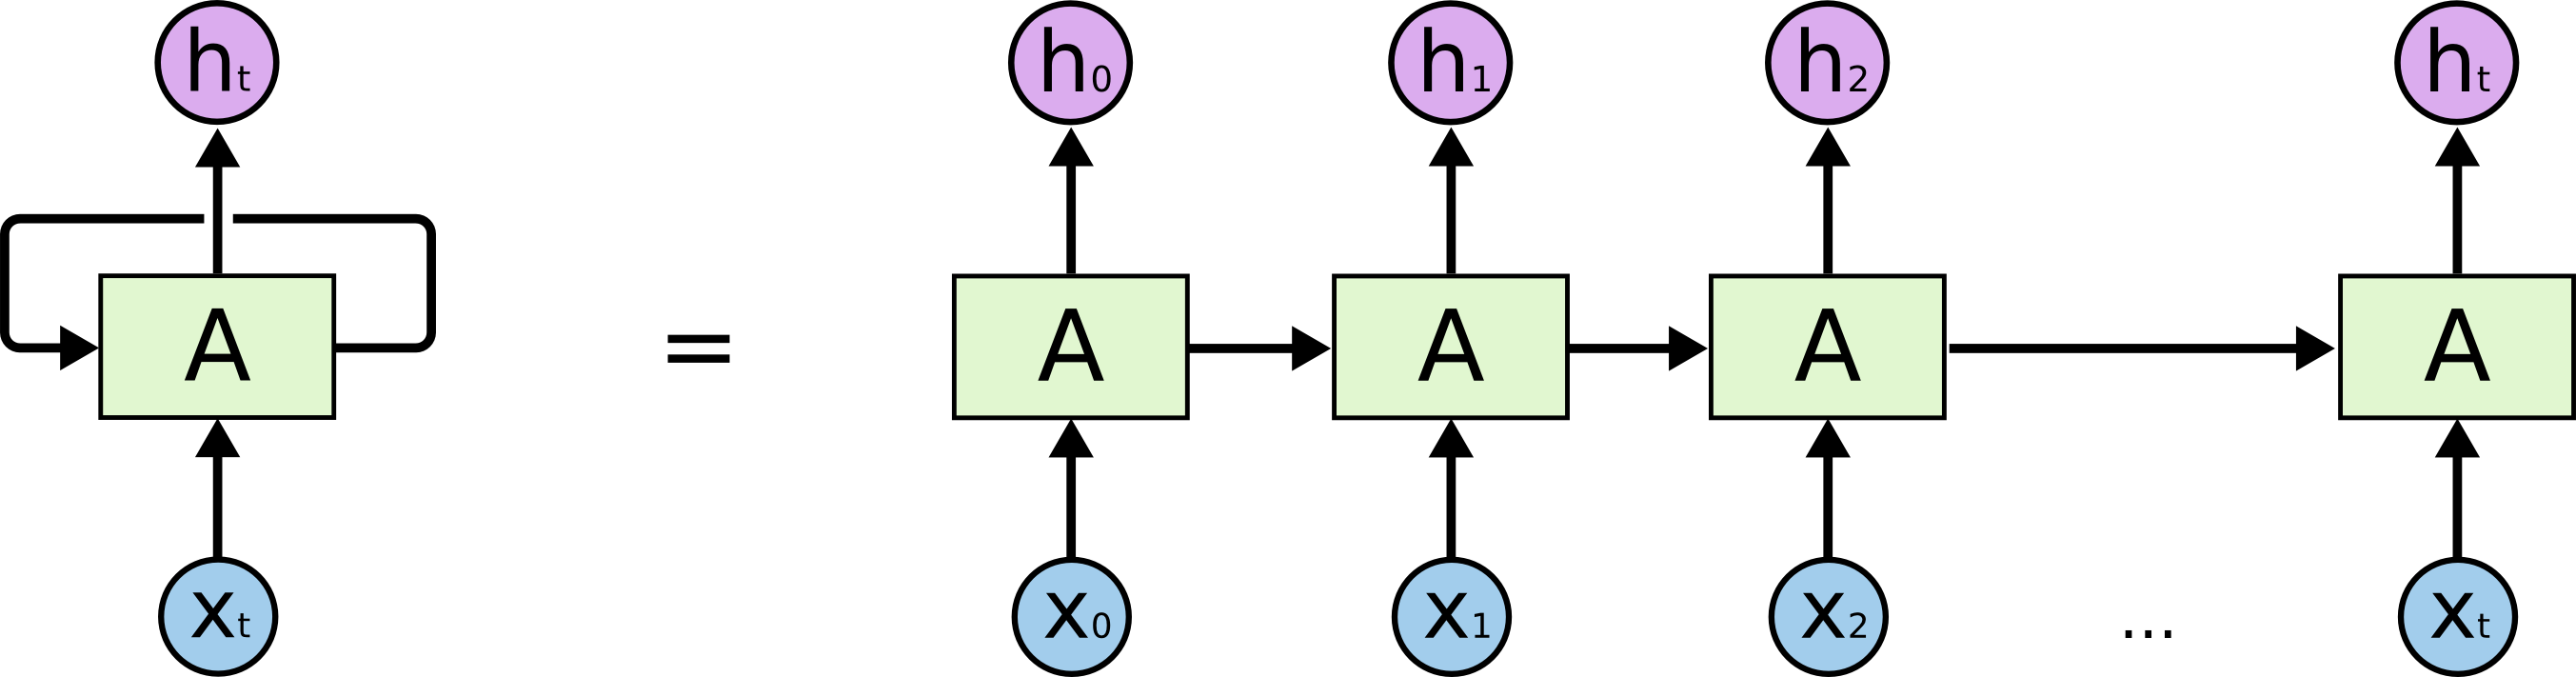
The image is taken from https://colah.github.io/posts/2015-08-Understanding-LSTMs
In RNN, your columns (the "700 columns") is the timesteps of RNN. Your data is processed from t=1 to 700t=1 to 700. After feeding the data to the RNN, now it have 700 outputs which are h1h1 to h700h700, not h1h1to h200h200. Remember that now the shape of your data is N×700×200N×700×200 which is samples (the rows) x timesteps (the columns) x channels.
And then, when you apply a TimeDistributedDense , you're applying a Dense layer on each timestep, which means you're applying a Dense layer on each h1h1, h2h2,...,htht respectively. Which means: actually you're applying the fully-connected operation on each of its channels (the "200" one) respectively, from h1h1 to h700h700. The 1st "1×1×2001×1×200" until the 700th "1×1×2001×1×200".
Why are we doing this? Because you don't want to flatten the RNN output.
Why not flattening the RNN output? Because you want to keep each timestep values separate.
Why keep each timestep values separate? Because:
- you're only want to interacting the values between its own timestep
- you don't want to have a random interaction between different timesteps and channels.
参考:
https://datascience.stackexchange.com/questions/10836/the-difference-between-dense-and-timedistributeddense-of-keras
https://github.com/keras-team/keras/blob/master/keras/layers/wrappers.py#L43
https://github.com/keras-team/keras/issues/1029
https://stackoverflow.com/questions/42398645/timedistributed-vs-timedistributeddense-keras
Keras 中 TimeDistributed 和 TimeDistributedDense 理解的更多相关文章
- keras中TimeDistributed的用法
TimeDistributed这个层还是比较难理解的.事实上通过这个层我们可以实现从二维像三维的过渡,甚至通过这个层的包装,我们可以实现图像分类视频分类的转化. 考虑一批32个样本,其中每个样本是一个 ...
- keras中TimeDistributed
TimeDistributed这个层还是比较难理解的.事实上通过这个层我们可以实现从二维像三维的过渡,甚至通过这个层的包装,我们可以实现图像分类视频分类的转化. 考虑一批32个样本,其中每个样本是一个 ...
- 深度学习基础系列(五)| 深入理解交叉熵函数及其在tensorflow和keras中的实现
在统计学中,损失函数是一种衡量损失和错误(这种损失与“错误地”估计有关,如费用或者设备的损失)程度的函数.假设某样本的实际输出为a,而预计的输出为y,则y与a之间存在偏差,深度学习的目的即是通过不断地 ...
- 在Keras中可视化LSTM
作者|Praneet Bomma 编译|VK 来源|https://towardsdatascience.com/visualising-lstm-activations-in-keras-b5020 ...
- SQL SERVER 2005/2008 中关于架构的理解(二)
本文上接SQL SERVER 2005/2008 中关于架构的理解(一) 架构的作用与示例 用户与架构(schema)分开,让数据库内各对象不再绑在某个用户账号上,可以解决SQL SERVE ...
- SQL SERVER 2005/2008 中关于架构的理解(一)
SQL SERVER 2005/2008 中关于架构的理解(一) 在一次的实际工作中碰到以下情况,在 SQL SERVER 2008中,新建了一个新用户去访问几张由其他用户创建的表,但是无法进行查询, ...
- C++中 类的构造函数理解(一)
C++中 类的构造函数理解(一) 写在前面 这段时间完成三个方面的事情: 1.继续巩固基础知识(主要是C++ 方面的知识) 2.尝试实现一个iOS的app,通过完成app,学习iOS开发中要用到的知识 ...
- ECshop中的session机制理解
ECshop中的session机制理解 在网上找了发现都是来之一人之手,也没有用自己的话去解释,这里我就抛砖引玉,发表一下自己的意见,还希望能得到各界人士的指导批评! 此session机制不需 ...
- [开发技巧]·Numpy中对axis的理解与应用
[开发技巧]·Numpy中对axis的理解与应用 1.问题描述 在使用Numpy时我们经常要对Array进行操作,如果需要针对Array的某一个纬度进行操作时,就会用到axis参数. 一般的教程都是针 ...
随机推荐
- Hibernate入门1 - Hibernate概述及第一个小例子
一.什么是ORM? ORM,即Object Relational Mapping.我们知道,利用面向对象的思想编写的数据库应用程序最终都是把对象信息保存在关系型数据库中,于是需要编写与底层数据库相关的 ...
- Java 虚拟机的对象创建
堆中存储的内容:在程序运行时,动态创建的对象. 创建对象的四种方式:new,clone(浅复制),反射,反序列化. 浅复制:只能复制当前对象本身,如果当前对象(A)引用了另外的对象(B),则引用对象( ...
- 微信小程序框架与组件
版权声明:未经博主允许不得转载 前言: 学习微信小程序应该不怎么难吧~下面我来记录一下学习笔记,在学微信小程序的时候,如果你有html+css+javascript的基础,那么你就很快地上手掌握的.下 ...
- 深度学习笔记(八)Focal Loss
论文:Focal Loss for Dense Object Detection 论文链接:https://arxiv.org/abs/1708.02002 一. 提出背景 object detect ...
- [Objective-C语言教程]预处理器(18)
Objective-C预处理器不是编译器的一部分,而是编译过程中的一个单独步骤. 简单来说,Objective-C预处理器只是一个文本替换工具,它指示编译器在实际编译之前进行必要的预处理. 我们将Ob ...
- Golang 协程调度
一.线程模型 N:1模型,N个用户空间线程在1个内核空间线程上运行.优势是上下文切换非常快但是无法利用多核系统的优点. 1:1模型,1个内核空间线程运行一个用户空间线程.这种充分利用了多核系统的优势但 ...
- 搭建oracle linux虚拟机报错解决
sysctl -P 报错解决办法问题症状修改 linux 内核文件 #vi /etc/sysctl.conf后执行sysctl -P 报错error: "net.bridge.bridge ...
- Asp.net mvc 5 CRUD代码自动生成工具- vs.net 2013 Saffolding功能扩展
Asp.net mvc 5 CRUD代码自动生成工具 -Visual Studio.net2013 Saffolding功能扩展 上次做过一个<Asp.net webform scaffoldi ...
- 线段树(segment tree)
线段树是一种二叉搜索树,它的每一个结点对应着一个区间[L, R],叶子结点对应的区间就是一个单位区间,即L == R.对于一个非叶子结点[L, R],它的左儿子所表示的区间是[L, (L +R)/2] ...
- c# 对象集合转Json
/// <summary> /// 普通集合转换Json /// </summary> /// <param name="array">集合对象 ...