Android控件进阶-自定义流式布局和热门标签控件
概述
详细
一、概述:
在日常的app使用中,我们会在android 的app中看见 热门标签等自动换行的流式布局,今天,我们就来看看如何
自定义一个类似热门标签那样的流式布局吧
类似的自定义换行流式布局控件。下面我们就来详细介绍流式布局的应用特点以及用的的技术点:
1.流式布局的特点以及应用场景
特点:当上面一行的空间不够容纳新的TextView时候,
才开辟下一行的空间
原理图:

场景:主要用于关键词搜索或者热门标签等场景
2.自定义ViewGroup,重点重写下面两个方法
1、onMeasure:测量子view的宽高,设置自己的宽和高
2、onLayout:设置子view的位置
onMeasure:根据子view的布局文件中属性,来为子view设置测量模式和测量值
测量=测量模式+测量值;
测量模式有3种:
EXACTLY:表示设置了精确的值,一般当childView设置其宽、高为精确值、match_parent时,ViewGroup会将其设置为EXACTLY;
AT_MOST:表示子布局被限制在一个最大值内,一般当childView设置其宽、高为wrap_content时,ViewGroup会将其设置为AT_MOST;
UNSPECIFIED:表示子布局想要多大就多大,一般出现在AadapterView的item的heightMode中、ScrollView的childView的heightMode中;此种模式比较少见。
3.LayoutParams
ViewGroup LayoutParams :每个 ViewGroup 对应一个 LayoutParams; 即 ViewGroup -> LayoutParams
getLayoutParams 不知道转为哪个对应的LayoutParams ,其实很简单,就是如下:
子View.getLayoutParams 得到的LayoutParams对应的就是 子View所在的父控件的LayoutParams;
例如,LinearLayout 里面的子view.getLayoutParams ->LinearLayout.LayoutParams
所以 咱们的FlowLayout 也需要一个LayoutParams,由于上面的效果图是子View的 margin,
所以应该使用MarginLayoutParams。即FlowLayout->MarginLayoutParams
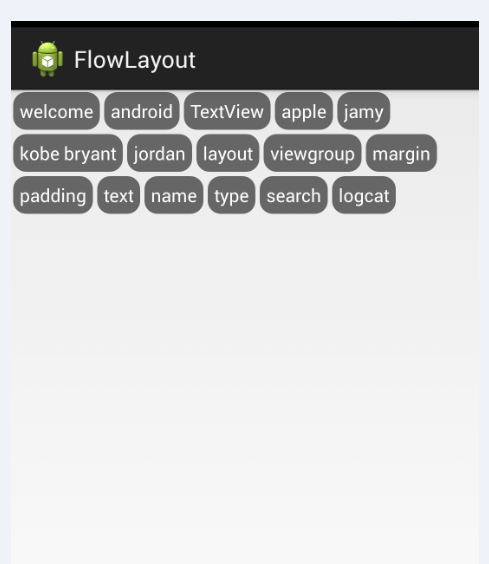
4.最后来看看实现的最终效果图:
二、热门标签的流式布局的实现:
1. 自定义热门标签的ViewGroup实现
根据上面的技术分析,自定义类继承于ViewGroup,并重写 onMeasure和onLayout等方法。具体核心实现代码如下:
package com.czm.flowlayout;

import java.util.ArrayList;

import java.util.List;

import android.content.Context;

import android.util.AttributeSet;

import android.view.View;

import android.view.ViewGroup;

/**

 *

 * @author caizhiming

 *

 */

public class XCFlowLayout extends ViewGroup{

    @Override

    protected void onMeasure(int widthMeasureSpec, int heightMeasureSpec) {

        // TODO Auto-generated method stub

        //父控件传进来的宽度和高度以及对应的测量模式

        int sizeWidth = MeasureSpec.getSize(widthMeasureSpec);

        int modeWidth = MeasureSpec.getMode(widthMeasureSpec);

        int sizeHeight = MeasureSpec.getSize(heightMeasureSpec);

        int modeHeight = MeasureSpec.getMode(heightMeasureSpec);

        //如果当前ViewGroup的宽高为wrap_content的情况

        int width = 0;//自己测量的 宽度

        int height = 0;//自己测量的高度

        //记录每一行的宽度和高度

        int lineWidth = 0;

        int lineHeight = 0;

        //获取子view的个数

        int childCount = getChildCount();

        for(int i = 0;i < childCount; i ++){

            View child = getChildAt(i);

            //测量子View的宽和高

            measureChild(child, widthMeasureSpec, heightMeasureSpec);

            //得到LayoutParams

            MarginLayoutParams lp = (MarginLayoutParams) child.getLayoutParams();

            //子View占据的宽度

            int childWidth = child.getMeasuredWidth() + lp.leftMargin + lp.rightMargin;

            //子View占据的高度

            int childHeight = child.getMeasuredHeight() + lp.topMargin + lp.bottomMargin;

            //换行时候

            if(lineWidth + childWidth > sizeWidth){

                //对比得到最大的宽度

                width = Math.max(width, lineWidth);

                //重置lineWidth

                lineWidth = childWidth;

                //记录行高

                height += lineHeight;

                lineHeight = childHeight;

            }else{//不换行情况

                //叠加行宽

                lineWidth += childWidth;

                //得到最大行高

                lineHeight = Math.max(lineHeight, childHeight);

            }

            //处理最后一个子View的情况

            if(i == childCount -1){

                width = Math.max(width, lineWidth);

                height += lineHeight;

            }

        }

        //wrap_content

        setMeasuredDimension(modeWidth == MeasureSpec.EXACTLY ? sizeWidth : width,

                modeHeight == MeasureSpec.EXACTLY ? sizeHeight : height);

    }

    @Override

    protected void onLayout(boolean changed, int l, int t, int r, int b) {

        // TODO Auto-generated method stub

        mAllChildViews.clear();

        mLineHeight.clear();

        //获取当前ViewGroup的宽度

        int width = getWidth();

        int lineWidth = 0;

        int lineHeight = 0;

        //记录当前行的view

        List<View> lineViews = new ArrayList<View>();

        int childCount = getChildCount();

        for(int i = 0;i < childCount; i ++){

            View child = getChildAt(i);

            MarginLayoutParams lp = (MarginLayoutParams) child.getLayoutParams();

            int childWidth = child.getMeasuredWidth();

            int childHeight = child.getMeasuredHeight();

            //如果需要换行

            if(childWidth + lineWidth + lp.leftMargin + lp.rightMargin > width){

                //记录LineHeight

                mLineHeight.add(lineHeight);

                //记录当前行的Views

                mAllChildViews.add(lineViews);

                //重置行的宽高

                lineWidth = 0;

                lineHeight = childHeight + lp.topMargin + lp.bottomMargin;

                //重置view的集合

                lineViews = new ArrayList();

            }

            lineWidth += childWidth + lp.leftMargin + lp.rightMargin;

            lineHeight = Math.max(lineHeight, childHeight + lp.topMargin + lp.bottomMargin);

            lineViews.add(child);

        }

        //处理最后一行

        mLineHeight.add(lineHeight);

        mAllChildViews.add(lineViews);

        //设置子View的位置

        int left = 0;

        int top = 0;

        //获取行数

        int lineCount = mAllChildViews.size();

        for(int i = 0; i < lineCount; i ++){

            //当前行的views和高度

            lineViews = mAllChildViews.get(i);

            lineHeight = mLineHeight.get(i);

            for(int j = 0; j < lineViews.size(); j ++){

                View child = lineViews.get(j);

                //判断是否显示

                if(child.getVisibility() == View.GONE){

                    continue;

                }

                MarginLayoutParams lp = (MarginLayoutParams) child.getLayoutParams();

                int cLeft = left + lp.leftMargin;

                int cTop = top + lp.topMargin;

                int cRight = cLeft + child.getMeasuredWidth();

                int cBottom = cTop + child.getMeasuredHeight();

                //进行子View进行布局

                child.layout(cLeft, cTop, cRight, cBottom);

                left += child.getMeasuredWidth() + lp.leftMargin + lp.rightMargin;

            }

            left = 0;

            top += lineHeight;

        }

    }

}
2.相关的布局文件:
引用自定义控件:
<RelativeLayout xmlns:android="http://schemas.android.com/apk/res/android"

    xmlns:tools="http://schemas.android.com/tools"

    android:id="@+id/container"

    android:layout_width="match_parent"

    android:layout_height="match_parent" >

    <com.czm.flowlayout.XCFlowLayout

        android:id="@+id/flowlayout"

        android:layout_width="match_parent"

        android:layout_height="match_parent" >

    </com.czm.flowlayout.XCFlowLayout>

</RelativeLayout>
三、使用该自定义布局控件类
最后,如何使用该自定义的热门标签控件类呢?很简单,请看下面实例代码:
package com.czm.flowlayout;

import android.app.Activity;

import android.graphics.Color;

import android.os.Bundle;

import android.view.ViewGroup.LayoutParams;

import android.view.ViewGroup.MarginLayoutParams;

import android.widget.TextView;

/**

 *

 * @author caizhiming

 *

 */

public class MainActivity extends Activity {

    private String mNames[] = {

            "welcome","android","TextView",

            "apple","jamy","kobe bryant",

            "jordan","layout","viewgroup",

            "margin","padding","text",

            "name","type","search","logcat"

    };

    private XCFlowLayout mFlowLayout;

    @Override

    protected void onCreate(Bundle savedInstanceState) {

        super.onCreate(savedInstanceState);

        setContentView(R.layout.activity_main);

        initChildViews();

    }

    private void initChildViews() {

        // TODO Auto-generated method stub

        mFlowLayout = (XCFlowLayout) findViewById(R.id.flowlayout);

        MarginLayoutParams lp = new MarginLayoutParams(

                LayoutParams.WRAP_CONTENT,LayoutParams.WRAP_CONTENT);

        lp.leftMargin = 5;

        lp.rightMargin = 5;

        lp.topMargin = 5;

        lp.bottomMargin = 5;

        for(int i = 0; i < mNames.length; i ++){

            TextView view = new TextView(this);

            view.setText(mNames[i]);

            view.setTextColor(Color.WHITE);

            view.setBackgroundDrawable(getResources().getDrawable(R.drawable.textview_bg));

            mFlowLayout.addView(view,lp);

        }

    }

}
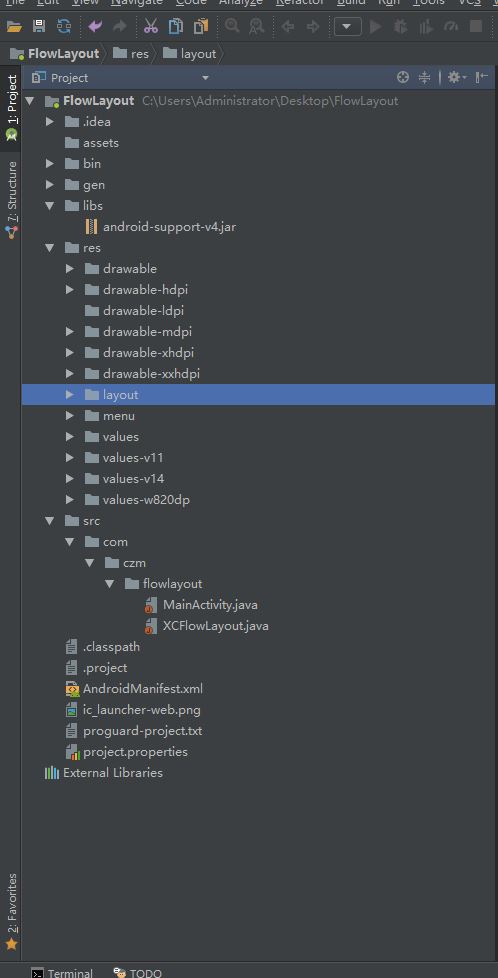
四、项目代码目录结构图
注:本文著作权归作者,由demo大师发表,拒绝转载,转载需要作者授权
Android控件进阶-自定义流式布局和热门标签控件的更多相关文章
- 自定义流式布局:ViewGroup的测量与布局
目录 1.View生命周期以及View层级 1.1.View生命周期 1.2.View层级 2.View测量与MeasureSpec类 2.1.MeasureSpec类 2.2.父View的限制 :测 ...
- Android中流式布局和热门标签
1.流式布局特点.应用场景.2.自定义ViewGroup (1)onMeasure:测量子View的宽和高,设置自己的宽和高. (2)onLayout:设置子View的位置. onMeasure:根据 ...
- android流式布局、待办事项应用、贝塞尔曲线、MVP+Rxjava+Retrofit、艺术图片应用等源码
Android精选源码 android模仿淘宝首页效果源码 一款艺术图片应用,采用T-MVVM打造 Android MVP + RxJava + Retrofit项目 android流式布局实现热门标 ...
- 【Android - 自定义View】之自定义可滚动的流式布局
首先来介绍一下这个自定义View: (1)这个自定义View的名称叫做 FlowLayout ,继承自ViewGroup类: (2)在这个自定义View中,用户可以放入所有继承自View类的视图,这个 ...
- Android 自定义View修炼-Android中常见的热门标签的流式布局的实现
一.概述:在日常的app使用中,我们会在android 的app中看见 热门标签等自动换行的流式布局,今天,我们就来看看如何 自定义一个类似热门标签那样的流式布局吧(源码下载在下面最后给出哈) 类似的 ...
- Android自定义之流式布局
流式布局,好处就是父类布局可以自动的判断子孩子是不是需要换行,什么时候需要换行,可以做到网页版的标签的效果.今天就是简单的做了自定义的流式布局. 具体效果: 原理: 其实很简单,Measure La ...
- 自定义View(三)--实现一个简单地流式布局
Android中的流式布局也就是常说的瀑布流很是常见,不仅在很多项目中都能见到,而且面试中也有很多面试官问道,那么什么是流式布局呢?简单来说就是如果当前行的剩余宽度不足以摆放下一个控件的时候,则自动将 ...
- 自定义ViewGroup 流式布局
使用 public class MainActivity extends Activity { @Override protected void onCreate(Bundle sav ...
- Android流式布局实现
查看我的所有开源项目[开源实验室] 欢迎增加我的QQ群:[201055521],本博客client下载[请点击] 摘要 新项目用到了一种全新布局----Android标签流式布局的功能,正好一直说给大 ...
随机推荐
- 在linux下 用p7zip 命令行下 解压 iso文件
todo tomorrorw! 在linux下可以通过 mount IOSFILE.iso /media/myiso/ -o loop 这种方式挂载,然后直接从 目录中拷贝 iso的内容出来就可以. ...
- 第二章 logstash - 输出插件之redis与es
最常用的两个输出插件: redis es 一.redis 1.用法 output { redis{ batch => false batch_events => 50 batch_time ...
- Linux 动态链接库(.so)的使用
1. 背景 库:就是已经编写好的,后续可以直接使用的代码. c++静态库:会合入到最终生成的程序,使得结果文件比较大.优点是不再有任何依赖. c++动态库:动态库,一个文件可以多个代码同时使用内存中只 ...
- iOS 开发的一些网址
http://www.cnblogs.com/iCocos/p/4553291.html ios学习路线图,值得看一下你的哪些技术还没掌握到位还有就是往高级发展还差哪些知识(这个人的博客特别值得看,虽 ...
- Linux下配置nfs并远程挂载
nfs是网络文件系统,允许一个节点通过网络访问远程计算机的文件系统,远程文件系统可以被直接挂载到本地,文件操作和本地没有区别,如果是局域网的nfs那么io的性能也可以保证,下面就以CentOS 7.x ...
- UML图中聚合、组合、关联、依赖、泛化的强弱关系
一.泛化 1.说明 泛化是一种继承关系,如果一个类A的所有属性和操作能被另一个类B所继承,则类B不仅可以包含自己独有的属性,而且可以包含类A的属性和操作.继承是类与类或者类与接口之间最常见的关系. 2 ...
- 赋值操作符、复制构造函数、析构函数、static成员练习
/** * 定义一个Employee类,包含雇员名字和一个唯一的雇员标识,为该类定义默认构造函数和参数为表示 * 雇员名字的string构造函数.如果该类需要复制构造函数或赋值操作符,实现这些函数 * ...
- [javase学习笔记]-6.4 成员变量与局部变量
前面我们学习了类的定义,我们不难理解,定义类事实上就是在定义类中的成员. 成员包含成员变量和成员函数. 说到成员变量,我们非常自然会想到前面提到过的局部变量,那么它们之间有什么差别呢? 首先我们定义一 ...
- 利用Docker搭建java项目开发环境
一.需求 一台 Ubuntu 16.0.4 LTS ,安装了Docker服务,Rancher服务,也制作了Tomcat相关的image,接下来我们就来说一下如何快速的构建一个开发环境和测试环境 二.步 ...
- CSS drop down的一个很好的示例
CSS drop down的一个很好的示例: http://www.runoob.com/css/css-dropdowns.html