Android ListView的使用(三)
前两节关于ListView的,已经使用了ArrayAdapter,SimpleAdapter了,两个比较基本的适配器
这里来用一个用的最多的一个适配器BaseAdapter。
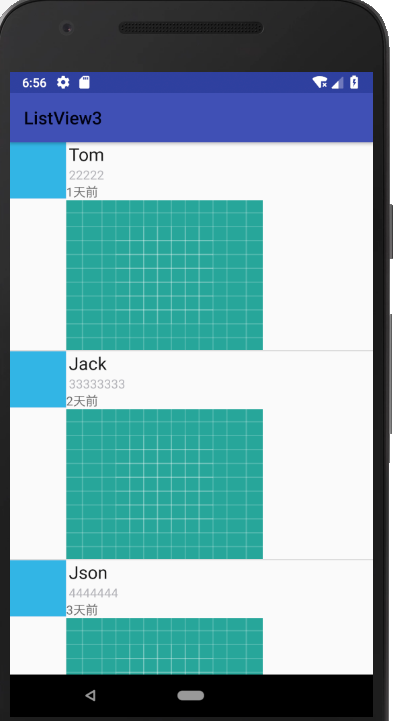
还是先上效果图。大概和微博首页差不多的
上代码:创建主页面 activity_main.xml
<?xml version="1.0" encoding="utf-8"?>

<android.support.constraint.ConstraintLayout xmlns:android="http://schemas.android.com/apk/res/android"

    xmlns:app="http://schemas.android.com/apk/res-auto"

    xmlns:tools="http://schemas.android.com/tools"

    android:layout_width="match_parent"

    android:layout_height="match_parent"

    tools:context=".MainActivity">

    <ListView

        android:id="@+id/list_item"

        android:layout_width="match_parent"

        android:layout_height="match_parent" />

</android.support.constraint.ConstraintLayout>
创建 ListView 要显示的内容页面:listview_item.xml
<?xml version="1.0" encoding="utf-8"?>

<LinearLayout xmlns:android="http://schemas.android.com/apk/res/android"

    xmlns:app="http://schemas.android.com/apk/res-auto"

    xmlns:tools="http://schemas.android.com/tools"

    android:layout_width="match_parent"

    android:layout_height="match_parent"

    android:orientation="horizontal">

    <ImageView

        android:id="@+id/imageView"

        android:layout_width="64dp"

        android:layout_height="64dp"

        app:srcCompat="@android:color/holo_blue_light" />

    <!-- 定义一个竖直方向的LinearLayout,把QQ呢称与说说的文本框设置出来 -->

    <LinearLayout

        android:id="@+id/new_line"

        android:layout_width="match_parent"

        android:layout_height="wrap_content"

        android:orientation="vertical">

        <TextView

            android:id="@+id/name"

            android:layout_width="wrap_content"

            android:layout_height="wrap_content"

            android:paddingLeft="8px"

            android:textColor="#1D1D1C"

            android:textSize="20sp" />

        <TextView

            android:id="@+id/says"

            android:layout_width="wrap_content"

            android:layout_height="wrap_content"

            android:paddingLeft="8px"

            android:textColor="#B4B4B9"

            android:textSize="14sp" />

        <TextView

            android:id="@+id/times"

            android:layout_width="match_parent"

            android:layout_height="wrap_content"

            android:text="TextView"

            android:textSize="14sp"/>

        <ImageView

            android:id="@+id/image"

            android:layout_width="223dp"

            android:layout_height="170dp"

            app:srcCompat="@drawable/ic_launcher_background" />

    </LinearLayout>

</LinearLayout>
创建一个dto类:
package action.sun.com.listview3;

public class Animal {

    private String aName;

    private String aSpeak;

    private int aIcon;

    private  String time;

    private  int Image;

    public Animal(String aName, String aSpeak, int aIcon,String atime,int aImage) {

        this.aName = aName;

        this.aSpeak = aSpeak;

        this.aIcon = aIcon;

        this.time = atime;

        this.Image = aImage;

    }

    public String getaName() {

        return aName;

    }

    public String getaSpeak() {

        return aSpeak;

    }

    public int getaIcon() {

        return aIcon;

    }

    public String getTime() {

        return time;

    }

    public int getaImage() {

        return Image;

    }

    public void setaName(String aName) {

        this.aName = aName;

    }

    public void setaSpeak(String aSpeak) {

        this.aSpeak = aSpeak;

    }

    public void setaIcon(int aIcon) {

        this.aIcon = aIcon;

    }

    public void setTime(String time) {

        this.time = time;

    }

    public void setImage(int Image) {

        this.Image = Image;

    }

}
创建一个适配器:
package action.sun.com.listview3;

import android.content.Context;

import android.view.LayoutInflater;

import android.view.View;

import android.view.ViewGroup;

import android.widget.BaseAdapter;

import android.widget.ImageView;

import android.widget.TextView;

import java.util.LinkedList;

public class AnimalAdapter extends BaseAdapter {

    private LinkedList<Animal> mData;

    private Context mContext;

    public AnimalAdapter(LinkedList<Animal> mData, Context mContext) {

        this.mData = mData;

        this.mContext = mContext;

    }

    //listview 总数

    @Override

    public int getCount() {

        return mData.size();

    }

    @Override

    public Object getItem(int i) {

        return null;

    }

    @Override

    public long getItemId(int i) {

        return i;

    }

    // 视图

    @Override

    public View getView(int i, View view, ViewGroup viewGroup) {

        view = LayoutInflater.from(mContext).inflate(R.layout.listview_item,viewGroup,false);

        ImageView img_icon = (ImageView) view.findViewById(R.id.imageView);

        TextView txt_aName = (TextView) view.findViewById(R.id.name);

        TextView txt_aSpeak = (TextView) view.findViewById(R.id.says);

        TextView txt_times = (TextView) view.findViewById(R.id.times);

        ImageView txt_image = (ImageView) view.findViewById(R.id.image);

        img_icon.setBackgroundResource(mData.get(i).getaIcon());

        txt_aName.setText(mData.get(i).getaName());

        txt_aSpeak.setText(mData.get(i).getaSpeak());

        txt_times.setText(mData.get(i).getTime());

        txt_image.setBackgroundResource(mData.get(i).getaImage());

        return view;

    }

}
主类MainActivity:
package action.sun.com.listview3;

import android.content.Context;

import android.support.v7.app.AppCompatActivity;

import android.os.Bundle;

import android.widget.ListView;

import java.util.LinkedList;

import java.util.List;

public class MainActivity extends AppCompatActivity {

    private List<Animal> mData = null;

    private Context mContext;

    private AnimalAdapter mAdapter = null;

    private ListView list_animal;

    @Override

    protected void onCreate(Bundle savedInstanceState) {

        super.onCreate(savedInstanceState);

        setContentView(R.layout.activity_main);

        mContext = MainActivity.this;

        list_animal = (ListView) findViewById(R.id.list_item);

        mData = new LinkedList<Animal>();

        mData.add(new Animal("Tom", "22222", R.mipmap.ic_launcher,"1天前",R.drawable.ic_launcher_background));

        mData.add(new Animal("Jack", "33333333", R.mipmap.ic_launcher,"2天前",R.drawable.ic_launcher_background));

        mData.add(new Animal("Json", "4444444", R.mipmap.ic_launcher,"3天前",R.drawable.ic_launcher_background));

        mData.add(new Animal("Kumi", "1121313", R.mipmap.ic_launcher,"4天前",R.drawable.ic_launcher_background));

        mData.add(new Animal("Timi", "88888", R.mipmap.ic_launcher,"5天前",R.drawable.ic_launcher_background));

        mAdapter = new AnimalAdapter((LinkedList<Animal>) mData, mContext);

        list_animal.setAdapter(mAdapter);

    }

}
代码完毕,运行即可。
Android ListView的使用(三)的更多相关文章
- Android实训案例(三)——实现时间轴效果的ListView,加入本地存储,实现恋爱日记的效果!
Android实训案例(三)--实现时间轴效果的ListView,加入本地存储,实现恋爱日记的效果! 感叹离春节将至,也同时感叹时间不等人,一年又一年,可是我依然是android道路上的小菜鸟,这篇讲 ...
- android ListView 属性
android:divider="#fffff" 分割线颜色 android:dividerHeight="1px" 分割线高度 divider 分割线-去掉分 ...
- 【腾讯Bugly干货分享】Android ListView与RecyclerView对比浅析--缓存机制
本文来自于腾讯bugly开发者社区,非经作者同意,请勿转载,原文地址:http://dev.qq.com/topic/5811d3e3ab10c62013697408 作者:黄宁源 一,背景 Recy ...
- Android ListView 常用技巧
Android ListView 常用技巧 Android TextView 常用技巧 1.使用ViewHolder提高效率 ViewHolder模式充分利用了ListView的视图缓存机制,避免了每 ...
- Android listview addHeaderView 和 addFooterView 详解
addHeaderView()方法:主要是向listView的头部添加布局addFooterView()方法:主要是向listView的底部添加布局 需要注意的是添加布局的时候应该添加从父容器开始添加 ...
- Android -----listView的属性大全
http://www.cnblogs.com/zhengbeibei/archive/2013/03/29/2988814.html 01 <?xml version="1.0 ...
- Adroid 总结--android ListView美化,个性化更改的属性
首先是stackFromBottom属性,这只该属性之后你做好的列表就会显示你列表的最下面,值为true和falseandroid:stackFromBottom="true" ...
- Android ListView OnItemLongClick和OnItemClick事件内部细节分享以及几个比较特别的属性
本文转自 http://blog.sina.com.cn/s/blog_783ede030101bnm4.html 作者kiven 辞职3,4个月在家休息,本以为楼主要程序员逆袭,结果失败告终继续码农 ...
- 【转】android ListView 几个重要属性
android ListView 几个重要属性 分类: Android2012-03-08 19:25 19324人阅读 评论(5) 收藏 举报 listviewandroid活动javalistnu ...
- Android ListView无法触发ItemClick事件
Android ListView无法触发ItemClick事件 开发中很常见的一个问题,项目中的listview不仅仅是简单的文字,常常需要自己定义listview,自己的Adapter去继承Base ...
随机推荐
- Spark+Hadoop+IDE环境搭建
下载地址:https://download.csdn.net/download/u014028392/8841545
- html5 ajax 文件上传
http://html5demos.com/dnd-upload 看这个例子看了一会儿...这个是支持拖拽的上传. 下面代码是一个简单的ajax的文件上传: function match(url,rs ...
- 豆瓣上9分以上的IT书籍-编程语言篇
我当要学习某些技术时,第一时间就是去找相关的书籍.而豆瓣读书是我主要的参考依据,主要是它的评分基本比较靠谱,对于技术书籍,一般来说评分在8分以上就是不错的书籍了,而达到9分就可以列入"必读& ...
- stm8 时钟输出引脚
CLK_CCO引脚是STM8的时钟输出引脚,若设置该脚输出主时钟Fmaster,时钟输出寄存器可以进行如下操作 CLK->CCOR=0X19;
- [转]java:IO流学习小结
Java流操作有关的类或接口: Java流类图结构: 流的概念和作用 流是一组有顺序的,有起点和终点的字节集合,是对数据传输的总称或抽象.即数据在两设备间的传输称为流,流的本质是数据传输,根据数据传输 ...
- [转]IC行业的牛人
转载的: 说来惭愧,我所了解的牛人也只是大学教授,工业界的高手了解的还太少,虽然我对教育界的牛人了解的也不多,但这里也要牢骚几句,论坛上的人好像只是认识Gray,Razavi,Allen,Lee, ...
- rxjs 简单的demo
开发环境是使用 create-react-app 创建的.再使用 $ cnpm install rxjs 来安装即可开始. $ npx create-react-app my-app $ cd my- ...
- Logstash+ElasticSearch+Kibana处理nginx访问日志(转)
ELK似乎是当前最为流行的日志收集-存储-分析的全套解决方案. 去年年初, 公司里已经在用, 当时自己还山寨了一个统计系统(postgresql-echarts, 日志无结构化, json形式存储到p ...
- xcode6 怎样下载ios7模拟器
1. 怎样下载ios7模拟器 点击xcode.选择"Preferences".选择"downloads",就能够看见IOS 7.1,只是下载有点慢. 2. 怎样 ...
- 关于第三方cookie的作用域以及针对用户行为的使用
cookie,很多网站都会用的一个机制,可以保存用户的相关信息,token等等,很多人熟知的应该是第一方cookie,可以针对二级域名进行信息的保存,如果遇到跨域的情况,那么第一方cookie是没有用 ...