Spring Boot (五)Spring Data JPA 操作 MySQL 8
一、Spring Data JPA 介绍
JPA(Java Persistence API)Java持久化API,是 Java 持久化的标准规范,Hibernate是持久化规范的技术实现,而Spring Data JPA是在 Hibernate 基础上封装的一款框架。
开发环境
- Spring Boot 2.0.4
- Spring Data JPA 2.0.4
- MySQL 8.0.12
- JDK 8
- IDEA 2018.2
- Windows 10
二、集成步骤
2.1 配置依赖
添加Spring Data JPA 和 MySQL Connector,配置pom.xml文件,代码如下:
<dependency>

    <groupId>org.springframework.boot</groupId>

    <artifactId>spring-boot-starter-data-jpa</artifactId>

    <version>2.0.4.RELEASE</version>

</dependency>

<dependency>

    <groupId>mysql</groupId>

    <artifactId>mysql-connector-java</artifactId>

    <version>8.0.12</version>

</dependency>
更多JPA版本:http://mvnrepository.com/artifact/org.springframework.boot/spring-boot-starter-data-jpa
更多Mysql版本:http://mvnrepository.com/artifact/mysql/mysql-connector-java
2.2 application.properties 设置配置文件
## 数据源配置

spring.datasource.url=jdbc:mysql://172.16.10.79:3306/mytestdb?serverTimezone=UTC&useSSL=false&allowPublicKeyRetrieval=true

spring.datasource.username=root

spring.datasource.password=123456

spring.datasource.driver-class-name=com.mysql.cj.jdbc.Driver

spring.jpa.hibernate.ddl-auto=update

spring.jpa.database-platform=org.hibernate.dialect.MySQL5InnoDBDialect

spring.jpa.show-sql=true
- hbm2ddl.auto:自动创建|更新|验证数据库表结构
- dialect:设置数据库引擎为InnoDB
- show-sql:打印sql语句,方便调试
hbm2ddl.auto有四个属性:
create:每次加载 hibernate 时都会删除上一次的生成的表,然后根据你的 model 类再重新来生成新表,哪怕两次没有任何改变也要这样执行,这就是导致数据库表数据丢失的一个重要原因。[删除-创建-操作]
create-drop :每次加载 hibernate 时根据 model 类生成表,但是 sessionFactory 一关闭,表就自动删除。[删除-创建-操作-再删除]
update:最常用的属性,第一次加载 hibernate 时根据 model 类会自动建立起表的结构(前提是先建立好数据库),以后加载 hibernate 时根据 model 类自动更新表结构,即使表结构改变了,但表中的行仍然存在,不会删除以前的行。要注意的是当部署到服务器后,表结构是不会被马上建立起来的,是要等应用第一次运行起来后才会。[没表-创建-操作 | 有表-更新没有的属性列-操作]
validate:每次加载 hibernate 时,验证创建数据库表结构,只会和数据库中的表进行比较,不会创建新表,但是会插入新值。[启动验证表结构,验证不成功,项目启动失败]
2.3 增加实体类(Entity)
@Entity

public class User implements Serializable {

    @Id

    @GeneratedValue

    private Long id;

    @Column(name = "name", nullable = false)

    private String name;

    @Column(nullable = false)

    private int age;

    @Column(nullable = false)

    private String pwd;

    public User(){}

    public User(String name, int age, String pwd) {

        this.name = name;

        this.age = age;

        this.pwd = pwd;

    }

	//...忽略set、get方法

}
- @GeneratedValue 自动生成id
- @Column 设置列属性(name="数据库列名")
- @Transient 不会映射到数据库
2.4 创建 Repository 接口构建业务方法
public interface UserRepository extends JpaRepository<User,Long> {

    public User findByName(String name);

}
继承JpaRepository之后就继承了:
- Repository.save(user); // 插入或保存
- Repository.saveFlush(user); // 保存并刷新
- Repository.exists(1) // 主键查询是否存在
- Repository.findOne(1); // 主键查询单条
- Repository.delete(1); // 主键删除
- Repository.findByUsername("stone"); // 查询单条
- Repository.findAll(pageable); // 带排序和分页的查询列表
- Repository.saveState(1, 0); // 更新单个字段
这些方法,可以不写一行代码就可以实现对一个表的操作,当然你也可以扩展一些自己的方法,只需要在UserRepository里面添加方法即可。
2.5 添加、查询数据库
@Controller

@RequestMapping("/")

public class UserController {

    @Autowired

    private UserRepository userRepository;

    @RequestMapping("/")

    public ModelAndView index() {

        userRepository.save(new User("老王",18,"123456"));

        ModelAndView modelAndView = new ModelAndView("/index");

        modelAndView.addObject("dataSize", userRepository.findAll().size());

        return modelAndView;

    }

}
到现在为止,集成 Spring Data JPA 已经全部完成了,启动调试,查看运行效果吧。
三、高级使用
本节高级使用将会涉及的知识点如下:
- 事务实现
- 根据名称自动生成SQL
- 自定义Sql语句查询
3.1 事务实现
3.1.1 Spring事务实现步骤
实现事务,只需要两步即可:
步骤一、在application.properties配置数据库引擎为InnoDB:
spring.jpa.database-platform=org.hibernate.dialect.MySQL5InnoDBDialect
步骤二、在方法或类上标识事务@Transactional
示例代码:
@Transactional

public void saveGroup(){

    userRepository.save(user);

    userRepository.save(user2);

}
如果出现错误,就会进行事务回滚。
3.1.2 事务不生效的原因
3.1.2.1 确认数据库引擎
在application.properties配置数据库引擎为InnoDB:
spring.jpa.database-platform=org.hibernate.dialect.MySQL5InnoDBDialect
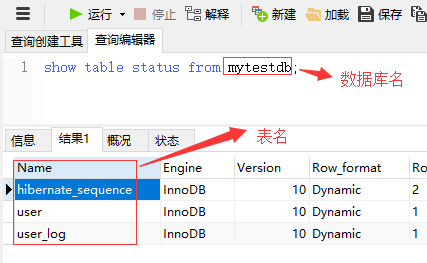
3.1.2.2 查看表的引擎必须为InnoDB
通过命令:
show table status from mytestdb;
修改表的引擎:
alter table table_name engine=innodb;
3.1.2.3 注意引入@Transactional的命名空间
@Transactional注解来自org.springframework.transaction.annotation包,而不是javax.transaction.
3.2 根据名称自动生成SQL
JPA支持根据简单的关键字自动生成Sql查询的方法,比如根据name和age的组合查询,代码如下:
public User findByNameAndAge(String name,int age);
使用关键字“And”即可,或者查询时间区间的:
public User findByStartDateBetween(Long startDate);
使用关键字“Between”即可。
更多内部支持的关键字,如下表:
| Keyword | Sample | JPQL snippet |
|---|---|---|
| And | findByLastnameAndFirstname | … where x.lastname = ?1 and x.firstname = ?2 |
| Or | findByLastnameOrFirstname | … where x.lastname = ?1 or x.firstname = ?2 |
| Is,Equals | findByFirstname,findByFirstnameIs | … where x.firstname = ?1 |
| Between | findByStartDateBetween | … where x.startDate between ?1 and ?2 |
| LessThan | findByAgeLessThan | … where x.age < ?1 |
| LessThanEqual | findByAgeLessThanEqual | … where x.age <= ?1 |
| GreaterThan | findByAgeGreaterThan | … where x.age > ?1 |
| GreaterThanEqual | findByAgeGreaterThanEqual | … where x.age >= ?1 |
| After | findByStartDateAfter | … where x.startDate > ?1 |
| Before | findByStartDateBefore | … where x.startDate < ?1 |
| IsNull | findByAgeIsNull | … where x.age is null |
| IsNotNull,NotNull | findByAge(Is)NotNull | … where x.age not null |
| Like | findByFirstnameLike | … where x.firstname like ?1 |
| NotLike | findByFirstnameNotLike | … where x.firstname not like ?1 |
| StartingWith | findByFirstnameStartingWith | … where x.firstname like ?1(parameter bound with appended %) |
| EndingWith | findByFirstnameEndingWith | … where x.firstname like ?1(parameter bound with prepended %) |
| Containing | findByFirstnameContaining | … where x.firstname like ?1(parameter bound wrapped in %) |
| OrderBy | findByAgeOrderByLastnameDesc | … where x.age = ?1 order by x.lastname desc |
| Not | findByLastnameNot | … where x.lastname <> ?1 |
| In | findByAgeIn(Collection ages) | … where x.age in ?1 |
| NotIn | findByAgeNotIn(Collection ages) | … where x.age not in ?1 |
| True | findByActiveTrue() | … where x.active = true |
| False | findByActiveFalse() | … where x.active = false |
| IgnoreCase | findByFirstnameIgnoreCase | … where UPPER(x.firstame) = UPPER(?1) |
官方文档:https://docs.spring.io/spring-data/jpa/docs/2.0.9.RELEASE/reference/html/#jpa.repositories
3.3 自定义Sql语句查询
对于用户自己编写sql,Spring Boot JPA也有很好的支持,只需要添加@Query(sql)即可。
示例代码:
@Transactional

@Modifying

@Query("update User set name=?1 where id=?2")

public int modifyName(String name,Long id);
注意:在执行修改和删除的时候必须添加@Modifying注解,ORM才知道要执行写操作,update/delete query 的时候,也必须需要加上@Transactional(事务)才能正常操作。
四、常见错误
在 Spring Data JPA 的使用当中,可能会遇到如下的一些错误。
1.No default constructor for entity
实体类Entity没有空参数的默认构造函数,新增即可解决。
2.java.sql.SQLException: Access denied for user ''@'172.17.0.1' (using password: NO)
启动项目报错,用户名和密码配置的key有误,MySQL8的用户名和密码配置和之前的不一样,MySQL 8 正确的用户名密码配置如下:
spring.datasource.username=root

spring.datasource.password=123456

# 以下为配置老数据库驱动配置

#spring.datasource.data-username=root

#spring.datasource.data-password=123456
3.Caused by: java.lang.IllegalStateException: Cannot load driver class: com.mysql.jdbc.Driver
MySQL 8 的spring.datasource.driver-class-name配置需要改为“com.mysql.cj.jdbc.Driver”而不是“com.mysql.jdbc.Driver”,正确配置如下:
spring.datasource.driver-class-name=com.mysql.cj.jdbc.Driver
Spring Boot (五)Spring Data JPA 操作 MySQL 8的更多相关文章
- spring boot(五)Spring data jpa介绍
在上篇文章springboot(二):web综合开发中简单介绍了一下spring data jpa的基础性使用,这篇文章将更加全面的介绍spring data jpa 常见用法以及注意事项 使用spr ...
- Spring Boot 2.x 使用 jpa 连接 mysql
在spring boot网站上生成一个项目,如图: 我使用的是Maven项目,java使用是jdk8(spring boot 2.x必须要jdk8及以上),dependencies分别输入选择 web ...
- Spring Boot项目中使用jdbctemplate 操作MYSQL数据库
不废话,先来代码 pom文件: <project xmlns="http://maven.apache.org/POM/4.0.0" xmlns:xsi="http ...
- Spring Boot使用Spring Data Jpa对MySQL数据库进行CRUD操作
只需两步!Eclipse+Maven快速构建第一个Spring Boot项目 构建了第一个Spring Boot项目. Spring Boot连接MySQL数据库 连接了MySQL数据库. 本文在之前 ...
- spring boot系列(五)spring boot 配置spring data jpa (查询方法)
接着上面spring boot系列(四)spring boot 配置spring data jpa 保存修改方法继续做查询的测试: 1 创建UserInfo实体类,代码和https://www.cnb ...
- Spring Boot 整合Spring Data JPA
Spring Boot整合Spring Data JPA 1)加入依赖 <dependency> <groupId>org.springframework.boot</g ...
- Spring Boot2 系列教程 (七) | 使用 Spring Data JPA 访问 Mysql
前言 如题,今天介绍 Spring Data JPA 的使用. 什么是 Spring Data JPA 在介绍 Spring Data JPA 之前,首先介绍 Hibernate . Hibernat ...
- Spring Boot 之Spring data JPA简介
文章目录 添加依赖 添加entity bean 创建 Dao Spring Data Configuration 测试 Spring Boot 之Spring data JPA简介 JPA的全称是Ja ...
- spring data jpa 操作pipelinedb 的continuous view 与stream
一. 由于pipelinedb是postgreSQL的扩展,因此相关依赖于配置都合集成postgreSQL是一样的. springboot + spring data jpa + postgreSQL ...
随机推荐
- 2018-04-10 我的GitHub诞生的日子,欢迎大家吐槽批评
我的GitHub,诞生的日子,欢迎大家吐槽与批评,嘻嘻 首先是自己想刷一下LeetCode上的代码,其次创建了自己的读书笔记以及面试经验与教训 下边是仓库的Git链接,欢迎大家的批评与修正,谢谢: L ...
- js 原型链解密
1.对象继承 javaScript的继承不是通过class实现的,而是通过“原型对象”(prototype). 1.每一个函数都有一个原型对象 2.每一个实例对象都有一个_proto_属性 2.原型链 ...
- IDEA添加项目为library
1.如果要作为library的项目没有被IDEA编译就先把项目放在IDEA里面编译一下,因为这样后面导入module会方便一点.下面直接附上步骤 2.假设你已经用IDEA编译好了作为library的项 ...
- redis启动出现错误creating server tcp listening socket 127.0.0.1:6379: bind No error
creating server tcp listening socket 127.0.0.1:6379: bind No error 的解决方案如下按顺序输入如下命令就可以连接成功 1. redis- ...
- Java核心技术卷一基础知识-第7章-图形程序设计-读书笔记
第7章 图形程序设计 本章内容: * Swing概述 * 创建框架 * 框架定位 * 在组件中显示信息 * 处理2D图形 * 使用颜色 * 文本使用特殊字体 * 显示图像 本章主要讲述如何编写定义屏幕 ...
- Java 实现文件压缩工具类
package com.wdxc.util; import java.io.BufferedInputStream; import java.io.File; import java.io.FileI ...
- 第一节:学会Java前提-手把手教你配置JDK环境变量
前言 大家好,今天写一遍学会Java前提-手把手教你配置JDK环境变量的概述,希望你们喜欢 下载地址 下载jdk,和eclipse就比较简单了,提供JDK 9 地址: http://www.oracl ...
- Kali学习笔记33:Linux系统缓冲区溢出实验
之前做过一个Windows应用SLmail的缓冲区溢出的实验 这次来做一个Linux平台的缓冲区溢出实验: 缓冲区溢出是什么? 学过汇编的应该知道,当缓冲区边界限制不严格时,由于变量传入畸形数据或程序 ...
- 解决Python中PyCharm导入模块时,模块名下出现红色波浪线的问题
在博主第一次在PyCharm中导入模块时,模块名下出现红色波浪线,不影响程序执行,但强迫症忍不了 以下是解决办法 Let's do it ... 进入设置,找到Console下的Python Cons ...
- iOS学习——更改导航栏的返回按钮的标题与颜色
转载自:修改navigationController返回按钮颜色和文字 今天在做项目时遇到这个问题,试了很多方法都失败了.最后终于找到正确的方案了,在这里分享给大家. 引言 在iOS开发过程中,Nav ...