Chapter 7 Resources in Plug-In(1)
Activity and resource are like twin brothers. And so if the activity need to be solve in Plug-In completely, you will have to face how to use the resource in it.
In this chapter, we start with loading mechanism of the resource, and further discusses the Plug-In of resources through the addAssetPath method of AssetManager. Finally, we implement a skinning technique based on this solution.
7.1 How to load resources in Android
7.1.1 Kinds of resources
The resource files in Android fall into two categories.
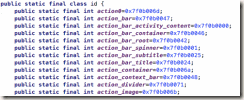
One is under ‘res’ folder which can be compiled. During the compile process, ‘R.java’ file will be created, it contains the hex value of each resource file, here is an example below:

It is easy to access these resources. You will get an instance of ‘Resources’ by the method of ‘getResources()’ in ‘Context’ class, then fetch any resources through ‘getXXX()’ method of this instance, just like below:
Resources resources = getResources();
String appName = resources.getString(R.string.app_name);
The other is stored under assets folder, since the file will not be compile here during the compile process, so we cannot access them through ‘R.java’. Then can we access them from absolute path? The answer is no, because the ‘apk’ file won’t be uncompress in local after downloading. That’s why we cannot fetch the absolute path of ‘assets’ folder.
Now it is the only way to use ‘open()’ method of ‘AssetManager’ class to fetch them. And you can get ‘AssetManager’ instance from ‘getAssets()’ method of ‘Resources’ class. So, the code will be like below:
Resources resources = getResources();
AssetManager am = getResources().getAssets();
InputStream is = getResources().getAssets().open("filename");
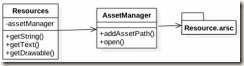
This shows that ‘Resources’ class can do the everything.
7.1.2 Resources and AssetManager
‘Resources’ class is like sales, but ‘AssetManager’ class is like developer. sales are external and developer is not.
So we can find that ‘Resource’ class provide many methods like ‘getString()’, ’getText()’, ’getDrawable()’ and so on. In fact, all of these methods call the private method of ‘AssetManager’ class indirectly, and ‘AssetManager’ do the job of query the resources.
It is injustice for ‘AssetManager’, as it does lots of work but few people know, it only has two public methods. For example, ‘open()’ is used for access the resources in ‘assets’ folder.
There has a ‘addAssetPath(String path)’ method in ‘AssetManager’ class, it will set the current APK path as variable when an APP launched, then ‘AssetManager’ and ‘Resources’ can access all the resources of this APK.
‘addAssetPath()’ is not a public method, we can use reflection, put the path of plugin APK into this method, then the resources of plugin APK were added into a resource pool. The current APP resource is already in here too.
How many Plug-In Apps are there, how many times the ‘addAssetPath()’ method need to be execute. All the Plug-In resource need to put in the resource pool.
7-1 Resource and AssetManger
There is a NDK method in AssetManager for accessing resource files. During packaging APK file, it will generate a HEX value for each resources in ‘R.java’ class. But when app is running, how do we know which file or which resource is corresponding to HEX value?
There is a file named ‘resources.arsc’ will be generate during package time, it contains a Hash table, which has the corresponding relationship of resources and HEX value.
7.2 Plug-In Solution of Resources
Let’s try to read a String resource from Plug-In App in Host App.
1) First, see the code from Plug-In App called ‘Plugin1’:
public class Dynamic implements IDynamic {
@Override
public String getStringForResId(Context context) {
return context.getResources().getString(R.string.myplugin1_hello_world);
}
}
In Plugin1, there is a ‘strings.xml’ exists under ‘res/values’ folder and a string resource was defined here:
<resources>
<string name=" myplugin1_hello_world">Hello World</string>
</resources>
2) Second, let’s see the code of ‘MainActivity’ in Host App
public class MainActivity extends AppCompatActivity {
private AssetManager mAssetManager;
private Resources mResources;
private Resources.Theme mTheme;
private String dexpath = null; //apk file path
private File fileRelease = null; //decompress folder
private DexClassLoader classLoader = null;
private String apkName = "plugin1.apk"; //apk file name
TextView tv;
@Override
protected void attachBaseContext(Context newBase) {
super.attachBaseContext(newBase);
try {
Utils.extractAssets(newBase, apkName);
} catch (Throwable e) {
e.printStackTrace();
}
}
@SuppressLint("NewApi")
@Override
protected void onCreate(Bundle savedInstanceState) {
super.onCreate(savedInstanceState);
setContentView(R.layout.activity_main);
File extractFile = this.getFileStreamPath(apkName);
dexpath = extractFile.getPath();
fileRelease = getDir("dex", 0); //0 means ‘Context.MODE_PRIVATE’
classLoader = new DexClassLoader(dexpath,
fileRelease.getAbsolutePath(), null, getClassLoader());
Button btn_6 = (Button) findViewById(R.id.btn_6);
tv = (TextView)findViewById(R.id.tv);
// The calling of resource files
btn_6.setOnClickListener(new View.OnClickListener() {
@Override
public void onClick(View arg0) {
loadResources();
Class mLoadClassDynamic = null;
try {
mLoadClassDynamic = classLoader.loadClass("jianqiang.com.plugin1.Dynamic");
Object dynamicObject = mLoadClassDynamic.newInstance();
IDynamic dynamic = (IDynamic) dynamicObject;
String content = dynamic.getStringForResId(MainActivity.this);
tv.setText(content);
Toast.makeText(getApplicationContext(), content + "", Toast.LENGTH_LONG).show();
} catch (Exception e) {
Log.e("DEMO", "msg:" + e.getMessage());
}
}
});
}
protected void loadResources() {
try {
AssetManager assetManager = AssetManager.class.newInstance();
Method addAssetPath = assetManager.getClass().getMethod("addAssetPath", String.class);
addAssetPath.invoke(assetManager, dexpath);
mAssetManager = assetManager;
} catch (Exception e) {
e.printStackTrace();
}
mResources = new Resources(mAssetManager, super.getResources().getDisplayMetrics(), super.getResources().getConfiguration());
mTheme = mResources.newTheme();
mTheme.setTo(super.getTheme());
}
@Override
public AssetManager getAssets() {
if(mAssetManager == null) {
return super.getAssets();
}
return mAssetManager;
}
@Override
public Resources getResources() {
if(mResources == null) {
return super.getResources();
}
return mResources;
}
@Override
public Resources.Theme getTheme() {
if(mTheme == null) {
return super.getTheme();
}
return mTheme;
}
}
The logic of code above are divided into 4 parts:
1) ‘LoadResources’ method
Create a ‘AssetManager’ instance by reflection, call ‘addAssetPath’ method and add the path of Plug-In App into the ‘AssetManager’.
That’s it! From now on, this ‘AsssetManager’ instance has only served ‘Plugin1’.
Then base on this ‘AssetManager’, we can create corresponding ‘Resources’ and ‘Theme’.
2) Override ‘getAsset’, ‘getResources’ and ‘getTheme’ methods. The logic is almost same, take getAsset as an example in below:
@Override
public AssetManager getAssets() {
if(mAssetManager == null) {
return super.getAssets();
}
return mAssetManager;
}
‘mAssetManager’ is point to Plug-In App, if this object is null, we can call the ‘getAsset’ method in its parent class – ‘ContextImpl’, and this time, the ‘AssetManager’ object, is point to Host App and the resources we fetch is also belongs to Host App.
3) Load the external Plug-In App, generate the corresponding ‘Classloader’:
File extractFile = this.getFileStreamPath(apkName);
dexpath = extractFile.getPath();
fileRelease = getDir("dex", 0); //0 means Context.MODE_PRIVATE
classLoader = new DexClassLoader(dexpath,
fileRelease.getAbsolutePath(), null, getClassLoader());
4) Thanks to the reflection, we can use the classes in Plug-In App, generate ‘dynamicObject’ object from it, then we can fetch resources in Plug-In App.
loadResource();
Class mLoadClassDynamic = classLoader.loadClass("jianqiang.com.plugin1.Dynamic");
Object dynamicObject = mLoadClassDynamic.newInstance();
IDynamic dynamic = (IDynamic) dynamicObject;
String content = dynamic.getStringForResId(MainActivity.this);
tv.setText(content);
Now, we find a perfect solution to load resources in Plug-In App.
We have notice that there is a little bit confusing in source code of Dynamic1.3, all the logic is in the ‘MainActivity’ of Host App. So, it is need to be refactored. Please refer to the project called ’Dynamic2’, the common code was in ‘BaseActivity’. For example we refactored ‘getAsset’, ‘getResource’ and ‘getTheme’ methods, and load the 3rd-party apk into resource pool.
7.3 Skin changing by Plug-in
If you’ve ever used Mobile QQ, you will find there is a feature to change skin.
If you’ve ever played Glory of the king, you will notice that you can see new heroes without updating APP.
The emoji in WeChat can be downloaded and used immediately.
In fact, all the features above is to replace the image, with the new resource files from the package just downloaded.
A simple but rough solution is to compress these images into a ZIP, and uncompressed to a folder after downloading, then you can use it.
Since we have the Plug-In technology, we find that we can put all the images into Plug-In App and read each of them by ‘R.java’.
Let’s continue to complete this function base on ‘Dynamic1.2’ .
1) Do some interest working in ‘plugin1’
We write a util class called ‘UIUtil’ and it provides ‘getText’, ‘getImage’ and ‘getLayout’ methods, which can fetch string, image and layout from ‘R.java’.
public class UIUtil {
public static String getTextString(Context ctx){
return ctx.getResources().getString(R.string.hello_message);
}
public static Drawable getImageDrawable(Context ctx){
return ctx.getResources().getDrawable(R.drawable.robert);
}
public static View getLayout(Context ctx){
return LayoutInflater.from(ctx).inflate(R.layout.main_activity, null);
}
}
Then put some resources into it:
· Put an image into ‘res/drawable’, the file name is ‘robert.png’, and the image content just like below:

· Add string value into ‘strings.xml’ which belongs to ‘res/values’, named ‘hello_message’.
<string name="hello_message">Hello</string>
· Modify the file ‘main_activity.xml’ in ‘res/layout’ and make three buttons placed horizontally.
After compile, rename the apk file to ‘plugin1.apk’ and put it into ‘assets’ folder in the Host App.
2) Make ‘Plungin2’ rapidly
Copy the entire project code of ‘Plugin1’ and rename to ‘Plugin2’. No need to modify anything.
Modify the resources of ‘Plugin2’
· Rotate the robert.png image 180 degrees.
· Change ‘hello_message’ string value to ‘你好’
· Change layout xml code, make three buttons placed vertically.
· After compile, rename the apk file to ‘plugin2.apk’ and put it into ‘assets’ folder in the Host App.
3) Work with Host App
Based on ‘Dynamic1.2’, let’s continue.
Firstly, move the common methods to ‘BaseActivity’, these includes
· Load 2 plugins
· Generate 2 ‘ClassLoader’
· Override ‘getAssets’, ’getResources’ and ‘getTheme’.
· ‘loadResources’ was increased to 2 methods because there are 2 Plug-In Apps now.
The code will be like this:
public class BaseActivity extends Activity {
private AssetManager mAssetManager;
private Resources mResources;
private Resources.Theme mTheme;
private String dexpath1 = null; //apk file path
private String dexpath2 = null; //apk file path
private File fileRelease = null; //decompression path
protected DexClassLoader classLoader1 = null;
protected DexClassLoader classLoader2 = null;
TextView tv;
@Override
protected void attachBaseContext(Context newBase) {
super.attachBaseContext(newBase);
Utils.extractAssets(newBase, "plugin1.apk");
Utils.extractAssets(newBase, "plugin2.apk");
}
@Override
protected void onCreate(Bundle savedInstanceState) {
super.onCreate(savedInstanceState);
fileRelease = getDir("dex", 0);
File extractFile1 = this.getFileStreamPath("plugin1.apk");
dexpath1 = extractFile1.getPath();
classLoader1 = new DexClassLoader(dexpath1, fileRelease.getAbsolutePath(), null, getClassLoader());
File extractFile2 = this.getFileStreamPath("plugin2.apk");
dexpath2 = extractFile2.getPath();
classLoader2 = new DexClassLoader(dexpath2, fileRelease.getAbsolutePath(), null, getClassLoader());
}
protected void loadResources1() {
try {
AssetManager assetManager = AssetManager.class.newInstance();
Method addAssetPath = assetManager.getClass().getMethod("addAssetPath", String.class);
addAssetPath.invoke(assetManager, dexpath1);
mAssetManager = assetManager;
} catch (Exception e) {
e.printStackTrace();
}
Resources superRes = super.getResources();
mResources = new Resources(mAssetManager, superRes.getDisplayMetrics(), superRes.getConfiguration());
mTheme = mResources.newTheme();
mTheme.setTo(super.getTheme());
}
protected void loadResources2() {
try {
AssetManager assetManager = AssetManager.class.newInstance();
Method addAssetPath = assetManager.getClass().getMethod("addAssetPath", String.class);
addAssetPath.invoke(assetManager, dexpath2);
mAssetManager = assetManager;
} catch (Exception e) {
e.printStackTrace();
}
Resources superRes = super.getResources();
mResources = new Resources(mAssetManager, superRes.getDisplayMetrics(), superRes.getConfiguration());
mTheme = mResources.newTheme();
mTheme.setTo(super.getTheme());
}
@Override
public AssetManager getAssets() {
return mAssetManager == null ? super.getAssets() : mAssetManager;
}
@Override
public Resources getResources() {
return mResources == null ? super.getResources() : mResources;
}
@Override
public Resources.Theme getTheme() {
return mTheme == null ? super.getTheme() : mTheme;
}
}
Secondly, let ResourceActivity inherit from BaseActivity, click Button1 to load the skin of plugin1 and click Button2 to load the skin of plugin2:
public class ResourceActivity extends BaseActivity {
/**
* The user control need to be change skin
* List 3 examples : TextView,ImageView,LinearLayout
*/
private TextView textV;
private ImageView imgV;
private LinearLayout layout;
@Override
protected void onCreate(Bundle savedInstanceState) {
super.onCreate(savedInstanceState);
setContentView(R.layout.activity_resource);
textV = (TextView) findViewById(R.id.text);
imgV = (ImageView) findViewById(R.id.imageview);
layout = (LinearLayout) findViewById(R.id.layout);
findViewById(R.id.btn1).setOnClickListener(new OnClickListener() {
@Override
public void onClick(View arg0) {
loadResources1();
doSomething1();
}
});
findViewById(R.id.btn2).setOnClickListener(new OnClickListener() {
@Override
public void onClick(View v) {
loadResources2();
doSomething2();
}
});
}
private void doSomething1() {
try {
Class clazz = classLoader1.loadClass("jianqiang.com.plugin1.UIUtil");
String str = (String) RefInvoke.invokeStaticMethod(clazz, "getTextString", Context.class, this);
textV.setText(str);
Drawable drawable = (Drawable) RefInvoke.invokeStaticMethod(clazz, "getImageDrawable", Context.class, this);
imgV.setBackground(drawable);
layout.removeAllViews();
View view = (View) RefInvoke.invokeStaticMethod(clazz, "getLayout", Context.class, this);
layout.addView(view);
} catch (Exception e) {
Log.e("DEMO", "msg:" + e.getMessage());
}
}
private void doSomething2() {
try {
Class clazz = classLoader2.loadClass("jianqiang.com.plugin1.UIUtil");
String str = (String) RefInvoke.invokeStaticMethod(clazz, "getTextString", Context.class, this);
textV.setText(str);
Drawable drawable = (Drawable) RefInvoke.invokeStaticMethod(clazz, "getImageDrawable", Context.class, this);
imgV.setBackground(drawable);
layout.removeAllViews();
View view = (View) RefInvoke.invokeStaticMethod(clazz, "getLayout", Context.class, this);
layout.addView(view);
} catch (Exception e) {
Log.e("DEMO", "msg:" + e.getMessage());
}
}
}
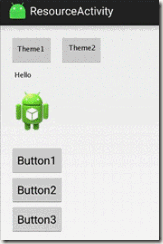
Run Host App, click ‘Button1’ and the theme in ‘Plugin1’ will be show:

7-2 The effect of click ‘Button1’
Click ‘Button2’ and the theme in ‘Plugin2’ will be show:
7-3 The effect of click ‘Button2’
But there is too much duplicate code in HostApp, it just for your easy understand, not elegant. In addition, as the number of plugin skins increases, the redundant code will be more and more. So it is necessary to throw them into a ‘HashMap’ for maintenance.
Here is the code of ‘BaseActivity’:
public class BaseActivity extends Activity {
private AssetManager mAssetManager;
private Resources mResources;
private Resources.Theme mTheme;
protected HashMap<String, PluginInfo> plugins = new HashMap<String, PluginInfo>();
@Override
protected void attachBaseContext(Context newBase) {
super.attachBaseContext(newBase);
Utils.extractAssets(newBase, "plugin1.apk");
Utils.extractAssets(newBase, "plugin2.apk");
}
@Override
protected void onCreate(Bundle savedInstanceState) {
super.onCreate(savedInstanceState);
genegatePluginInfo("plugin1.apk");
genegatePluginInfo("plugin2.apk");
}
protected void genegatePluginInfo(String pluginName) {
File extractFile = this.getFileStreamPath(pluginName);
File fileRelease = getDir("dex", 0);
String dexpath = extractFile.getPath();
DexClassLoader classLoader = new DexClassLoader(dexpath, fileRelease.getAbsolutePath(), null, getClassLoader());
plugins.put(pluginName, new PluginInfo(dexpath, classLoader));
}
protected void loadResources(String dexPath) {
try {
AssetManager assetManager = AssetManager.class.newInstance();
Method addAssetPath = assetManager.getClass().getMethod("addAssetPath", String.class);
addAssetPath.invoke(assetManager, dexPath);
mAssetManager = assetManager;
} catch (Exception e) {
e.printStackTrace();
}
Resources superRes = super.getResources();
mResources = new Resources(mAssetManager, superRes.getDisplayMetrics(), superRes.getConfiguration());
mTheme = mResources.newTheme();
mTheme.setTo(super.getTheme());
}
@Override
public AssetManager getAssets() {
return mAssetManager == null ? super.getAssets() : mAssetManager;
}
@Override
public Resources getResources() {
return mResources == null ? super.getResources() : mResources;
}
@Override
public Resources.Theme getTheme() {
return mTheme == null ? super.getTheme() : mTheme;
}
}
And here is the code of ‘ResourceActivity’:
public class ResourceActivity extends BaseActivity {
/**
* The widgets that need to replace the theme
* The example of them: TextView,ImageView,LinearLayout
*/
private TextView textV;
private ImageView imgV;
private LinearLayout layout;
@Override
protected void onCreate(Bundle savedInstanceState) {
super.onCreate(savedInstanceState);
setContentView(R.layout.activity_resource);
textV = (TextView) findViewById(R.id.text);
imgV = (ImageView) findViewById(R.id.imageview);
layout = (LinearLayout) findViewById(R.id.layout);
findViewById(R.id.btn1).setOnClickListener(new OnClickListener() {
@Override
public void onClick(View arg0) {
PluginInfo pluginInfo = plugins.get("plugin1.apk");
loadResources(pluginInfo.getDexPath());
doSomething(pluginInfo.getClassLoader());
}
});
findViewById(R.id.btn2).setOnClickListener(new OnClickListener() {
@Override
public void onClick(View v) {
PluginInfo pluginInfo = plugins.get("plugin2.apk");
loadResources(pluginInfo.getDexPath());
doSomething(pluginInfo.getClassLoader());
}
});
}
private void doSomething(ClassLoader cl) {
try {
Class clazz = cl.loadClass("jianqiang.com.plugin1.UIUtil");
String str = (String) RefInvoke.invokeStaticMethod(clazz, "getTextString", Context.class, this);
textV.setText(str);
Drawable drawable = (Drawable) RefInvoke.invokeStaticMethod(clazz, "getImageDrawable", Context.class, this);
imgV.setBackground(drawable);
layout.removeAllViews();
View view = (View) RefInvoke.invokeStaticMethod(clazz, "getLayout", Context.class, this);
layout.addView(view);
} catch (Exception e) {
Log.e("DEMO", "msg:" + e.getMessage());
}
}
}
To change skin by using Plug-In way is very easy. ‘Plugin1’ is a template, there is no need to change any code when we create a new skin, just replace the resources under ‘res’ folder, and do not need to modify the resources files name.
That’s it! Have you learned?
7.4 Another solution of Skin changing
In this section, we talk about ‘Dynamic3.2’, it based on ‘Dynamic 3.1’, and modify ‘doSomething’ method of ‘ResourceActivity’.
The example in last section, we use ‘R.drawable.robert’ to access resource in Plug-In.
In fact, we can access the inner class - ‘R.java’ in Plug-In in the HostApp directly. With the Hex value, the image can be fetch by the use of ‘getDrawable(resId)’. In this way, ‘getResources’ method will provide the resources in Plug-In App.
Class stringClass = cl.loadClass("jianqiang.com.plugin1.R$string");
int resId1 = (int) RefInvoke.getStaticFieldObject(stringClass, "hello_message");
textV.setText(getResources().getString(resId1));
Class drawableClass = cl.loadClass("jianqiang.com.plugin1.R$drawable");
int resId2 = (int) RefInvoke.getStaticFieldObject(drawableClass, "robert");
imgV.setBackground(getResources().getDrawable(resId2));
Class layoutClazz = cl.loadClass("jianqiang.com.plugin1.R$layout");
int resId3 = (int) RefInvoke.getStaticFieldObject(layoutClazz, "main_activity");
View view = (View) LayoutInflater.from(this).inflate(resId3, null);
layout.removeAllViews();
layout.addView(view);
From now on, there is no need for ‘UIUtil’ class in Plug-In App, it is only a APK contains resource files and ‘R’ file.
7.5 Summary
This chapter gives a detailed description of the principle of resources. Based on this, we use reflection, use ‘addAssetPath’ of ‘AssetManager’ to load resources in Plug-In App.
And skin changing is the specific implementation of resource Plug-In.
Chapter 7 Resources in Plug-In(1)的更多相关文章
- 译:Spring框架参考文档之IoC容器(未完成)
6. IoC容器 6.1 Spring IoC容器和bean介绍 这一章节介绍了Spring框架的控制反转(IoC)实现的原理.IoC也被称作依赖注入(DI).It is a process wher ...
- Android二维码开源项目zxing编译
ZXing是一个开放源代码的,用Java实现的多种格式的1D/2D条码图像处理库,它包括了联系到其它语言的port.Zxing能够实现使用手机的内置的摄像头完毕条形码的扫描及解码.该项目可实现的条形码 ...
- Spring4参考手册中文版
Spring4参考手册中文版 前言 https://github.com/b2gats/stone-docs/blob/master/spring-4-beans.md Part III. 核心技术 ...
- Android Programming: Pushing the Limits -- Chapter 3: Components, Manifests, and Resources
Android Components Manifest文件 Resource and Assets v\:* {behavior:url(#default#VML);} o\:* {behavior: ...
- TIJ——Chapter One:Introduction to Objects
///:~容我对这个系列美其名曰"读书笔记",其实shi在练习英文哈:-) Introduction to Objects Object-oriented programming( ...
- Chapter 5: Container
Chapter 5: Container A container is a module that processes the requests for a servlet and populates ...
- 如何写出优秀的研究论文 Chapter 1. How to Write an A+ Research Paper
This Chapter outlines the logical steps to writing a good research paper. To achieve supreme excelle ...
- Chapter 2 - How to Add a sprite
Chapter 2 - How to Add a sprite 1. Add image resources 1.1add resources on win32 2. Add a sprite TIP ...
- Chapter 6 — Improving ASP.NET Performance
https://msdn.microsoft.com/en-us/library/ff647787.aspx Retired Content This content is outdated and ...
随机推荐
- @ManyToMany的学习
新建了一个manyToMany的学生-课程表,学生可以选择多个课程,多个课程可以被学生选.尝试如下代码,创建了两个list,然后新建对象,加入list,然后set<list>,报错,这是因 ...
- php 守护进程(Daemon)
守护进程(daemon)是一类在后台运行的特殊进程,用于执行特定的系统任务. 很多守护进程在系统引导的时候启动,并且一直运行直到系统关闭. 守护进程一直在后台运行,脱离终端运行的程序 独立运行的守护进 ...
- h5页面转图片长按保存
5页面经常会遇到此类需求.将最后的结果页转换为图片长按保存.下面介绍一下实现此需求的过程 1,依赖安装 cnpm install html2canvas --save 2,依赖引入,使用 绑定 初始化 ...
- Learning to Promote Saliency Detectors
Learning to Promote Saliency Detectors 原本放在了思否上, 但是公式支持不好, csdn广告太多, 在博客园/掘金上发一下 https://github.com/ ...
- [树上倍增+二分答案][NOIP2012]运输计划
题目背景 公元 2044 年,人类进入了宇宙纪元. 题目描述 公元 2044 年,人类进入了宇宙纪元 L 国有 nn 个星球,还有 n-1n−1 条双向航道,每条航道建立在两个星球之间,这 n-1n− ...
- Javaweb过滤器
http://blog.csdn.net/reggergdsg/article/details/52821502
- Python3 单下划线_双下划线__开头
Python 中,下划线对解释器有特殊的含义,而且是内建标识符所使用的符号,使用时要多加留意. 在 Python3 的面向对象中,双下划线开头的变量和方法表名为私有变量和私有方法. __private ...
- 1. String可调用方法
class str(basestring): """ str(object='') -> string Return a nice string represent ...
- 关于签名sign的坑
在有些支付文档或其他文档都会要求签名验证 /** * description:签名 * function name:sign * @param $data * @return string */fun ...
- python (创建虚拟环境)
Python python 介绍 Python是一门计算机编程语言.是一种面向对象的动态类型语言,最初被设计用于编写自动化脚本(shell),随着版本的不断更新和语言新功能的添加,越来越多被用于独立的 ...