
TabHost实现底部导航栏
源代码及可执行文件下载地址:http://files.cnblogs.com/rainboy2010/tabnavigation.zip


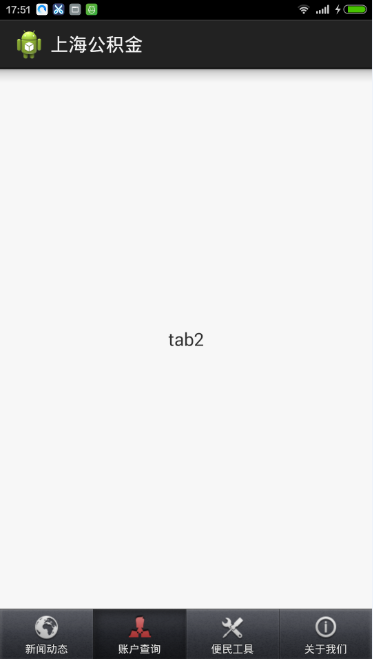
现在很多Android应用界面都采用底部导航栏的设计方式,这样可以使用户灵活的切换不同的页面。采用TabHost控件很容易实现一个底部导航栏的功能,下面以模仿鲁大师客户端底部导航栏为例小试牛刀
1.设计主界面,布局文件tab_ludashi.xml如下:
<?xml version="1.0" encoding="utf-8"?>

<FrameLayout xmlns:android="http://schemas.android.com/apk/res/android"

    android:id="@+id/container"

    android:layout_width="fill_parent"

    android:layout_height="fill_parent" >

    <TabHost

        android:id="@android:id/tabhost"

        android:layout_width="fill_parent"

        android:layout_height="fill_parent"

        android:background="@drawable/bg"

     >

        <LinearLayout

            android:layout_width="fill_parent"

            android:layout_height="fill_parent"

            android:orientation="vertical" >

             <FrameLayout

                android:id="@android:id/tabcontent"

                android:layout_width="fill_parent"

                android:layout_height="0.0dp"

                android:layout_weight="1"

              >

             </FrameLayout>

             <TabWidget

                android:id="@android:id/tabs"

                android:layout_width="fill_parent"

                android:layout_height="@dimen/tabwidget_height"

                android:gravity="center"

                android:showDividers="none"

             >

             </TabWidget>

        </LinearLayout>

    </TabHost>

</FrameLayout>
每一个TabItem对应的布局文件tab_ludashi_item.xml如下,图片在上部,文字在下部
<LinearLayout xmlns:android="http://schemas.android.com/apk/res/android"

    android:id="@+id/tabwidget_item_layout"

    android:layout_width="fill_parent"

    android:layout_height="@dimen/tabwidget_height"

    android:orientation="vertical"

    android:gravity="center"

    android:background="@drawable/selector_ludashi_tabitem_bg"

   >

    <RelativeLayout

      android:layout_width="fill_parent"

      android:layout_height="wrap_content"

    >

      <ImageView

          android:id="@+id/tabwidget_item_image"

          android:layout_width="wrap_content"

          android:layout_height="wrap_content"

          android:layout_centerInParent="true"

          android:contentDescription="@null"

          android:scaleType="fitCenter"

       />

       <ImageView

          android:id="@+id/tabwidget_item_dot"

          android:layout_width="wrap_content"

          android:layout_height="wrap_content"

          android:layout_alignParentTop="true"

          android:layout_toRightOf="@id/tabwidget_item_image"

          android:contentDescription="@null"

          android:scaleType="fitCenter"

          android:visibility="invisible"

          android:src="@drawable/red_dot"

       />

    </RelativeLayout>

    <TextView

       android:id="@+id/tabwidget_item_text"

       android:layout_width="wrap_content"

       android:layout_height="wrap_content"

       android:gravity="center_vertical"

       android:layout_marginTop="3dp"

       android:textSize="12sp"

       android:textColor="@drawable/selector_ludashi_tabitem_text"

    />

</LinearLayout>
选中状态和未选中状态下背景对应的xml文件selector_ludashi_tabitem_bg.xml为:
<?xml version="1.0" encoding="utf-8"?>

<selector xmlns:android="http://schemas.android.com/apk/res/android" >

    <item android:state_pressed="true" android:drawable="@drawable/ludashi_tabitem_selected" />

    <item android:state_selected="true" android:drawable="@drawable/ludashi_tabitem_selected" />

    <item android:drawable="@android:color/transparent" />

</selector>
选中状态和未选中状态下文字颜色对应的xml文件selector_ludashi_tabitem_text.xml为:
<?xml version="1.0" encoding="utf-8"?>

<selector xmlns:android="http://schemas.android.com/apk/res/android">

    <item android:state_pressed="true" android:color="#ff00a5df" />

    <item android:state_selected="true" android:color="#ff00a5df" />

    <item android:color="#ff797979" />

</selector>
2.设计每一个TabItem选中状态和未选中状态对应的图片,以第一个Item为例,对应的xml文件selector_ludashi_tabitem_image_myphone.xml如下:
<?xml version="1.0" encoding="utf-8"?>

<selector xmlns:android="http://schemas.android.com/apk/res/android" >

    <item android:state_pressed="true" android:drawable="@drawable/ludashi_tabitem_myphone_pressed" />

    <item android:state_selected="true" android:drawable="@drawable/ludashi_tabitem_myphone_pressed" />

    <item android:drawable="@drawable/ludashi_tabitem_myphone_normal" />

</selector>
3.编写Java代码,如下:
@SuppressWarnings("deprecation")

public class LudashiActivity extends TabActivity

{

    private TabHost mTabHost;

    private int []mTabImage=new int[]{R.drawable.selector_ludashi_tabitem_image_myphone,R.drawable.selector_ludashi_tabitem_image_bench,
    R.drawable.selector_ludashi_tabitem_image_optimize,R.drawable.selector_ludashi_tabitem_image_find};

    private int []mTabText=new int[]{R.string.ludashi_tab1,R.string.ludashi_tab2,R.string.ludashi_tab3,R.string.ludashi_tab4};

    private String[]mTabTag=new String[]{"tab1","tab2","tab3","tab4"};

    private Class<?>[] mTabClass=new Class<?>[]{Tab1.class,Tab2.class,Tab3.class,Tab4.class};

    @Override

    protected void onCreate(Bundle savedInstanceState)

    {

        super.onCreate(savedInstanceState);

        setContentView(R.layout.tab_ludashi);

        initUI();

    }

    private void initUI()

    {

        this.setTitle(R.string.button2);

        this.mTabHost=this.getTabHost();

        this.mTabHost.setup();

        //设置显示的图片和文字

        for(int i=0;i<mTabClass.length;i++)

        {

           View view=LayoutInflater.from(this).inflate(R.layout.tab_ludashi_item, null);

          ((ImageView)view.findViewById(R.id.tabwidget_item_image)).setImageResource(mTabImage[i]);

          ((TextView)view.findViewById(R.id.tabwidget_item_text)).setText(mTabText[i]);

           this.mTabHost.addTab(this.mTabHost.newTabSpec(mTabTag[i]).setIndicator(view).setContent(new Intent(this,mTabClass[i])));

        }

        //设置默认选中项

        this.mTabHost.setCurrentTab(0);

    }

}
TabHost实现底部导航栏的更多相关文章
- Android应用底部导航栏(选项卡)实例
现在很多android的应用都采用底部导航栏的功能,这样可以使得用户在使用过程中随意切换不同的页面,现在我采用TabHost组件来自定义一个底部的导航栏的功能. 我们先看下该demo实例的框架图: 其 ...
- Android (争取做到)最全的底部导航栏实现方法
本文(争取做到)Android 最全的底部导航栏实现方法. 现在写了4个主要方法. 还有一些个人感觉不完全切题的方法也会简单介绍一下. 方法一. ViewPager + List<View> ...
- Android UI-仿微信底部导航栏布局
现在App基本的标配除了侧滑菜单,还有一个就是底部导航栏,常见的聊天工具QQ,微信,购物App都有底部导航栏,用户可以随便切换看不同的内容,说是情怀也好,用户体验也罢.我们开发的主要的还是讲的是如何如 ...
- 【转】Android应用底部导航栏(选项卡)实例
现在很多android的应用都采用底部导航栏的功能,这样可以使得用户在使用过程中随意切换不同的页面,现在我采用TabHost组件来自定义一个底部的导航栏的功能. 我们先看下该demo实例的框架图: 其 ...
- TextView+Fragment实现底部导航栏
前言:项目第二版刚上线没多久,产品又对需求进行了大改动,以前用的是左滑菜单,现在又要换成底部导航栏,于是今天又苦逼加班了.花了几个小时实现了一个底部导航栏的demo,然后总结一下.写一篇博客.供自己以 ...
- Android 修改底部导航栏navigationbar的颜色
Android 修改底部导航栏navigationbar的颜色 getWindow().setNavigationBarColor(Color.BLUE); //写法一 getWindow().set ...
- Android底部导航栏——FrameLayout + RadioGroup
原创文章,转载请注明出处http://www.cnblogs.com/baipengzhan/p/6285881.html Android底部导航栏有多种实现方式,本文详细介绍FrameLayout ...
- Android底部导航栏创建——ViewPager + RadioGroup
原创文章,引用请注明出处:http://www.cnblogs.com/baipengzhan/p/6270201.html Android底部导航栏有多种实现方式,本文详解其中的ViewPager ...
- 二、Fragment+RadioButton实现底部导航栏
在App中经常看到这样的tab底部导航栏 那么这种效果是如何实现,实现的方式有很多种,最常见的就是使用Fragment+RadioButton去实现.下面我们来写一个例子 首先我们先在activi ...
随机推荐
- vertica系列:时间相关函数
-- * 注意: 本文的SQL是在 2017-09-14 测试的. 所以如果取当前日期, 结果为 2017-09-14* ------------------------------ 相关数据类型 - ...
- linux上安装mysql,tomcat,jdk
Linux 上安装 1 安装jdk 检测是否安装了jdk 运行 java –version 若有 需要将其卸载 a) 查看安装哪些jdk rmp –qa |grep java b) ...
- 堆栈Stack介绍
堆栈(Stack)代表了一个后进先出的对象集合.当您需要对各项进行后进先出的访问时,则使用堆栈.当您在列表中添加一项,称为推入元素,当您从列表中移除一项时,称为弹出元素. Stack 类的方法和属性 ...
- WebSocket 快速开始
[Html5客户端API] 1.创建websocket对象 var connection = new WebSocket('ws[s]://www.example.com/chat',可选自己实现的 ...
- Linux静默安装matlab
对linux系统不是很熟,所有装起来有点费劲.来来回回折腾了二三天,查了很多攻略,但按照步骤老是报错,大体上各人设备不同.系统不同.环境设置不同,总是会多多少少略有差异. 一 基本配置 linux系统 ...
- matplotlib-2D绘图库-面向对象
个人理解:plt--画本 figure--产生画纸 子图 import numpy as np import matplotlib.pyplot as plt #解决能显示中文 plt.rcPa ...
- cocos 自动内存管理分析
#include "CCAutoreleasePool.h" #include "ccMacros.h" NS_CC_BEGIN static CCPoolMa ...
- aplication.properties配置
1.设置使用的properties文件 spring.profiles.active=dev 设置激活使用哪个properties一般设置两个,一个是开发环境的,一个是本地的测试环境 可设置默认使用开 ...
- 检索 COM 类工厂中 CLSID 为 {00024500-0000-0000-C000-000000000046} 的组件时失败,原因是出现以下错误: 80070005。
错误描述:当在ASP.NET应用程序中引用Microsoft Excel组件,并在程序中调用时,部署到服务器上经常会遇到以下的错误:检索 COM 类工厂中 CLSID 为{00024500-0000- ...
- Django REST Framework API Guide 04
本节大纲 1.serializers 1.Serializers Serializers允许复杂的数据,像queryset和模型实例转换成源生的Python数据类型.从而可以更简单的被渲染成JSON, ...