Spirng boot maven多模块打包不踩坑
本文参考 https://blog.csdn.net/Ser_Bad/article/details/78433340
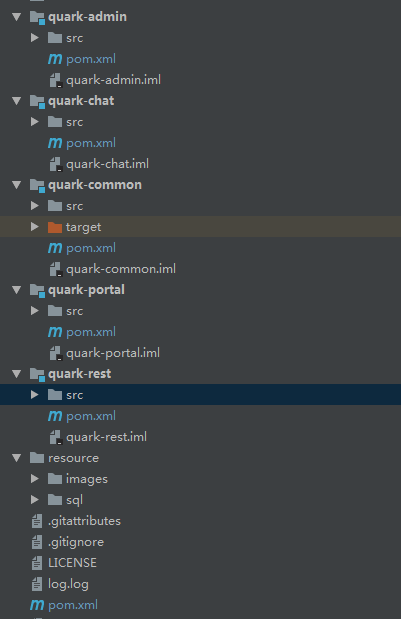
经过实战一次通过。回话不多说,话费不多说,直接上图。
项目整体结构:
父模块:
<?xml version="1.0" encoding="UTF-8"?>

<project xmlns="http://maven.apache.org/POM/4.0.0"

         xmlns:xsi="http://www.w3.org/2001/XMLSchema-instance"

         xsi:schemaLocation="http://maven.apache.org/POM/4.0.0 http://maven.apache.org/xsd/maven-4.0.0.xsd">

    <modelVersion>4.0.0</modelVersion>

    <!--版本号-->

    <groupId>com.quark</groupId>

    <artifactId>quark-parent</artifactId>

    <version>1.0-SNAPSHOT</version>

    <packaging>pom</packaging>

    <!--管理所有的模块-->

    <modules>

        <module>quark-admin</module>

        <module>quark-chat</module>

        <module>quark-common</module>

        <module>quark-portal</module>

        <module>quark-rest</module>

    </modules>

    <!-- 集中定义依赖版本号与基本配置 -->

    <properties>

        <!--指定jdk的版本为1.8,默认为1.6-->

        <project.build.sourceEncoding>UTF-8</project.build.sourceEncoding>

        <project.reporting.outputEncoding>UTF-8</project.reporting.outputEncoding>

        <java.version>1.8</java.version>

    </properties>

    <dependencyManagement>

        <dependencies>

      省略其他公共包

        </dependencies>

    </dependencyManagement>

    <!--指定使用maven打包-->

    <build>

        <plugins>

            <plugin>

                <groupId>org.apache.maven.plugins</groupId>

                <artifactId>maven-compiler-plugin</artifactId>

                <configuration>

                    <source>${java.version}</source>

                    <target>${java.version}</target>

                </configuration>

            </plugin>

            <plugin>

                <groupId>org.apache.maven.plugins</groupId>

                <artifactId>maven-surefire-plugin</artifactId>

                <configuration>

                    <skipTests>true</skipTests>    <!--默认关掉单元测试 -->

                </configuration>

            </plugin>

        </plugins>

    </build>

</project>
admin模块:
<?xml version="1.0" encoding="UTF-8"?>

        <project xmlns="http://maven.apache.org/POM/4.0.0"

         xmlns:xsi="http://www.w3.org/2001/XMLSchema-instance"

         xsi:schemaLocation="http://maven.apache.org/POM/4.0.0 http://maven.apache.org/xsd/maven-4.0.0.xsd">

    <modelVersion>4.0.0</modelVersion>

    <!--指定父模块,需要注意的是,这里要指定父模块pom.xml的相对路径-->

    <parent>

        <artifactId>quark-parent</artifactId>

        <groupId>com.quark</groupId>

        <version>1.0-SNAPSHOT</version>

        <relativePath>../pom.xml</relativePath>

    </parent>

    <groupId>com.quark</groupId>

    <artifactId>quark-admin</artifactId>

    <version>1.0-SNAPSHOT</version>

    <packaging>jar</packaging>

    <dependencies>

        省略导包

    </dependencies>

    <!--spring boot打包的话需要指定一个唯一的入门-->

    <build>

        <plugins>

            <plugin>

                <groupId>org.springframework.boot</groupId>

                <artifactId>spring-boot-maven-plugin</artifactId>

                <configuration>

                    <!-- 指定该Main Class为全局的唯一入口 -->

                    <mainClass>com.quark.admin.AdminApplication</mainClass>

                    <layout>ZIP</layout>

                </configuration>

                <executions>

                    <execution>

                        <goals>

                            <goal>repackage</goal><!--可以把依赖的包都打包到生成的Jar包中-->

                        </goals>

                    </execution>

                </executions>

            </plugin>

        </plugins>

    </build>

</project>
其他模块都是一致的配置

如果有公共模块不需要打包
<?xml version="1.0" encoding="UTF-8"?>

<project xmlns="http://maven.apache.org/POM/4.0.0"

         xmlns:xsi="http://www.w3.org/2001/XMLSchema-instance"

         xsi:schemaLocation="http://maven.apache.org/POM/4.0.0 http://maven.apache.org/xsd/maven-4.0.0.xsd">

    <parent>

        <artifactId>quark-parent</artifactId>

        <groupId>com.quark</groupId>

        <version>1.0-SNAPSHOT</version>

        <relativePath>../pom.xml</relativePath>

    </parent>

    <modelVersion>4.0.0</modelVersion>

    <groupId>com.quark</groupId>

    <artifactId>quark-common</artifactId>

    <version>1.0-SNAPSHOT</version>

    <dependencies>

            ...........

    </dependencies>

</project>
打包
按照上面的配置好以后,执行下面的命令就好了
mvn clean package
上面的命令是打包所以,如果要单个打包用下面的命令
mvn -pl quark-admin -am install
Spirng boot maven多模块打包不踩坑的更多相关文章
- spring boot maven多模块打包部署到tomcat
@SpringBootApplication(scanBasePackages = {"com.xxx.*"}) public class ApiApplication exten ...
- Spirng boot maven多模块
https://blog.csdn.net/Ser_Bad/article/details/78433340
- spring boot & maven 多模块 ---心得
1.前言 有个名字叫 多模块企业级项目 ,其实就是一个父级maven工程里面有着多个子级maven工程的项目 ,甚至在子级maven 里面还有多个子级maven, 这用到了 maven多模块开发的使 ...
- 解决IDEA maven多模块打包问题
参考: https://www.jianshu.com/p/37c6688c4fcb https://blog.csdn.net/sjhuangx/article/details/71519066 h ...
- Spring boot redis自增编号控制 踩坑
近段期间,公司 接手一个订单号生成服务,规则的话已经由项目经理他们规定好了,主要是后面的四位数代表的关于当前订单号已经执行第几个了.而这里面有一个要求就是支持分布式.为了实现这个东西,刚开始我使用了r ...
- 【nodejs代理服务器二】nodejs webpack打包配置踩坑总结
接着上篇用Nodejs开发web代理,防止web渗透.如果部署到正式环境,需要进行打包配置. 我在用webpack打包配置中遇到了几个错误,总结如下: webpack环境变量问题 https://ww ...
- Unity打包IOS踩坑记
1. Xcode不显示模拟器 之前一直用真机调试,就没注意模拟器.今天要上传版本要用到模拟器截图,发现竟然Xcode的运行选项竟然没有显示模拟器. 也是网上找了各种方法,修改各种设置,清了各种文件夹都 ...
- Spring Boot 项目实战(一)Maven 多模块项目搭建
一.前言 最近公司项目准备开始重构,框架选定为 Spring Boot ,本篇主要记录了在 IDEA 中搭建 Spring Boot Maven 多模块项目的过程. 二.软件及硬件环境 macOS S ...
- spring boot +dubbo 踩坑记录
今天初次搭建spring boot +duboo的demo.记录一下踩坑记录. 首先搭建3个小demo,一个maven项目,两个spring boot (服务提供者和服务消费者)项目. 两 sprin ...
随机推荐
- centos7下kubernetes(7.kubernetesScale Up/Down)
伸缩(Scale up/down)是指在线增加或减少pod副本数量 通过yml文件创建两个nginx的pod 先查看一下nginx的yml文件: 通过kubectl apply -f创建 通过kube ...
- 机器学习算法总结(五)——聚类算法(K-means,密度聚类,层次聚类)
本文介绍无监督学习算法,无监督学习是在样本的标签未知的情况下,根据样本的内在规律对样本进行分类,常见的无监督学习就是聚类算法. 在监督学习中我们常根据模型的误差来衡量模型的好坏,通过优化损失函数来改善 ...
- hyperledger中文文档学习-2-简介
参考https://hyperledgercn.github.io/hyperledgerDocs/blockchain_zh/ Hyperledger区块链框架(https://blog.csdn. ...
- mongo索引命令
http://blog.csdn.net/salmonellavaccine/article/details/53907535 1. 创建/重建索引 MongoDB全新创建索引使用ensureInde ...
- Java NIO4:缓冲区Buffer(续)
一.什么是缓冲区 一个缓冲区对象是固定数量的数据的容器,其作用是一个存储器,或者分段运输区,在这里数据可被存储并在之后用于检索.缓冲区像前篇文章讨论的那样被写满和释放,对于每个非布尔原始数据 ...
- 使用Git进行代码管理的心得--github for windows
首先简述一下Git进行代码管理的情况 我使用的是github for windows,官网下载的速度太慢,所以用了离线安装包.安装之后会有GitHub和GitShell两个软件,其中Github采用图 ...
- 关于GitHub的Hello Word
最近GitHub一直是最火的配置库技术之一,各个技术大牛也都纷纷入驻GitHub 我每天都打交道的DITA-OT开源项目也宣布迁入GitHub. 那么GitHub到底有什么过人之处呢?给各位先扫个盲. ...
- disconf原理 “入坑”指南
之前有了解过disconf,也知道它是基于zookeeper来做的,但是对于其运行原理不太了解,趁着周末,debug下源码,也算是不枉费周末大好时光哈 :) .关于这篇文章,笔者主要是参考discon ...
- Python3 与 C# 基础语法对比(就当Python和C#基础的普及吧)
文章汇总:https://www.cnblogs.com/dotnetcrazy/p/9160514.html 多图旧排版:https://www.cnblogs.com/dunitian/p/9 ...
- python实现本地图片上传到服务区
本地图片上传到服务器,其本质上来讲,就是读取本地图片,复制到服务器,并返回服务器url 前端代码,用的form表单提交,form表单中包含两个文件选择表单元素,选择文件,点击提交按钮,提交form表单 ...