《基于Nginx的中间件架构》学习笔记---4.nginx编译参数详细介绍
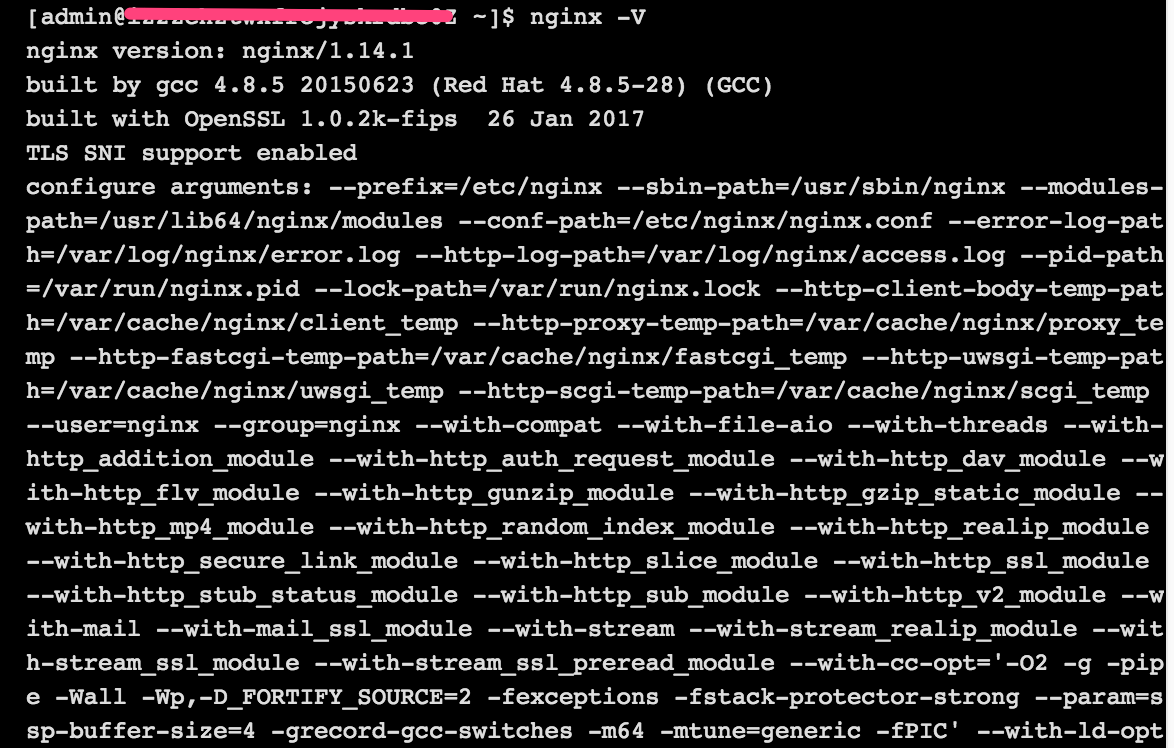
通过nginx -V查看编译时参数:
在nginx安装目录下,通过./configure --help,查看对应版本ngnix编译时支持的所有参数:
Nginx编译参数详细介绍:

--help 显示本提示信息

--prefix=PATH 设定安装目录

--sbin-path=PATH 设定程序文件目录

--conf-path=PATH 设定配置文件(nginx.conf)目录

--error-log-path=PATH 设定错误日志目录

--pid-path=PATH 设定pid文件(nginx.pid)目录

--lock-path=PATH 设定lock文件(nginx.lock)目录

--user=USER 设定程序运行的用户环境(www)

--group=GROUP 设定程序运行的组环境(www)

--build=NAME  设定程序编译名称

--builddir=DIR 设定程序编译目录

--with-rtsig_module 允许rtsig模块

--with-select_module 允许select模块(一种轮询模式,不推荐用在高载环境)

--without-select_module 不使用select模块

--with-poll_module 允许poll模块(一种轮询模式,不推荐用在高载环境)

--without-poll_module 不使用poll模块

--with-threads  允许支持的线程池线程数

--with-http_ssl_module 允许ngx_http_ssl_module模块(Apache对应:mod_ssl)

--with-http_realip_module 允许ngx_http_realip_module模块(mod_rpaf)

--with-http_addition_module 允许ngx_http_addition_module模块(mod_layout)

--with-http_xslt_module 允许ngx_http_xslt_module模块

--with-http_sub_module 允许ngx_http_sub_module模块

--with-http_dav_module 允许ngx_http_dav_module模块(mod_dav)

--with-http_flv_module 允许ngx_http_flv_module模块(mod_flvx)

--with-http_gzip_static_module 允许ngx_http_gzip_static_module模块(mod_dflate)

--with-http_random_index_module 允许ngx_http_random_index_module模块(mod_autoindex)

--with-http_stub_status_module 允许ngx_http_stub_status_module模块(mod_status)

--without-http_charset_module 不使用ngx_http_charset_module模块

--without-http_gzip_module 不使用ngx_http_gzip_module模块

--without-http_ssi_module 不使用ngx_http_ssi_module模块

--without-http_userid_module 不使用ngx_http_userid_module模块

--without-http_access_module 不使用ngx_http_access_module模块

--without-http_auth_basic_module 不使用ngx_http_auth_basic_module模块

--without-http_autoindex_module 不使用ngx_http_autoindex_module模块

--without-http_geo_module 不使用ngx_http_geo_module模块

--without-http_map_module 不使用ngx_http_map_module模块

--without-http_referer_module 不使用ngx_http_referer_module模块

--without-http_rewrite_module 不使用ngx_http_rewrite_module模块

--without-http_proxy_module 不使用ngx_http_proxy_module模块

--without-http_fastcgi_module 不使用ngx_http_fastcgi_module模块

--without-http_memcached_module 不使用ngx_http_memcached_module模块

--without-http_limit_zone_module 不使用ngx_http_limit_zone_module模块

--without-http_empty_gif_module 不使用ngx_http_empty_gif_module模块

--without-http_browser_module 不使用ngx_http_browser_module模块

--without-http_upstream_ip_hash_module 不使用ngx_http_upstream_ip_hash_module模块

--with-http_perl_module 允许ngx_http_perl_module模块

--with-perl_modules_path=PATH 设置perl模块路径

--with-perl=PATH 设置perl库文件路径

--http-log-path=PATH 设置access log文件路径

--http-client-body-temp-path=PATH 设置客户端请求临时文件路径

--http-proxy-temp-path=PATH 设置http proxy临时文件路径

--http-fastcgi-temp-path=PATH 设置http fastcgi临时文件路径

--without-http 不使用HTTP server功能

--with-mail 允许POP3/IMAP4/SMTP代理模块

--with-mail_ssl_module 允许ngx_mail_ssl_module模块

--without-mail_pop3_module 不允许ngx_mail_pop3_module模块

--without-mail_imap_module 不允许ngx_mail_imap_module模块

--without-mail_smtp_module 不允许ngx_mail_smtp_module模块

--with-google_perftools_module 允许ngx_google_perftools_module模块(调试用)

--with-cpp_test_module 允许ngx_cpp_test_module模块

--add-module=PATH 允许使用外部模块,以及路径

--with-cc=PATH 设置C编译器路径

--with-cpp=PATH 设置C预处理路径

--with-cc-opt=OPTIONS 设置C编译器参数

--with-ld-opt=OPTIONS 设置连接文件参数

--with-cpu-opt=CPU 为指定CPU优化,可选参数有:

          pentium, pentiumpro, pentium3, pentium4,

          athlon, opteron, sparc32, sparc64, ppc64

--without-pcre 不使用pcre库文件

--with-pcre=DIR 设定PCRE库路径

--with-pcre-opt=OPTIONS 设置PCRE运行参数

--with-md5=DIR 设定md5库文件路径

--with-md5-opt=OPTIONS 设置md5运行参数

--with-md5-asm 使用md5源文件编译

--with-sha1=DIR 设定sha1库文件路径

--with-sha1-opt=OPTIONS 设置sha1运行参数

--with-sha1-asm 使用sha1源文件编译

--with-zlib=DIR 设定zlib库文件路径

--with-zlib-opt=OPTIONS 设置zlib运行参数

--with-zlib-asm=CPU 使zlib对特定的CPU进行优化,可选参数:

          pentium, pentiumpro

--with-openssl=DIR 设定OpenSSL库文件路径

--with-openssl-opt=OPTIONS 设置OpenSSL运行参数

--with-debug 允许调试日志
补充:centos下如何查看yum安装的软件路径:
1、rpm -qa | grep 软件包名
2、rpm -ql 第一步的结果
例如:

《基于Nginx的中间件架构》学习笔记---4.nginx编译参数详细介绍的更多相关文章
- 基于Netty的RPC架构学习笔记(十二):借助spring实现业务分离、聊天室小项目、netty3和4、5的不同、业务线程池以及消息串行化
文章目录 借助spring实现业务分离(
- 基于Netty的RPC架构学习笔记(十一):粘包、分包分析,如何避免socket攻击
文章目录 问题 消息如何在管道中流转 源码解析 AbstractNioSelector.java AbstractNioWorker.java NioWorker.java DefaultChanne ...
- 基于Netty的RPC架构学习笔记(十):自定义数据包协议
文章目录 数据包简介 粘包.分包现象 数据包格式 举个
- 基于Netty的RPC架构学习笔记(九):自定义序列化协议
文章目录 为什么需要自定义序列化协议
- 基于Netty的RPC架构学习笔记(八):protocol buff学习使用
文章目录 简介 准备 protobuf配置文件 生成java代码 举个
- 基于Netty的RPC架构学习笔记(七):netty学习之心跳
文章目录 idleStateHandler netty3
- 基于Netty的RPC架构学习笔记(六):netty5案例学习
文章目录 netty5服务端入门案例 netty5客户端入门案例 单客户端多连接程序 知识普及 线程池原理图 对象池原理图 对象组原理图 结论 理论结合实际 开干开干 总结 netty5服务端入门案例 ...
- 基于Netty的RPC架构学习笔记(五):netty线程模型源码分析(二)
文章目录 小技巧(如何看开源框架的源码) 源码解析 阅读源码技巧 打印查看 通过打断点调试 查看调用栈 小技巧(如何看开源框架的源码) 一断点 二打印 三看调用栈 四搜索 源码解析 //设置nioso ...
- 基于Netty的RPC架构学习笔记(四):netty线程模型源码分析(一)
文章目录 如何提高NIO的工作效率 举个
- 基于Netty的RPC架构学习笔记(三):netty客户端
文章目录 举个
随机推荐
- 自动配置IE代理脚本
http://www.cnblogs.com/ttyp/archive/2005/11/18/279124.html
- struts2中的constant介绍之struts.objectFactory与spring的整合
struts2提供给我们更为灵活的设计,他的很多东西都是可以手动配置的,下面介绍下他的一些 常用的constant作用和配置 struts.objectFactory这个属性用于说明Struts2的 ...
- iframe+form表单提交数据
<h6>基于iframe+Form表单</h6> <iframe id="iframe" name="ifra" onclick= ...
- linux终端发送邮件
使用mail: echo "This is message to send" | mail -a /tmp/attachment.txt -s "This is Subj ...
- css:自己实现一个带小图标的input输入框
有小图标的input输入框<input type="text" placeholder="输入手机号" style="background:ur ...
- ACM__菜鸟之经典错误
1:多组输入与单组输入 Input contains multiple test cases. Input contains a single test case. 2: EOF=-1 while( ...
- 【363】python 相关小技巧
1. 对列表进行乱序 通过 random.shuffle() 方法实现,直接对列表进行操作 >>> import random >>> a = list(range ...
- mybatis中事务简单使用
一步: 事务只用在service层方法上加 @Transactional(propagation = Propagation.REQUIRED) :发现如果没有它,增加执行-->1/ ...
- Hibernate 再接触 关系映射 一对一双向外键关联
凡是双向关联必设mapped by 由对方主导 wifi.java package com.bjsxt.hibernate; import javax.persistence.Entity; imp ...
- datagridview表头全选
参与程序http://www.codeproject.com/KB/grid/CheckBoxHeaderCell.aspx 这里老外写的一个控件,他少了委托重载的一个方法.先写一个控件 public ...