brctl创建虚拟网卡详解
brctl创建虚拟网卡详解
作者:尹正杰
版权声明:原创作品,谢绝转载!否则将追究法律责任。
很久之前我分享过一篇关于搭建Openvpn的笔记,在笔记的最后我分享了一个脚本,是用来创建虚拟网卡的,今天我们就来聊一聊如何用Linux命令创建虚拟网卡,在学习命令之前,我们先了解一下Linux比较重要的2个模式:TUN和TAP。
在计算机网络中,TUN与TAP是操作系统内核中的虚拟网络设备。不同于普通靠硬件网络板卡实现的设备,这些虚拟的网络设备全部用软件实现,并向运行于操作系统上的软件提供与硬件的网络设备完全相同的功能。
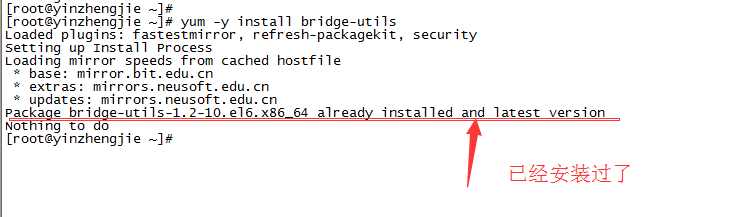
2.安装“brctl”软件包:
3.查看帮助:
 #!/usr/bin/env gorun

 #@author :yinzhengjie

 #Blog:http://www.cnblogs.com/yinzhengjie/tag/GO%E8%AF%AD%E8%A8%80%E7%9A%84%E8%BF%9B%E9%98%B6%E4%B9%8B%E8%B7%AF/

 #EMAIL:y1053419035@qq.com

 [root@yinzhengjie ~]# brctl  --help

 Usage: brctl [commands]

 commands:

 addbr           <bridge>                add bridge                             #添加一个桥

 delbr           <bridge>                delete bridge                          #创建一个桥

 addif           <bridge> <device>       add interface to bridge            #将某个接口添加到这个桥上来

 delif           <bridge> <device>       delete interface from bridge        #将某个接口从这个桥上删除

 setageing       <bridge> <time>         set ageing time

 setbridgeprio   <bridge> <prio>         set bridge priority

 setfd           <bridge> <time>         set bridge forward delay

 sethello        <bridge> <time>         set hello time

 setmaxage       <bridge> <time>         set max message age

 sethashel       <bridge> <int>          set hash elasticity

 sethashmax      <bridge> <int>          set hash max

 setmclmc        <bridge> <int>          set multicast last member count

 setmcrouter     <bridge> <int>          set multicast router

 setmcsnoop      <bridge> <int>          set multicast snooping

 setmcsqc        <bridge> <int>          set multicast startup query count

 setmclmi        <bridge> <time>         set multicast last member interval

 setmcmi         <bridge> <time>         set multicast membership interval

 setmcqpi        <bridge> <time>         set multicast querier interval

 setmcqi         <bridge> <time>         set multicast query interval

 setmcqri        <bridge> <time>         set multicast query response interval

 setmcqri        <bridge> <time>         set multicast startup query interval

 setpathcost     <bridge> <port> <cost>  set path cost

 setportprio     <bridge> <port> <prio>  set port priority

 setportmcrouter <bridge> <port> <int>   set port multicast router

 show            [ <bridge> ]            show a list of bridges               #查看当前是否有桥设备

 showmacs        <bridge>                show a list of mac addrs

 showstp         <bridge>                show bridge stp info

 stp             <bridge> {on|off}       turn stp on/off

 [root@yinzhengjie ~]#
4.创建桥接网卡配置流程:
 #!/usr/bin/env gorun

 #@author :yinzhengjie

 #Blog:http://www.cnblogs.com/yinzhengjie/tag/GO%E8%AF%AD%E8%A8%80%E7%9A%84%E8%BF%9B%E9%98%B6%E4%B9%8B%E8%B7%AF/

 #EMAIL:y1053419035@qq.com

 [root@yinzhengjie ~]# brctl addbr br0       #创建一个名称为"br0"的网卡

 [root@yinzhengjie ~]# ifconfig eth0  up     #将需要桥接的网卡IP清空

 [root@yinzhengjie ~]# ifconfig

 eth0      Link encap:Ethernet  HWaddr :0C::::A9

 inet6 addr: fe80::20c:29ff:fe32:86a9/ Scope:Link

 UP BROADCAST RUNNING MULTICAST  MTU:  Metric:

 RX packets: errors: dropped: overruns: frame:

 TX packets: errors: dropped: overruns: carrier:

 collisions: txqueuelen:

 RX bytes: (4.7 MiB)  TX bytes: (217.1 KiB)

 lo        Link encap:Local Loopback

 inet addr:127.0.0.1  Mask:255.0.0.0

 inet6 addr: ::/ Scope:Host

 UP LOOPBACK RUNNING  MTU:  Metric:

 RX packets: errors: dropped: overruns: frame:

 TX packets: errors: dropped: overruns: carrier:

 collisions: txqueuelen:

 RX bytes: (960.0 b)  TX bytes: (960.0 b)

 [root@yinzhengjie ~]#

 [root@yinzhengjie ~]# brctl addif br0 eth0                       #在"br0"上添加"eth0";

 [root@yinzhengjie ~]# ifconfig  br0 192.168.16.107/ up        #给"br0"配置IP;

 [root@yinzhengjie ~]# route add default gw 192.168.16.1        #设置默认的网关地址;

 [root@yinzhengjie ~]#

 [root@yinzhengjie ~]# ifconfig

 br0       Link encap:Ethernet  HWaddr :0C::::A9

 inet addr:192.168.16.107  Bcast:192.168.16.255  Mask:255.255.255.0

 inet6 addr: fe80::20c:29ff:fe32:86a9/ Scope:Link

 UP BROADCAST RUNNING MULTICAST  MTU:  Metric:

 RX packets: errors: dropped: overruns: frame:

 TX packets: errors: dropped: overruns: carrier:

 collisions: txqueuelen:

 RX bytes: (4.1 KiB)  TX bytes: (780.0 b)

 eth0      Link encap:Ethernet  HWaddr :0C::::A9

 inet6 addr: fe80::20c:29ff:fe32:86a9/ Scope:Link

 UP BROADCAST RUNNING MULTICAST  MTU:  Metric:

 RX packets: errors: dropped: overruns: frame:

 TX packets: errors: dropped: overruns: carrier:

 collisions: txqueuelen:

 RX bytes: (4.9 MiB)  TX bytes: (217.8 KiB)

 lo        Link encap:Local Loopback

 inet addr:127.0.0.1  Mask:255.0.0.0

 inet6 addr: ::/ Scope:Host

 UP LOOPBACK RUNNING  MTU:  Metric:

 RX packets: errors: dropped: overruns: frame:

 TX packets: errors: dropped: overruns: carrier:

 collisions: txqueuelen:

 RX bytes: (960.0 b)  TX bytes: (960.0 b)

 [root@yinzhengjie ~]#
5.开启stp服务(根据你自己的需求,觉得是否开启)
 #!/usr/bin/env gorun

 #@author :yinzhengjie

 #Blog:http://www.cnblogs.com/yinzhengjie/tag/GO%E8%AF%AD%E8%A8%80%E7%9A%84%E8%BF%9B%E9%98%B6%E4%B9%8B%E8%B7%AF/

 #EMAIL:y1053419035@qq.com

 [root@yinzhengjie ~]# brctl show

 bridge name     bridge id               STP enabled     interfaces

 br0             .000c293286a9       no              eth0

 [root@yinzhengjie ~]#

 [root@yinzhengjie ~]# brctl stp br0 on

 [root@yinzhengjie ~]#

 [root@yinzhengjie ~]# brctl show

 bridge name     bridge id               STP enabled     interfaces

 br0             .000c293286a9       yes             eth0

 [root@yinzhengjie ~]#
以上方式配置是在命令行上配置的,是临时存在的,只要重启网络服务可能配置就不存在的,是不长久的,不过一般运维人员都是写shell脚本,根据自己的需求编写相应的脚本,可以根据自己的需要去相应的桥接网卡。不过接下来,还要给大家推荐的是一种永久配置生效的,需要我们手动修改,估计大家也猜到了,那就是修改配置文件。
二.手动配置桥接网卡
刚刚我们介绍了用"brctl"命令来创建桥接网卡,其实这个命令存在与否都是没有关系的,因为真正的桥功能实现是内核中的网络模块(TUN/TAP)来实现的,所以它用的是桥驱动功能。因此我们可以通过编辑配置文件就可以配置桥接网卡了,
1.修改桥接配置文件
 #!/usr/bin/env gorun

 #@author :yinzhengjie

 #Blog:http://www.cnblogs.com/yinzhengjie/tag/GO%E8%AF%AD%E8%A8%80%E7%9A%84%E8%BF%9B%E9%98%B6%E4%B9%8B%E8%B7%AF/

 #EMAIL:y1053419035@qq.com

 [root@yinzhengjie ~]#

 [root@yinzhengjie ~]# cd /etc/sysconfig/network-scripts/

 [root@yinzhengjie network-scripts]# cp ifcfg-eth0 ifcfg-br100

 [root@yinzhengjie network-scripts]# more ifcfg-eth0   #注意,需要将原来的网卡(eth0)上的地址和DNS都删除掉.

 DEVICE="eth0"                #定义当前设备名称

 BOOTPROTO="none"

 ONBOOT="yes"

 TYPE="Ethernet"

 BRIDGE="br100"                #定义被桥接到的某块具体的网卡

 [root@yinzhengjie network-scripts]#

 [root@yinzhengjie network-scripts]# more ifcfg-br100

 DEVICE="br100"                #这个地方需要改一下,其他的地方可以不动

 BOOTPROTO="none"

 ONBOOT="yes"

 TYPE="Bridge"                #这个地方需要改一下

 IPADDR="192.168.16.107"

 NETMAST="255.255.255.0"

 GATEWAY="192.168.16.1"

 DNS1="219.141.136.10"

 DNS2="219.141.140.10"

 [root@yinzhengjie network-scripts]#
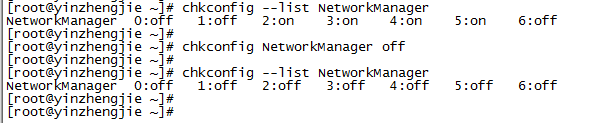
2.重新加载配置文件
 #!/usr/bin/env gorun

 #@author :yinzhengjie

 #Blog:http://www.cnblogs.com/yinzhengjie/tag/GO%E8%AF%AD%E8%A8%80%E7%9A%84%E8%BF%9B%E9%98%B6%E4%B9%8B%E8%B7%AF/

 #EMAIL:y1053419035@qq.com

 [root@yinzhengjie ~]# chkconfig --list NetworkManager

 NetworkManager  :off   :off   :on    :on    :on    :on    :off

 [root@yinzhengjie ~]#

 [root@yinzhengjie ~]# chkconfig NetworkManager off  #将NetworkManager开机自启的功能关闭

 [root@yinzhengjie ~]#

 [root@yinzhengjie ~]# chkconfig --list NetworkManager

 NetworkManager  :off   :off   :off   :off   :off   :off   :off

 [root@yinzhengjie ~]#

 [root@yinzhengjie network-scripts]# /etc/init.d/NetworkManager status

 NetworkManager (pid  ) is running...

 [root@yinzhengjie network-scripts]# /etc/init.d/NetworkManager stop  #必须要关闭此服务,不然会可能会报错!

 Stopping NetworkManager daemon:                            [  OK  ]

 [root@yinzhengjie network-scripts]#

 [root@yinzhengjie network-scripts]# /etc/init.d/network restart

 Shutting down loopback interface:                          [  OK  ]

 Bringing up loopback interface:                            [  OK  ]

 Bringing up interface eth0:                                [  OK  ]

 Bringing up interface br0:  Determining if ip address 192.168.16.107 is already in use for device br0...

 [  OK  ]

 [root@yinzhengjie network-scripts]#

 [root@yinzhengjie network-scripts]# ifconfig                  #下面就可以看出创建虚拟网卡很轻松就实现了

 br100       Link encap:Ethernet  HWaddr :0C::::A9

 inet addr:192.168.16.107  Bcast:192.168.16.255  Mask:255.255.255.0

 inet6 addr: fe80::20c:29ff:fe32:86a9/ Scope:Link

 UP BROADCAST RUNNING MULTICAST  MTU:  Metric:

 RX packets: errors: dropped: overruns: frame:

 TX packets: errors: dropped: overruns: carrier:

 collisions: txqueuelen:

 RX bytes: (736.0 b)  TX bytes: (695.0 b)

 eth0      Link encap:Ethernet  HWaddr :0C::::A9

 inet6 addr: fe80::20c:29ff:fe32:86a9/ Scope:Link

 UP BROADCAST RUNNING MULTICAST  MTU:  Metric:

 RX packets: errors: dropped: overruns: frame:

 TX packets: errors: dropped: overruns: carrier:

 collisions: txqueuelen:

 RX bytes: (89.7 MiB)  TX bytes: (3.9 MiB)

 lo        Link encap:Local Loopback

 inet addr:127.0.0.1  Mask:255.0.0.0

 inet6 addr: ::/ Scope:Host

 UP LOOPBACK RUNNING  MTU:  Metric:

 RX packets: errors: dropped: overruns: frame:

 TX packets: errors: dropped: overruns: carrier:

 collisions: txqueuelen:

 RX bytes: (17.2 KiB)  TX bytes: (17.2 KiB)

 [root@yinzhengjie network-scripts]#
brctl创建虚拟网卡详解的更多相关文章
- 虚拟DOM详解
虚拟DOM简介 Virtual Dom可以看做一棵模拟了DOM树的JavaScript对象树,其主要是通过vnode,实现一个无状态的组件,当组件状态发生更新时,然后触发Virtual Dom数据的变 ...
- 虚拟Dom详解 - (二)
第一篇文章中主要讲解了虚拟DOM基本实现,简单的回顾一下,虚拟DOM是使用json数据描述的一段虚拟Node节点树,通过render函数生成其真实DOM节点.并添加到其对应的元素容器中.在创建真实DO ...
- 虚拟Dom详解 - (一)
随着Vue和React的风声水起,伴随着诸多框架的成长,虚拟DOM渐渐成了我们经常议论和讨论的话题.什么是虚拟DOM,虚拟DOM是如何渲染的,那么Vue的虚拟Dom和React的虚拟DOM到底有什么区 ...
- VMware创建虚拟机教程详解及问题解决
关于VMware Workstation Pro虚拟机创建教程,本教程主要详细描述使用软件VMware Workstation Pro建虚拟系统过程中步骤详解,以及个人安装时所出现部分问题的解决方案. ...
- Signalr系列之虚拟目录详解与应用中的CDN加速实战
目录 对SignalR不了解的人可以直接移步下面的目录 SignalR系列目录 前言 前段时间一直有人问我 在用SignalR 2.0开发客服系统[系列1:实现群发通讯]这篇文章中的"/Si ...
- Linux 虚拟网络设备详解之 Bridge 网桥
本文首发于我的公众号 Linux云计算网络(id: cloud_dev),专注于干货分享,号内有 10T 书籍和视频资源,后台回复「1024」即可领取,欢迎大家关注,二维码文末可以扫. 前面几篇文章介 ...
- Ubuntu 14.10 创建虚拟网卡实现桥接网络
目标需求:在Ubuntu主机创建一张虚拟网卡,使得搭建在VirtualBox中的其他主机能借助虚拟网卡构建的局域网进行相互间的通讯 步骤一:准备工具包 安装 uml-utilities 以及 brid ...
- Windows 10 创建虚拟网卡
想把虚拟机桥接到我的电脑,但我连的是无线网电脑没查网线,所以就创建个虚拟网卡吧. 1.win + x 打开设备管理器 2.网络适配器 + 操作 + 添加过时硬件 3.下一步 4.选-->安 ...
- 【已解决】Vmware无法创建虚拟网卡的问题
最近因为各种需要,要在虚拟机里使用桥接方式连接.但是不管怎么操作,都无法添加虚拟网卡.连续好多天需要用到桥接上网,今儿多方搜索,找到了解决方案. 参考资料:http://tieba.baidu.com ...
随机推荐
- 同步手绘板——将View的内容映射成Bitmap转图片导出
在Android中自有获取view中的cache内容,然后将内容转换成bitmap,方法名是:getDrawingCache(),返回结果为Bitmap,但是刚开始使用的时候,得到的结果都是null, ...
- Freemaker的了解
freemarket 模板技术 与web容器没什么关系 可以用struct2作为视图组件 第一步导入jar包 项目目录下建立一个templates目录 在此目录下建立一个模板文件a.ftl文件 ...
- 5.2&5.3
队友吕日荣 http://www.cnblogs.com/Russelling/ 最近队友有点忙,尽管如此,队友还是有很给力的付出,让我们在最后完成了任务. 一开始都不知道这次的任务是要做什么,毫无头 ...
- 队列----java实现
FIFO:先进先出 存储单元: public class Node { /* 元素有两部分: 元素 下一个元素的引用 */ Object data;//数据域 Node next; //指针域 pub ...
- HDU 2032 杨辉三角
http://acm.hdu.edu.cn/showproblem.php?pid=2032 Problem Description 还记得中学时候学过的杨辉三角吗?具体的定义这里不再描述,你可以参考 ...
- 用Axios Element 实现全局的请求 loading
Kapture 2018-06-07 at 14.57.40.gif demo in github 背景 业务需求是这样子的,每当发请求到后端时就触发一个全屏的 loading,多个请求合并为 ...
- 转帖--计算机网络基础知识大总汇 https://www.jianshu.com/p/674fb7ec1e2c?utm_campaign=maleskine&utm_content=note&utm_medium=seo_notes&utm_source=recommendation
计算机网络基础知识大总汇 龙猫小爷 关注 2016.09.14 23:01* 字数 12761 阅读 30639评论 35喜欢 720 一.什么是TCP/IP 网络和协议 1. TCP/IP是 ...
- sql server2005查询分析器显示行号方法
工具栏:工具--选项--文本编辑器---所有语言--右边复选框 行号 打上勾就ok了
- 我的G++编译选项
-Wall -Wextra -g3 -DLOCAL -Wshadow -Wpointer-arith -Wcast-qual -Waggregate-return -Winline -Wunreach ...
- mybatis There is no getter for property named '*' in 'class java.lang.String
1.原因 server层 xxxx.get("1234") map <if test="aaa != null and aaa.id != null and ...