安卓开发_浅谈Notification(通知栏)
Notification通知栏
是显示在手机状态的消息,代表一种全局效果的通知
快速创建一个Notification的步骤简单可以分为以下四步:
第一步:通过getSystemService()方法得到NotificationManager对象;
第二步:对Notification的一些属性进行设置比如:内容,图标,标题,相应notification的动作进行处理等等;
第三步:通过NotificationManager对象的notify()方法来执行一个notification的快讯;
第四步:通过NotificationManager对象的cancel()方法来取消一个notificatioin的快讯;
示例:
布局:
 <?xml version="1.0" encoding="utf-8"?>

 <LinearLayout xmlns:android="http://schemas.android.com/apk/res/android"

     android:layout_width="match_parent"

     android:layout_height="match_parent"

     android:orientation="vertical" >

     <Button

         android:id="@+id/notification_open"

         android:layout_width="fill_parent"

         android:layout_height="wrap_content"

         android:text="打开通知栏" />

     <Button

         android:id="@+id/notification_close"

         android:layout_width="fill_parent"

         android:layout_height="wrap_content"

         android:text="取消通知栏" />

 </LinearLayout>
布局
JAVA文件:
 package information;

 import android.annotation.SuppressLint;

 import android.app.Activity;

 import android.app.Notification;

 import android.app.Notification.Builder;

 import android.app.NotificationManager;

 import android.app.PendingIntent;

 import android.content.Context;

 import android.content.Intent;

 import android.os.Bundle;

 import android.view.View;

 import android.view.View.OnClickListener;

 import android.widget.Button;

 import com.example.allcode.R;

 public class Notification_text_one extends Activity implements OnClickListener{

     NotificationManager manger; //通知控制类

     int notification_id;

     private Button open;

     private Button close;

     @Override

     protected void onCreate(Bundle savedInstanceState) {

         // TODO Auto-generated method stub

         super.onCreate(savedInstanceState);

         setContentView(R.layout.notification);

         open = (Button) findViewById(R.id.notification_open);

         close = (Button) findViewById(R.id.notification_close);

         //系统服务

         manger = (NotificationManager) getSystemService(Context.NOTIFICATION_SERVICE);

         open.setOnClickListener(this);

         close.setOnClickListener(this);

     }

     @Override

     public void onClick(View v) {

         // TODO Auto-generated method stub

         switch (v.getId()) {

         case R.id.notification_open:  //打开通知栏

             sendNotification();

             break;

         case R.id.notification_close:

             manger.cancel(notification_id);  //取消通知栏

             break;

         default:

             break;

         }

     }

     private void sendNotification(){

         Intent intent = new Intent(this,AlertDialog_text.class);

         PendingIntent pi = PendingIntent.getActivity(this, , intent, );

         Builder builder = new Notification.Builder(this);

         builder.setSmallIcon(R.drawable.icon_72);  //设置通知栏图标

         builder.setTicker("Hello");  //设置通知栏提示

         builder.setWhen(System.currentTimeMillis());//设置时间

         builder.setContentTitle("这是通知栏标题");//通知栏标题

         builder.setContentText("这里是通知栏内容");//通知栏内容

         builder.setContentIntent(pi);//设置点击后的意图

         //效果,需要添加相应的权限

         builder.setDefaults(Notification.DEFAULT_SOUND);//设置提示声音

         builder.setDefaults(Notification.DEFAULT_LIGHTS);//设置指示灯

         builder.setDefaults(Notification.DEFAULT_VIBRATE);//设置震动

         //builder.setDefaults(Notification.DEFAULT_ALL);//设置全部效果
      //权限 <uses-permission android:name="android.permission.VIBRATE" />

         //Notification notification = builder.build();//安卓版本4.1及以上

         Notification notification = builder.getNotification();//安卓版本4.1以下

         manger.notify(notification_id,notification);

     }

 }
PendingIntent.getActivity(this, 0, intent, 0);
参数:
第二个:
    id
第四个:
设置flag位
FLAG_AUTO_CANCEL 该通知能被状态栏的清除按钮给清除掉
FLAG_NO_CLEAR 该通知能被状态栏的清除按钮给清除掉
FLAG_ONGOING_EVENT 通知放置在正在运行
FLAG_INSISTENT 是否一直进行,比如音乐一直播放,知道用户响应
1         notification.flags = Notification.FLAG_NO_CLEAR; // 点击清除按钮时就会清除消息通知,但是点击通知栏的通知时不会消失

         notification.flags = Notification.FLAG_ONGOING_EVENT; // 点击清除按钮不会清除消息通知,可以用来表示在正在运行

         notification.flags |= Notification.FLAG_AUTO_CANCEL; // 点击清除按钮或点击通知后会自动消失

         notification.flags |= Notification.FLAG_INSISTENT; // 一直进行,比如音乐一直播放,知道用户响应
效果图:

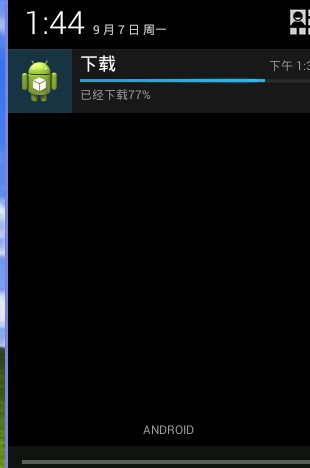
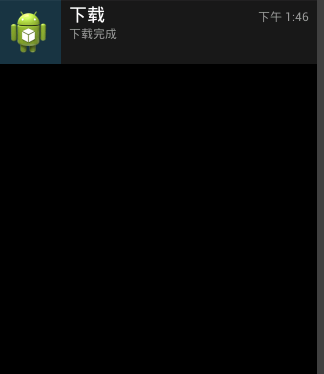
下面看一个具体应用,异步任务下载网络上的一个图片,将下载进度放到通知栏里,要求下载时,通知栏不能被删除,下载完成时,通知栏可以被删除
 package com.example.work;

 import java.io.ByteArrayOutputStream;

 import java.io.IOException;

 import java.io.InputStream;

 import java.net.HttpURLConnection;

 import java.net.MalformedURLException;

 import java.net.ProtocolException;

 import java.net.URL;

 import android.app.Activity;

 import android.app.ProgressDialog;

 import android.graphics.Bitmap;

 import android.graphics.BitmapFactory;

 import android.os.AsyncTask;

 import android.os.Bundle;

 import android.util.Log;

 import android.view.View;

 import android.view.View.OnClickListener;

 import android.widget.Button;

 import android.widget.ImageView;

 public class MainActivity extends Activity {

     private Button btn_load;

     private ImageView image_load;

     private ProgressDialog dialog;

     @Override

     protected void onCreate(Bundle savedInstanceState) {

         super.onCreate(savedInstanceState);

         setContentView(R.layout.activity_main);

         btn_load = (Button) findViewById(R.id.btn_submit);

         image_load = (ImageView) findViewById(R.id.image);

         btn_load.setOnClickListener(new OnClickListener() {

             @Override

             public void onClick(View v) {

                 // TODO Auto-generated method stub

                 new DownImageAsyncTask(MainActivity.this,image_load).execute("http://images2015.cnblogs.com/blog/493196/201509/493196-20150901203057606-579869820.jpg");

             }

         });

     }

 }
MainActivity.class
异步任务类:
 package com.example.work;

 import java.io.ByteArrayOutputStream;

 import java.io.IOException;

 import java.io.InputStream;

 import java.net.HttpURLConnection;

 import java.net.MalformedURLException;

 import java.net.ProtocolException;

 import java.net.URL;

 import android.app.Notification;

 import android.app.NotificationManager;

 import android.content.Context;

 import android.graphics.Bitmap;

 import android.graphics.BitmapFactory;

 import android.os.AsyncTask;

 import android.support.v4.app.NotificationCompat;

 import android.util.Log;

 import android.widget.ImageView;

 class DownImageAsyncTask extends AsyncTask<String, Integer, byte[]>

 {

     private Context context;

     private ImageView image;

     public DownImageAsyncTask(Context context ,ImageView image)

     {

         this.context = context;

         this.image = image;

     }

     @Override

     protected byte[] doInBackground(String... params) {

         // TODO Auto-generated method stub

         byte b[] = new byte[*];

         if(params[]!=null)

         {

             URL url;

             try {

                 url = new URL(params[]);

                 HttpURLConnection conn = (HttpURLConnection) url.openConnection();

                 conn.setRequestMethod("GET");

                 conn.setConnectTimeout();

                 conn.setDoInput(true);

                 //记录当前下载量

                 int current_len = ;

                 if(conn.getResponseCode()==)

                 {

                     //获取下载文件的总大小

                     InputStream in = conn.getInputStream();

                     int len=;

                     //获取总长度

                     long total = conn.getContentLength();

                     ByteArrayOutputStream out = new ByteArrayOutputStream();

                     while((len = in.read(b))!=-)

                     {

                         out.write(b,,len);

                         current_len+=len;

                         int progress = (int)(current_len/(float)total*);

                         //发布进度

                         publishProgress(progress);

                         Log.i("-------------------", progress+"");

                     }

                     b = out.toByteArray();

                 }

             } catch (MalformedURLException e) {

                 // TODO Auto-generated catch block

                 e.printStackTrace();

             } catch (ProtocolException e) {

                 // TODO Auto-generated catch block

                 e.printStackTrace();

             } catch (IOException e) {

                 // TODO Auto-generated catch block

                 e.printStackTrace();

             }

         }

         return b;

     }

     @Override

     protected void onPostExecute(byte[] result) {

         // TODO Auto-generated method stub

         super.onPostExecute(result);

         //将网络解析数据转换成bitmap图片格式

         Bitmap bitmap = BitmapFactory.decodeByteArray(result, , result.length);

         //下载完成后 关闭对话框

         image.setImageBitmap(bitmap);

         NotificationCompat.Builder builder = new NotificationCompat.Builder(context);

         builder.setContentTitle("下载");

         builder.setContentText("下载完成");

         builder.setSmallIcon(R.drawable.ic_launcher);

 //        builder.setOngoing(true);//设置不可以被删除

         Notification n = builder.build();

         NotificationManager manager = (NotificationManager) context.getSystemService(Context.NOTIFICATION_SERVICE);

         manager.notify(, n);

     }

     //在执行doInputBackground方法前主线程自动执行

     @Override

     protected void onPreExecute() {

         // TODO Auto-generated method stub

         super.onPreExecute();

     }

     //当使用publishProgress()方法时 自动调用此方法来更新进度

     @Override

     protected void onProgressUpdate(Integer... values) {

         // TODO Auto-generated method stub

 NotificationCompat.Builder builder = new NotificationCompat.Builder(context);

         builder.setContentTitle("下载");

         builder.setContentText("已经下载"+values[]+"%");

         builder.setSmallIcon(R.drawable.ic_launcher);

         builder.setOngoing(true);//设置不可以被删除

         //设置通知栏进度条,第一个参数为最大进度,第二个参数为进度,第三个参数为显示进度,为true时不显示进度条填充效果,

         builder.setProgress(, values[], false);

         Notification n = builder.build();

         NotificationManager manager = (NotificationManager) context.getSystemService(Context.NOTIFICATION_SERVICE);

         manager.notify(, n);

         super.onProgressUpdate(values);

     }

 }
布局文件
 <LinearLayout xmlns:android="http://schemas.android.com/apk/res/android"

     xmlns:tools="http://schemas.android.com/tools"

     android:layout_width="match_parent"

     android:layout_height="match_parent"

        android:orientation="vertical"

        android:gravity="center_horizontal"

     >

     <ImageView

         android:layout_width="wrap_content"

         android:layout_height="wrap_content"

         android:id="@+id/image"

         android:src="@drawable/ic_launcher"

         />

     <Button

         android:layout_width="wrap_content"

         android:layout_height="wrap_content"

         android:id="@+id/btn_submit"

         android:text="下载"

         />

 </LinearLayout>
效果图:
安卓开发_浅谈Notification(通知栏)的更多相关文章
- 安卓开发_浅谈ListView(SimpleAdapter数组适配器)
安卓开发_浅谈ListView(ArrayAdapter数组适配器) 学习使用ListView组件和SimapleAdapter适配器实现一个带图标的ListView列表 总共3部分 一.MainAc ...
- 安卓开发_浅谈Android动画(四)
Property动画 概念:属性动画,即通过改变对象属性的动画. 特点:属性动画真正改变了一个UI控件,包括其事件触发焦点的位置 一.重要的动画类及属性值: 1. ValueAnimator 基本属 ...
- 安卓开发_浅谈ListView(自定义适配器)
ListView作为一个实际开发中使用率非常高的视图,一般的系统自带的适配器都无法满足开发中的需求,这时候就需要开发人员来自定义适配器使得ListView能够有一个不错的显示效果 有这样一个Demo ...
- 安卓开发_浅谈Fragment之ListFragment
ListFragment,即Fragment的一个子类,当我们用的一个Fragment只需要一个listview视图的时候使用 该类有几个特点: 1.ListFragment 本身具只有一个ListV ...
- 安卓开发_浅谈OptionsMenus(选项菜单)
Android平台下所提供的菜单大体上可分为三类:选项菜单.上下文菜单和子菜单. 当Activity在前台运行时,如果用户按下手机上的Menu键,此时就会在屏幕低端弹出相应的选项菜单.但这个功能需要开 ...
- 安卓开发_浅谈ListView之分页列表
前言: 在开发的过程中,有时候我们需要从网络解析一些数据,比如最近的一些新闻,我们需要把这些数据用ListView显示出来. 因为是解析一个网络数据源,这样将会一下子将所有的数据解析出来,当数据源数据 ...
- 安卓开发_浅谈AsyncTask
现在就来学习一下AsyncTask. 一.先介绍一下AsyncTask: 在开发Android移动客户端的时候往往要使用多线程来进行操作,我们通常会将耗时的操作放在单独的线程执行,避免其占用主线程而给 ...
- 安卓开发_浅谈ListView(ArrayAdapter数组适配器)
列表视图(ListView)以垂直的形式列出需要显示的列表项. 实现过程:新建适配器->添加数据源到适配器->视图加载适配器 在安卓中,有两种方法可以在屏幕中添加列表视图 1.直接用Lis ...
- 安卓开发_浅谈SubMenu(子菜单)
子菜单,即点击菜单后出现一个菜单栏供选择 创建子菜单的步骤: (1) 覆盖Activity的onCreateOptionsMenu()方法,调用Menu的addSubMenu()方法来添加子菜单 (2 ...
随机推荐
- Android精通教程V
前言 大家好,给大家带来Android精通教程V的概述,希望你们喜欢 前言 如果你想学习Android开发,那你就要了解Java编程,这是基础,也是重点,如果没学Java语法就先学习,再来学Andro ...
- JavaScript中的constructor和继承
概述 这是我在看JavaScript面向对象编程指南的时候,对constructor和继承的总结. 关于它们的详细知识,可以上网查到,所以我只写那些网上没有的. 内容 constructor的理解 c ...
- python学习记录(一)
1.打印操作 >>> print('hello') hello >>> print(1+2) 3 2.字符串操作 ① ') Traceback (most rece ...
- 一个 react 小的 demo
一.搭建开发环境: webpack构建工具. 新建一个文件夹(login),进入根目录, 1.输入命令:cnpm init,生成了一个package.json文件,这是一个标准的npm说明文件,里面蕴 ...
- [每天解决一问题系列 - 0005] WiX Burn 如何校验chained package的合法性
问题描述: 项目中使用Wix burn打包,内部包含了多个MSI.有时候会遇到如下错误 Error 0x80091007: Failed to verify hash of payload: Setu ...
- 05-TypeScript中的方法新功能(下)
再TypeScript中,方法还有一些新功能能够让我们更好的控制方法执行. 1.Generator方法: yield关键字用于控制方法在执行的时候暂停住,后续方法调用方又可以从暂停的地方继续执行,这种 ...
- Spring Boot + Spring Cloud 构建微服务系统(六):熔断监控集群(Turbine)
Spring Cloud Turbine 上一章我们集成了Hystrix Dashboard,使用Hystrix Dashboard可以看到单个应用内的服务信息,显然这是不够的,我们还需要一个工具能让 ...
- k8s升级,HA集群1.12.0~HA集群1.13.2
k8s升级,此次升级是1.12.0 至1.13.2 准备 # 首先升级master节点的基础组件kubeadm.kubelet.kubectl apt policy kubeadm 找到相应的版本,如 ...
- link rel=alternate网站换肤功能
此方法借助HTML rel属性的alternate属性值实现. <link href="reset.css" rel="stylesheet" type= ...
- Anaconda 安装、使用
一.下载: 清华镜像:https://mirrors.tuna.tsinghua.edu.cn/anaconda/archive/ 二.安装: 默认就行,安装路径最好换一下 三.配置环境变量: 控制面 ...