arduino一些内容
arduino 套件使用说明书V1.0.pdf,
步进电机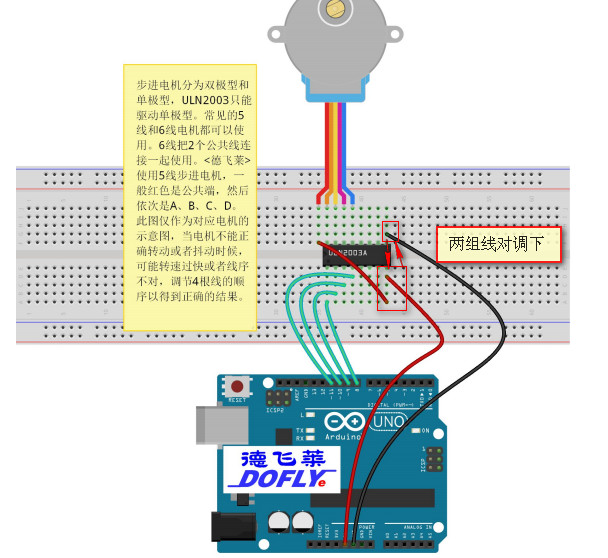
DHT11
传感器另外一脚要接A0
/*

  Web client

 This sketch connects to a website (http://www.google.com)

 using an Arduino Wiznet Ethernet shield.

 Circuit:

 * Ethernet shield attached to pins 10, 11, 12, 13

 created 18 Dec 2009

 by David A. Mellis

 modified 9 Apr 2012

 by Tom Igoe, based on work by Adrian McEwen

 */

#include <SPI.h>

#include <Ethernet.h>

#define DHT11_PIN 1

// Enter a MAC address for your controller below.

// Newer Ethernet shields have a MAC address printed on a sticker on the shield

byte mac[] = { 0xDE, 0xAD, 0xBE, 0xEF, 0xFE, 0xED };

// if you don't want to use DNS (and reduce your sketch size)

// use the numeric IP instead of the name for the server:

//IPAddress server(74,125,232,128);  // numeric IP for Google (no DNS)

char server[] = "192.168.1.95";    // name address for Google (using DNS)

// Set the static IP address to use if the DHCP fails to assign

IPAddress ip(,,,);

// Initialize the Ethernet client library

// with the IP address and port of the server

// that you want to connect to (port 80 is default for HTTP):

EthernetClient client;

void uploadData(String c,String h){

    // if you get a connection, report back via serial:

  if (client.connect(server, )) {

    Serial.println("connected");

    // Make a HTTP request:

    client.println("GET /DHT11Data.ashx?C="+c+"&h="+h+" HTTP/1.1");

    client.println("Host:192.168.1.95");

    client.println("Connection: close");

    client.println();

    delay();

    // if there are incoming bytes available

    // from the server, read them and print them:

    while (client.available()) {

      char c = client.read();

      Serial.print(c);

    }

  }

  else {

    // kf you didn't get a connection to the server:

    Serial.println("connection failed");

  }

    // if the server's disconnected, stop the client:

  if (!client.connected()) {

    Serial.println();

    Serial.println("disconnecting.");

    client.stop();

    // do nothing forevermore:

  }

}

byte read_dht11_dat()

{

  byte i = ;

  byte result = ;

  for(i=;i<;i++)

  {

    while(!(PINC&_BV(DHT11_PIN)));

    delayMicroseconds();

    if(PINC&_BV(DHT11_PIN))

      result|=(<<(-i));

    while((PINC&_BV(DHT11_PIN)));

  }

  return result;

}

void setup() {

   DDRC|=_BV(DHT11_PIN);

  PORTC|=_BV(DHT11_PIN);

 // Open serial communications and wait for port to open:

  Serial.begin();

   while (!Serial) {

    ; // wait for serial port to connect. Needed for Leonardo only

  }

  // start the Ethernet connection:

  if (Ethernet.begin(mac) == ) {

    Serial.println("Failed to configure Ethernet using DHCP");

    // no point in carrying on, so do nothing forevermore:

    // try to congifure using IP address instead of DHCP:

    Ethernet.begin(mac, ip);

  }

  // give the Ethernet shield a second to initialize:

  delay();

  Serial.println("Ready");

}

void loop()

{

  byte dht11_dat[];

  byte dht11_in;

  byte i;

  PORTC &= ~_BV(DHT11_PIN);

  delay();

  PORTC|=_BV(DHT11_PIN);

  delayMicroseconds();

  DDRC &= ~_BV(DHT11_PIN);

  delayMicroseconds();

  dht11_in = PINC & _BV(DHT11_PIN);

  if(dht11_in)

  {

    Serial.println("dht11 start condition 1 not met");

    return;

  }

  delayMicroseconds();

  dht11_in=PINC & _BV(DHT11_PIN);

  if(!dht11_in)

  {

    Serial.println("dht11 start condition 2 not met");

    return;

  }

  delayMicroseconds();

  for(i=;i<;i++)

    dht11_dat[i]=read_dht11_dat();

  DDRC|=_BV(DHT11_PIN);

  PORTC|=_BV(DHT11_PIN);

  byte dht11_check_sum = dht11_dat[]+dht11_dat[]+dht11_dat[]+dht11_dat[];

  if(dht11_dat[]!=dht11_check_sum)

  {

    Serial.println("DHT11 checksum error");

  }

 uploadData(String(dht11_dat[]) +"." +String(dht11_dat[]),String(dht11_dat[]) +"." +String(dht11_dat[]) );

  Serial.print("Current humdity= ");

  Serial.print(String(dht11_dat[]));

  Serial.print(".");

  Serial.print(dht11_dat[],DEC);

  Serial.print("%");

  Serial.print("temperature = ");

  Serial.print(dht11_dat[],DEC);

  Serial.print(".");

  Serial.print(dht11_dat[],DEC);

  Serial.println("C");

  delay();

}
调整PWM频率
源代码如下:Here are some usage examples of the function:

// Set pin 9's PWM frequency to 3906 Hz (31250/8 = 3906)

// Note that the base frequency for pins 3, 9, 10, and 11 is 31250 Hz

setPwmFrequency(, );

// Set pin 6's PWM frequency to 62500 Hz (62500/1 = 62500)

// Note that the base frequency for pins 5 and 6 is 62500 Hz

setPwmFrequency(, );

// Set pin 10's PWM frequency to 31 Hz (31250/1024 = 31)

setPwmFrequency(, );

Please keep in mind that changing the PWM frequency changes the Atmega's timers and disrupts the normal operation of many functions that rely on time (delay(), millis(), Servo library).

/**

* Divides a given PWM pin frequency by a divisor.

*

* The resulting frequency is equal to the base frequency divided by

* the given divisor:

*   - Base frequencies:

*      o The base frequency for pins 3, 9, 10, and 11 is 31250 Hz.

*      o The base frequency for pins 5 and 6 is 62500 Hz.

*   - Divisors:

*      o The divisors available on pins 5, 6, 9 and 10 are: 1, 8, 64,

*        256, and 1024.

*      o The divisors available on pins 3 and 11 are: 1, 8, 32, 64,

*        128, 256, and 1024.

*

* PWM frequencies are tied together in pairs of pins. If one in a

* pair is changed, the other is also changed to match:

*   - Pins 5 and 6 are paired on timer0

*   - Pins 9 and 10 are paired on timer1

*   - Pins 3 and 11 are paired on timer2

*

* Note that this function will have side effects on anything else

* that uses timers:

*   - Changes on pins 3, 5, 6, or 11 may cause the delay() and

*     millis() functions to stop working. Other timing-related

*     functions may also be affected.

*   - Changes on pins 9 or 10 will cause the Servo library to function

*     incorrectly.

*

* Thanks to macegr of the Arduino forums for his documentation of the

* PWM frequency divisors. His post can be viewed at:

*   http://www.arduino.cc/cgi-bin/yabb2/YaBB.pl?num=1235060559/0#4

*/

void setPwmFrequency(int pin, int divisor) {

  byte mode;

  if(pin ==  || pin ==  || pin ==  || pin == ) {

    switch(divisor) {

      case : mode = 0x01; break;

      case : mode = 0x02; break;

      case : mode = 0x03; break;

      case : mode = 0x04; break;

      case : mode = 0x05; break;

      default: return;

    }

    if(pin ==  || pin == ) {

      TCCR0B = TCCR0B & 0b11111000 | mode;

    } else {

      TCCR1B = TCCR1B & 0b11111000 | mode;

    }

  } else if(pin ==  || pin == ) {

    switch(divisor) {

      case : mode = 0x01; break;

      case : mode = 0x02; break;

      case : mode = 0x03; break;

      case : mode = 0x04; break;

      case : mode = 0x05; break;

      case : mode = 0x06; break;

      case : mode = 0x7; break;

      default: return;

    }

    TCCR2B = TCCR2B & 0b11111000 | mode;

  }

}
关于按钮软件去抖动法
unsigned char btnIsPress=;

const int buttonPin = ; // 按键位置

const int ledPin = ; // led 位置

// 定义变量

int ledState = HIGH; // 当前led 状态

int buttonState=; // 读取的当前按键状态

int lastButtonState = ; // 上次读取的按键状态

// 使用长整型变量

long lastDebounceTime = ; // 上次按键触发时间

long debounceDelay = ; // 去抖时间,根

void setup() {

  // put your setup code here, to run once:

 pinMode(buttonPin, INPUT);

pinMode(ledPin, OUTPUT);

// 初始化led 的状态

digitalWrite(ledPin, ledState);

 Serial.begin();

}

void loop() {

  // put your main code here, to run repeatedly:

 // checkResetPress();

 checkBtnPress();

}

void checkBtnPress(){

 int reading = digitalRead(buttonPin);

 if (reading != lastButtonState) {

   lastDebounceTime = millis();

 }

if ((millis() - lastDebounceTime) > debounceDelay) {

 if (reading != buttonState) {

    buttonState = reading;

    if (buttonState == HIGH) {

     ledState = !ledState;

    }

  }

 }

 digitalWrite(ledPin, ledState);

 lastButtonState = reading;

}

void checkResetPress(){

  btnIsPress= digitalRead(buttonPin);

  Serial.println(btnIsPress);

  if(btnIsPress==){

    delay();

    btnIsPress= digitalRead(buttonPin);

    if(btnIsPress==){

       delay();

       btnIsPress= digitalRead(buttonPin);

       if(btnIsPress==){

           Serial.println("yes!");

       }

    }

  }

}
上面代码中,if (buttonState == HIGH){ledState=!ledState;} 表示只识别脉冲的上升或阶段,因为一次按键相当于一次脉冲,有上升与下降两个边缘,
如果去掉判断,那么没次按钮时,只能发现led闪几下就又恢复原样(按前是灭还是亮)
arduino一些内容的更多相关文章
- arduino中SCoop库的简单应用案例
转载:https://www.csdn.net/gather_27/MtTaggzsMDExMS1ibG9n.html arduino中SCoop库的简单应用案例首先这篇文章来在视频https://v ...
- arduino 中通过寄存器地址访问寄存器内容
void call_func( void (*func)(void)){ (*func)(); } void setup() { // put your setup code here, to run ...
- Arduino 1602液晶屏实验和程序
在Arduino IDE中, 项目->加载库->管理库中搜索LiquidCrystal,然后安装即可 1.接线图 2.引脚图 3.最简单程序 #include <LiquidCrys ...
- Arduino下LCD1602综合探究(上)——1602的两种驱动方式,如何使LCD的控制编程变得更简单
一.前言: LCD ( Liquid Crystal Display 的简称)液晶显示器,已经逐渐替代CRT成为主流的显示设备之一,因此也成为了单片机发烧友绕不过的话题之一:而LCD1602更是很多单 ...
- 基于 Arduino 的 RFID 识别实验
http://www.it165.net/embed/html/201512/3287.html 2015年12月04日(周五) 上午 博士的智能卡实验--RFID识别实验,基于51单片机: 我们的 ...
- 如何编写自己的Arduino库?
一开始写Arduino 的时候很不习惯,没有main函数,因为好多东西都被隐藏了.一直想搞清楚,以便编写自己的库文件.于是研究一下午,下面是一些总结. Arduino工程的初步认识 一.目录规范 当你 ...
- Arduino 极速入门系列–1 点亮 LED
本篇内容为,使用 Arduino 点亮 LED 的做法示范.很简单的一个入门示范.我们让 LED 闪. 本篇使用到的工具和材料 Arduino Mini Pro 1 PCS Mini USB 数据线 ...
- 关于arduino清空串口缓存(转)
在arduino1.0之前的版本 Serial.flush()的作用是是清空串口缓存( dropping received incoming data).但在1.0之后的版本 Serial.flush ...
- NFC:Arduino、Android与PhoneGap近场通信
NFC:Arduino.Android与PhoneGap近场通信(第一本全面讲解NFC应用开发的技术著作移动智能设备近距离通信编程实战入门) [美]Tom Igoe(汤姆.伊戈),Don Colema ...
随机推荐
- UI5-文档-2-开发环境
这一部分将指导您安装.配置和设置SAPUI5开发环境的最常见和推荐用例. 请注意:您可以在不同的平台上使用SAPUI5.各自平台的许可和维护条件也适用于SAPUI5.例如,如果在SAP云平台上使用SA ...
- windows10配置java开发环境
一.下载jdk 二.安装jdk路径,这个路径不能包含中文名 三.系统会提示安装jre,安装目录不要是jdk的安装目录,否则会覆盖掉jdk目录下的jre目录 四. .;%JAVA_HOME%\lib;% ...
- 更新日志(建议升级到2017.1.18a) && 更新程序的方法
更新程序的步骤: 1,在控制面板里点击备份当前数据库文件到磁盘,把当天获取的信息从内存写到磁盘/存储卡.2,下载最新版的源码 wget -O "infopi.zip" " ...
- 抽象类(abstract class)
package com.bjsxt.oop.abstractClass; //抽象类 public abstract class Animal { //因为父类的方法总是被重写 那就没写的必要了 但是 ...
- jremoting的功能扩展点
1 InvokeFilter,实现此接口 可以在consumer端 与provider端的调用过程中拦截住请求调用. 已经实现的InvokeFilter包括 RetryInvokeFilter:实现 ...
- Kconfig详解
当执行#make menuconfig时会出现内核的配置界面,所有配置工具都是通过读取"arch/$(ARCH)Kconfig"文件来生成配置界面,这个文件就是所有配置的总入口,它 ...
- Bioconductor应用领域之基因芯片
引用自https://mp.weixin.qq.com/s?__biz=MzU4NjU4ODQ2MQ==&mid=2247484662&idx=1&sn=194668553f9 ...
- 网页信息抓取 Jsoup的不足之处 httpunit
今天又遇到一个网页数据抓取的任务,给大家分享下. 说道网页信息抓取,相信Jsoup基本是首选的工具,完全的类JQuery操作,让人感觉很舒服.但是,今天我们就要说一说Jsoup的不足. 1.首先我们新 ...
- windows server 2008 远程桌面连接数修改--无限连接
1.开启远程桌面 我的电脑 | 属性 | 远程设置 | 远程 | 进允许运行使用网络级别身份验证的远程桌面的计算机连接(更安全)(N)
- swift UITextfield 添加点击方法 - 简单实现
1. 真正在任何系统上都有效的方法 1./// 城市选择 private lazy var cityTextfield:UITextField = { let tf = UITextField() t ...