Spring基础17——使用注解来配置Bean
1.组件扫描
组件扫描(component scanning):Spring能够从classpath下自动扫描,侦测和实例化具有特定的注解的组件。
特定组件包括:
—@Component:基本注解,标识了一个受Spring管理的组件
—@Respository:标识持久层组件,具有将数据库操作抛出的原生异常翻译转化为Spring的持久层异常的功能。
—@Service:标识服务层(业务层)组件
—@Controller:标识表示层组
对于扫描到的组件,Spring有默认的命名策略:使用非限定类名,第一个字母小写,也可以在注解中通过value属性表示组件的名称@Repository(value = "userRepository")。比如UserService创建Bean默认的名字就是userService。
2.具体实现
下面来编写具体的实现代码:
TestObject类使用@Compent注解:
 @Component

 public class TestObject {

 }
UserService类使用@Service注解
 @Service

 public class UserService {

     public void add() {

         System.out.println("UserService add...");

     }

 }
UserRepository接口
 public interface UserRepository {

     public void save();

 }
UserRepositoryImpl实现类使用@Repository
 @Repository

 public class UserRepositoryImpl implements UserRepository {

     public void save() {

         System.out.println("UserRepository Save。。。。");

     }

 }
UserController使用@Controller
 @Controller

 public class UserController {

     public void execute() {

         System.out.println("UserController execute....");

     }

 }
在类上加完注解之后,SpringIOC容器并不能直接去管理我们的bean,因为注解本身和xml一样只是起一个配置作用,Spring需要对指定类路径下的包进行扫描:
<context:component-scan base-package="com.wzy.annotation"/>
编写一个测试类,来测试标识了这些注解的类是否被添加到SpringIOC容器中:
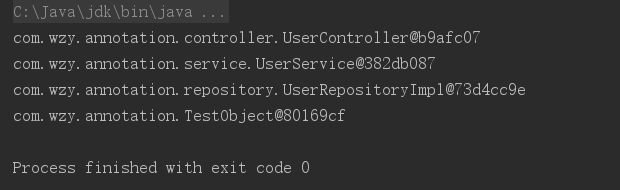
 public static void main(String[] args) {

     ApplicationContext ctx = new ClassPathXmlApplicationContext("beans-annotation.xml");

     UserController userController = (UserController) ctx.getBean("userController");

     System.out.println(userController);

     UserService userService = (UserService) ctx.getBean("userService");

     System.out.println(userService);

     UserRepository userRepository = (UserRepository) ctx.getBean("userRepositoryImpl");

     System.out.println(userRepository);

     TestObject testObject = (TestObject) ctx.getBean("testObject");

     System.out.println(testObject);

 }
输出结果:我们可以观察到可以打印出这些bean,并且也可以验证他们的bean的id确实是,类的名字第一个字母小写。
在使用<context:component-scan>注意一下几个关键点:
—base-package属性指定一个需要扫描的基类包,Spring容器将会扫描这个基类包里及其子包中的所有类。
—当需要扫描多个包时,可以使用逗号分隔。
—如果仅希望扫描特定的类而非基类包下的所有类,可以使用resource-pattern属性过滤特定的类。
 <context:component-scan base-package="com.wzy.annotation" resource-pattern="repository/*.class">

 </context:component-scan>
3.包含和移除bean(过滤)
在<context:component-scan>标签下有两个子标签:<context:include-filter>和<context:exclude-filter>:
<context:include-filter> :子节点表示要包含的目标类
<context:exclude-filter>: 子节点表示要排除在外的目标类
<context:component-scan>下可以拥有若干个<context:include-filter> <context:exclude-filter> 子节点,两个子标签支持多种类型的过滤表达式,以下五种模式:最常用的是前两种。
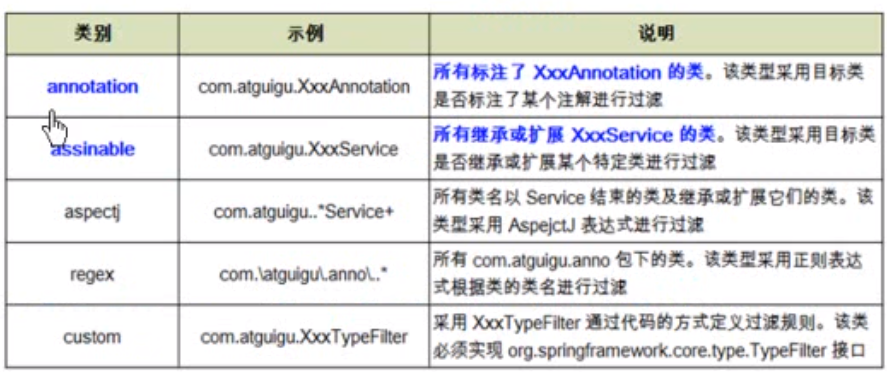
首先来看annotation过滤表达式的用法,首先看这个表达式的名字,说明它过滤的是注解,也就包含或者不包含某种注解,这里要注意的是指定包含哪些子节点的组件,该子节点需要user-default-filters 配合使用,否则是使用默认的过滤器,会扫描全部的组件。
 <!--不包含什么: <context:exclude-filter子节点指定排除哪些指定表达式的组件-->

 <context:component-scan base-package="com.wzy.annotation">

     <!--不包含repository-->

     <context:exclude-filter type="annotation" expression="org.springframework.stereotype.Repository"/>

 </context:component-scan>

 <!--<context:include-filter 指定包含哪些子节点的组件,该子节点需要user-default-filters 配合使用,否则是使用默认的过滤器,会扫描全部的组件-->

 <context:component-scan base-package="com.wzy.annotation"

         use-default-filters="false">

     <!--包含repository-->

     <context:include-filter type="annotation" expression="org.springframework.stereotype.Repository"/>

 </context:component-scan>
下面来看assignable表达式的用法,它过滤的是某个类以及它的子类,如果设置没有扫描某种bean,我们依然从容器中获取,那么就会抛出异常。
  <context:component-scan base-package="com.wzy.annotation">

         <!--不包含repository-->

         <context:exclude-filter type="assignable" expression="com.wzy.annotation.repository.UserRepository"/>

     </context:component-scan>

     <context:component-scan base-package="com.wzy.annotation" use-default-filters="false">

         <!--只包含repository-->

         <context:include-filter type="assignable" expression="com.wzy.annotation.repository.UserRepository"/>

     </context:component-scan>
Spring基础17——使用注解来配置Bean的更多相关文章
- 跟着刚哥学习Spring框架--通过注解方式配置Bean(四)
组件扫描:Spring能够从classpath下自动扫描,侦测和实例化具有特定注解的组件. 特定组件包括: 1.@Component:基本注解,识别一个受Spring管理的组件 2.@Resposit ...
- spring学习笔记 星球日two - 注解方式配置bean
注解要放在要注解的对象的上方 @Autowired private Category category; <?xml version="1.0" encoding=" ...
- Spring框架学习(6)使用ioc注解方式配置bean
内容源自:使用ioc注解方式配置bean context层 : 上下文环境/容器环境 applicationContext.xml 1 ioc注解功能 注解 简化xml文件配置 如 hibernate ...
- Spring--通过注解来配置bean【转】
Spring通过注解配置bean 基于注解配置bean 基于注解来配置bean的属性在classpath中扫描组件 组件扫描(component scanning):Spring能够从classpat ...
- Spring--通过注解来配置bean
Spring通过注解配置bean 基于注解配置bean 基于注解来配置bean的属性 在classpath中扫描组件 组件扫描(component scanning):Spring能够从classpa ...
- spring:自定义限定符注解@interface, 首选bean
spring:自定义限定符注解@interface, 首选bean 1.首选bean 在声明bean的时候,通过将其中一个可选的bean设置为首选(primary)bean能够避免自动装配时的歧义性. ...
- Spring基础18——通过注解配置bean之间的关联关系
1.组件装配 <context:component-scan>元素还会自动注册AutowiredAnnotaionBeanPostProcessor实例,这是一个bean的后置处理器,该实 ...
- spring笔记--通过注解(annotation)配置Bean
Spring能够在classpath下自动扫描,侦测和实例化具有特定注解的组件,这在Spring中成为组件扫描(Component scanning). 特定组件的注解包括: @Component:基 ...
- MyBatis学习(二):与Spring整合(非注解方式配置MyBatis)
搭建SpringMVC的-->传送门<-- 一.环境搭建: 目录结构: 引用的JAR包: 如果是Maven搭建的话,pom.xml的配置如下: <?xml version=" ...
随机推荐
- 2018-2019-2-20175225 实验四《Android开发基础》实验报告
一.实验报告封面 课程:Java程序设计 班级:1752班 姓名:张元瑞 学号:20175225 指导教师:娄嘉鹏 实验日期:2019年5月14日 实验时间:13:45 - 21:00 实验序号:实验 ...
- HBuilder使用逍遥Android模拟器
Microvirt HBuilder使用逍遥Android模拟器 1.逍遥模拟器安装 地址: 点我下载 2.连接注意事项 a. 复制adb等文件 HBuilder安装目录中tools文件夹下的三个文件 ...
- CentOS关闭系统不必要的端口
注:以下所有操作均在CentOS 7.2 x86_64位系统下完成. 1)首先查看当前系统开放的端口号: # netstat -tlnup Active Internet connections (o ...
- C#中winform下利用ArcEngine调用ArcGIS Server发布的服务 AE 10
开发环境:vs2010 + AE 10 测试 public Form1() { ESRI.ArcGIS.RuntimeManager.Bind(ESRI.ArcGIS.ProductCode.Engi ...
- robot framework UI自动化之登录
前面已写环境的搭建,接下来就可以直接进行UI自动化的编写工作了 目录 1.准备工作 2.了解定位 3.一个登录案例 1.准备工作 第一步:需要使用chrome浏览器来测试,因此首先要有一个驱动,下载好 ...
- Mysql-5.7 x64安装
首先在官网下载Mysql:https://dev.mysql.com/downloads/mysql/ 选择ZIP Archive下载. 下载安装之后配置环境变量: 编辑现有环境变量Path: PS: ...
- Lesson 2 Thirteen equals one
vicar 牧师 grocer 杂货铺店主 with a start 由于受到惊吓 Whtaever are you dong up here?你究竟在这上面干什么?whatever用于疑问句中,用以 ...
- LSTM用于MNIST手写数字图片分类
按照惯例,先放代码: import tensorflow as tf from tensorflow.examples.tutorials.mnist import input_data #载入数据集 ...
- win10安装Tensorflow1.9GPU版本
前言 看到DateWhale出了一篇安装教程(微信公众号DateWhale),决定体验一下Tensorflow1.9的GPU版本..其实一开始装的是2.0,但是tf.Session()就报错了,说是2 ...
- 应用安全 - CMS - PHPCMS漏洞汇总
CVE-2011-0644 Date: 2011.1 类型: /flash_upload.php SQL注入 影响版本:phpCMS 2008 V2 PHPCMS PHPCMS通杀XSS 在我要报错功 ...