
PHPUnit笔记
PHPUnit是一个面向PHP程序员的测试框架,这是一个xUnit的体系结构的单元测试框架。
复杂的项目,通过单元测试能够快速排查bug,有效减少bug的产生。简单的项目,使用php自带的var_dump()、print_r()也能很方便的调试bug。
PHPUnit通过运行测试用例里的断言(例如判断返回结果不为空),检查代码是否符合预期。
安装
安装方式有两种。一种是使用phar包,一种是使用Composer。
1、使用phar包
下载地址 https://phpunit.de/
有三个版本:
PHPUnit 6.4 支持PHP 7.0, 和 PHP 7.1。(Current Stable Release)
PHPUnit 5.7 支持 PHP 5.6, PHP 7.0, 和 PHP 7.1。(Old Stable Release)
PHPUnit 4.8 支持PHP 5.3~5.6。(No Longer Supported)
运行方法:
# 通用

php phpunit.phar --version

# linux

chmod +x phpunit.phar

sudo mv phpunit.phar /usr/local/bin/phpunit

phpunit --version
可以查看版本号。
2、使用Composer
如果用 Composer 来管理项目的依赖关系,只要在项目的composer.json 文件中简单地加上对 phpunit/phpunit 的依赖关系即可。下面是一个最小化的 composer.json 文件的例子,只定义了一个对 PHPUnit 5.7 的开发时依赖:
{

    "require-dev": {

        "phpunit/phpunit": "5.5.*"

    }

}
要通过 Composer 完成系统级的安装,可以运行:
composer global require "phpunit/phpunit=5.5.*"
请确保 path 变量中包含有 ~/.composer/vendor/bin/。
配置PhpStorm使用PHPUnit
1、点击File->Settings->Languages & Frameworks,点击php,设置PHP开发环境:
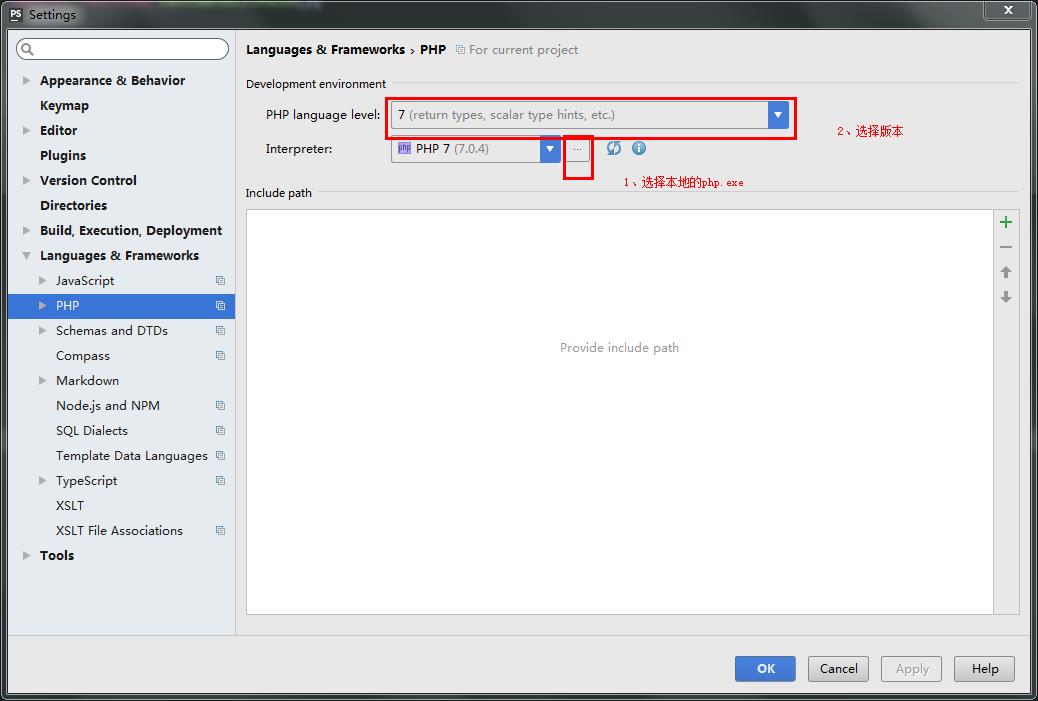
2、点击php->PHPUnit,PHPUnit library里选中Path to phpunit.phar,指定路径,例如:D:\phpsetup\php\phpunit-5.7.4.phar:

编写第一个测试用例
1、新建文件夹Testcase,编写SayHello.php:
<?php

class SayHello{

    public function printHello(){

        echo 'Hello';

        return 'Hello';

    }

}

?>
2、新建测试用例SayHelloTest.php
<?php

require_once 'SayHello.php';

class SayHelloTest extends PHPUnit_Framework_TestCase {

    public function setUp(){ }

    public function tearDown(){ }

    public function testConnectionIsValid(){

        $hi = new SayHello();

        $this->assertTrue($hi->printHello() == 'Hello');

    }

}
编写完成后,切换到phpunit.phar所在目录命令行执行:
$ php phpunit.phar Testcase/SayHelloTest.php
输出结果:
PHPUnit 5.7.4 by Sebastian Bergmann and contributors.

.                                                                  1 / 1 (100%)Hello

Time: 130 ms, Memory: 10.00MB

OK (1 test, 1 assertion)
结果表明:
测试通过,1个测试方法,1个断言,没有失败。
这里注意的是:
1、所有以Test结尾的类均为测试用例;
2、所有以test开头的方法均是测试方法,会自动运行;
3、setUp是每个测试用例最先运行的方法,tearDown是每个测试用例最后运行的方法;
4、assertTrue用于判断结果是否为true。
如果用的PhpStorm,可以单击文件,右键Run SayHelloTest即可看到相同效果;也可以针对整个文件夹全部执行,选择文件夹Testcase右键Run Testcase即可。
ThinkPHP3.1集成PHPUnit
集成
需要修改的地方:
1、复制index.php为phpunit.php,内容增加:
define('APP_PHPUNIT', true);
示例:
<?php

define('APP_DEBUG', true);

header("Content-type: text/html; charset=utf-8");

//define('APP_PATH', './');

define('APP_PATH', __DIR__ .'/');

define('APP_PHPUNIT', true);

require APP_PATH .'Core/ThinkPHP.php';

?>
需要使用绝对路径。
2、修改ThinkPHP/Lib/Core/App.class.php:
将run()方法里App::exec()改为:
(APP_PHPUNIT !== true) && App::exec();//支持phpunit
3、ThinkPHP/Core/Lib/Core/增加AjaxReturnEvent.class.php:
<?php

class AjaxReturnEvent extends Exception {

}
4、修改ThinkPHP/Common/runtime.php:
将2处
CORE_PATH.'Core/Think.class.php',

CORE_PATH.'Core/ThinkException.class.php',  // 异常处理类

CORE_PATH.'Core/Behavior.class.php',
改为:
CORE_PATH.'Core/Think.class.php',

CORE_PATH.'Core/ThinkException.class.php',  // 异常处理类

CORE_PATH.'Core/Behavior.class.php',

CORE_PATH.'Core/AjaxReturnEvent.class.php',
记得是2处。load_runtime_file和build_runtime_cache方法都要修改。
5、修改ThinkPHP/Lib/Core/Action.class.php里ajaxReturn方法:
        switch (strtoupper($type)){

            case 'JSON' :

                // 返回JSON数据格式到客户端 包含状态信息

                header('Content-Type:application/json; charset=utf-8');

                if(APP_PHPUNIT === true){throw new AjaxReturnEvent(json_encode($data)); return;}//以支持phpunit捕获结果

                exit(json_encode($data));

            case 'XML'  :

                // 返回xml格式数据

                header('Content-Type:text/xml; charset=utf-8');

                if(APP_PHPUNIT === true){throw new AjaxReturnEvent(xml_encode($data)); return;}//以支持phpunit捕获结果

                exit(xml_encode($data));

            case 'JSONP':

                // 返回JSON数据格式到客户端 包含状态信息

                header('Content-Type:application/json; charset=utf-8');

                $handler  =   isset($_GET[C('VAR_JSONP_HANDLER')]) ? $_GET[C('VAR_JSONP_HANDLER')] : C('DEFAULT_JSONP_HANDLER');

                if(APP_PHPUNIT === true){throw new AjaxReturnEvent($handler.'('.json_encode($data).');'); return;}//以支持phpunit捕获结果

                exit($handler.'('.json_encode($data).');');

            case 'EVAL' :

                // 返回可执行的js脚本

                header('Content-Type:text/html; charset=utf-8');

                if(APP_PHPUNIT === true){throw new AjaxReturnEvent($data); return;}//以支持phpunit捕获结果

                exit($data);

            default     :

                // 用于扩展其他返回格式数据

                tag('ajax_return',$data);

        }
主要做了2件事情:
1、支持phpunit测试模式;
2、防止ajaxReturn里的exit结束了程序。
示例
目录结构(示例程序采用了模块分组):
--example

  |--Common

  |--Conf

  |--ThinkPHP

  |--Lib

    |--Action

    |     |--Weixin

    |     |--Api

    |        |--UserAction.class.php

    |--Model

  |--Runtime

  |--Testcase

    |--Weixin

    |--Api

      |--UserAction.class.php

  |--Tpl

  |--vendor

  |--index.php

  |--phpunit.php
1、Model测试
<?php

define('TEST_PATH', dirname(dirname(__FILE__)));

require TEST_PATH .'/../phpunit.php';

class OrderTest extends PHPUnit_Framework_TestCase {

    public function testGetBillRule(){

        $order_model = D('Orders');

        $this->assertTrue(is_object($order_model) == true);

        $this->assertNotEmpty($order_model->getBillRule());

    }

}
2、Api测试
<?php

define('TEST_APP', 'Api');

define('TEST_PATH', dirname(dirname(__FILE__)));

require TEST_PATH .'/../phpunit.php';

class OrderTest extends PHPUnit_Framework_TestCase {

    public function setUp() {

        //自动加载

        spl_autoload_register (function ( $class ) {

            include  APP_PATH . 'Lib/Action/'.TEST_APP.'/'  .  $class  .  '.class.php' ;

        });

    }

    public function tearDown(){

    }

    public function testModule(){

        $obj = new OrderAction();

        $this->assertTrue(is_array($obj->getBillRule()) == true);

    }

	public function testApi(){

        try{

			$obj = new OrderAction();

			$obj->getBillRule(); //由于TP里的ajaxReturn会使用exit结束程序,这里使用异常来得到返回的内容

		}catch(AjaxReturnEvent $e){

			$res = json_decode($e->getMessage(), treu);

			$this->assertNotEmpty($res);

		}

    }

}
参考
1、开始使用 PHPUnit – PHP测试框架
http://phpunit.cn/getting-started.html
2、web3d/TPUnit: ThinkPHP PHPUnit框架集成
https://github.com/web3d/TPUnit/
3、[PHP]PHPUnit安装配置及样例 | CoinIdea的技术分享博客
http://blog.coinidea.com/web开发/php-1088.html
4、《xUnit Test Patterns》学习笔记系列 - CoderZh - 博客园
http://www.cnblogs.com/coderzh/archive/2010/01/23/xUnit-Test-Patterns.html
(未完待续)
PHPUnit笔记的更多相关文章
- 【夯实PHP基础】PHPUnit -- PHP测试框架
本文地址 分享提纲: 1.概述 2.安装 3.编写第一个测试用例 4.PHPUnit高级 5.参考 1.概述 1)[测试框架] 它是一款轻量级的PHP测试框架,是一个xUnit的体系结构的单元测试框架 ...
- phpunit实践笔记
phpunit成为单元测试的代名词已成为共识, 但很多在实际编写测试过程中遇到的很多问题通过手册.网上搜索都很难找到相关资料, 大部分都得通过查看源代码和实践的代码经验解决.欢迎大家拍砖.(在此之前请 ...
- 第一次工作->笔记:在phpstrom2019上搭建phpunit单元测试环境,php环境使用docker
前言:公司大佬让我开发一个工具,并合并到他的工具包中,使用的是github 说明:这里的php环境使用的是laradock.感兴趣的道友自行查找. 工具:php.phpstrom.phpunit.do ...
- 工作笔记:phpstrom、docker、phpunit进行单元测试
- phpunit学习 3:
16:17 2015/12/11phpunit学习 3:单元测试的大概步骤是:编写待测试类,编写测试用例类,编写测试类,测试.1.如果你有多个类,多个测试类的test类,那么可以编写一个AllTest ...
- phpunit测试学习 1:一点简单的扼要有用的东西的总结 一点入门认识
16:45 2015/12/8phpunit测试学习 1:一点简单的扼要有用的东西的总结 一点入门认识 具体的入门安装和入门实践请参照文中的推荐博客或网上其他博客推荐博客,我感觉这几篇博客写得很不错 ...
- laravel安装 笔记
http://laod.cn/hosts/2015-google-hosts.html 谷歌FQIP laravel安装和设置流程 1安装composer , VirtualBox和Vagrant 下 ...
- 《Create Your own PHP Framework》笔记
前言 大力推荐该教程:<Create Your own PHP Framework> Symfony的学习蛮累的,官方文档虽然很丰富,但是组织方式像参考书而不是指南,一些不错的指导性文档常 ...
- thinkphp5框架笔记(ing)
重新整理下学习tp5手册的笔记.自己再好好看一次tp5的开发手册,学到哪里记到哪里. 0x01 安装 Composer安装 ThinkPHP5支持使用Composer安装 curl -sS https ...
随机推荐
- 深入理解DIP、IoC、DI以及IoC容器
摘要 面向对象设计(OOD)有助于我们开发出高性能.易扩展以及易复用的程序.其中,OOD有一个重要的思想那就是依赖倒置原则(DIP),并由此引申出IoC.DI以及Ioc容器等概念.通过本文我们将一起学 ...
- Win10 IIS本地部署MVC网站时不能运行?
异常处理汇总-服 务 器 http://www.cnblogs.com/dunitian/p/4522983.html 部署后出现这个错误: 打开文件目录后发现是可以看见目录的,静态页面也是可以打开的 ...
- 虚拟dom与diff算法 分析
好文集合: 深入浅出React(四):虚拟DOM Diff算法解析 全面理解虚拟DOM,实现虚拟DOM
- 协议森林16 小美的桌号(DHCP协议)
作者:Vamei 出处:http://www.cnblogs.com/vamei 转载请先与我联系. DHCP协议用于动态的配置电脑的网络相关参数,如主机的IP地址,路由器出口地址.DNS域名服务器地 ...
- Git命令总结
本文转载自345大神.... 查看原文 先上个图形化界面GIT工具 SourceTree下载链接 windows版 1.8.3 & Mac版 2.2.4 链接: http://pan.baid ...
- MVC如何使用开源分页插件shenniu.pager.js
最近比较忙,前期忙公司手机端接口项目,各种开发+调试+发布现在几乎上线无问题了:虽然公司项目忙不过在期间抽空做了两件个人觉得有意义的事情,一者使用aspnetcore开发了个人线上项目(要说线上其实只 ...
- Openfiler配置RAC共享存储
将 Openfiler 用作 iSCSI 存储服务器,主要操作步骤如下: 1.设置 iSCSI 服务 2.配置网络访问 3.指定物理存储器并对其分区 4.创建新的卷组 5.创建所有逻辑卷 6.为每个逻 ...
- 装饰者模式 Decoration
1.什么是装饰者模式 动态给对象增加功能,从一个对象的外部来给对象添加功能,相当于改变了对象的外观,比用继承的方式更加的灵活.当使用装饰后,从外部系统的角度看,就不再是原来的那个对象了,而是使用一系列 ...
- 流程表单中js如何清空SheetUser控件数据?
昨天有人问我js怎么清空.我试了试,发现简单的赋给他空值,并没有用.只能给他赋一个真实存在的值才有用.于是跟踪了一下他的删除按钮. 效果如下 使用场景:可以根据字段的不同类别变更人员. js代码如下, ...
- Android Butterknife 8.4.0 使用方法总结
转载请标明出处:http://www.cnblogs.com/zhaoyanjun/p/6016341.html 本文出自[赵彦军的博客] 前言 ButterKnife 简介 ButterKnife是 ...