
python学习笔记-Day6(2)
xml处理模块
xml是实现不同语言或程序之间进行数据交换的协议,跟json差不多,但json使用起来更简单,不过,古时候,在json还没诞生的黑暗年代,大家只能选择用xml呀,至今很多传统公司如金融行业的很多系统的接口还主要是xml。
import xml.etree.ElementTree as ET

tree = ET.parse("country.xml")

root = tree.getroot() # 获得根节点

print(root.tag)

# 遍历xml文档

for child in root:

    print(child.tag,child.attrib)

    for i in child:

        print("-->",i.tag,i.text)
import xml.etree.ElementTree as ET

tree = ET.parse("country.xml")

root = tree.getroot() # get the root node

#只获得year节点

for node in root.iter('year'):

    print(node.tag,node.text)
#修改

for node in root.iter('year'):

    new_year = int(node.text)+1

    node.text = str(new_year)

    node.set("updated","yes")

tree.write("xml_test2.xml")
#删除

for country in root.findall("country"):

    rank = int(country.find('rank').text)

    if rank > 50:

        root.remove(country)

tree.write("xml_test2.xml")
#create

new_xml = ET.Element("namelist")#root

name = ET.SubElement(new_xml,"name",attrib={"enrolled":"yes"})

age = ET.SubElement(name,"age",attrib={"checked":"no"})

sex = ET.SubElement(name,"sex")

sex.text = '33'

name2 = ET.SubElement(new_xml,"name",attrib={"enrolled":"no"})

age = ET.SubElement(name2,"age")

age.text = '19'

et = ET.ElementTree(new_xml) #生成文档对象

et.write("new_test.xml", encoding="utf-8",xml_declaration=True)

ET.dump(new_xml) #打印生成的格式
ConfigParser模块
用于生成和修改常见配置文档
[DEFAULT]

ServerAliveInterval = 45

Compression = yes

CompressionLevel = 9

ForwardX11 = yes

[bitbucket.org]

User = hg

[topsecret.server.com]

Port = 50022

ForwardX11 = no
对配置文件操作
#生成配置文件

import configparser

config = configparser.ConfigParser()

config.read('example6.ini')

config["DEFAULT"] = {'ServerAliveInterval': '45',

                      'Compression': 'yes',

                     'CompressionLevel': '9'}

config['bitbucket.org'] = {}

config['bitbucket.org']['User'] = 'hg'

config['topsecret.server.com'] = {}

topsecret = config['topsecret.server.com']

topsecret['Host Port'] = '50022'     # mutates the parser

topsecret['ForwardX11'] = 'no'  # same here

config['DEFAULT']['ForwardX11'] = 'yes'

with open('example.ini', 'w') as configfile:

   config.write(configfile)

# 删除指定模块

sec = config.remove_section('bitbucket.org')

config.write(open('example4.ini','w'))

#删除模块下的指定项目

config.remove_option('alan','age')

config.write(open('example6.ini','w'))

#判断模块名是否存在不存在就创建

sec = config.has_section('alan')

config.add_section('alan')

config['alan']['age']="21"

config.write(open('example6.ini','w'))

#改写模块下的指定项目

config.set('alan','age','22')

config.write(open('example6.ini','w'))
hashlib模块
用于加密相关的操作,3.x里代替了md5模块和sha模块,主要提供 SHA1, SHA224, SHA256, SHA384, SHA512
>>> import hashlib

>>> a =hashlib.md5()

>>> a.update(b"Hello")

>>> a.update(b"it's me")

>>> a.digest()  #二进制

b'\xc3\xb8Fk,fV\x9c\xd3\x01\x15\xdf\xd3\x9bd\xb8'

>>> a.hexdigest()  #16进制

'c3b8466b2c66569cd30115dfd39b64b8'

>>> b = hashlib.sha512()

>>> b.update(b'Hello')

>>> b.digest()

b'6\x15\xf8\x0c\x9d)>\xd7@&\x87\xf9K"\xd5\x8eR\x9b\x8c\xc7\x91o\x8f\xac\x7f\xdd\xf7\xfb\xd5\xafL\xf7w\xd3\xd7\x95\xa7\xa0\n\x16\xbf~\x7f?\xb9V\x1e\xe9\xba\xaeH\r\xa9\xfez\x18v\x9eq\x88k\x03\xf3\x15'

>>> b.hexdigest()

'3615f80c9d293ed7402687f94b22d58e529b8cc7916f8fac7fddf7fbd5af4cf777d3d795a7a00a16bf7e7f3fb9561ee9baae480da9fe7a18769e71886b03f315'
hmac模块
python 还有一个 hmac 模块,它内部对我们创建 key 和 内容 再进行处理然后再加密
>>> import hmac

>>> a=hmac.new(b"secret_key")

>>> a.update(b"Hello")

>>> a.digest()

b'RF\r"\xec~@-\xc8\xc6*\xed\xa5\x1e\xc9 '

>>> a.hexdigest()

'52460d22ec7e402dc8c62aeda51ec920'
Subprocess模块
运行python的时候,我们都是在创建并运行一个进程。像Linux进程那样,一个进程可以fork一个子进程,并让这个子进程exec另外一个程序。在Python中,我们通过标准库中的subprocess包来fork一个子进程,并运行一个外部的程序。
subprocess包中定义有数个创建子进程的函数,这些函数分别以不同的方式创建子进程,所以我们可以根据需要来从中选取一个使用。另外subprocess还提供了一些管理标准流(standard stream)和管道(pipe)的工具,从而在进程间使用文本通信。
>>> subprocess.run(["ls", "-l"])  # doesn't capture output

CompletedProcess(args=['ls', '-l'], returncode=0)

>>> subprocess.run("exit 1", shell=True, check=True)

Traceback (most recent call last):

  ...

subprocess.CalledProcessError: Command 'exit 1' returned non-zero exit status 1

>>> subprocess.run(["ls", "-l", "/dev/null"], stdout=subprocess.PIPE)

CompletedProcess(args=['ls', '-l', '/dev/null'], returncode=0,

stdout=b'crw-rw-rw- 1 root root 1, 3 Jan 23 16:23 /dev/null\n')
调用subprocess.run(...)是推荐的常用方法,在大多数情况下能满足需求,但如果你可能需要进行一些复杂的与系统的交互的话,你还可以用subprocess.Popen(),语法如下:
p = subprocess.Popen("find / -size +1000000 -exec ls -shl {} \;",shell=True,stdout=subprocess.PIPE)

print(p.stdout.read())#显示执行结果
可用参数:
- args:shell命令,可以是字符串或者序列类型(如:list,元组)
- bufsize:指定缓冲。0 无缓冲,1 行缓冲,其他 缓冲区大小,负值 系统缓冲
- stdin, stdout, stderr:分别表示程序的标准输入、输出、错误句柄
- preexec_fn:只在Unix平台下有效,用于指定一个可执行对象(callable object),它将在子进程运行之前被调用
- close_sfs:在windows平台下,如果close_fds被设置为True,则新创建的子进程将不会继承父进程的输入、输出、错误管道。
所以不能将close_fds设置为True同时重定向子进程的标准输入、输出与错误(stdin, stdout, stderr)。 - shell:同上
- cwd:用于设置子进程的当前目录
- env:用于指定子进程的环境变量。如果env = None,子进程的环境变量将从父进程中继承。
- universal_newlines:不同系统的换行符不同,True -> 同意使用 \n
- startupinfo与createionflags只在windows下有效
将被传递给底层的CreateProcess()函数,用于设置子进程的一些属性,如:主窗口的外观,进程的优先级等等
终端输入的命令分为两种:
- 输入即可得到输出,如:ifconfig
- 输入进行某环境,依赖再输入,如:python
交互实例
import subprocess

obj =  subprocess.Popen(["python"],stdin=subprocess.PIPE,stdout=subprocess.PIPE,stderr=subprocess.PIPE)

obj.stdin.write("print('hello')\n")

obj.stdin.write("print('hello1')\n")

obj.stdin.write("print('hello2')\n")

obj.stdin.write("print('hello3')\n")

out_error_list = obj.communicate()

print(out_error_list)
logging模块
很多程序都有记录日志的需求,并且日志中包含的信息即有正常的程序访问日志,还可能有错误、警告等信息输出,python的logging模块提供了标准的日志接口,你可以通过它存储各种格式的日志,logging的日志可以分为 debug(), info(), warning(), error() and critical() 5个级别
| Level | When it’s used |
|---|---|
DEBUG |
Detailed information, typically of interest only when diagnosing problems. |
INFO |
Confirmation that things are working as expected. |
WARNING |
An indication that something unexpected happened, or indicative of some problem in the near future (e.g. ‘disk space low’). The software is still working as expected. |
ERROR |
Due to a more serious problem, the software has not been able to perform some function. |
CRITICAL |
A serious error, indicating that the program itself may be unable to continue running. |
实例
import logging

logging.basicConfig(filename='example2.log',level=logging.ERROR)#创建日志文件并设定级别

logging.debug('This message should go to the log file') #当级别为debug时打印的信息

logging.info('So should this')

logging.warning('And this, too')#除了level设置为error意外的任何一个级别都会打印
格式化输出
import logging

logging.basicConfig(format='%(asctime)s %(message)s', datefmt='%Y-%m-%d %H:%M:%S ')

logging.warning('is when this event was logged.')
输出文件并输出到屏幕
#create logger

logger = logging.getLogger('TEST-LOG')

logger.setLevel(logging.DEBUG)

# create console handler and set level to debug

ch = logging.StreamHandler()

ch.setLevel(logging.DEBUG)

# create file handler and set level to warning

fh = logging.FileHandler("access.log")

fh.setLevel(logging.WARNING)

# create formatter

formatter = logging.Formatter('%(asctime)s - %(name)s - %(levelname)s - %(message)s')

# add formatter to ch and fh

ch.setFormatter(formatter)

fh.setFormatter(formatter)

# add ch and fh to logger

logger.addHandler(ch)

logger.addHandler(fh)

# 'application' code

logger.debug('debug message')

logger.info('info message')

logger.warn('warn message')

logger.error('error message')

logger.critical('critical message')
对于格式,有如下属性可是配置:
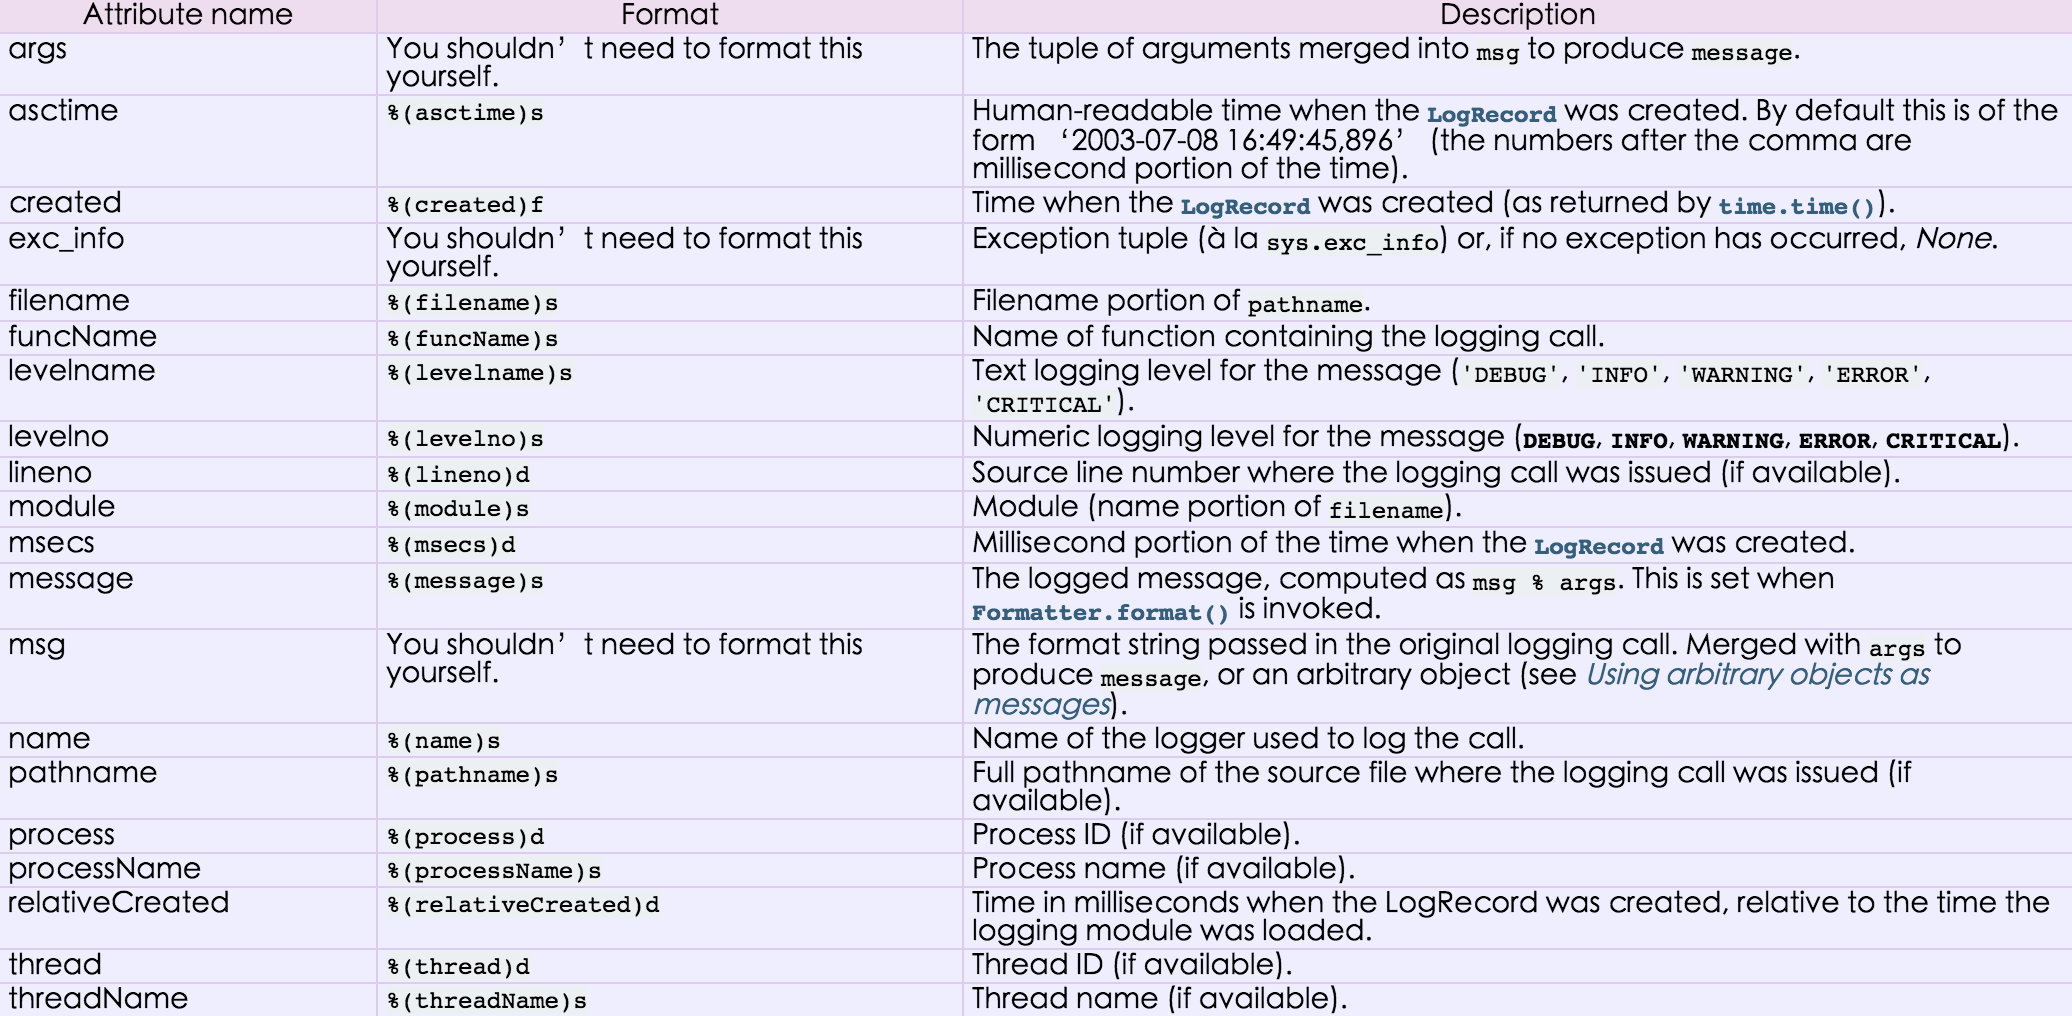
用于便捷记录日志且线程安全的模块
mport logging

logging.basicConfig(filename='log.log',

                    format='%(asctime)s - %(name)s - %(levelname)s -%(module)s:  %(message)s',

                    datefmt='%Y-%m-%d %H:%M:%S %p',

                    level=10)

logging.debug('debug')

logging.info('info')

logging.warning('warning')

logging.error('error')

logging.critical('critical')

logging.log(10,'log')
等级:
只有大于当前日志等级的操作才会被记录。
CRITICAL = 50

FATAL = CRITICAL

ERROR = 40

WARNING = 30

WARN = WARNING

INFO = 20

DEBUG = 10

NOTSET = 0
python学习笔记-Day6(2)的更多相关文章
- python学习笔记-Day6(3)
代码书写原则: 1)不能重复写代码 2)写的代码要经常变更 编程模式概述 面向过程:根据业务逻辑从上到下写垒代码 函数式:将某功能代码封装到函数中,日后便无需重复编写,仅调用函数即可 面向对象:对函数 ...
- python学习笔记-Day6(1)
shelve模块是一个简单的k,v将内存数据通过文件持久化的模块,可以持久化任何pickle可支持的python数据格式 >>> s=shelve.open('test') > ...
- Python学习笔记 - day6 - 函数
函数 函数在编程语言中就是完成特定功能的一个词句组(代码块),这组语句可以作为一个单位使用,并且给它取一个名字.可以通过函数名在程序的不同地方多次执行(这叫函数的调用).函数在编程语言中有基本分为:预 ...
- 【目录】Python学习笔记
目录:Python学习笔记 目标:坚持每天学习,每周一篇博文 1. Python学习笔记 - day1 - 概述及安装 2.Python学习笔记 - day2 - PyCharm的基本使用 3.Pyt ...
- Python学习记录day6
title: Python学习记录day6 tags: python author: Chinge Yang date: 2016-12-03 --- Python学习记录day6 @(学习)[pyt ...
- python学习笔记整理——字典
python学习笔记整理 数据结构--字典 无序的 {键:值} 对集合 用于查询的方法 len(d) Return the number of items in the dictionary d. 返 ...
- VS2013中Python学习笔记[Django Web的第一个网页]
前言 前面我简单介绍了Python的Hello World.看到有人问我搞搞Python的Web,一时兴起,就来试试看. 第一篇 VS2013中Python学习笔记[环境搭建] 简单介绍Python环 ...
- python学习笔记之module && package
个人总结: import module,module就是文件名,导入那个python文件 import package,package就是一个文件夹,导入的文件夹下有一个__init__.py的文件, ...
- python学习笔记(六)文件夹遍历,异常处理
python学习笔记(六) 文件夹遍历 1.递归遍历 import os allfile = [] def dirList(path): filelist = os.listdir(path) for ...
随机推荐
- sqlserver2008 ,只能选C盘目录,不能选其它盘目录
数据库sql2008安装后,无论备份或还原,只能看到C盘,手工输入路径,错误提示如下:尝试打开或创建物理文件 'D:\数据库\db.mdf' 时,CREATE FILE 遇到操作系统错误 5(拒绝访问 ...
- LAMP平台搭建菜鸟入门级实验
LAMP平台搭建(菜鸟入门级) mysql 安装: (1)二进制安装 二进制安装 ,执行解压配置即可.无须执行三布安装. (2)源码编译安装 安装准备工作: (1)查看系统配置:#uname -a/ ...
- Storm Ack框架笔记
Storm利用Acker Bolt节点跟踪消息,当Spout发送出去的消息以及这些消息所衍生出来的消息均被处理后,Spout将受到对应于该消息的Ack.实现要点: 1.Storm中每条发送出去的消息都 ...
- PHP判断访问终端,电脑或手机访问
函数代码: //判断电脑或手机访问 function is_mobile(){ $user_agent = $_SERVER['HTTP_USER_AGENT']; $mobile_agents = ...
- 最牛B的编码套路
最近,我大量阅读了Steve Yegge的文章.其中有一篇叫“Practicing Programming”(练习编程),写成于2005年,读后令我惊讶不已: 与你所相信的恰恰相反,单纯地每天埋头 ...
- 转:Tomcat安装配置及站点说明
原文地址:http://www.cnblogs.com/Johness/archive/2012/07/20/2600937.html 1.首先是Tomcat的获取和安装. 获取当然得上Apache的 ...
- 【knowledgebase】不要在一个很大的RDD上调用collect
如果一个RDD很大以至于它的所有元素并不能在driver端机器的内存中存放下,请不要进行如下调用: val values = myVeryLargeRDD.collect() collect将尝试 ...
- EL简介
一.EL简介 1.语法结构 ${expression}2.[]与.运算符 EL 提供.和[]两种运算符来存取数据. 当要存取的属性名称中包含一些特殊字符,如.或?等并非字母或数字的符 ...
- Jmeter组件1. CSV Data Set Config
位置:Test Plan | Add | Config Element | CSV Data Set Config 意义: 脚本参数化 节省CPU跟内存(可以准备好数据文件去代替动态生成数据,节约CP ...
- 2016-06-08:Windows中的bat脚本
涉及循环嵌套,启用变量延时,算术运算 @echo off setlocal enabledelayedexpansion %路径以及文件名等变量设置% set x264_exe=E:\demo\c++ ...