
转载-Springboot整合ehcache缓存
转载:https://www.cnblogs.com/xzmiyx/p/9897623.html
EhCache是一个比较成熟的Java缓存框架,最早从hibernate发展而来, 是进程中的缓存系统,它提供了用内存,磁盘文件存储,以及分布式存储方式等多种灵活的cache管理方案,快速简单。
Springboot对ehcache的使用非常支持,所以在Springboot中只需做些配置就可使用,且使用方式也简易。
在你的项目上配置以下几步即可使用
首先,老规矩,pom.xml加依赖;
|
1
2
3
4
5
6
7
8
9
10
|
<!-- Spring Boot 缓存支持启动器 --><dependency> <groupId>org.springframework.boot</groupId> <artifactId>spring-boot-starter-cache</artifactId></dependency><!-- Ehcache 坐标 --><dependency> <groupId>net.sf.ehcache</groupId> <artifactId>ehcache</artifactId></dependency> |
第二步,创建ehcache.xml配置文件
位置:classpath目录下,即src/main/resources/ehcache.xml
文件内容开发的时候可参考第一步导入的jar包,具体在哪呢,看下面:
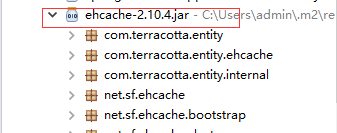
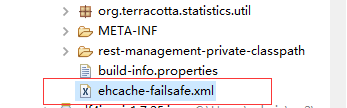
再看代码:
|
1
2
3
4
5
6
7
8
9
10
11
12
13
14
15
16
17
18
19
20
21
22
23
24
25
26
|
<ehcache xmlns:xsi="http://www.w3.org/2001/XMLSchema-instance" xsi:noNamespaceSchemaLocation="../config/ehcache.xsd"> <diskStore path="java.io.tmpdir"/> <!--defaultCache:echcache的默认缓存策略 --> <defaultCache maxElementsInMemory="10000" eternal="false" timeToIdleSeconds="120" timeToLiveSeconds="120" maxElementsOnDisk="10000000" diskExpiryThreadIntervalSeconds="120" memoryStoreEvictionPolicy="LRU"> <persistence strategy="localTempSwap"/> </defaultCache> <cache name="users" maxElementsInMemory="10000" eternal="false" timeToIdleSeconds="120" timeToLiveSeconds="120" maxElementsOnDisk="10000000" diskExpiryThreadIntervalSeconds="120" memoryStoreEvictionPolicy="LRU"> <persistence strategy="localTempSwap"/> </cache></ehcache> |
说明:
|
1
|
<diskStore path="java.io.tmpdir"/>这个是磁盘存储路径,当内存缓存满了的时候,就会往这里面放,java.io.tmdir是操作系统缓存的临时目录,不同操作系统缓存目录不一样。 |
maxElementsInMemory      内存缓存中最多可以存放的元素数量,若放入Cache中的元素超过这个数值,则有以下两种情况

                         1)若overflowToDisk=true,则会将Cache中多出的元素放入磁盘文件中

                         2)若overflowToDisk=false,则根据memoryStoreEvictionPolicy策略替换Cache中原有的元素
overflowToDisk 内存不足时,是否启用磁盘缓存
|
1
|
eternal 缓存中对象是否永久有效 |
|
1
|
timeToIdleSeconds 缓存数据在失效前的允许闲置时间(单位:秒),仅当eternal=false时使用,默认值是0表示可闲置时间无穷大,若超过这个时间没有访问此Cache中的某个元素,那么此元素将被从Cache中清除 |
|
1
|
timeToLiveSeconds 缓存数据的总的存活时间(单位:秒),仅当eternal=false时使用,从创建开始计时,失效结束。 |
|
1
|
maxElementsOnDisk 磁盘缓存中最多可以存放的元素数量,0表示无穷大 |
diskExpiryThreadIntervalSeconds 磁盘缓存的清理线程运行间隔,默认是120秒
memoryStoreEvictionPolicy   内存存储与释放策略,即达到maxElementsInMemory限制时,Ehcache会根据指定策略清理内存  共有三种策略,分别为LRU(最近最少使用)、LFU(最常用的)、FIFO(先进先出)

另外,defaultCache是默认缓存方式,cache是自定义的缓存方式,自行设置name

第三步,在Springboot配置文件中把ehcache.xml配置进去;即在application.properties中加入以下配置代码
|
1
|
spring.cache.ehcache.config=ehcache.xml |
第三步结束,ehcache在Springboot中就配置完成了,下面就是怎么在Springboot中使用
第四步,在启动类前加上@EnableCaching注解;这样的话,启动类启动时会去启动缓存启动器。
|
1
2
3
4
5
6
7
8
9
10
11
|
@SpringBootApplication@MapperScan("com.yunxing.mapper")@EnableCachingpublic class app { public static void main(String[] args) { SpringApplication.run(app.class, args); }} |
第五步,实体类实现可序列化接口Serializable;由于需要实体类支持缓存中的磁盘存储,所以需要实体类实现可序列化接口
|
1
2
3
4
5
6
7
8
9
10
11
12
13
14
15
16
17
18
19
20
21
22
23
24
|
public class user implements Serializable{ private Integer id; private String name; private Integer age; public Integer getId() { return id; } public void setId(Integer id) { this.id = id; } public String getName() { return name; } public void setName(String name) { this.name = name; } public Integer getAge() { return age; } public void setAge(Integer age) { this.age = age; } } |
第六步,使用@Cacheable把数据存进缓存,下面就是专门把方法返回值存入缓存
|
1
2
3
4
5
6
7
8
9
10
11
12
13
14
|
@Service@Transactional //事务,表示该类下所有的都受事务控制public class userServiceImpl implements userService { @Autowired private userMapper usermapper; @Override @Cacheable(value="users") public user selectUserById(int id) { user user=this.usermapper.selectUserById(id); System.out.println("1111111111111111111111111"); return user; }} |
说明: @Cacheable可以标记在一个方法上,也可以标记在一个类上,当标记在一个方法上时表示该方法是支持缓存的,当标记在一个类上时则表示该类所有的方法都是支持缓存的。对于一个支持缓存的方法,Spring会在其被调用后将其返回值缓存起来,以保证下次利用同样的参数来执行该方法时可以直接从缓存中获取结果,而不需要再次执行该方法。Spring在缓存方法的返回值时是以键值对进行缓存的,值就是方法的返回结果。
@Cacheable可以指定三个属性,value、key和condition。
value属性指定cache的名称(即选择ehcache.xml中哪种缓存方式存储)
key属性是用来指定Spring缓存方法的返回结果时对应的key的。该属性支持SpringEL表达式。当我们没有指定该属性时,Spring将使用默认策略生成key。我们也直接使用“#参数名”或者“#p参数index”。下面是几个使用参数作为key的示例
|
1
2
3
4
5
6
7
8
9
10
11
12
13
14
15
16
17
18
19
20
21
22
23
24
25
26
27
28
29
30
31
32
33
34
35
36
37
|
@Cacheable(value="users", key="#id")public User find(Integer id) { returnnull;}@Cacheable(value="users", key="#p0")public User find(Integer id) { returnnull;}@Cacheable(value="users", key="#user.id")public User find(User user) { returnnull;}@Cacheable(value="users", key="#p0.id")public User find(User user) { returnnull;} |
最后,使用@CacheEvict清除缓存;
|
1
2
3
4
|
@CacheEvict(value="users",allEntries=true)public void saveUsers(Users users) {this.usersRepository.save(users);} |
说明:@CacheEvict是用来标注在需要清除缓存元素的方法或类上的。当标记在一个类上时表示其中所有的方法的执行都会触发缓存的清除操作。@CacheEvict可以指定的属性有value、key、condition、allEntries和beforeInvocation。
其中value、key和condition的语义与@Cacheable对应的属性类似;allEntries是boolean类型,表示是否需要清除缓存中的所有元素。默认为false,表示不需要。
当指定了allEntries为true时,Spring Cache将忽略指定的key。有的时候我们需要Cache一下清除所有的元素,这比一个一个清除元素更有效率。
EhCache是一个比较成熟的Java缓存框架,最早从hibernate发展而来, 是进程中的缓存系统,它提供了用内存,磁盘文件存储,以及分布式存储方式等多种灵活的cache管理方案,快速简单。
Springboot对ehcache的使用非常支持,所以在Springboot中只需做些配置就可使用,且使用方式也简易。
在你的项目上配置以下几步即可使用
首先,老规矩,pom.xml加依赖;
|
1
2
3
4
5
6
7
8
9
10
|
<!-- Spring Boot 缓存支持启动器 --><dependency> <groupId>org.springframework.boot</groupId> <artifactId>spring-boot-starter-cache</artifactId></dependency><!-- Ehcache 坐标 --><dependency> <groupId>net.sf.ehcache</groupId> <artifactId>ehcache</artifactId></dependency> |
第二步,创建ehcache.xml配置文件
位置:classpath目录下,即src/main/resources/ehcache.xml
文件内容开发的时候可参考第一步导入的jar包,具体在哪呢,看下面:
再看代码:
|
1
2
3
4
5
6
7
8
9
10
11
12
13
14
15
16
17
18
19
20
21
22
23
24
25
26
|
<ehcache xmlns:xsi="http://www.w3.org/2001/XMLSchema-instance" xsi:noNamespaceSchemaLocation="../config/ehcache.xsd"> <diskStore path="java.io.tmpdir"/> <!--defaultCache:echcache的默认缓存策略 --> <defaultCache maxElementsInMemory="10000" eternal="false" timeToIdleSeconds="120" timeToLiveSeconds="120" maxElementsOnDisk="10000000" diskExpiryThreadIntervalSeconds="120" memoryStoreEvictionPolicy="LRU"> <persistence strategy="localTempSwap"/> </defaultCache> <cache name="users" maxElementsInMemory="10000" eternal="false" timeToIdleSeconds="120" timeToLiveSeconds="120" maxElementsOnDisk="10000000" diskExpiryThreadIntervalSeconds="120" memoryStoreEvictionPolicy="LRU"> <persistence strategy="localTempSwap"/> </cache></ehcache> |
说明:
|
1
|
<diskStore path="java.io.tmpdir"/>这个是磁盘存储路径,当内存缓存满了的时候,就会往这里面放,java.io.tmdir是操作系统缓存的临时目录,不同操作系统缓存目录不一样。 |
maxElementsInMemory      内存缓存中最多可以存放的元素数量,若放入Cache中的元素超过这个数值,则有以下两种情况

                         1)若overflowToDisk=true,则会将Cache中多出的元素放入磁盘文件中

                         2)若overflowToDisk=false,则根据memoryStoreEvictionPolicy策略替换Cache中原有的元素
overflowToDisk 内存不足时,是否启用磁盘缓存
|
1
|
eternal 缓存中对象是否永久有效 |
|
1
|
timeToIdleSeconds 缓存数据在失效前的允许闲置时间(单位:秒),仅当eternal=false时使用,默认值是0表示可闲置时间无穷大,若超过这个时间没有访问此Cache中的某个元素,那么此元素将被从Cache中清除 |
|
1
|
timeToLiveSeconds 缓存数据的总的存活时间(单位:秒),仅当eternal=false时使用,从创建开始计时,失效结束。 |
|
1
|
maxElementsOnDisk 磁盘缓存中最多可以存放的元素数量,0表示无穷大 |
diskExpiryThreadIntervalSeconds 磁盘缓存的清理线程运行间隔,默认是120秒
memoryStoreEvictionPolicy   内存存储与释放策略,即达到maxElementsInMemory限制时,Ehcache会根据指定策略清理内存  共有三种策略,分别为LRU(最近最少使用)、LFU(最常用的)、FIFO(先进先出)

另外,defaultCache是默认缓存方式,cache是自定义的缓存方式,自行设置name

第三步,在Springboot配置文件中把ehcache.xml配置进去;即在application.properties中加入以下配置代码
|
1
|
spring.cache.ehcache.config=ehcache.xml |
第三步结束,ehcache在Springboot中就配置完成了,下面就是怎么在Springboot中使用
第四步,在启动类前加上@EnableCaching注解;这样的话,启动类启动时会去启动缓存启动器。
|
1
2
3
4
5
6
7
8
9
10
11
|
@SpringBootApplication@MapperScan("com.yunxing.mapper")@EnableCachingpublic class app { public static void main(String[] args) { SpringApplication.run(app.class, args); }} |
第五步,实体类实现可序列化接口Serializable;由于需要实体类支持缓存中的磁盘存储,所以需要实体类实现可序列化接口
|
1
2
3
4
5
6
7
8
9
10
11
12
13
14
15
16
17
18
19
20
21
22
23
24
|
public class user implements Serializable{ private Integer id; private String name; private Integer age; public Integer getId() { return id; } public void setId(Integer id) { this.id = id; } public String getName() { return name; } public void setName(String name) { this.name = name; } public Integer getAge() { return age; } public void setAge(Integer age) { this.age = age; } } |
第六步,使用@Cacheable把数据存进缓存,下面就是专门把方法返回值存入缓存
|
1
2
3
4
5
6
7
8
9
10
11
12
13
14
|
@Service@Transactional //事务,表示该类下所有的都受事务控制public class userServiceImpl implements userService { @Autowired private userMapper usermapper; @Override @Cacheable(value="users") public user selectUserById(int id) { user user=this.usermapper.selectUserById(id); System.out.println("1111111111111111111111111"); return user; }} |
说明: @Cacheable可以标记在一个方法上,也可以标记在一个类上,当标记在一个方法上时表示该方法是支持缓存的,当标记在一个类上时则表示该类所有的方法都是支持缓存的。对于一个支持缓存的方法,Spring会在其被调用后将其返回值缓存起来,以保证下次利用同样的参数来执行该方法时可以直接从缓存中获取结果,而不需要再次执行该方法。Spring在缓存方法的返回值时是以键值对进行缓存的,值就是方法的返回结果。
@Cacheable可以指定三个属性,value、key和condition。
value属性指定cache的名称(即选择ehcache.xml中哪种缓存方式存储)
key属性是用来指定Spring缓存方法的返回结果时对应的key的。该属性支持SpringEL表达式。当我们没有指定该属性时,Spring将使用默认策略生成key。我们也直接使用“#参数名”或者“#p参数index”。下面是几个使用参数作为key的示例
|
1
2
3
4
5
6
7
8
9
10
11
12
13
14
15
16
17
18
19
20
21
22
23
24
25
26
27
28
29
30
31
32
33
34
35
36
37
|
@Cacheable(value="users", key="#id")public User find(Integer id) { returnnull;}@Cacheable(value="users", key="#p0")public User find(Integer id) { returnnull;}@Cacheable(value="users", key="#user.id")public User find(User user) { returnnull;}@Cacheable(value="users", key="#p0.id")public User find(User user) { returnnull;} |
最后,使用@CacheEvict清除缓存;
|
1
2
3
4
|
@CacheEvict(value="users",allEntries=true)public void saveUsers(Users users) {this.usersRepository.save(users);} |
说明:@CacheEvict是用来标注在需要清除缓存元素的方法或类上的。当标记在一个类上时表示其中所有的方法的执行都会触发缓存的清除操作。@CacheEvict可以指定的属性有value、key、condition、allEntries和beforeInvocation。
其中value、key和condition的语义与@Cacheable对应的属性类似;allEntries是boolean类型,表示是否需要清除缓存中的所有元素。默认为false,表示不需要。
当指定了allEntries为true时,Spring Cache将忽略指定的key。有的时候我们需要Cache一下清除所有的元素,这比一个一个清除元素更有效率。
转载-Springboot整合ehcache缓存的更多相关文章
- springboot 整合ehcache缓存
1.CacheManager Spring Boot默认集成CacheManager,如下包所示: 可以看出springboot自动配置了 JcacheCacheConfiguration. EhCa ...
- Springboot整合Ehcache缓存
Pom.xml导包 <!-- ehcache --> <dependency> <groupId>org.springframework.boot</grou ...
- springboot整合ehcache缓存失效
最近做了个微信公众号后台,因为只是单应用就选用了ehcache来做本地缓存,主要是用于缓存微信的accece_token和jsapi_ticket.在使用ehcache的时候遇到了@Cacheable ...
- [原创]mybatis中整合ehcache缓存框架的使用
mybatis整合ehcache缓存框架的使用 mybaits的二级缓存是mapper范围级别,除了在SqlMapConfig.xml设置二级缓存的总开关,还要在具体的mapper.xml中开启二级缓 ...
- MyBatis高级篇之整合ehcache缓存框架
MyBatis高级篇之整合ehcache缓存框架 2017-09-01 0 Comments 1,671 Views 0 Times 一.前言 MyBatis为我们提供了Cache接口,也提供 ...
- mybatis中整合ehcache缓存框架的使用
mybatis整合ehcache缓存框架的使用 mybaits的二级缓存是mapper范围级别,除了在SqlMapConfig.xml设置二级缓存的总开关,还要在具体的mapper.xml中开启二级缓 ...
- Springboot使用ehcache缓存
本文部分步骤继承于springboot使用cache缓存,如果有不清楚的,请移驾springboot使用cache缓存 ehcache是一种广泛使用的开源Java分布式缓存.主要面向通用缓存,Java ...
- 【Springboot】Springboot整合Ehcache
刚刚项目上线了,记录下使用的技术...... EhCache 是一个纯Java的进程内缓存框架,具有快速.精干等特点,是Hibernate中默认的CacheProvider. Ehcache的特点 ( ...
- 项目一:第十四天 1.在realm中动态授权 2.Shiro整合ehcache 缓存realm中授权信息 3.动态展示菜单数据 4.Quartz定时任务调度框架—Spring整合javamail发送邮件 5.基于poi实现分区导出
1 Shiro整合ehCache缓存授权信息 当需要进行权限校验时候:四种方式url拦截.注解.页面标签.代码级别,当需要验证权限会调用realm中的授权方法 Shiro框架内部整合好缓存管理器, ...
随机推荐
- MyBatis Generator Example.Criteria 查询条件复制
背景: 我们在开发中使用MyBatis Generator生成的 XxxExample查询时,咋添加 or 查询时候,可能两个 Example.Criteria 对象的条件存在交集,即多个查询条件是相 ...
- 林大妈的JavaScript基础知识(三):JavaScript编程(1)对象
1. 对象的简单介绍与一些注意事项 JavaScript中具有几个简单数据类型:数字.字符串.布尔值.null值以及undefined值.除此之外其余所有值(包括数组.函数,甚至正则表达式)都是对象. ...
- javascript基础学习第一天
Javascript 发展过程: 1.出现:为了解决用户和游览器之间的交互. 2.概念:基于对象和事件驱动,运行在游览器客户端的脚本语言. -js在游览器中运行的.(js引擎:执行js代码) -事件: ...
- jsp数据交互(一).3
引入的文件如果是jsp则应定义为***.jspf文件,如果其他文件可定义为***.inc文件,即include file. jsp:include是既可以静态包含又可以动态包含,用jsp:includ ...
- rm -rf /*时遇到的趣事
今天在一个linux群里面闲逛的时候,突然看见一个愤青把自己的linux系统给 rm -rf /* 了 ,感觉很好玩就看了一下,突然我发现了有趣的事情! 我的朋友问我,这个为什么显示没有删除,我看了确 ...
- Win10系统下安装labelme,json文件批量转化
一.安装环境:windows10,anaconda3,python3.6 由于框架maskrcnn需要json数据集,在没安装labelme环境和跑深度学习之前,我安装的是anacon ...
- 敏捷和DevOps:是敌是友?
DevOps是敏捷在软件开发团队的另一应用.那么相比之下,哪个更胜一筹? 一边,有业界认可的scrum master,它的朋友极限编程者,以及由其衍生的 LeSS.SAFe.DAD等,是敏捷. 另一边 ...
- Python3发送邮件功能
Python3实现邮件发送功能 import smtplib from email.mime.text import MIMEText # 导入模块 class SendEmail: def send ...
- git基础学习
1.git是什么 内容寻址文件系统,分布式版本控制系统 2.git作用 开发过程中的版本控制 3.git基础命令 克隆git仓库---clone:git clone 仓库url 选分支---check ...
- Eclipse Other Projects小问题
Eclipse 不知什么时候多了个 "Other Projects" 文件夹,所有的项目又多了一层目录,如图所示: 虽然对功能没任何影响,但每次打开有些麻烦,多少感觉有些不爽…… ...