Yolov5——训练目标检测模型
项目的克隆
打开yolov5官网(GitHub - ultralytics/yolov5 at v5.0),下载yolov5的项目:

环境的安装(免额外安装CUDA和cudnn)
打开anaconda的终端,创建新的名为yolov5的环境(python选择3.8版本):
conda create -n yolov5 python=3.8

执行如下命令,激活这个环境:
conda activate yolov5

打开pytorch的官网,选择自己显卡对应的pytorch版本(我的显卡为GTX1650,这里选择1.8.0pytorch版本):

选择CUDA版本(这里我选择10.2),复制命令到anaconda终端执行:

至此pytorch环境安装完成,接下来验证CUDA和cudnn版本,打开Ptcharm,执行如下代码:
import torch

print(torch.cuda.is_available())

print(torch.backends.cudnn.is_available())

print(torch.cuda_version)

print(torch.backends.cudnn.version())
输出如下结果表示安装成功:

利用labelimg标注数据集:
labelimg的安装:
打开cmd命令控制台,输入如下的命令下载labelimg相关的依赖:
pip install labelimg -i https://pypi.tuna.tsinghua.edu.cn/simple
数据准备:
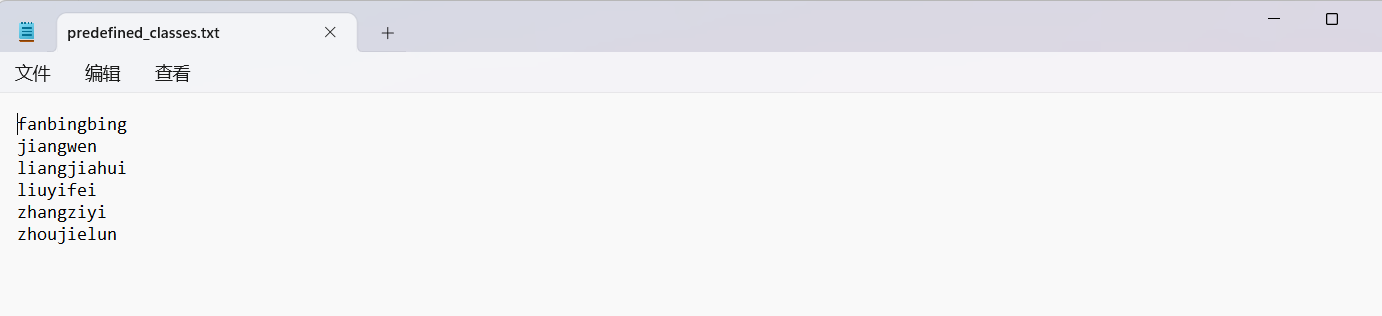
新建一个名为VOC2007的文件夹,在里面创建一个名为JPEGImages的文件夹存放需要打标签的图片文件;再创建一个名为Annotations的文件夹存放标注的标签文件;最后创建一个名为 predefined_classes.txt 的txt文件来存放所要标注的类别名称(这里我的类别一共有6类,分别是fanbingbing,jiangwen,liangjiahui,liuyifei,zhangziyi,zhoujielun):


进入到刚刚创建的VOC2007路径,执行cmd命令:

输入如下的命令打开labelimg并初始化predefined_classes.txt里面定义的类:
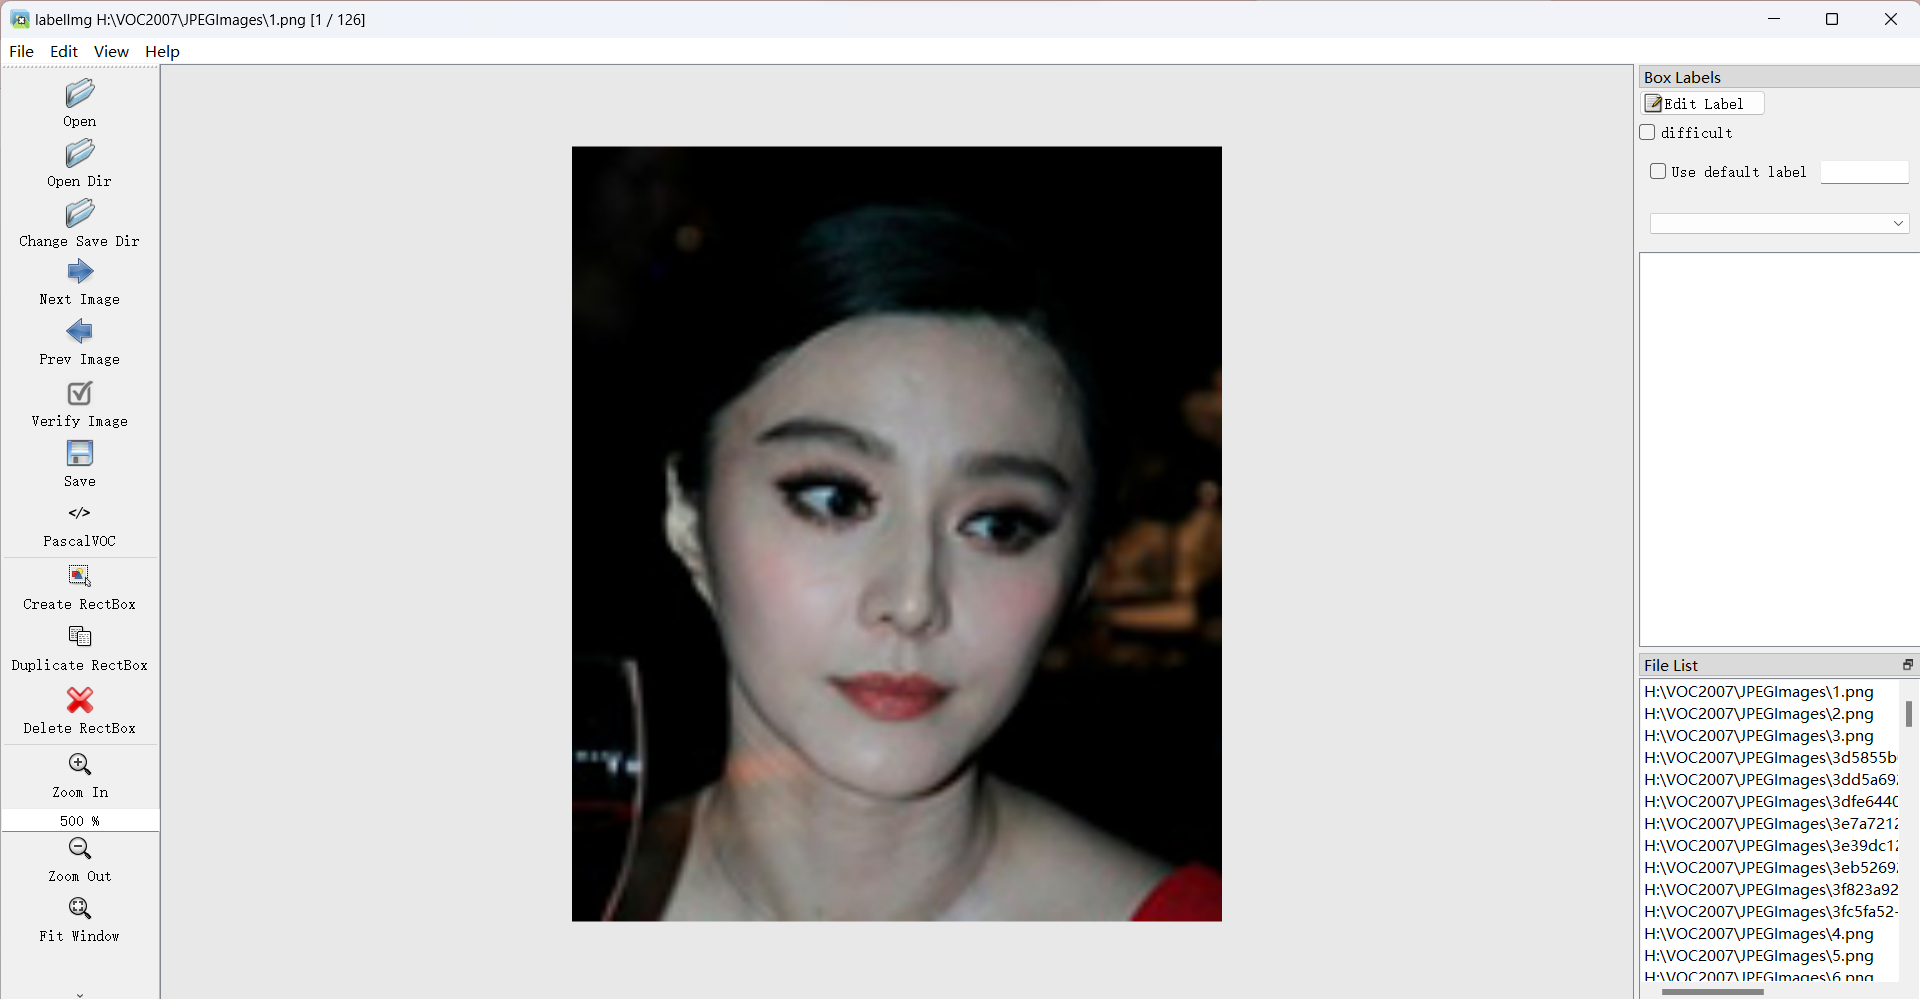
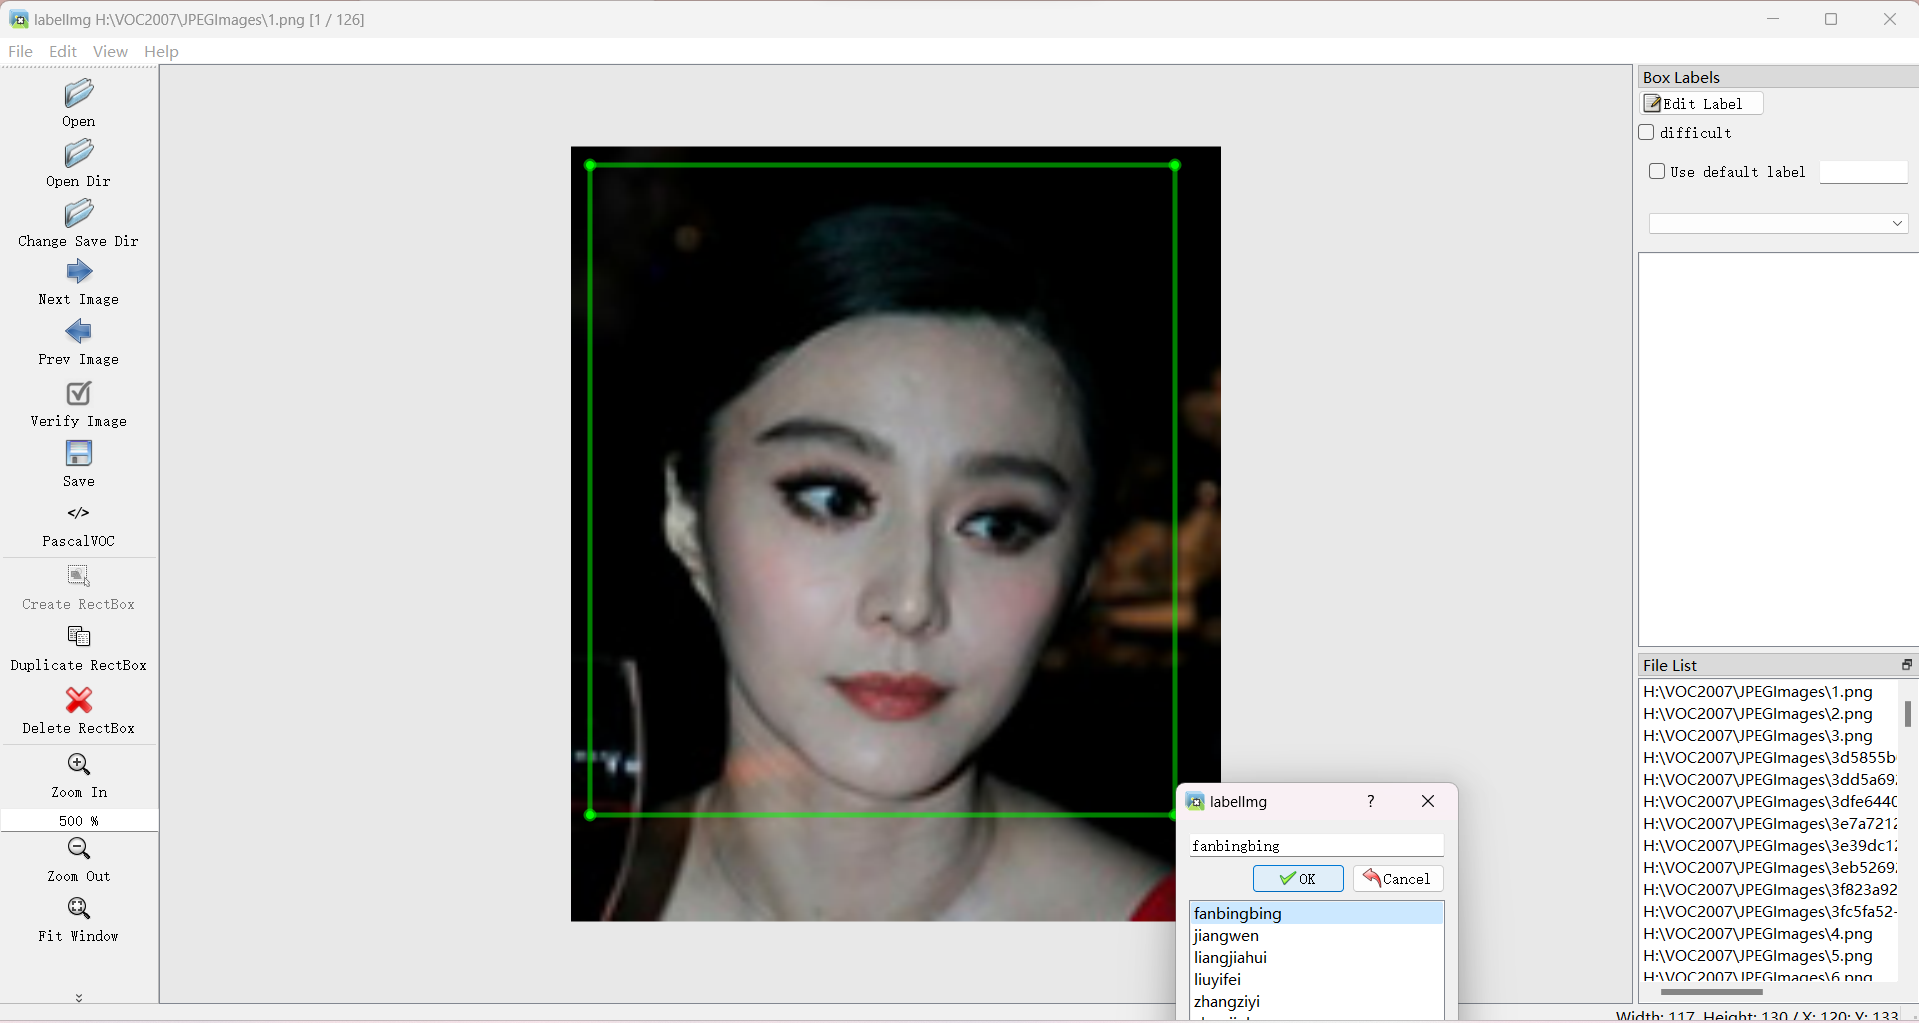
labelimg JPEGImages predefined_classes.txt
打开view设置,勾选如下选项(建议勾选):

标注数据:
按下快捷键W调出标注十字架,选择需要标注的对象区域,并定义自己要标注的类别:
打完标签后的图片会在Annotations 文件夹下生成对应的xml文件:

数据集格式转化及训练集和验证集划分
利用pycharm打开从yolov5官网下载的yolov5项目,在该项目目录下创建名为VOCdevkit的文件夹,并将刚才的VOC2007文件夹放入:

在VOCdevkit的同级目录下创建新的python文件,执行如下代码:
(注:classes里面必须正确填写xml里面已经标注好的类这里为classes = ["fanbingbing", "jiangwen", "liangjiahui", "liuyifei", "zhangziyi", "zhoujielun"])
import xml.etree.ElementTree as ET

import pickle

import os

from os import listdir, getcwd

from os.path import join

import random

from shutil import copyfile

classes = ["fanbingbing", "jiangwen", "liangjiahui", "liuyifei", "zhangziyi", "zhoujielun"]

# classes=["ball"]

TRAIN_RATIO = 80

def clear_hidden_files(path):

    dir_list = os.listdir(path)

    for i in dir_list:

        abspath = os.path.join(os.path.abspath(path), i)

        if os.path.isfile(abspath):

            if i.startswith("._"):

                os.remove(abspath)

        else:

            clear_hidden_files(abspath)

def convert(size, box):

    dw = 1. / size[0]

    dh = 1. / size[1]

    x = (box[0] + box[1]) / 2.0

    y = (box[2] + box[3]) / 2.0

    w = box[1] - box[0]

    h = box[3] - box[2]

    x = x * dw

    w = w * dw

    y = y * dh

    h = h * dh

    return (x, y, w, h)

def convert_annotation(image_id):

    in_file = open("F:/Yolov5/yolov5_offical/yolov5-master/VOCdevkit/VOC2007/Annotations/%s.xml" % image_id)

    out_file = open('F:/Yolov5/yolov5_offical/yolov5-master/VOCdevkit/VOC2007/YOLOLabels/%s.txt' % image_id, 'w')

    tree = ET.parse(in_file)

    root = tree.getroot()

    size = root.find('size')

    w = int(size.find('width').text)

    h = int(size.find('height').text)

    for obj in root.iter('object'):

        difficult = obj.find('difficult').text

        cls = obj.find('name').text

        if cls not in classes or int(difficult) == 1:

            continue

        cls_id = classes.index(cls)

        xmlbox = obj.find('bndbox')

        b = (float(xmlbox.find('xmin').text), float(xmlbox.find('xmax').text), float(xmlbox.find('ymin').text),

             float(xmlbox.find('ymax').text))

        bb = convert((w, h), b)

        out_file.write(str(cls_id) + " " + " ".join([str(a) for a in bb]) + '\n')

    in_file.close()

    out_file.close()

wd = os.getcwd()

wd = os.getcwd()

data_base_dir = os.path.join(wd, "F:/Yolov5/yolov5_offical/yolov5-master/VOCdevkit/")

if not os.path.isdir(data_base_dir):

    os.mkdir(data_base_dir)

work_sapce_dir = os.path.join(data_base_dir, "VOC2007/")

if not os.path.isdir(work_sapce_dir):

    os.mkdir(work_sapce_dir)

annotation_dir = os.path.join(work_sapce_dir, "Annotations/")

if not os.path.isdir(annotation_dir):

    os.mkdir(annotation_dir)

clear_hidden_files(annotation_dir)

image_dir = os.path.join(work_sapce_dir, "JPEGImages/")

if not os.path.isdir(image_dir):

    os.mkdir(image_dir)

clear_hidden_files(image_dir)

yolo_labels_dir = os.path.join(work_sapce_dir, "YOLOLabels/")

if not os.path.isdir(yolo_labels_dir):

    os.mkdir(yolo_labels_dir)

clear_hidden_files(yolo_labels_dir)

yolov5_images_dir = os.path.join(data_base_dir, "images/")

if not os.path.isdir(yolov5_images_dir):

    os.mkdir(yolov5_images_dir)

clear_hidden_files(yolov5_images_dir)

yolov5_labels_dir = os.path.join(data_base_dir, "labels/")

if not os.path.isdir(yolov5_labels_dir):

    os.mkdir(yolov5_labels_dir)

clear_hidden_files(yolov5_labels_dir)

yolov5_images_train_dir = os.path.join(yolov5_images_dir, "train/")

if not os.path.isdir(yolov5_images_train_dir):

    os.mkdir(yolov5_images_train_dir)

clear_hidden_files(yolov5_images_train_dir)

yolov5_images_test_dir = os.path.join(yolov5_images_dir, "val/")

if not os.path.isdir(yolov5_images_test_dir):

    os.mkdir(yolov5_images_test_dir)

clear_hidden_files(yolov5_images_test_dir)

yolov5_labels_train_dir = os.path.join(yolov5_labels_dir, "train/")

if not os.path.isdir(yolov5_labels_train_dir):

    os.mkdir(yolov5_labels_train_dir)

clear_hidden_files(yolov5_labels_train_dir)

yolov5_labels_test_dir = os.path.join(yolov5_labels_dir, "val/")

if not os.path.isdir(yolov5_labels_test_dir):

    os.mkdir(yolov5_labels_test_dir)

clear_hidden_files(yolov5_labels_test_dir)

train_file = open(os.path.join(wd, "yolov5_train.txt"), 'w')

test_file = open(os.path.join(wd, "yolov5_val.txt"), 'w')

train_file.close()

test_file.close()

train_file = open(os.path.join(wd, "yolov5_train.txt"), 'a')

test_file = open(os.path.join(wd, "yolov5_val.txt"), 'a')

list_imgs = os.listdir(image_dir)  # list image files

prob = random.randint(1, 100)

print("Probability: %d" % prob)

for i in range(0, len(list_imgs)):

    path = os.path.join(image_dir, list_imgs[i])

    if os.path.isfile(path):

        image_path = image_dir + list_imgs[i]

        voc_path = list_imgs[i]

        (nameWithoutExtention, extention) = os.path.splitext(os.path.basename(image_path))

        (voc_nameWithoutExtention, voc_extention) = os.path.splitext(os.path.basename(voc_path))

        annotation_name = nameWithoutExtention + '.xml'

        annotation_path = os.path.join(annotation_dir, annotation_name)

        label_name = nameWithoutExtention + '.txt'

        label_path = os.path.join(yolo_labels_dir, label_name)

    prob = random.randint(1, 100)

    print("Probability: %d" % prob)

    if (prob < TRAIN_RATIO):  # train dataset

        if os.path.exists(annotation_path):

            train_file.write(image_path + '\n')

            convert_annotation(nameWithoutExtention)  # convert label

            copyfile(image_path, yolov5_images_train_dir + voc_path)

            copyfile(label_path, yolov5_labels_train_dir + label_name)

    else:  # test dataset

        if os.path.exists(annotation_path):

            test_file.write(image_path + '\n')

            convert_annotation(nameWithoutExtention)  # convert label

            copyfile(image_path, yolov5_images_test_dir + voc_path)

            copyfile(label_path, yolov5_labels_test_dir + label_name)

train_file.close()

test_file.close()
代码执行完成后目录结构如下:

下载预训练权重:
打开这个网址下载预训练权重,这里选择yolov5s.pt。
训练模型
修改数据配置文件:
找到data目录下的voc.yaml文件,将该文件复制一份,重命名为people.yaml:

打开people.yaml,修改相关参数(train,val,nc):

修改模型配置文件:
找到models目录下的yolov5s.yaml文件,将该文件复制一份,重命名为yolov5s_people.yaml:

打开yolov5_people.yaml,修改相关参数(nc):

训练模型:
打开irain.py,修改如下参数:
weights:权重的路径
cfg:yolov5s_people.yaml路径
data:people.yaml路径
epochs:训练的轮数
batch-size:每次输入图片数量(根据自己电脑情况修改)
workers:最大工作核心数(根据自己电脑情况修改)


运行train.py函数训练自己的模型。
tensorbord查看参数
打开pycharm的命令控制终端,运行如下命令:
tensorboard --logdir=runs/train


推理测试
模型训练完成后,会在主目录下产生一个名为runs的文件夹,在runs/train/exp/weights目录下会产生两个权重文件,一个是最后一轮的权重文件,一个是最好的权重文件。

打开detect.py文件,修改相关参数:
weights:权重路径(这里选择best.pt)
source:测试数据路径,可以是图片/视频,也可以是'0'(电脑自带摄像头)

行detect.py进行测试,测试结果会保存在runs/detect/exp目录下:

Yolov5——训练目标检测模型的更多相关文章
- 平均精度均值(mAP)——目标检测模型性能统计量
在机器学习领域,对于大多数常见问题,通常会有多个模型可供选择.当然,每个模型会有自己的特性,并会受到不同因素的影响而表现不同. 每个模型的好坏是通过评价它在某个数据集上的性能来判断的,这个数据集通常被 ...
- 目标检测模型的性能评估--MAP(Mean Average Precision)
目标检测模型中性能评估的几个重要参数有精确度,精确度和召回率.本文中我们将讨论一个常用的度量指标:均值平均精度,即MAP. 在二元分类中,精确度和召回率是一个简单直观的统计量,但是在目标检测中有所不同 ...
- 谷歌大脑提出:基于NAS的目标检测模型NAS-FPN,超越Mask R-CNN
谷歌大脑提出:基于NAS的目标检测模型NAS-FPN,超越Mask R-CNN 朱晓霞发表于目标检测和深度学习订阅 235 广告关闭 11.11 智慧上云 云服务器企业新用户优先购,享双11同等价格 ...
- PyTorch专栏(八):微调基于torchvision 0.3的目标检测模型
专栏目录: 第一章:PyTorch之简介与下载 PyTorch简介 PyTorch环境搭建 第二章:PyTorch之60分钟入门 PyTorch入门 PyTorch自动微分 PyTorch神经网络 P ...
- 微调torchvision 0.3的目标检测模型
微调torchvision 0.3的目标检测模型 本文将微调在 Penn-Fudan 数据库中对行人检测和分割的已预先训练的 Mask R-CNN 模型.它包含170个图像和345个行人实例,说明如何 ...
- 旷世提出类别正则化的域自适应目标检测模型,缓解场景多样的痛点 | CVPR 2020
论文基于DA Faster R-CNN系列提出类别正则化框架,充分利用多标签分类的弱定位能力以及图片级预测和实例级预测的类一致性,从实验结果来看,类该方法能够很好地提升DA Faster R-CNN系 ...
- 目标检测模型的评价标准-AP与mAP
目录 目录 目录 前言 一,精确率.召回率与F1 1.1,准确率 1.2,精确率.召回率 1.3,F1 分数 1.4,PR 曲线 1.4.1,如何理解 P-R 曲线 1.5,ROC 曲线与 AUC 面 ...
- 如何使用 Yolov4 训练人脸口罩检测模型
前言 疫情当下,出入医院等公共场所都被要求佩戴口罩.这篇博客将会介绍如何使用 Yolov4,训练一个人脸口罩检测模型(使用 Yolov4 的原因是目前只复现到了 v4 ),代码地址为 https:// ...
- (转)如何用TensorLayer做目标检测的数据增强
数据增强在机器学习中的作用不言而喻.和图片分类的数据增强不同,训练目标检测模型的数据增强在对图像做处理时,还需要对图片中每个目标的坐标做相应的处理.此外,位移.裁剪等操作还有可能使得一些目标在处理后只 ...
- 目标检测-基于Pytorch实现Yolov3(1)- 搭建模型
原文地址:https://www.cnblogs.com/jacklu/p/9853599.html 本人前段时间在T厂做了目标检测的项目,对一些目标检测框架也有了一定理解.其中Yolov3速度非常快 ...
随机推荐
- holiday11
holiday11--linux basis From today I will write my note in English ,hope I will stick to it. user and ...
- signalR client属性中的大致方法
T All { get; } 相当于持久连接中的 Broadcast. T AllExcept(params string[] excludeConnectionIds); 给排除本人所有人发送消息. ...
- NSSM 软件参数使用教程
NSSM 一款可以自定义为软件安装守护进程的软件 NSSM: The non-sucking service manager Version 2.24-101-g897c7ad 64-bit, 201 ...
- zynq_ps端点亮led灯代码
#include "stdio.h"#include "xparameters.h"#include "xgpiops.h"#include ...
- Falsk 大文件上传/下载(send_from_directory)
下载接口: 服务端flask下载接口 @app.route("/api/download/", methods=["POST"]) def download() ...
- 5ppm高精度自动同步标准化考场时钟系统
自动同步标准化考场时钟系统------专业LED时钟厂家![点击进入] 学校考场医院车站GPS/NTP网络校时之组联网对时精度达5ppm原理剖析. 时间精度是根据各个用户所要求对LE ...
- jmeter&badboy安装
一.jmeter下载地址: 1. http://jmeter.apache.org/download_jmeter.cgi \ https://www.apache.org/dist/jmete ...
- toLua文件夹结构
写在前面 本文是我对toLua(1.0.8.591版本)文件夹内容理解的记录. 文件夹结构 总览 下图是toLua的Unity工程视图: BaseType 基础类型的Wrap文件,有些是自动生成(即用 ...
- 【搭建】【转】搭建 yum仓库
https://blog.csdn.net/wuxingge/article/details/100761637 3.2 服务端部署 1)安装软件程序(createrepo) yum install ...
- ES搜索高亮分词排序聚合搜索
分词高亮搜索代码 List<A> list = new ArrayList<>(); //设置高亮显示 HighlightBuilder highlightBuilder = ...