qt webassembly emscripten build 编译 环境搭建 JS调用C++传参
环境搭建
本文主要是针对ubuntu/mac编译环境搭建和调试环境 可以直接参考下面的dockerfile
qt wasm build

docker pull colorlength/qt-webassembly-build-env:latest

docker run -v $BUILD_PWD/build_wasm:/project/build -v $SOURCE_PWD:/project/source colorlength/qt-webassembly-build-env:latest

$BUILD_PWD编译目录

$BUILD_PWD源码目录qt pro所在路径

注意源码中的路径必须是/
https://github.com/QueenConch/wasm
1.运行环境
选择了虚拟机里安装了ubuntu版本和内核号如图

2. 安装emscripten
按照https://emscripten.org/docs/getting_started/index.html的方式安装最新版emscripten编译器
首先下载
# Get the emsdk repo

git clone https://github.com/emscripten-core/emsdk.git

# Enter that directory

cd emsdk
然后安装em++
# Fetch the latest version of the emsdk (not needed the first time you clone)

git pull

# Download and install the latest SDK tools.

./emsdk install latest

# Make the "latest" SDK "active" for the current user. (writes ~/.emscripten file)

./emsdk activate latest

# Activate PATH and other environment variables in the current terminal

source ./emsdk_env.sh
选择安装Python CMake Java
# Install Python

sudo apt-get install python2.7

# Install CMake (optional, only needed for tests and building Binaryen)

sudo apt-get install cmake

# Install Java (optional, only needed for Closure Compiler minification)

sudo apt-get install default-jre
当然你也可以选择安装特定版本的em++这里我就选择最新版拉下面步骤跳过y
./emsdk install 1.38.45
可以指定特定版本的后台
# Get a specific version using the upstream backend.

./emsdk install latest-upstream

# Get a specific version using the fastcomp backend.

./emsdk install 1.38.45-fastcomp
输入查看版本
em++ --version

能显示出emcc版本号 到此编译器安装成功
3.编译安装qt
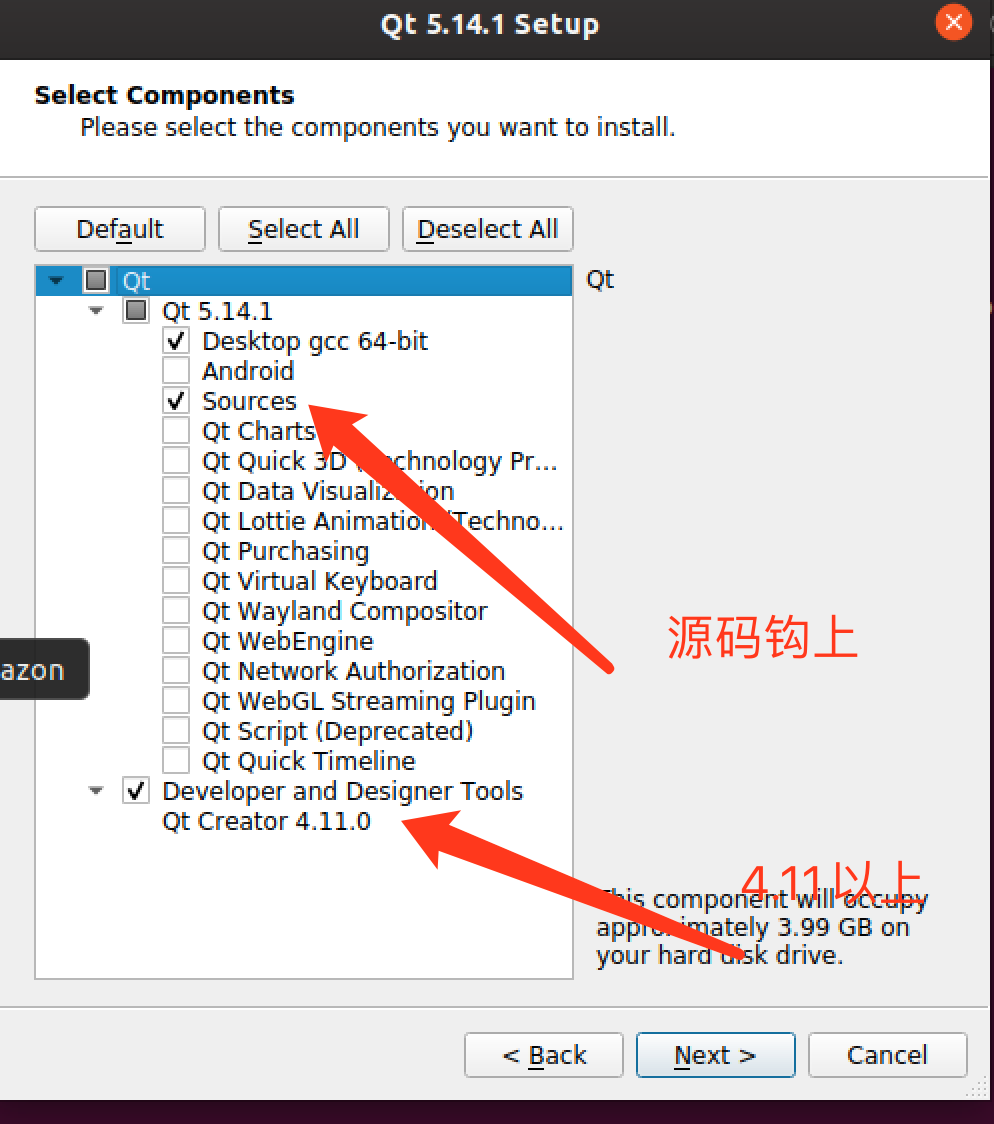
1. 已经安装qt 5.14以上的小伙伴打开qt目录下的 MaintenanceTool进行修改增加qt的源码
新安装的小伙伴在
https://download.qt.io/official_releases/qt/5.14/5.14.1/
下载对应的版本并运行
chmod +x 程序 ./程序
填上邮箱开始安装拉
钩上4.11的qt和源码开始安装拉
安装完成后关闭。
考虑到编译器版本兼容问题,决定手动编译qt源码生产成webassembly二进制。
不想编译的可以用在线版本安装编译好的webassembly二进制
下载地址在里面可以选择编译好的webassembly版本这里我们跳过这一部直接开始编译
https://download.qt.io/official_releases/online_installers/
4.编译qt库
qt目录下新建一个目录来存放编译的进制库
比如我在qt目录下建了一个wasmbuild的目录方便存文件

cd进入qt源码目录 输入刚才建的目录开始编译确认。
~/Qt5.14.1/5.14.1/Src
./configure -xplatform wasm-emscripten -nomake examples -prefix ../wasmbuild/qtbase
其中要选择开源版并同意协调
开始编译吧 这步比较久,喝个茶再回来
make module-qtbase module-qtdeclarative
这个时候编译报错了

查了一下资料
For @Calinou's issue, it's because emscripten 1.39.5 broke compatibility again: https://github.com/emscripten-core/emscripten/blob/incoming/ChangeLog.md#v1395-12202019
Removed
timestampfield from mouse, wheel, devicemotion and deviceorientation events. The presence of atimestampon these events was slightly arbitrary, and populating this field caused a small profileable overhead that all users might not care about. It is easy to get a timestamp of an event by callingemscripten_get_now()oremscripten_performance_now()inside the event handler function of any event.
qt更新比较慢5.14.1还不支持新版em++
我改回em++ 1.38.30
./emsdk install sdk-fastcomp-1.38.30-64bit
./emsdk activate --embedded sdk-fastcomp-1.38.30-64bit
source ./emsdk_env.sh
重新回到源码目录进行编译并安装到wasm目录下
./configure -xplatform wasm-emscripten -nomake examples -prefix ../wasmbuild/qtbase
make module-qtbase module-qtdeclarative
make install
成功!
这个时候就能用编译的qmake 的命令行 编译项目拉,配置一下qtcreator会比较方便下一步
比如
$ ~/Qt5.14.1/5.14.1/wasmbuild/qtbase/bin/qmake

$ make
到此命令行的编译环境配置完毕
下面我们配置一下qtcreator界面调试哈
5.设置调试
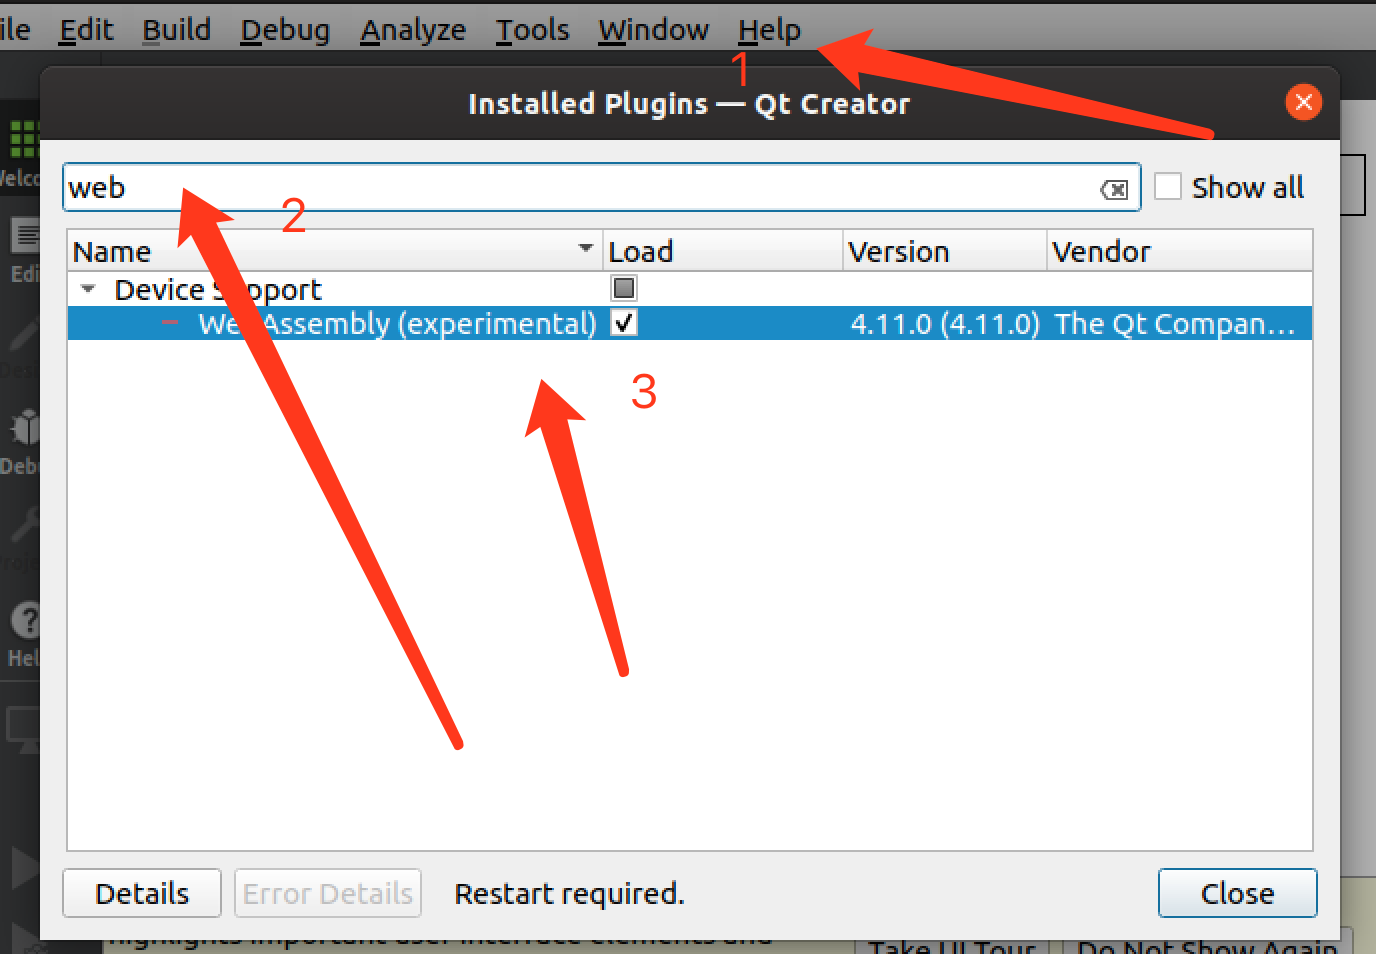
1.qt creator打开webassembly的插件
配置编译器
配置qt版本(qmake)
配置kit
6.运行demo
7.可参考Dockerfile
FROM trzeci/emscripten:1.38.45 AS baseBuild
ARG packages="build-essential git cmake \
python3 \
python \
ninja-build \
build-essential \
wget \
"
# Required for non-interactive timezone installation
RUN ln -fs /usr/share/zoneinfo/Europe/Berlin /etc/localtime
RUN apt-get update && apt-get install -q -yy $packages
RUN mkdir -p /root/dev
WORKDIR /root/dev
# RUN git clone https://github.com/emscripten-core/emsdk.git
# WORKDIR /root/dev/emsdk
# RUN ./emsdk install sdk-fastcomp-1.38.30-64bit
# RUN ./emsdk activate --embedded sdk-fastcomp-1.38.30-64bit
# ENV PATH="/root/dev/emsdk:/root/dev/emsdk/fastcomp-clang/e1.38.30_64bit:/root/dev/emsdk/node/8.9.1_64bit/bin:/root/dev/emsdk/emscripten/1.38.30:${PATH}"
FROM baseBuild AS qtbuilder
# ARG targetBranch=5.14.1
RUN mkdir -p /development
WORKDIR /development
# RUN git clone --branch=$targetBranch git://code.qt.io/qt/qt5.git
RUN wget https://download.qt.io/archive/qt/5.14/5.14.1/single/qt-everywhere-src-5.14.1.tar.xz
RUN tar -xvJf qt-everywhere-src-5.14.1.tar.xz
WORKDIR /development/qt5
RUN mkdir -p /development/qt5_build
WORKDIR /development/qt5_build
RUN /development/qt-everywhere-src-5.14.1/configure -xplatform wasm-emscripten -nomake examples -nomake tests -opensource -feature-thread --confirm-license -prefix /usr/local/Qt
RUN make module-qtbase module-qtdeclarative -j `grep -c '^processor' /proc/cpuinfo`
# RUN make -j `grep -c '^processor' /proc/cpuinfo`
RUN make install
# Construct the build image from user perspective
FROM baseBuild AS userbuild
COPY --from=qtbuilder /usr/local/Qt /usr/local/Qt
ENV PATH="/usr/local/Qt/bin:${PATH}"
WORKDIR /project/build
# CMD qmake /project/source && make -j `grep -c '^processor' /proc/cpuinfo`
CMD /usr/local/Qt/bin/qmake /project/source && make -j `grep -c '^processor' /proc/cpuinfo`
参考资料:
1.Qt for WebAssembly官方教程
https://doc.qt.io/qt-5/wasm.html
2. WebAssembly的限制
https://doc.qt.io/qt-5/qtwebassembly-platform-notes.html
3. Qt 下载地址主源
4.emscripten编译器的文档
https://emscripten.org/docs/getting_started/index.html
qt webassembly emscripten build 编译 环境搭建 JS调用C++传参的更多相关文章
- Emscripten编译环境搭建--将C和C++编译成JS
Emscripten编译环境搭建--将C和C++编译成JS 需求:linux环境下用js执行c.c++文件,使用emscirpten编译器 目标:搭建好Emscripten环境 环境:Ubuntu16 ...
- ubuntu12.04下安卓编译环境搭建总结
前言: 因为工作需要,经常要编译安卓下的动态库,公司有已经搭建好环境的服务器,但是第一自己想自己搭建一下了解一个整个过程,另外,公司的服务器也经常出现问 题,导致编译不了,所以就想自己搭建环 ...
- IoT设备程序开发及编译环境搭建初体验
引言 Mirai事件一经曝出,立即引领了一轮研究IoT设备的热潮.目前,对Mirai的报告大多只是在对其功能实现上的介绍,却很少提及如何实现IoT设备程序开发的测试环境.本文在对Mirai的源码研究的 ...
- Tiny4412 开发板 编译环境搭建【转】
本文转载自:http://blog.csdn.net/beijiwei/article/details/51055369 版权声明:本文为博主原创文章,未经博主允许不得转载. /*********** ...
- windows下cocos2dx3.0开发环境及Android编译环境搭建
cocos2dx更新到了3.x版本号,自己一直没有换,如今开发组要求统一换版本号,我就把搭建好开发环境的过程记录下来. 一.Windowns下开发环境搭建 1. 所需工具 1)coc ...
- openwrt(一):openwrt源码下载及编译环境搭建
声明:从网上各位大神的博客学习,整理后记录,非原创. 注:请用非root用户来下载源码 导航: 1. openwrt编译环境搭建 2. openwrt源码下载 3. feeds更新 1. openwr ...
- C语言编程入门之--第二章编译环境搭建
第二章 编译环境搭建 导读:C语言程序如何工作,首先需要编译链接成可执行文件,然后就可以运行在不同的环境中,这个“环境”的意思就是比如说,电脑,手机,路由器,蓝牙音箱等等智能设备中,其中编译器启到了关 ...
- u-boot 移植(一)编译环境搭建
u-boot 移植(一)编译环境搭建 soc:s3c2440 board:jz2440 uboot:u-boot-2016.11 toolchain:gcc-linaro-7.4.1-2019.02- ...
- JS基础之传参(值传递、对象传递)
一.概念 我们需了解什么是按值传递(call by value),什么是按引用传递(call by reference).在计算机科学里,这个部分叫求值策略(Evaluation Strategy). ...
- js 不固定传参
js 不固定传参 CreationTime--2018年7月2日15点18分 Author:Marydon /** * 声明一个函数 * @explain 传参个数不确定 */ function ...
随机推荐
- (K8s学习笔记四)常用命令实例
1.显示Pod的更多信息 kubectl get pod <pod-name> -o wide kubectl get pods -show-all # 查看已经停止的Pod 2.以yam ...
- Vulnhub 靶场 DOUBLETROUBLE: 1
Vulnhub 靶场 DOUBLETROUBLE: 1 前期准备 靶机地址:https://www.vulnhub.com/entry/doubletrouble-1,743/ kali攻击机: 靶机 ...
- Ingress限流
先说结论: ingress节点数量=n0 ingress限流配置 nginx.ingress.kubernetes.io/limit-rps: "n1" nginx.ingre ...
- taro+vue3+TS+Pinia+tailwindcss+NutUI项目创建与开发
一.初始化 1.Taro 基本安装并初始化项目 npx @tarojs/cli init WechatAppDemo -选择框架:vue3 -是否使用ts?y -请选择css预编译器:无 -请选择we ...
- HTML语言基本标签
创建一个HTML文档 <html></html> 设置文档标题以及其他不在WEB网页上显示的信息 <head></head> 设置文档的可见部分 < ...
- Linux 远程数据同步工具详解
一.简介 1 认识 Rsync(remote synchronize)是一个远程数据同步工具,可通过LAN/WAN快速同步多台主机间的文件.Rsync使用所谓的"Rsync算法"来 ...
- Vue后台管理项目中解决需要配置多个端口号问题
背景 登录接口:http://39.98.123.211:8170/ 商品接口:http://39.98.123.211:8510/ 可见前面是地址是一致的,但是端口号不一样. 这就会导致,登录进得去 ...
- 7. 交换排序的阈值(swapThreshold)
1 <!DOCTYPE html> 2 <html lang="zh"> 3 <head> 4 <meta charset="U ...
- Mysql数据库基础第二章:(八)子查询经典案例
Mysql数据库基础系列 软件下载地址 提取码:7v7u 数据下载地址 提取码:e6p9 mysql数据库基础第一章:(一)数据库基本概念 mysql数据库基础第一章:(二)mysql环境搭建 mys ...
- svn提交注释限制
找到svn仓库 目录结构长这样 在hooks下的新建一个名字为pre-commit.bat的可执行文件 注意:findstr后边的.通配符表示一个任意字符,findstr "." ...