
centos 安装单机版 redis4.0.10
redis源码地址: http://download.redis.io/releases/
下载 redis-4.0.10.tar.gz 和 redis-stable.tar.gz
第一步:安装gcc编译环境
yum install gcc-c++
第二步:把redis的源码上传到linux服务器。
第三步:解压缩。
tar -zxvf redis-4.0.10.tar.gz
第四步:进入解压后的文件夹, make
第五步:make install PREFIX=/usr/local/redis
第六步: (忽略,因为已经下载过了 )wget http://download.redis.io/redis-stable.tar.gz(下载redis-cli的压缩包)

第七步:tar xvzf redis-stable.tar.gz(解压)

第八步:cd redis-stable(进入redis-stable目录)

make(安装)

sudo cp src/redis-cli /usr/local/bin/(将redis-cli拷贝到bin下,让redis-cli指令可以在任意目录下直接使用)
按照上面的指令执行之后redis-cli就可以正常执行了,注意上面的几条指令必须都执行,make是单独的一条。
启动redis
两种启动方式,前端启动、后台启动。
前端启动:
cd /usr/local/redis
./redis-server
后台启动:
1、复制redis.conf到redis的安装目录
2、修改redis.conf。修改daemonize yes
3、[root@bogon redis]# ./redis-server redis.conf
redis关闭
到redis节点目录下执行如下命令
redis-cli -p 端口号 shutdown
redis启动
./redis-server 参数
参数:redis.conf文件全路径
客户端
redis-cli -p 端口 -h ip地址 <-c>连接集群时使用此参数
默认端口:6379
Ip:localhost(127.0.0.1)
RedisDesktopManager:
只能在单机版环境使用。不支持redis集群。
其他记录:
没想到在进行连接时报了下面这么一个错,fuck,Linux上的redis还真是麻烦,哪像windows上的redis这么简单一解压完事
Exception in thread "main" redis.clients.jedis.exceptions.JedisDataException: DENIED Redis is running in protected mode because protected mode is enabled, no bind address was specified, no authentication password is requested to clients. In this mode connections are only accepted from the loopback interface. If you want to connect from external computers to Redis you may adopt one of the following solutions:

 1) Just disable protected mode sending the command 'CONFIG SET protected-mode no' from the loopback interface by connecting to Redis from the same host the server is running, however MAKE SURE Redis is not publicly accessible from internet if you do so. Use CONFIG REWRITE to make this change permanent.

 2) Alternatively you can just disable the protected mode by editing the Redis configuration file, and setting the protected mode option to 'no', and then restarting the server

 3) If you started the server manually just for testing, restart it with the '--protected-mode no' option.

 4) Setup a bind address or an authentication password. NOTE: You only need to do one of the above things in order for the server to start accepting connections from the outside.

    at redis.clients.jedis.Protocol.processError(Protocol.java:127)

    at redis.clients.jedis.Protocol.process(Protocol.java:161)

    at redis.clients.jedis.Protocol.read(Protocol.java:215)

    at redis.clients.jedis.Connection.readProtocolWithCheckingBroken(Connection.java:340)

    at redis.clients.jedis.Connection.getStatusCodeReply(Connection.java:239)

    at redis.clients.jedis.BinaryJedis.ping(BinaryJedis.java:196)

at com.example.redis.JedisTest.main(JedisTest.java:24)- 1
- 2
- 3
- 4
- 5
- 6
- 7
- 8
- 9
- 10
- 11
- 12
经过我英语八级的翻译,上面一共提供了四种解决方案,但是综合考虑为了简单起见只需要执行以下几步即可:
1.修改redis.conf配置文件,将绑定的ip地址端口号给注释见下图
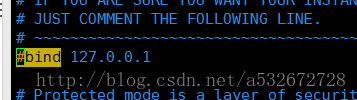
2.由于Linux上的redis处于安全保护模式,这就让你无法从虚拟机外部去轻松建立连接,这里就有两种解决方法,一种是在redis.conf中设置保护模式为no,见下图

3.另外一种方式是加上安全认证,即redis默认是没有密码的可以直接登录,这里加上密码,配置见下图

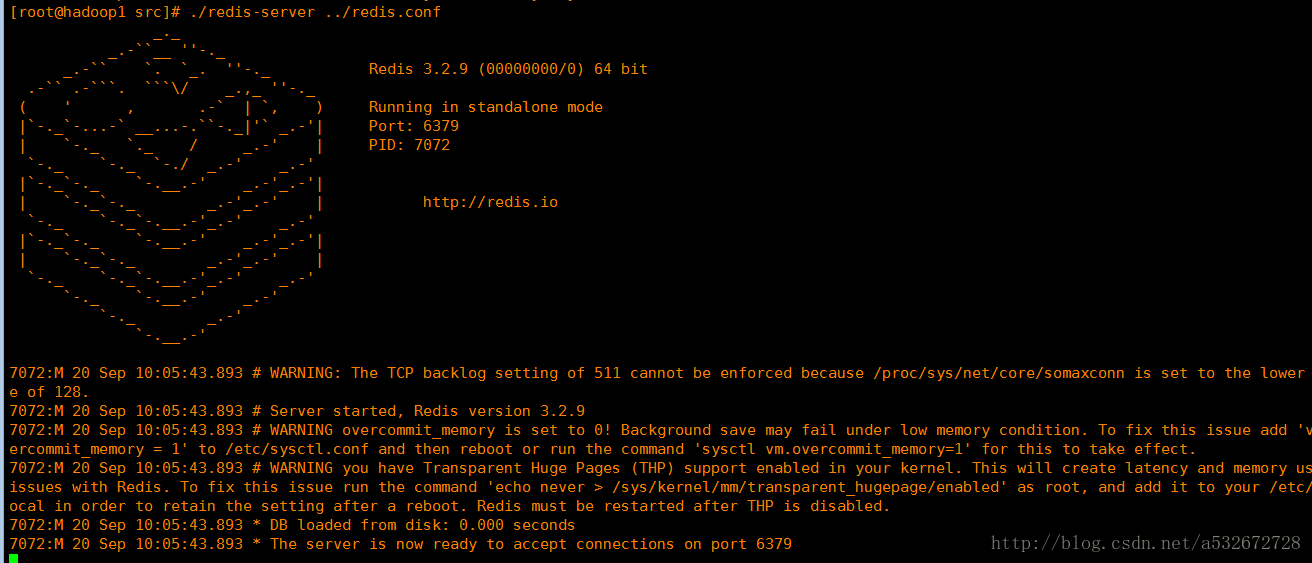
4.好吧,此时你以为轻松解决问题了,于是再次在Linux启动redis服务器后,在外部连接还是报错,真是too young too native,起初我以为是配置没有生效,因为明明配置都写好了,于是杀掉redis的相关进程重启服务,结果发现还是没卵用。最后研究发现问题所在:之前启动redis-server并没有指定配置文件,而Linux上的redis比较操蛋的一点就是如果你不指定配置文件去启动,那么你做的修改就没有用,会读取默认配置(PS:至于这个默认配置在哪我也不清楚),于是用下面这种方式启动就可以使修改的配置文件生效,至于config rewrite命令我测试了并没有什么卵用。
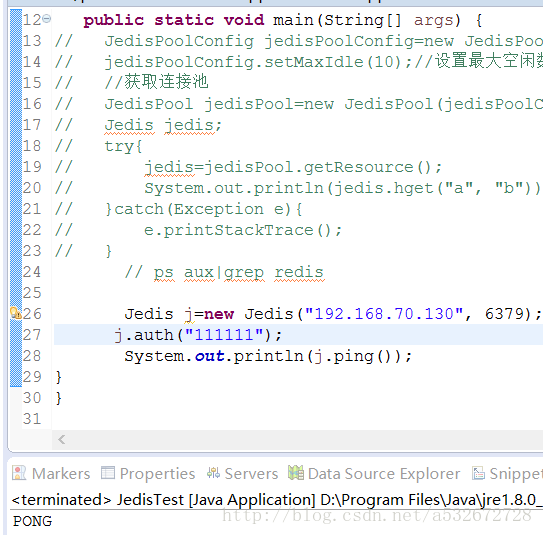
5.再次测试,在windows上进行jedis连接测试,出现下面pong(),恼人的错误终于消失了,比起windows版本的redis还真是让人龟毛啊,如果配置了密码认证,调用Jedis的auth方法输入密码即可
修改redis.conf文件,将daemonize改为yes
无奈在最后关闭redis的服务的时候,redis服务报错redis (error) ERR Errors trying to SHUTDOWN. Check logs.,怎么关都关不掉,百度一番,信息很少,无奈多次尝试,终于解决。方法如下:
打开redis安装目录下的redis.conf找到
# The working directory.
#
# The DB will be written inside this directory, with the filename specified
# above using the 'dbfilename' configuration directive.
#
# The Append Only File will also be created inside this directory.
#
# Note that you must specify a directory here, not a file name.
dir ./
这一段
把die ./改为相应的目录,如"dir /home/distance/redis_dbfiles/"(这里需要注意最后的斜杠不能忘记,如果缺失斜杠可能会解析为文件而非目录),保存。
centos 安装单机版 redis4.0.10的更多相关文章
- 【安装】Redis4.0.10在Linux环境搭建
1.下载Redis后上传到指定目录 2.解压 tar -zxvf redis-4.0.10.tar.gz 3.进入加压后的目录并编译 cd redis-4.0.10 make 4.进入src目录安装 ...
- CentOS 7安装Redis4.0.10
cd /usr/local/src && wget http://download.redis.io/releases/redis-4.0.10.tar.gz && t ...
- Redis(二)CentOS7安装Redis4.0.10与集群搭建
一 Redis单机安装 1 Redis下载安装 1.1 检查依赖环境(Redis是C语言开发,编译依赖gcc环境) [root@node21 redis-]$ gcc -v -bash: gcc: c ...
- redis4.0.10安装与常用命令
----------- redis安装 ------------------------------------------- 安装reids:https://redis.io/download (4 ...
- Linux下安装redis-4.0.10
1.下载redis-4.0.10 在redis官网(https://redis.io/download)下载redis-4.0.10 2.将安装包上传至Linux服务器 在Linux服务器根目录下创建 ...
- ubuntu 14.04 安装 Apache Thrift 0.10
1.到官网下载源码压缩文件 https://thrift.apache.org/download 2.安装依赖软件,可以参考 https://thrift.apache.org/docs/instal ...
- 安装新版redis4.0.6
看看新版本有那些特性提升,测试用!先安装 网址:https://redis.io/download 获取:wget http://download.redis.io/releases/redis-4. ...
- centos php7.1 redis4.0.9 安装扩展phpredis
1.扩展列表 https://github.com/phpredis/phpredis/releases [root@VM_27_0_centos server]# ls data lib.pl my ...
- centos 安装 redis3.2.0 集群
这里创建6个redis节点,其中三个为主节点,三个为从节点. redis和端口对应关系: 127.0.0.1:7000 127.0.0.1:7001 127.0.0.1:7002 从: 127.0.0 ...
随机推荐
- FastAdmin 插件刷新缓存出现 200 红色提示框解决 always_populate_raw_post_data
使用 phpStudy 全新安装了 FastAdmin,PHP 版本是 5.6. 安装完成后在刷新插件缓存时出现红色 提示消息,但状态 为 200. 打开 F12 看,发现有以下信息. <br ...
- Python学习系列(一)(基础入门)
Python入门 本系列为Python学习相关笔记整理所得,IT人,多学无害,多多探索,激发学习兴趣,开拓思维,不求高大上,只求懂点皮毛,作为知识储备,不至于落后太远.如果兴趣学习者,推荐一个基础视频 ...
- slf4j-api、slf4j-log4j12、log4j 之间是什么关系?
slf4j:Simple Logging Facade for Java,为java提供的简单日志Facade.Facade:门面,更底层一点说就是接口.他允许用户以自己的喜好,在工程中通过slf4j ...
- npm 构建时,次要版本变化引起的问题
问题:下载项目后,运行 npm install 或 yarn install,vue-awesome-swiper 做的功能显示不正常. 解决:从 官方网站 文件 README.md 中找到: // ...
- 设置zedgraph鼠标拖拽和局部放大属性(转帖)
说一下几个属性的意义和具体应用: (1)鼠标拖拽显示区域 PanModifierKeys ->> Gets or sets a value that determines which mo ...
- js往div里添加table
$("#div").append("<table><tr align='center'>" +"<td >&quo ...
- git Push failed: Could not read from remote repository 解决方案
解决的办法很简单,进入Android Studio配置界面,选择Version Control——>Git,在右边界面切换SSH下拉选项为Native,最后重新提交.如果解决你的问题,记得分享哦 ...
- bzoj1047 理想的正方形
Description 有一个a*b的整数组成的矩阵,现请你从中找出一个n*n的正方形区域,使得该区域所有数中的最大值和最小值的差最小. Input 第一行为3个整数,分别表示a,b,n的值第二行至第 ...
- 服务端tomcat的简单监控
由于线上对tomcat监控处于失控的状态(只能通过跳转,简单地jstack/jstat进行监控),故需要针对tomcat快速查看其运行状态 Tomcat-manager 在tomcat/web ...
- 使用Golang进行性能分析(Profiling)
转自:http://www.cppblog.com/sunicdavy/archive/2015/04/11/210308.html 本文介绍游戏服务器的性能分析, web服务器性能分析不在本文分析范 ...