
cobbler全自动批量安装部署linux
Cobbler的设计方式:
Cobbler的配置结构基于一组注册的对象。每个对象表示一个与另一个实体相关联的实体(该对象指向另一个对象,或者另一个对象指向该对象)。当一个对象指向另一个对象时,它就继承了被指向对象的数据,并可覆盖或添加更多特定信息。以下对象类型的定义
Distros(发行版):表示一个操作系统,它承载了内核和initrd的信息,以及内核参数等其他数据

Profile(配置文件):包含一个发行版、一个kickstart文件以及可能的存储库,还包含更多特定的内核参数等其他数据

Systems(系统):表示要配给的额机器。它包含一个配置文件或一个景象,还包含IP和MAC地址、电源管理(地址、凭据、类型)、(网卡绑定、设置valn等)

Repository(镜像):保存一个yum或rsync存储库的镜像信息

Image(存储库):可替换一个包含不属于此类比的额文件的发行版对象(例如,无法分为内核和initrd的对象)。
基于注册的对象以及各个对象之间的关联,Cobbler知道如何更改文件系统以反应具体配置。因为系统配置的内部是抽象的,所以您可以仅关注想要执行的操作。
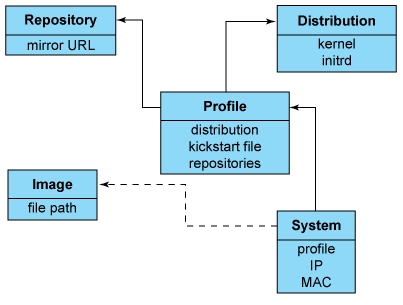
Cobbler流程图如下:
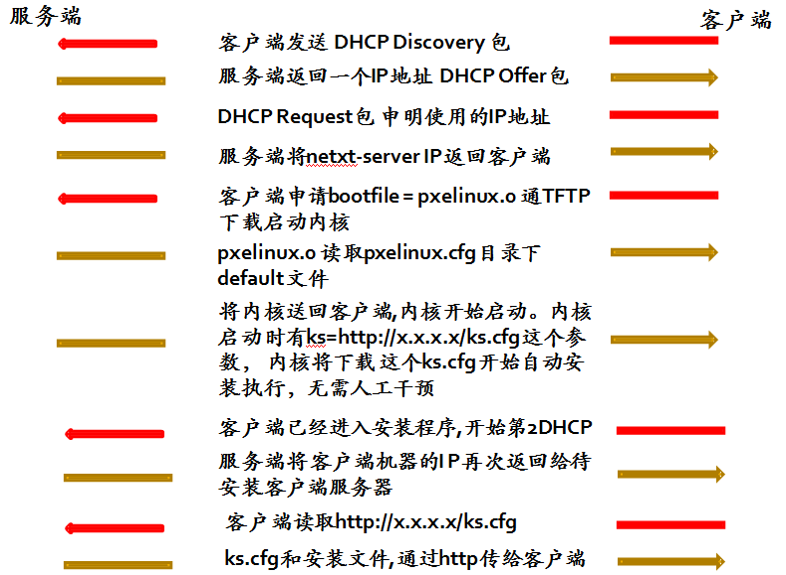
1、安装cobbler和所需组件
cobbler可以手动编译安装,也可以基于yum源的安装,如果使用yum源安装,则需要配置epel源epel源可以通过下载官网的epel源的目录来实现。由于cobbler是由python而写,所以还要安装python环境。
https://fedoraproject.org/wiki/EPEL/zh-cn
# yum -y install cobbler cobbler-web pykickstart debmirror cman createrepo httpd dhcp xinted tftp-server rsync python
2、配置cobbler依赖的服务,本次操作使用cobbler来管理这些依赖服务,即使用cobbler提供的模板配置文件。
cobbler可行管理这些服务中的部分甚至全部,但需要配置/etc/cobbler/settings文件中的“manager_dhcp”、 “manage_tftpd”、“manage_rsync”、“manage_dns”来定义,同时各种服务都有着不同的实现方式,如果进行自定义,需要通过修改/etc/cobbler/modules.conf配置文件中各个服务的模块参数的值来实现。
#在Cobbler主配置文件/etc/cobbler/settings设置开启自带的dhcp服务开关
# sed -i 's/manage_dhcp: 0/manage_dhcp: 1/g' /etc/cobbler/settings
# sed -i 's/manage_tftpd: 0/manage_tftpd: 1/g' /etc/cobbler/settings
# sed -i 's/manage_rsync: 0/manage_rsync: 1/g' /etc/cobbler/settings
# sed -i 's/pxe_just_once: 0/pxe_just_once: 1/g' /etc/cobbler/settings
按环境需求编辑以下dhcp模板文件部分内容
# vim  /etc/cobbler/dhcp.template
subnet 172.16.65.0 netmask 255.255.255.0 {
     option routers             172.16.65.1;
     option domain-name-servers 8.8.8.8;
     option subnet-mask         255.255.255.0;
     range dynamic-bootp        172.16.65.100 172.16.65.200;
     default-lease-time         21600;
     max-lease-time             43200;
     next-server                $next_server;
3、检查配置文件,需要在启动httpd服务的前提下检查
#service httpd start

#service cobblerd start
#cobbler sync    #让cobbler接管所依赖的服务,应用cobbler自带的模板配置

#cobbler check

The following are potential configuration items that you may want to fix:

1 : The 'server' field in /etc/cobbler/settings must be set to something other than localhost, or kickstarting features will not work.  This should be a resolvable hostname or IP for the boot server as reachable by all machines that will use it.

2 : For PXE to be functional, the 'next_server' field in /etc/cobbler/settings must be set to something other than 127.0.0.1, and should match the IP of the boot server on the PXE network.

3 : some network boot-loaders are missing from /var/lib/cobbler/loaders, you may run 'cobbler get-loaders' to download them, or, if you only want to handle x86/x86_64 netbooting, you may ensure that you have installed a *recent* version of the syslinux package installed and can ignore this message entirely.  Files in this directory, should you want to support all architectures, should include pxelinux.0, menu.c32, elilo.efi, and yaboot. The 'cobbler get-loaders' command is the easiest way to resolve these requirements.

4 : change 'disable' to 'no' in /etc/xinetd.d/rsync

5 : comment out 'dists' on /etc/debmirror.conf for proper debian support

6 : comment out 'arches' on /etc/debmirror.conf for proper debian support

7 : The default password used by the sample templates for newly installed machines (default_password_crypted in /etc/cobbler/settings) is still set to 'cobbler' and should be changed, try: "openssl passwd -1 -salt 'random-phrase-here' 'your-password-here'" to generate new one

8 : fencing tools were not found, and are required to use the (optional) power management features. install cman or fence-agents to use them

Restart cobblerd and then run 'cobbler sync' to apply changes.
以上8个问题的解决方法
1.修改/etc/cobbler/settings文件中的server参数的值为提供cobbler服务的主机对应的ip地址
2.修改/etc/cobbler/settings文件的next_server参数的值为提供PXE服务的主机的ip
#sed -i 's/next_server: 127.0.0.1/next_server: 172.16.65.222/g' /etc/cobbler/settings
3.如果当前节点可以访问互联网,执行“cobbler get-loaders”命令下载pxelinux.0,menu.c32,elibo.efi,yaboot文件,否则则需要安装syslinux程序 包,复制/usr/share/syslinux/中的pxelinux.0,menu.c32等文件至/var/lib/cobbler /loaders目录中
4.将/etc/xinetd.d/rsync 中的disable改为no
#sed -i '/disable/s/yes/no/g' /etc/xinetd.d/rsync
#sed -i '/disable/s/yes/no/g' /etc/xinetd.d/tftp
5.注释/etc/debmirror.conf文件中的@dists="sid";一行
6.注释/etc/debmirror.conf文件中的@arches="i386";一行
# sed -i 's/@dists=\"sid\";/#@dists=\"sid\";/g' /etc/debmirror.conf
# sed -i 's/@arches=\"i386\";/#@arches=\"i386\";/g' /etc/debmirror.conf
7.执行 openssl passwd -1 -salt 'haha' '123456' 生成密码 其中haha为随意给出的干扰码,并将密码串替换掉/etc/cobbler/settings中的default_password_crypted
default_password_crypted: "$1$haha$T7nt1ThchynsrEviA0KLT0" #该密码即创建完成后新装系统的root密码
8.安装cam和fence-agents来实现电源管理
4、同步数据,与此同时同步配置文件到dhcp服务器,并自动重新启动dhcp服务。
# /etc/init.d/xinetd restart
# service cobblerd restart
# cobbler sync #每次对各依赖服务的配置进行修改完毕后都需要执行此命令进行同步生效,尤其是dhcp服务被接管后,更改dhcp配置的话,应该配 置/etc/cobbler/dhcp.template文件,否则如果每次执行cobbler sync同步的话,/etc/dhcp/dhcpd.conf会被覆盖。
5、导入系统镜像到cobbler
# mount /dev/cdrom /media
# cobbler import --name=centos6.5-x86-64 --path=/media/
6、设置profile,使用自定义的ks文件进行全自动安装
# cobbler profile edit --name=centos-6.5-x86_64 --distro=centos-6.5-x86_64 --kickstart=/var/lib/cobbler/kickstarts/centos65.ks
profile默认是采用 /var/lib/cobbler/kickstarts/sample_end.ks 模板文件作为ks文件,而不是default.ks
此至,cobbler全部安装完毕,可以进行客户端服务器系统PXE安装了。
以下为详细说明:
在第一次导入系统镜像时,cobbler会给安装镜像指定一个默认的kickstart自动安装文件
例如:CentOS-5.10-x86_64版本的kickstart自动安装文件为:/var/lib/cobbler/kickstarts/sample.ks
cobbler profile report --name CentOS-5.10-x86_64 #查看profile设置
cobbler distro report --name CentOS-5.10-x86_64 #查看安装镜像文件信息
cobbler profile remove --name=CentOS-5.10-x86_64 #移除profile
cobbler profile add --name=CentOS-5.10-x86_64 --distro=CentOS-5.10-x86_64 --kickstart=/var/lib/cobbler/kickstarts/CentOS-5.10-x86_64.ks #添加
cobbler profile edit --name=CentOS-5.10-x86_64 --distro=CentOS-5.10-x86_64 --kickstart=/var/lib/cobbler/kickstarts/CentOS-5.10-x86_64.ks #编辑
命令:cobbler profile add|edit|remove --name=安装引导名 --distro=系统镜像名 --kickstart=kickstart自动安装文件路径
--name:自定义的安装引导名,注意不能重复
--distro:系统安装镜像名,用cobbler distro list可以查看
--kickstart:与系统镜像文件相关联的kickstart自动安装文件
#查看Cobbler列表
cobbler list
cobbler report
cobbler profile report
cobbler distro list
#通过profile查找对应的kickstart自动安装文件文件
例如:
ksfile=$( cobbler profile report --name CentOS-5.10-x86_64|grep -E '^Kickstart' |head -n 1|cut -d ':' -f 2 );cat $ksfile;
重复上面的操作,把其他的系统镜像文件和kickstart自动安装文件关联起来
7、配置cobbler_web
cobbler_web支持多种认证方式,如authn_configfil、authn_ldap或 authn_pam等,默认为authn_denyall拒接所有。
下面我们使用authn_pam模块认证cobbler_web用户
# vim  /etc/cobbler/modules.conf
  [authentication]
   module = authn_pam
# useradd wjoyxt

# passwd wjoyxt

# vim  /etc/cobbler/users.conf

 [admins]

 admin = "wjoyxt"
访问:https://172.16.65.222/cobbler_web
此时我们可以手动的添加删除配置,更灵活的对distro 、profile等组件的管理!
参考资料:http://www.osyunwei.com/archives/7606.html
http://www.cnblogs.com/xiaocen/p/3734767.html
---------------------------------------------------------------------------------------------
如果想要实现进入启动项时输入密码的话,需要在以下两个模板文件中添加红色项:
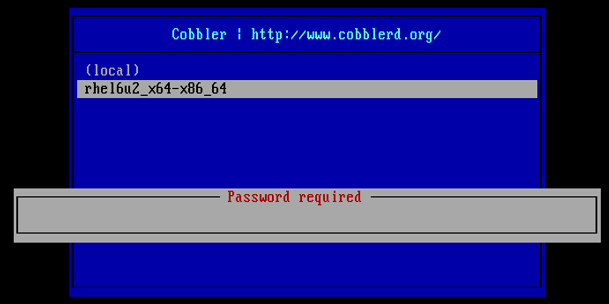
vim /etc/cobbler/pxe/pxedefault.template
DEFAULT menu

PROMPT

MENU TITLE Cobbler | http://cobbler.github.com

MENU MASTER PASSWD $1$haha$T7nt1ThchynsrEviA0KLT0

TIMEOUT

TOTALTIMEOUT

ONTIMEOUT $pxe_timeout_profile

LABEL local

        MENU LABEL (local)

        MENU DEFAULT

        LOCALBOOT -

$pxe_menu_items

MENU end
vim /etc/cobbler/pxe/pxeprofile.template
LABEL $profile_name

        MENU PASSWD

        kernel $kernel_path

        $menu_label

        $append_line

        ipappend
------------------------------------------------------------------

当出现如上报错的话,修改 /var/lib/cobbler/kickstarts/centos65.ks 中的"url --url=...." 改完后cobbler sync同步一次配置,并且确保此url是可以被正常访问的。
此处是 url --url="http://172.16.65.222/cobbler/ks_mirror/CentOS-6.4-x86_64/"
cobbler全自动批量安装部署linux的更多相关文章
- Cobbler全自动批量安装部署Linux系统
说明: Cobbler服务器系统:CentOS 5.10 64位 IP地址:192.168.21.128 需要安装部署的Linux系统: eth0(第一块网卡,用于外网)IP地址段:192.168.2 ...
- 解决pxe网络批量安装部署linux遇到的问题和解决方法
解决“出现Unable to retrieve 192.168.0.100/var/www/html/images/install.img错误” 分析:我们必须了解这个错误出现在哪个阶段才能正确找到错 ...
- kvm cobbler无人值守批量安装操作系统
kvm cobbler无人值守批量安装操作系统 cobbler:一个自动网络安装系统的工具,集成PEX.dhcp.dns.tftpd.sync等服务.可以供大家管理安装操作系统 kvm:Linux系统 ...
- (转)Cobbler无人值守批量安装Linux系统
本文目录: 1.1 pxe安装系统 1.2 cobbler基本介绍 1.3 安装和配置cobbler 1.3.1 安装cobbler 1.3.2 配置dhcp和tftp 1.4 cobbler从本地光 ...
- Cobbler自动化批量安装Linux操作系统 - 运维总结
一.Cobbler简述 Cobbler是一个自动化和简化系统安装的工具,通过使用网络引导来控制和启动安装.Cobbler的特性包括存储库镜像.Kickstart模板和连接电源管理系统.Cobbler通 ...
- Cobbler自动化批量安装linux服务器的操作记录
Cobbler为何物?Cobbler是一个快速网络安装linux的服务,而且在经过调整也可以支持网络安装windows.该工具使用python开发,小巧轻便(才15k行python代码),使用简单的命 ...
- cobbler一键批量安装系统
cobbler是一个可以实现批量安装系统的Linux应用程序.它有别于pxe+kickstart,cobbler可以实现同个服务器批量安装不同操作系统版本. 一.系统环境准备及其下载cobbler 1 ...
- cobbler无人值守批量安装Linux系统
本文目录: 1.1 pxe安装系统 1.2 cobbler基本介绍 1.3 安装和配置cobbler 1.3.1 安装cobbler 1.3.2 配置dhcp和tftp 1.4 cobbler从本地光 ...
- 利用cobbler无人值守批量安装centos
准备: 至少两台机器,分别用作cobbler的服务端和安装测试端 准备一个iso的安装文件,最好是4G多的那个dvd包,以前用网易源上那个centos 6.4 x86_64 通过xen安装时就报错:N ...
随机推荐
- tomcat源码阅读之部署器
我们知道web应用是用Context实例表示的,而Context是部署到Host实例中的,因此tomcat的部署器是关联的Host实例.Context实例可以用WAR文件部署,也可以把整个web应用的 ...
- vue-resource 知识点
vue-resource 发送json到后端: Content-Type字段的类型是application/json,就会有options请求. http://www.ruanyifeng.com/b ...
- JUC锁之 框架
根据锁的添加到Java中的时间,Java中的锁,可以分为"同步锁"和"JUC包中的锁". 同步锁 即通过synchronized关键字来进行同步,实现对竞争资源 ...
- mysql 聚簇索引、非聚簇索引的区别
索引分为聚簇索引和非聚簇索引. 以一本英文课本为例,要找第8课,直接翻书,若先翻到第5课,则往后翻,再翻到第10课,则又往前翻.这本书本身就是一个索引,即"聚簇索引". 如果要找& ...
- MongoDB GUI( Robo 3T) Shell使用及操作
Robo 3T 下载及使用 之前叫 Robomongo,后面被收购了,改名 Robo 3T . 下载链接:https://robomongo.org/download (需要FQ) 安装步骤省略,下一 ...
- linux下syscall函数 间接系统调用
NAME syscall - 间接系统调用 SYNOPSIS #define _GNU_SOURCE #include ...
- php使用ffmpeg向视频中添加文字字幕
这篇文章主要介绍了PHP使用ffmpeg给视频增加字幕显示的方法,实例分析了php操作ffmpeg给视频增加字母的技巧,具有一定参考借鉴价值,需要的朋友可以参考下. 本文实例讲述了PHP使用ffmpe ...
- python中os常用方法
python中OS常用方法 Python的标准库中的os模块包含普遍的操作系统功能.如果你希望你的程序能够与平台无关的话,这个模块是尤为重要的.即它允许一个程序在编写后不需要任何改动,也不会发生任何问 ...
- 《Linux内核精髓:精通Linux内核必会的75个绝技》一HACK #21FUSE
HACK #21FUSE 本节将介绍使用用户进程的文件系统框架—FUSE.FUSE概要FUSE(Filesystem in Userspace,用户空间文件系统),是用来生成用户空间的一般进程的框架. ...
- Erasure Coding(纠删码)深入分析
http://blog.sina.com.cn/s/blog_57f61b490102viq9.html 1.前言 Swift升级到2.0大版本后宣称开始支持纠删码,这其实是一个很有意义的特性,主要是 ...