181102 Python环境搭建(安装Sublime Text3)
利用Pycharm来编写、执行python代码是一个不错的选择,Pycharm的安装的确也很方便。但是偶然看到别人用Sublime Text来编写、执行代码,觉得很酷。所以自己动手搭建环境。
1. 下载Sublime Text3--->win7系统,安装在C盘(wherever you like,你高兴就好。反正容量不大)C:\Program Files\Sublime Text 3(我的路径);
2. 打开cmd命令窗口,安装Flake8
pip install flake8
3. 下载Package Control(点击Clone download下的Download ZIPx下载)--->在以下路径解压:C:\Users\Administrator\AppData\Roaming\Sublime Text 3(这个路径很容易找:打开软件--首选项(Preferences--Browse Packages)--打开目录后往后退一步就OK了)
注意:不推荐通过Preferences下面的Packges Control来安装,后续会有各种问题。


4. 安装插件:
通过快捷键:Ctrl+shift+p打开插一个输入框--->输入install--->按Enter键(窗口左下角就会出现Loading repositories)--->Loading结束后优惠弹出一个输入框(如下图10%***的那个)--->再这个输入框中输入插件名称,再按Enter键就开始安装插件了。
需要安装的插件是:SublimeLinter,SublimeLinter-flake8,Anaconda,SoDaReloaded,Zen Tabs,SublimeREPL等(安装插件后,重启生效)


5. 设置
5.1 Preferences--->Settings--->User
 {

     "caret_style": "solid",

     "color_scheme": "Packages/Tomorrow Color Schemes/Tomorrow-Night.tmTheme",

     "draw_white_space": "all",

     "file_exclude_patterns":

     [

         "*.pyc",

         "*.pyo",

         "*.exe",

         "*.dll",

         "*.obj",

         "*.o",

         "*.a",

         "*.lib",

         "*.so",

         "*.dylib",

         "*.ncb",

         "*.sdf",

         "*.suo",

         "*.pdb",

         "*.idb",

         ".DS_Store",

         "*.class",

         "*.psd",

         "*.db",

         "*.sublime-workspace"

     ],

     "fold_buttons": false,

     "folder_exclude_patterns":

     [

         ".svn",

         ".git",

         ".hg",

         "CVS",

         "__pycache__"

     ],

     "font_face": "Ubuntu Mono",

     "font_options":

     [

         "directwrite",

         "subpixel_antialias",

         "no_bold",

         "no_italic"

     ],

     "font_size": 16,

     "highlight_line": "true",

     "highlight_modified_tabs": true,

     "ignored_packages":

     [

         "Vintage"

     ],

     "indent_guide_options":

     [

         "draw_active"

     ],

     "line_padding_bottom": 1,

     "line_padding_top": 2,

     "scroll_past_end": true,

     "shift_tab_unindent": true,

     "theme": "SoDaReloaded Dark.sublime-theme",

     "wide_caret": "true"

 }
5.2 Preferences--->Package Settings--->Package Control--->Setting User
 {

     "bootstrapped": true,

     "in_process_packages":

     [

     ],

     "installed_packages":

     [

         "Anaconda",

         "Package Control",

         "SideBarEnhancements",

         "SublimeLinter",

         "SublimeLinter-flake8",

         "SublimeREPL",

         "Theme - SoDaReloaded",

         "Tomorrow Color Schemes",

         "View In Browser",

         "Zen Tabs"

     ],

     "repositories":

     [

         "https://github.com/n1k0/SublimeHighlight/tree/python3",

         "https://github.com/n1k0/SublimeHighlight/tree/python3"

     ]

 }
5.3 Prefereces-->Package Settings-->SublimeLinter-->Settings
改两处:把Default替换成user;添加python执行文件的路径在paths中。


5.4 Preferences--->Package Settings--->Zen Tab--->Setting User
 {

     "open_tab_limit":5,

     "highlight_modified_tabs":true,

     "show_full_path":false

 }
5.5 Preferences--->Settings - Syntax Specific
 "tab_size": 4,

 "translate_tabs_to_spaces": true,

 "trim_trailing_white_space_on_save": true,

 "ensure_newline_at_eof_on_save": true,

 "rulers": [

 72,

 79

 ],

 "word_wrap": true,

 "wrap_width": 80
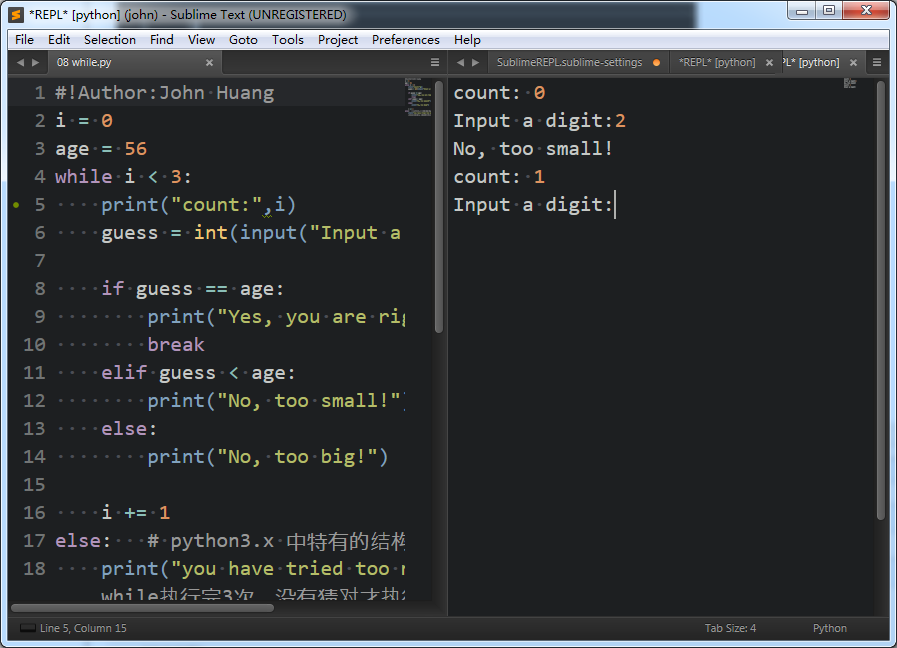
6. 设置执行程序的快捷键
可以通过点击Tools-->SublimeREPL-->Python-->Python-RUN current file来执行代码,但是过于麻烦,我们可以设置快捷键F5来执行程序。
设置方法:Preferences-->Key Bindings,添加如下代码。设置好后,运行效果如下图:
 [

     {

         "keys":["f5"],

         "caption":"SublimeREPL:Pyhton - RUN current file",

         "command":"run_existing_window_command",

         "args":

         {

             "id":"repl_python_run",

             "file":"config\\python\\Main.sublime-menu"

         }

     }

 ]
本文参考:让你用sublime写出最完美的python代码--windows环境
181102 Python环境搭建(安装Sublime Text3)的更多相关文章
- 4.7 Sublime Text3 中配置 Python环境 --之上安装Sublime 3
返回总目录 目录: 1.展示效果: 2.缺优分析: 3.下载Sublime Text3 (一)展示效果: 1.能够交互式编写Python代码: 2.可以编写文件式Python代码: 3.能够自动补齐代 ...
- Python环境下的Sublime Text3无法使用input()函数
在Sublime Text3中写好Python程序,按Ctrl+B运行程序,在控制台中输入内容,回车,程序没有响应.最后求助网络,找到了解决办法. 一.安装插件SublimeREPL 按Ctrl+Sh ...
- 在windows环境下基于sublime text3的node.js开发环境搭建
首先安装sublime text3,百度一堆,自己找吧.理论上sublime text2应该也可以.我只能说一句:这个软件实在是太强悍了. 跨平台,丰富的插件体系,加上插件基本上就是一个强悍的ide了 ...
- Python 环境搭建(Win 安装以及Mac OS 安装)
千里之行始于足下,今天我们先来学习 Python 环境搭建. 注意:本系列教程基于 Python 3.X Python 环境搭建 Win 安装 打开 Python 官网 https://www.pyt ...
- 下载安装sublime text3,打包sublime text3便携版,激活sublime text3,配置sublime text3的php环境
下载安装sublime text3: http://www.sublimetext.com/3 安装就一直下一步 打包sublime text3便携版 : 参考http://segmentfa ...
- Python环境搭建和pycharm安装
Python环境搭建和pycharm安装 本人安装环境为Windows10系统,下载的Python版本为3.4社区版本,可参考 1.下载Python3.4版本 官网:https://www.pytho ...
- python环境搭建以及pycharm的安装
要实现python自动化,环境和IDE都是必须的.我选择的是python3.4.4版本以及pycharm社区版. 资源链接:https://pan.baidu.com/s/1hRqyRe3J ...
- python环境搭建、pycharm安装
一. 实验目标 (1) Python环境搭建 (2) 会pycharm安装和使用 (3) 了解python程序设计流程 二. 实验内容 1.勾选Add Python 3.7 ...
- python环境搭建以及jupyter notebook的安装和启动
一.Python 环境搭建 本章节我们将向大家介绍如何在本地搭建Python开发环境. Python可应用于多平台包括 Linux 和 Mac OS X. 你可以通过终端窗口输入 "pyth ...
随机推荐
- about:firefox set
about:config new:browser.cache.disk.parent_directory (disk.cache) new:browser.cache.offline.parent_ ...
- BH1750FVI调试
在写此博客之前已经看了几遍数据手册了,现在已经调试成功了,可以读出来数据,还有不如意的地方,写此博客整理下思路. 1.BH1750fvi介绍. 这是一个16bit的数字传感器,使用I2C作为通信接口, ...
- python爬虫得到unicode编码处理方式
在用python做爬虫的时候经常会与到结果中包含unicode编码,需要将结果转化为中文,处理方式如下 str.encode('utf-8').decode('unicode_escape')
- Unity优化之贴图
默认情况下当你把图片导入到unity中时,unity会自动把图片转换成最适合当前平台的压缩格式.如果你有一些特殊的需求,unity也提供了覆盖默认压缩格式的方法,如下图 在图片的Inspector窗口 ...
- python笔记06-10
作者:Vamei 出处:http://www.cnblogs.com/vamei 基础06 循环 for循环 举例: range的用法 这个函数的功能是新建一个表.这个表的元素都是整数,从0开始,下 ...
- 如果想让某个块状元素右对齐,脑子里不要就一个float:right,很多时候,margin-left:auto才是最佳的实践
- neo4j-cypher
cypher查询务必在需要查询的节点上加上标签,否则数据量一大查询就会非常慢(在查询时必须设置实体标签,否则不走索引),另外Neo4j索引做好了查询的优化基本上就完成了80%.需要注意index是建立 ...
- vue 部署404
https://www.cnblogs.com/kevingrace/p/6126762.html 在nginx部署https://www.jianshu.com/p/7017143e3f7a 在ap ...
- IDEA创建完整目录maven项目
鉴于第三次利用idea建立完整目录maven项目时仍要反反复复地问度娘,特此记录 1.第一步,进行project-> 勾选Create from archetype,搜索maven.archet ...
- socket.io笔记
API 网址:https://socket.io/get-started/chat/ 页面上引入: 服务器: 每一个socket可以触发一个断开连接事件: 如果需要使用jquery: 引入网页的jqu ...