
flask 在视图函数中验证表单
在视图函数中验证表单
因为现在的basic_form视图同时接受两种类型的请求:GET请求和POST请求。所以我们要根据请求方法的不同执行不同的代码。具体来说,首先是实例化表单,如果是GET请求,就渲染模板;如果是POST请求,就调用validate()方法验证表单数据。
请求的HTTP方法可以通过requeset.method属性获取,我们可以使用下面的方式来组织视图函数:
from flask import request

@app.route('/basic', methods=['GET','POST'])

def basic():

    form = LoginForm() #GET + POST

    #如果用户提交表单,并且数据通过验证

    if request.method == 'POST' and form.validate():

    #获取表单数据并保存

        ...#处理POST请求

    return render_template('forms/basic.html',form=form)  #处理GET请求
当请求方法是GET时,会跳过这个if语句,渲染basic.html模板;当请求的方法是POST时(说明用户提交了表单),则验证表单数据。这会逐个字段(包括CSRF令牌字段)调用附加的验证器进行验证。
因为WTForms会自动对CSRF令牌字段进行验证,如果没有渲染该字段会导致验证出错,错误消息为”CSRF token is missing”。
Flask-WTF提供的validate_on_submit()方法合并了这两个操作(判断请求方法和验证表单字段),因此上面的代码可以简化为:
@app.route('/basic', methods=['GET','POST'])

def basic():

    form = LoginForm()

    if form.validate_on_submit():

        ...

    return render_template('basic.html', form=form)
除了POST方法,如果请求的方法是PUT、PATCH和DELETE方法,form.validate_on_submit()也会验证表单数据。
如果form.validate_on_submit()返回True,则表示用户提交了表单,且表单通过验证,那么我们就可以在这个if语句内获取表单数据,比如:
from flask import Flask, render_template, redirect, url_for, flash

@app.route('/basic', methods=['GET', 'POST'])

def basic():

    form = LoginForm()

    if form.validate_on_submit():

        username = form.username.data

        flash('Welcom home, %s!' % username)

        return redirect(url_for('hello'))

    return render_template('basic.html', form = form)

@app.route('/hello')

def hello():

    return render_template('hello.html')
表单类的data属性是一个匹配所有字段与对应数据的字典,我们一般直接通过”form.字段属性名.data”的形式来获取对应字段的数据。例如,form.username.data返回username字段的值。在代码中,当表单验证成功后,我们获取了username字段的数据,然后用来发送一条flash消息,最后将程序重定向到hello视图。
表单的数据一般会存储到数据库中,在这里将数据填充到flash()函数里。
先访问127.0.0.1:5000/basic
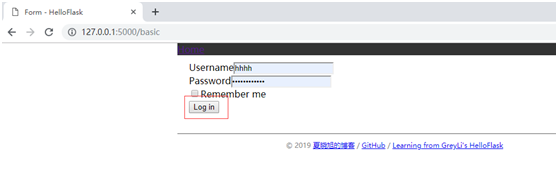
输入表单内容,点击提交,触发validate_on_submit()方法
发送闪现消息
闪现消息在重定向后的hello页面显示
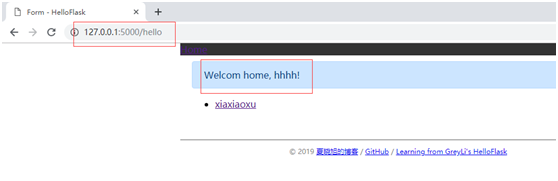
程序的逻辑是:访问/basic页面,提交了表单后,触发了视图函数里的表单验证逻辑,之后flash了消息,然后重定向到hello视图(页面重定向到/hello地址),在hello页面显示了flash消息
在basic模板中定义了表单,继承了base模板:
basic.html:
{% extends 'base.html' %}

{% block content %}

<form method="post">

    {{ form.csrf_token }}<!-- 渲染CSRF令牌隐藏字段 -->

    {{ form.username.label }}{{ form.username }}<br>

    {{ form.password.label }}{{ form.password }}<br>

    {{ form.remember }}{{ form.remember.label }}<br>

    {{ form.submit }}<br>

</form>

{% endblock %}
同时hello.html模板也继承了basic模板,在basic模板中有get_flashed_messages()方法来处理flash消息,使得basic视图的flash消息能够在重定向到hello.html模板时可以在页面显示
base.html模板:
<!DOCTYPE html>
<html lang="en">
<head>
{% block head %}
{% block metas %}
<meta charset="utf-8">
{% endblock metas %}
<title>
{% block title %}
Form - HelloFlask
{% endblock title %}
</title>
<link rel="stylesheet" type="text/css" href="{{ url_for('static', filename='favicon.ico') }}">
{% block styles %}
<link rel="stylesheet" type="text/css" href="{{ url_for('static', filename='style.css') }}">
{% endblock styles %}
{% endblock head %}
</head>
<body>
<nav>
{% block nav %}
<ul>
<li><a href="{{ url_for('basic') }}">Home</a></li>
</ul>
{% endblock %}
</nav> <main>
{% for message in get_flashed_messages() %}
<div class="alert">
{{ message }}
</div>
{% endfor %}
{% block content %}{% endblock %}
</main>
<footer>
{% block footer %}
<small> © 2019 <a href="https://www.cnblogs.com/xiaxiaoxu/" title="xiaxiaoxu's blog">夏晓旭的博客</a> /
<a href="https://github.com/xiaxiaoxu/hybridDrivenTestFramework" title="Contact me on GitHub">GitHub</a> /
<a href="http://helloflask.com" title="A HelloFlask project">Learning from GreyLi's HelloFlask</a>
</small>
{% endblock %}
</footer>
{% block scripts %}{% endblock %}
</body>
</html>
hello.html模板:
{% extends 'base.html' %}

{% block content %}

<title>Hello from Flask</title>

<ul>

    <li><a href="{{ url_for('hello') }}">xiaxiaoxu</a></li>

</ul>

{% endblock %}
flask 在视图函数中验证表单的更多相关文章
- Flask从入门到精通之在视图函数中处理表单
在新版hello.py 中,视图函数index() 不仅要渲染表单,还要接收表单中的数据.更新后的index() 视图函数如下: @app.route('/') def index(): name = ...
- 在springboot中验证表单信息(六)
构建工程 创建一个springboot工程,由于用到了 web .thymeleaf.validator.el,引入相应的起步依赖和依赖,代码清单如下: 1 2 3 4 5 6 7 8 9 10 11 ...
- Spring Boot教程(六)在springboot中验证表单信息
构建工程 创建一个springboot工程,由于用到了 web .thymeleaf.validator.el,引入相应的起步依赖和依赖,代码清单如下: <dependencies> &l ...
- flask中的表单文件上传
在表单中上传文件时,一定要加入 enctype="multipart/form-data" 属性 为什么要加入这个属性呢: enctype就是encodetype就是编码类型的意思 ...
- flask 在模板中渲染表单
在模板中渲染表单 为了能够在模板中渲染表单,我们需要把表单类实例传入模板.首先在视图函数里实例化表单类LoginForm,然后再render_template()函数中使用关键脑子参数form将表单实 ...
- SpringBoot非官方教程 | 第十九篇: 验证表单信息
转载请标明出处: 原文首发于:https://www.fangzhipeng.com/springboot/2017/07/11/springboot19/ 本文出自方志朋的博客 这篇文篇主要简述如何 ...
- ValidForm验证表单
在做项目时,要求熟悉项目中验证表单的插件,所以学习一下validForm这个插件 http://validform.rjboy.cn/document.html#validformObject
- AngularJS中的表单验证
AngularJS中的表单验证 AngularJS自带了很多验证,什么必填,最大长度,最小长度...,这里记录几个有用的正则式验证 1.使用angularjs的表单验证 正则式验证 只需要配置一个正则 ...
- angular中的表单验证
angular中的表单验证很强大, 一共有5中验证信息,$valid,$invalid,$pristine,$dirty,$error. $valid-----当验证通过的时候,为true,不通过的时 ...
随机推荐
- 常用的shell脚本(安全方向)
更多shell脚本参考:https://blog.51cto.com/zero01/2046242 1.拒绝密码撞库攻击的ip shell脚本:实现对登录主机失败10次以上的ip进行拒绝登录 #! / ...
- 报错解决——Disconnected:No supported authentication methods available
该问题是由于ssh链接未允许远程密码认证导致的 解决方法 通过管理控制台进入系统,查看 /etc/ssh/sshd_config配置文件中是否包含以下配置 PasswordAuthentication ...
- Python3学习之路~2.8 文件操作实现简单的shell sed替换功能
程序:实现简单的shell sed替换功能 #实现简单的shell sed替换功能,保存为file_sed.py #打开命令行输入python file_sed.py 我 Alex,回车后会把文件中的 ...
- JavaScript 全栈工程师培训教程 - 阮一峰
http://www.ruanyifeng.com/blog/2016/11/javascript.html https://github.com/ruanyf/jstraining 我现在的技术方向 ...
- CMDB资产管理
.传统运维和自动化运维的区别: 传统运维: 1.项目上线: a.产品经理前期调研(需求分析) b.和开发进行评审 c.开发进行开发 d.测试进行测试 e.交给运维人员进行上线 上线: 直接将代码交给运 ...
- spark sql的agg函数,作用:在整体DataFrame不分组聚合
.agg(expers:column*) 返回dataframe类型 ,同数学计算求值 df.agg(max("age"), avg("salary")) df ...
- Angular知识点
Angular CLI 快速创建Angular 2项目和组件, 压缩打包发布. 7.创建包含html.ts.css文件的命令cd到需要创建文件的目录下面,输入如下命令 ng g c myFile 会自 ...
- 10.110.20.16上的MQTT server
apollo 10.110.20.16 root XnlzeNP2 /var/lib/apache-apollo-1.7.1 1 创建broker 进入 bin 创建 broker ...
- mybatis oracle 插入自增记录 获取主键值 写回map参数
网上搜了好多文章照着弄都返回不了主键给map, 实践证明要在传入的map参数里写回插入的主键,要这样写 <selectKey resultType="java.lang.Integer ...
- node 图片验证码生成
var captchapng = require('captchapng'); var http = require("http") var server = http.creat ...