
mybatis用mybatis-generator-core-1.3.5.jar自动生成实体类
原文出处:https://blog.csdn.net/shuoshuo_12345/article/details/80626241,本文只是个人总结而已!
方法1:在pom文件中添加依赖
只需在搭建好的项目里创建一个包用于生成就好:
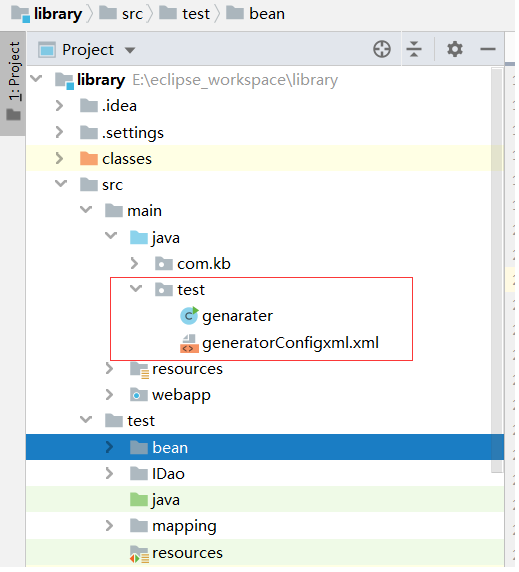
1、需要用到的jar包有:
        <dependency>

            <groupId>org.mybatis.generator</groupId>

            <artifactId>mybatis-generator-core</artifactId>

            <version>1.3.5</version>

        </dependency>

        <dependency>

            <groupId>org.mybatis</groupId>

            <artifactId>mybatis</artifactId>

            <version>${mybatis.version}</version>

        </dependency>

        <dependency>

              <groupId>mysql</groupId>

              <artifactId>mysql-connector-java</artifactId>

              <version>5.1.25</version>

        </dependency>

2、需要用到的配置文件有:

generatorConfigxml中配置代码如下:(表自行设计,设计好以后套用就好了)

<?xml version="1.0" encoding="UTF-8"?>

<!DOCTYPE generatorConfiguration

  PUBLIC "-//mybatis.org//DTD MyBatis Generator Configuration 1.0//EN"

  "http://mybatis.org/dtd/mybatis-generator-config_1_0.dtd">

<generatorConfiguration>

<!-- 数据库驱动 -->

<classPathEntry location="E:\rxyb\workspace\testWeb\WebContent\WEB-INF\lib\mysql-connector-java-5.1.38.jar"/>

    <context id="DB2Tables"  targetRuntime="MyBatis3">

        <commentGenerator>
      <!--如果生成日期,会造成即便修改一个字段,整个实体所有属性都发生变化,不利于版 E制,所以设置为true -->

            <property name="suppressDate" value="true"/>

            <!-- 是否去除自动生成的注释 true:是 : false:否 -->

            <property name="suppressAllComments" value="false"/>

        </commentGenerator>

        <!--数据库链接URL,用户名、密码 -->

    <jdbcConnection driverClass="com.mysql.jdbc.Driver" connectionURL="jdbc:mysql://127.0.0.1:3306/testconnection" userId="root" password="">

        </jdbcConnection>

        <javaTypeResolver>

            <property name="forceBigDecimals" value="false"/>

        </javaTypeResolver>

        <!-- 生成模型的包名和位置-->

        <javaModelGenerator targetPackage="test.domain" targetProject="src">

            <property name="enableSubPackages" value="true"/>

            <property name="trimStrings" value="true"/>

        </javaModelGenerator>

        <!-- 生成映射文件的包名和位置-->

        <sqlMapGenerator targetPackage="test.mapping" targetProject="src">

            <property name="enableSubPackages" value="true"/>

        </sqlMapGenerator>

        <!-- 生成DAO的包名和位置-->

        <javaClientGenerator type="XMLMAPPER" targetPackage="test.IDao" targetProject="src">

            <property name="enableSubPackages" value="true"/>

        </javaClientGenerator>

        <!-- 要生成的表 tableName是数据库中的表名或视图名 domainObjectName是实体类名-->

        <table tableName="student" domainObjectName="Student" enableCountByExample="false" enableUpdateByExample="false" enableDeleteByExample="false"

        enableSelectByExample="false" selectByExampleQueryId="false"></table>

    </context>

//enableCountByExample,enableUpdateByExample,enableDeleteByExample,enableSelectByExample,selectByExampleQueryId
这些表示是否产生example类,产生则可以使用他们代替手写sql语句!!!,对应mapper.xml文件也会不一样(可以百度查看如何使用genarater生成的example类)

</generatorConfiguration>
3、需要写一个main方法,用于运行generator.xml文件:
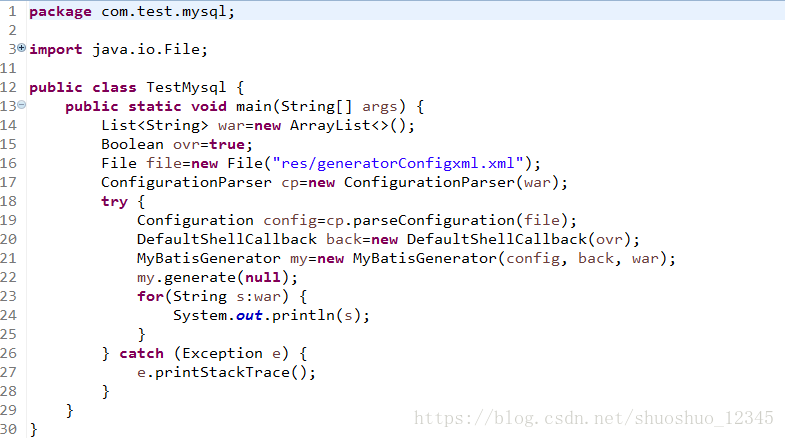
代码如下:
import java.io.File;

import java.util.ArrayList;

import java.util.List;

import org.mybatis.generator.api.MyBatisGenerator;

import org.mybatis.generator.config.Configuration;

import org.mybatis.generator.config.xml.ConfigurationParser;

import org.mybatis.generator.internal.DefaultShellCallback;

public class TestMysql {

public static void main(String[] args) {

List<String> war=new ArrayList<>();

Boolean ovr=true;

File file=new File("res/generatorConfigxml.xml");

ConfigurationParser cp=new ConfigurationParser(war);

try {

Configuration config=cp.parseConfiguration(file);

DefaultShellCallback back=new DefaultShellCallback(ovr);

MyBatisGenerator my=new MyBatisGenerator(config, back, war);

my.generate(null);

for(String s:war) {

System.out.println(s);

}

} catch (Exception e) {

e.printStackTrace();

}

}

}
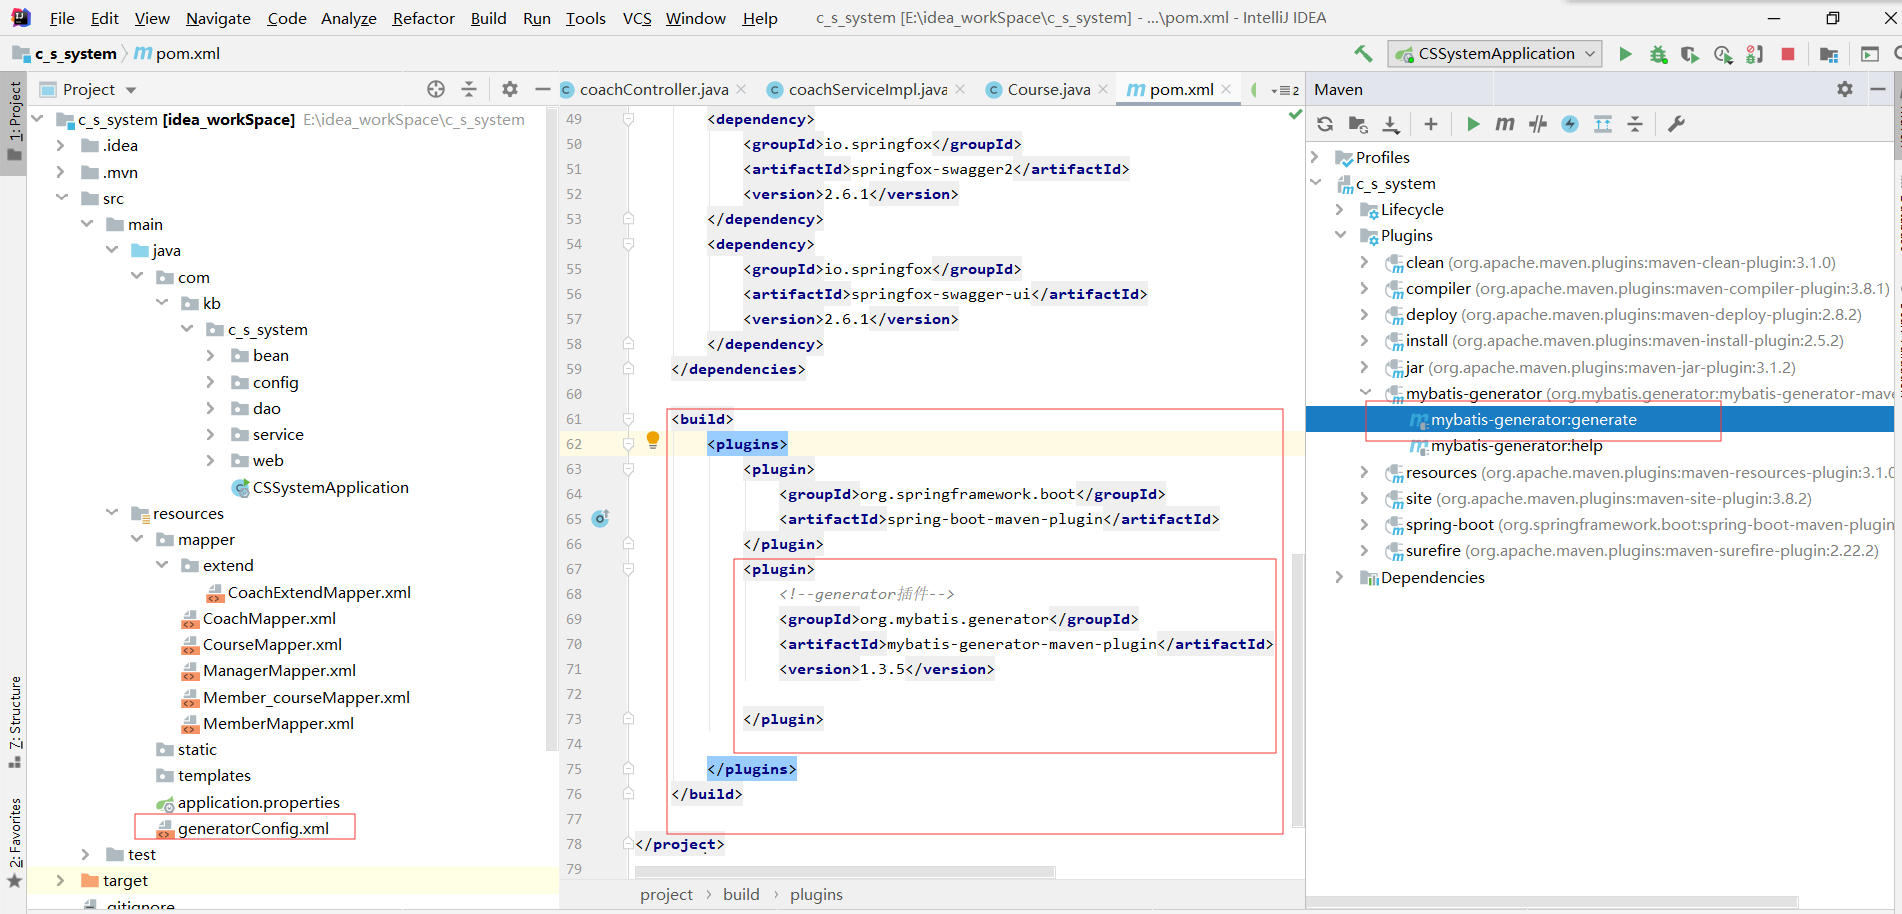
方法2:在pom文件中加入插件
1,引入插件
2,在resources下,创建一个generatorConfig.xml配置文件并修改generatorConfig.xml文件

代码如下:
<?xml version="1.0" encoding="UTF-8"?>

<!DOCTYPE generatorConfiguration

        PUBLIC "-//mybatis.org//DTD MyBatis Generator Configuration 1.0//EN"

        "http://mybatis.org/dtd/mybatis-generator-config_1_0.dtd">

<!-- mybatis-generator的核心配置文件 -->

<generatorConfiguration>

    <classPathEntry location="E:\maven\repository\mysql\mysql-connector-java\5.1.25\mysql-connector-java-5.1.25.jar" />

    <context id="DB2Tables" targetRuntime="MyBatis3">

    <commentGenerator>

      <!-- 如果生成日期,会造成即使修改一个字段,整个实体类所有属性都会发生变化,不利于版本控制,所以设置为true -->

      <property name="suppressDate" value="true"/>

      <!-- 是否去除自动生成的注释 true:是 : false:否 -->

      <property name="suppressAllComments" value="false"/>

  </commentGenerator>

<jdbcConnection driverClass="com.mysql.jdbc.Driver" connectionURL="jdbc:mysql://localhost:3306/cssystem" userId="root" password="root">

<!--设置为 true 可以获取 tables 信息, 解决生成文件缺少 xxxByPrimaryKey 的问题 -->

 <property name="useInformationSchema" value="true"/>

 </jdbcConnection>

 <!--指定生成的类型为java类型,避免数据库中number等类型字段 -->

 <javaTypeResolver >

 <property name="forceBigDecimals" value="false" />

 </javaTypeResolver>

 <!--自动生成的实体的存放包路径 -->

 <javaModelGenerator targetPackage="com.kb.c_s_system.bean" targetProject="./src/main/java">

 <property name="enableSubPackages" value="true" /> <property name="trimStrings" value="true" />

 </javaModelGenerator>

 <!--自动生成的*Mapper.xml文件存放路径 -->

 <sqlMapGenerator targetPackage="mapper" targetProject="./src/main/resources">

 <property name="enableSubPackages" value="true" />

 </sqlMapGenerator>

 <!--自动生成的*Mapper.java存放路径 -->

 <javaClientGenerator type="XMLMAPPER" targetPackage="com.kb.c_s_system.dao" targetProject="./src/main/java">

 <property name="enableSubPackages" value="true" />

 </javaClientGenerator>

 <!-- 映射配置 -->

 <!-- <table tableName="c_user" domainObjectName="User" >

 </table> <table tableName="c_course" domainObjectName="Course" ></table>-->

 <table tableName="coach" domainObjectName="Coach" >

 </table> <table tableName="course" domainObjectName="Course" >

 </table> <table tableName="member" domainObjectName="Member" >

 </table> <table tableName="manager" domainObjectName="Manager" >

 </table> <table tableName="member_course" domainObjectName="Member_course" >

 </table>

 <!--运行命令-->

 <!-- mvn -Dmybatis.generator.overwrite=true mybatis-generator:generate-->

 </context>

 </generatorConfiguration>
3,点击maven,运行插件即可
example使用方法:
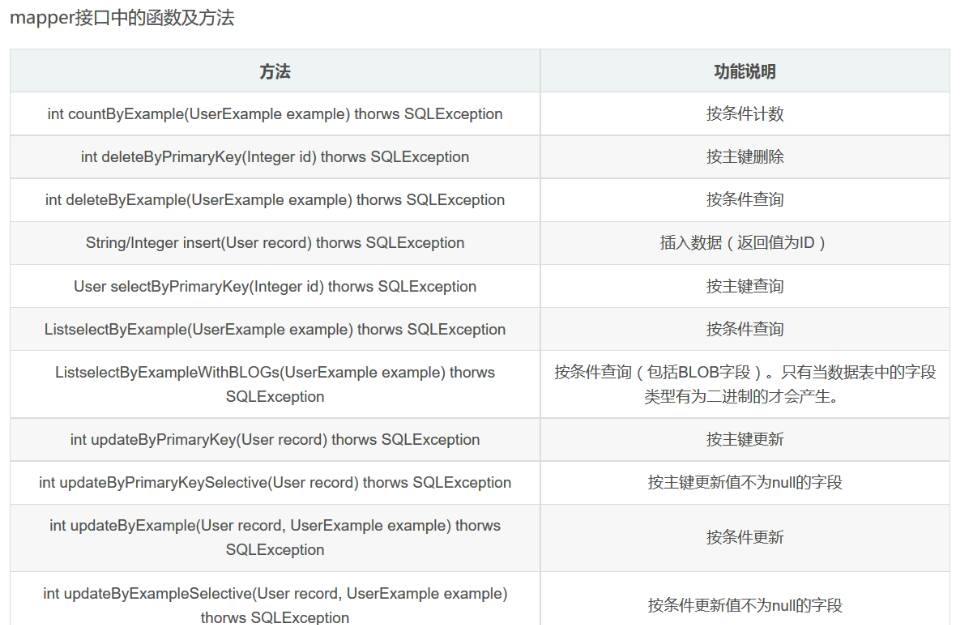


mybatis用mybatis-generator-core-1.3.5.jar自动生成实体类的更多相关文章
- 使用.net core efcore根据数据库结构自动生成实体类
源码 github,已更新最新代码 https://github.com/leoparddne/GenEntities/ 使用的DB是mysql,所有先nuget一下mysql.data 创建t4模板 ...
- Mybatis自动生成实体类
Maven自动生成实体类需要的jar包 一.pom.xml中 <project xmlns="http://maven.apache.org/POM/4.0.0" xmlns ...
- Springboot mybatis generate 自动生成实体类和Mapper
https://github.com/JasmineQian/SpringDemo_2019/tree/master/mybatis Springboot让java开发变得方便,Springboot中 ...
- Mybatis自动生成实体类、dao接口和mapping映射文件
由于Mybatis是一种半自动的ORM框架,它的工作主要是配置mapping映射文件,为了减少手动书写映射文件,可以利用mybatis生成器,自动生成实体类.dao接口以及它的映射文件,然后直接拷贝到 ...
- .net core 中简单封装Dapper.Extensions 并使用sqlsuger自动生成实体类
引言 由公司需要使用dapper 同时支持多数据库 又需要支持实体类 又需要支持sql 还需要支持事务 所以采用了 dapper + dapperExtensions 并配套 生成实体类小工具的方 ...
- Mybatis自动生成实体类和实体映射工具
Mybatis Mysql生成实体类 用到的Lib包: mybatis-generator-core-1.3.2.jarmysql-connector-java-5.1.30.jar 1. 创建一个文 ...
- mybatis根据数据库表结构自动生成实体类,dao,mapper
首先, pom需要引入 <!-- mysql --> <dependency> <groupId>mysql</groupId> <artifac ...
- mybatis根据表逆向自动化生成代码(自动生成实体类、mapper文件、mapper.xml文件)
.personSunflowerP { background: rgba(51, 153, 0, 0.66); border-bottom: 1px solid rgba(0, 102, 0, 1); ...
- mybatis generator自动生成 实体类, sqlmap配置文件 详细介绍
我使用的是Eclipse Luna 装了自己常用的插件, generator也是其中一个推荐下载 MyBatis_Generator_1.3.1.zip离线安装包 <?xml version=& ...
随机推荐
- DVWA全级别之File Inclusion(文件包含)
File Inclusion File Inclusion,意思是文件包含(漏洞),是指当服务器开启allow_url_include选项时,就可以通过php的某些特性函数(include(),req ...
- Flink 应用的一致性保障
应用一致性保障 在Flink中,会自动做检查点,用于故障时恢复一个应用.在恢复时,application的state信息可以根据最近完成的检查点进行重建,并继续运行.不过,仅将一个applicatio ...
- linux系统下如何打开端口
1)vi /etc/sysconfig/iptables 2)-A INPUT -m state --state NEW -m tcp -p tcp --dport xxxxxxxxxx -j ACC ...
- Oracle的表空间、用户和模式
Oracle 的 表空间(Tablespace).用户(User).模式(Schema) 前面有整理了一篇 Oracle 数据库(database) 与 实例(instance) 的概念及关系整理 ...
- td标签内容:换行和不换行设置
td标签内容:换行和不换行设置 固定td内容不换行:<td style="white-space:nowrap">内容</td>或<td nowrap ...
- 程序员必需知道的Chrome使用技巧(入门篇)
浏览器版本 Chrome Canary 新增一些没有经过Google工程师的测试或使用的浏览器功能版本.Chrome Dev让大多数开发人员主要使用此版本来测试对浏览器的重大版本功能版本.Chrome ...
- WSAGetLastError错误原因的博客与时间函数
https://blog.csdn.net/skc361/article/details/9254507 https://blog.csdn.net/HK_5788/article/details/4 ...
- Bugku-CTF之文件包含2 (150)
Day37 文件包含2
- 网站复制工具:HTTrack
HTTrack简介: HTTrack是Kali中内置的工具,主要用于克隆网站.渗透测试人员可以利用它来在自主可控制的环境中查看该网站的完整内容:所有离线文件.同时可以利用该网站的副本来开发假冒的钓鱼网 ...
- Mysql2docx自动生成数据库说明文档
[需要python3.0以上] 首先安装Mysql2docx,如下: pip install Mysql2docx 然后打开pycharm,新建test.py # python from Mysql2 ...