ListView + ArrayAdapter + 接口回调
众所周知,ListView是安卓最为频繁使用的控件,但是,随着人们审美观的提高,一些初级的ListView已经满足不了需求了,于是,我们必须为自己定制一套专属的ListView,这就需要用到适配器,ArrayAdapter可以满足大部分需求,在自己定制适配器的过程中,我遇到了许许多多的问题,希望把我的心得交给大家,免得大家再重蹈覆辙,下面进入实战。
我们的终极界面是这样的:
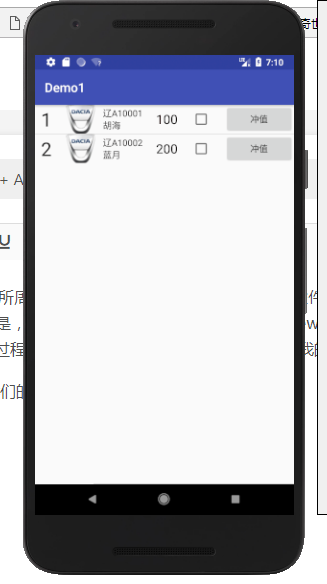
此图是静态截面图
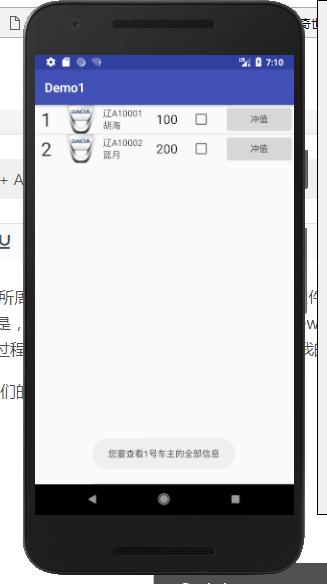
此图是点击ID为1的整行信息后的效果图
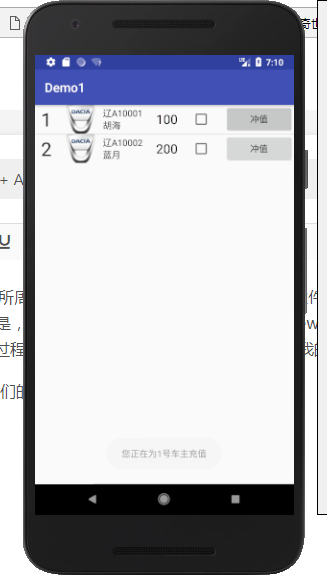
此图是点击ID为1中的按钮后的效果图
下面开始步入正题
完成这整个项目需要完成以下条目:
1.为每个ListView中的元素编写一个通用界面。
2.为每个元素写一个通用适配器。
3.在主界面中添加一个ListView。
4.实例化元素并与ArrayAdapter绑定,并添加全局和内部点击事件。
1.开始编写元素布局(这里叫Node)
<?xml version="1.0" encoding="utf-8"?>

<LinearLayout xmlns:android="http://schemas.android.com/apk/res/android"

    android:layout_width="match_parent"

    android:layout_height="120px"

    android:orientation="horizontal"

    android:descendantFocusability="blocksDescendants">            //如果不写这句代码,会使最外层元素点击无效

    <TextView

        android:id="@+id/order"

        android:layout_width="wrap_content"

        android:layout_height="match_parent"

        android:layout_weight="1"

        android:layout_gravity="center"

        android:textSize="30dp"

        android:textColor="@color/theme"

        android:gravity="center"

        />

    <ImageView

        android:id="@+id/logo"

        android:layout_width="wrap_content"

        android:layout_height="match_parent"

        android:layout_weight="1"

        android:layout_gravity="center"

        />

    <LinearLayout

        android:id="@+id/info"

        android:layout_width="wrap_content"

        android:layout_height="match_parent"

        android:layout_weight="1"

        android:gravity="center_vertical"

        android:layout_gravity="center"

        android:orientation="vertical">

        <TextView

            android:id="@+id/car_order"

            android:layout_width="wrap_content"

            android:layout_height="wrap_content"

            android:textColor="@color/theme"

            />

        <TextView

            android:id="@+id/name"

            android:layout_width="wrap_content"

            android:layout_height="wrap_content"

            android:textColor="@color/theme"

            />

    </LinearLayout>

    <TextView

        android:id="@+id/money"

        android:layout_width="wrap_content"

        android:layout_height="match_parent"

        android:layout_weight="1"

        android:gravity="center_vertical"

        android:textColor="@color/black"

        android:textSize="20dp"

        />

    <CheckBox

        android:id="@+id/jud"

        android:layout_width="wrap_content"

        android:layout_height="match_parent"

        android:layout_weight="1"

        android:layout_gravity="center"

        />

    <Button

        android:id="@+id/delta"

        android:layout_width="wrap_content"

        android:layout_height="match_parent"

        android:layout_weight="1"

        android:layout_gravity="center"

        android:text="冲值"/>

</LinearLayout>
需要在values的布局下的colors布局界面中添加如下代码:
<color name="black">#080000</color>

<color name="theme">#282626</color>
还需要在drawble目录下放一张50 * 50(推荐大小)的名为Logo.png的图片
2.为元素写一个管理类(Node类)。
public class Node {

    private int order;

    private int logo;

    private String car_order;

    private String name;

    private int money;

    private CheckBox jud;

    private Button delta;

    public Node(int order,int logo,String name,int money){

        this.order = order;

        this.logo = logo;

        this.car_order = "辽A1000" + order;

        this.name = name;

        this.money = money;

    }

    public int getorder(){

        return order;

    }

    public String getcar_order(){

        return car_order;

    }

    public int getlogoID(){

        return logo;

    }

    public String getname(){

        return name;

    }

    public int getmoney(){

        return money;

    }

}
2.为元素写一个适配器.
public class NodeAdapter extends ArrayAdapter<Node>{

    private int resourceId;

    public NodeAdapter(Context context, int resourceId, List<Node> objects){

        super(context,resourceId,objects);

        this.resourceId = resourceId;

    }

    @Override

    public View getView(final int position, View convertView, ViewGroup parent) {

        Node node = getItem(position);

        //View view = LayoutInflater.from(getContext()).inflate(resourceId, null);

        View view;

        ViewHolder holder;

        if(convertView == null){

            view = LayoutInflater.from(getContext()).inflate(resourceId,parent,false);

            holder = new ViewHolder();

            holder.order = (TextView)view.findViewById(R.id.order);

            holder.logo = (ImageView)view.findViewById(R.id.logo);

            holder.car_order = (TextView)view.findViewById(R.id.car_order);

            holder.name = (TextView)view.findViewById(R.id.name);

            holder.money = (TextView)view.findViewById(R.id.money);

            holder.jud = (CheckBox)view.findViewById(R.id.jud);

            holder.delta = (Button)view.findViewById(R.id.delta);

            view.setTag(holder);

        }else{

            view = convertView;

            holder = (ViewHolder)view.getTag();

        }

        holder.order.setText(node.getorder() + "");

        holder.logo.setImageResource(node.getlogoID());

        holder.car_order.setText(node.getcar_order());

        holder.name.setText(node.getname() + "");

        holder.money.setText(node.getmoney() + "");

        holder.jud.setTag(position);

        holder.delta.setTag(position);

        holder.delta.setOnClickListener(new View.OnClickListener() {

            @Override

            public void onClick(View v) {

                itemSelect.seleId(position);

            }

        });

        return view;

    }

    public interface onItemSelect{                //回调接口

        void seleId(int i);

    }

    private onItemSelect itemSelect;

    public void setOnItemSelectListener(onItemSelect listener){

        this.itemSelect = listener;

    }

    class ViewHolder{

        TextView order;

        ImageView logo;

        TextView car_order;

        TextView name;

        TextView money;

        CheckBox jud;

        Button delta;

    }

}
3,写主界面布局代码:
<?xml version="1.0" encoding="utf-8"?>

<LinearLayout xmlns:android="http://schemas.android.com/apk/res/android"

    android:orientation="vertical"

    android:layout_width="match_parent"

    android:layout_height="match_parent">

    <ListView

        android:id="@+id/nodeview"

        android:layout_width="match_parent"

        android:layout_height="wrap_content" />

</LinearLayout>
4.为主界面完成代码。
public class MainActivity extends AppCompatActivity {

    private List<Node> nodeList = new ArrayList<Node>();

    private ListView nodeview;

    @Override

    protected void onCreate(Bundle savedInstanceState) {

        super.onCreate(savedInstanceState);

        setContentView(R.layout.activity_main);

        initNode();

        NodeAdapter adapter = new NodeAdapter(getApplicationContext(),R.layout.node,nodeList);

        nodeview.setAdapter(adapter);

        nodeview.setOnItemClickListener(new AdapterView.OnItemClickListener() {

            @Override

            public void onItemClick(AdapterView<?> parent, View view, int position, long id) {

                Node node = nodeList.get(position);

                Toast.makeText(getApplicationContext(),"您要查看" + node.getorder() + "号车主的全部信息",Toast.LENGTH_SHORT).show();

            }

        });

        adapter.setOnItemSelectListener(new NodeAdapter.onItemSelect() {

            @Override

            public void seleId(int i) {

                int order = i + 1;

                Toast.makeText(getApplicationContext(),"您正在为" + order + "号车主充值",Toast.LENGTH_SHORT).show();

            }

        });

    }

    private void initNode(){

        nodeview = (ListView)findViewById(R.id.nodeview);

        Node node1 = new Node(1,R.drawable.logo,"胡海",100);

        Node node2 = new Node(2,R.drawable.logo,"蓝月",200);

        nodeList.add(node1);

        nodeList.add(node2);

    }

}
5.整个项目框架如下:
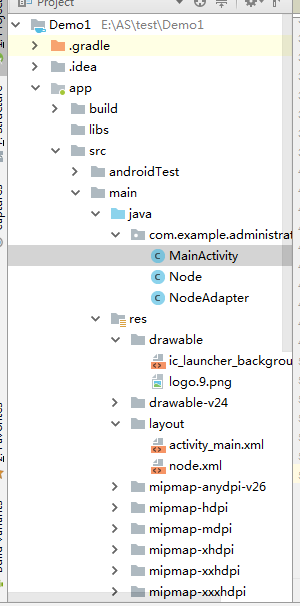
到此,这个项目就完成了.效果上面已经有图了。
ListView + ArrayAdapter + 接口回调的更多相关文章
- Android接口回调的理解
1.各种理解 <1>说白了,就是拿到对象引用,调其方法 <2>实际上就是利用多态的方式调用而已 <3>其实很容易理解的,定义接口,然后提供一个外部的接口设置进去,然 ...
- Android中的接口回调技术
Android中的接口回调技术有很多应用的场景,最常见的:Activity(人机交互的端口)的UI界面中定义了Button,点击该Button时,执行某个逻辑. 下面参见上述执行的模型,讲述James ...
- Android系列之Fragment(三)----Fragment和Activity之间的通信(含接口回调)
[声明] 欢迎转载,但请保留文章原始出处→_→ 生命壹号:http://www.cnblogs.com/smyhvae/ 文章来源:http://www.cnblogs.com/smyhvae/p/ ...
- Android开发之自定义组件和接口回调
说到自定义控件不得不提的就是接口回调,在Android开发中接口回调用的还是蛮多的.在这篇博客开始的时候呢,我想聊一下iOS的自定义控件.在iOS中自定义控件的思路是继承自UIView, 在UIVie ...
- Android接口回调机制
开发中,接口回调是我们经常用到的. 接口回调的意思即,注册之后并不立马执行,而在某个时机触发执行. 举个例子: A有一个问题不会,他去问B,B暂时解决不出来,B说,等我(B)解决了再告诉你(A)此时A ...
- java中的接口回调
[接口回调]接口回调是多态的另一种体现.接口回调是指:可以把使用某一个接口的类创建的对象的引用赋给该接口声明的接口变量中,那么该接口变量就可以调用被类实现的接口中的方法.当接口变量调用被类实现的接口中 ...
- (转)Android之接口回调机制
开发中,接口回调是我们经常用到的. 接口回调的意思即,注册之后并不立马执行,而在某个时机触发执行. 举个例子: A有一个问题不会,他去问B,B暂时解决不出来,B说,等我(B)解决了再告诉你(A)此时A ...
- Android 中的接口回调
http://blog.csdn.net/wangjinyu501/article/details/22052187 在Android中到处可见接口回调机制,尤其是UI事件处理方面.举一个最常见的 ...
- 弄明白Android 接口回调机制
以前对于这个机制理解不够深刻,现在重新整理下思路. 一.建模 我理解的接口回调就是,我这个类实现了一个接口里的方法doSomething,然后注册到你这里,然后我就去做别的事情去了,你在某个触发的时机 ...
随机推荐
- Robotutor Scratch3.0 在线编程平台升级啦!
Robotutor推出的Scratch3.0在线编程平台受到很多编程老师和学员的喜爱,上一个版本我们提供了用户注册,找回密码,个人项目的在线保存和浏览,社区分享评论. 我们根据实际的教学需要,用户角色 ...
- 关于beforeRouteEnter中的next()
beforeRouteEnter(to,from, next){ console.log(this) //undefined next(vm => { console.log(vm)}) } ...
- 树链剖分与倍增求LCA
树链剖分与倍增求\(LCA\) 首先我要吐槽机房的辣基供电情况,我之前写了一上午,马上就要完成的时候突然停电,然后\(GG\)成了送链剖分 其次,我没歧视\(tarjan LCA\) 1.倍增求\(L ...
- 深入理解计算机系统 (CS:APP) Lab2 - Bomb Lab 解析
原文地址:https://billc.io/2019/04/csapp-bomblab/ 写在前面 CS:APP是这学期的一门硬核课程,应该是目前接触到最底层的课程了.学校的教学也是尝试着尽量和CMU ...
- Python基础篇(二)_基本数据类型
Python基础篇——基本数据类型 数字类型:整数类型.浮点数类型.复数类型 整数类型:4种进制表示形式:十进制.二进制.八进制.十六进制,默认采用十进制,其他进制需要增加引导符号 进制种类 引导符号 ...
- 深入理解Java内存模型(摘)
--摘自 周志明<深入理解Java虚拟机> 转自 https://www.jianshu.com/p/15106e9c4bf3 深入理解Java内存模型(摘) java内存模型(Java ...
- Linux常用命令总结(一)
一.cd命令 用于切换当前目录,类似与win的命令.它可以切换到绝对路径,也可以是相对路径. cd /root/Doce # 切换到绝对路径/root/Doce目录下 cd ./path # 切 ...
- 【python 数据结构】相同某个字段值的所有数据(整理成数组包字典的形式)
class MonitoredKeywordMore(APIView): def post(self, request): try: # 设置原生命令并且请求数据 parents_asin = str ...
- Linux下反弹shell笔记
0x00 NC命令详解 在介绍如何反弹shell之前,先了解相关知识要点. nc全称为netcat,所做的就是在两台电脑之间建立链接,并返回两个数据流 可运行在TCP或者UDP模式,添加参数 —u 则 ...
- jQuery常用事件,each循环,引用当前时间
jQuery常用事件,each循环,引用当前时间 1.常用事件 click(function(){...}) #点击时触发hover(function(){...}) #鼠标移到时就触发blur(fu ...