六、Vue-Router:基础路由处理、路由提取成单独文件、路由嵌套、路由传参数、路由高亮、html5的history使用
一、vue-router的安装
官网文档
【官网】:https://cn.vuejs.org/v2/guide/routing.html
【router文档】:https://router.vuejs.org/zh/
导入文件时找到根目录写法:[@目录]
import router from '@/src/components/index.vue'
1.1直接下载 / CDN
https://unpkg.com/vue-router/dist/vue-router.js
Unpkg.com 提供了基于 NPM 的 CDN 链接。上面的链接会一直指向在 NPM 发布的最新版本。你也可以像 https://unpkg.com/vue-router@2.0.0/dist/vue-router.js 这样指定 版本号 或者 Tag。
在 Vue 后面加载 vue-router,它会自动安装的:
<script src="/path/to/vue.js"></script>

<script src="/path/to/vue-router.js"></script>
1.2NPM安装(重点)
npm / cnpm install vue-router
如果在一个模块化工程中使用它,必须要通过 Vue.use() 明确地安装路由功能:
import Vue from 'vue'

import VueRouter from 'vue-router'

Vue.use(VueRouter)
如果使用全局的 script 标签,则无须如此 (手动安装)。
1.3构建开发版
如果你想使用最新的开发版,就得从 GitHub 上直接 clone,然后自己 build 一个 vue-router。
git clone https://github.com/vuejs/vue-router.git node_modules/vue-router

cd node_modules/vue-router

npm install

npm run build
二、路由代码实例(重点)
2.1简单实例
src/main.js(重点1)
[1]引入路由
[2]引入组件
[3]使用路由
[4]创建一个路由实例
[5]默认路径
[6]待控制的组件
[7]把路由投到vue实例
import Vue from 'vue'

import App from './App'

import VueRouter from 'vue-router' //[1]引入路由

import Parent from './components/parent.vue' //[2]引入组件

Vue.config.productionTip = false

Vue.use(VueRouter)//[3]使用路由

var router = new VueRouter({//[4]创建一个路由实例

  routes: [{

    path: "/",//[5]默认路径

    component:Parent //[6]待控制的组件

  }]

})

new Vue({

  el: '#app',

  template: '<App/>',

  router,//[7]把路由投到vue实例

  components: {

    App

  }

})
App.vue(重点2)
[1]路由显示位置
<template>

  <div id="app">

     <img src="./assets/logo.png" width="80px">

    <router-view></router-view><!-- [1]路由显示位置 -->

  </div>

</template>

<script>

export default {

  name: 'App',

  components: {},

  data () {

    return {}

  },

}

</script>

<style>

#app {

  font-family: 'Avenir', Helvetica, Arial, sans-serif;

  -webkit-font-smoothing: antialiased;

  -moz-osx-font-smoothing: grayscale;

  text-align: center;

  color: #2c3e50;

  margin-top: 60px;

}

</style>
parent.vue
一个简单的组件即可
<template>

  <div class="parent">

    <h1>路由实例</h1>

  </div>

</template>

<script>

 export default{

    name:'parent',

    components:{},

    data(){

      return{}

    }

 }

</script>

<style scoped>

</style>
效果:注意地址栏多了个#号,即路由成功
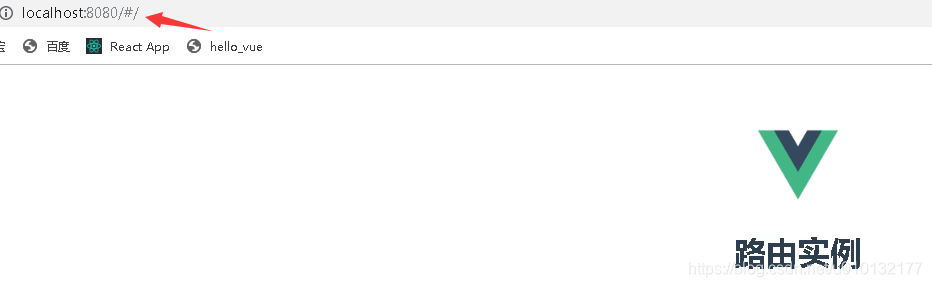
地址栏改成:http://localhost:8080/#/app ,即访问app.vue

2.2路由控制2个及多个组件
src/main.js(主要)
[2.2]引入组件2
[2.5]非默认路径
[2.6]待控制的组件
import Vue from 'vue'

import App from './App'

import VueRouter from 'vue-router' //[1]引入路由

import Parent from './components/parent.vue'//[2]引入组件

import Hello from './components/hello.vue'//【2.2】引入组件2

Vue.config.productionTip = false

Vue.use(VueRouter)//[3]使用路由

var router = new VueRouter({//[4]创建一个路由实例

  routes: [{

    path: "/",//[5]默认路径组件 / 后不要加parent即可

    component:Parent ,//[6]待控制的组件

  },{

    path: "/hello",//【2.5】非默认路径

    component:Hello ,//【2.6】待控制的组件

  }]

})

new Vue({

  el: '#app',

  template: '<App/>',

  router,//[7]把路由投到vue实例

  components: {

    App

  }

})
src/app.vue
只写重点:其它略过
<router-view></router-view><!-- [1]路由显示位置 -->
src/components/parent.vue
简单组件,略过
src/components/hello.vue
简单组件,略过
效果:mian.js【5-6】步谁是 /默认就显示谁
http://localhost:8080/#/
路由实例parent
http://localhost:8080/#/hello
路由实例hello
2.3把路由单独提取出来成一个独立文件
src/router.js【主要】
【重点】此处必须用export default 导出其它地方才能使用
import Vue from 'vue' //[0]引入vue

import VueRouter from 'vue-router' //[1]引入路由

import Parent from './components/parent.vue'//[2]引入组件

import Hello from './components/hello.vue'//[2.2]引入组件2

Vue.use(VueRouter)//[3]使用路由

//【重点】此处必须导出其它地方才能使用

export default new VueRouter({//[4]创建一个路由实例

  routes: [{

    path: "/",//[5]默认路径组件 / 后不要加parent即可

    component:Parent ,//[6]待控制的组件

  },{

    path: "/hello",//[2.5]非默认路径

    component:Hello ,//[2.6]待控制的组件

  }]

})
src/main.js(次要)
[7]先引入上面写好的router.js
[8]把路由投到vue实例
import Vue from 'vue'

import App from './App'

import router from './router.js'//[7]先引入

Vue.config.productionTip = false

new Vue({

  el: '#app',

  template: '<App/>',

  router,//[8]把路由投到vue实例

  components: {

    App

  }

})
src/app.vue
只写重点:其它略过
<router-view></router-view><!-- [1]路由显示位置 -->
src/components/parent.vue
简单组件,略过
src/components/hello.vue
简单组件,略过
效果同上例。
2.4 导航(跳转)路由各组件
navList.vue(主要)
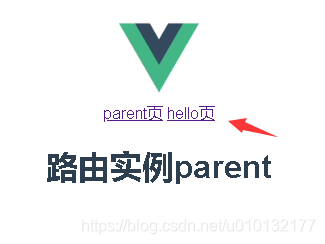
【重点】路由链接
<template>

  <div>

  <!-- 【重点】路由链接 -->

    <router-link to='/'>parent页</router-link>

    <router-link to="/hello">hello页</router-link>

  </div>

</template>

<script>

  export default{

    name:'navList',

    data(){

      return{

        msg:'导航组件'

      }

    }

  }

</script>

<style>

</style>
在app.vue引入导航组件
<template>

  <div id="app">

     <img src="./assets/logo.png" width="80px">

     <navList/>

    <router-view></router-view><!-- [1]路由显示位置 -->

  </div>

</template>

<script>

  import navList from './components/navList'

export default {

  name: 'App',

  components: {

    navList,

  },

  data () {

    return {}

  },

}

</script>

<style>

#app {

  font-family: 'Avenir', Helvetica, Arial, sans-serif;

  -webkit-font-smoothing: antialiased;

  -moz-osx-font-smoothing: grayscale;

  text-align: center;

  color: #2c3e50;

  margin-top: 60px;

}

</style>
src/components/parent.vue
简单组件,略过
src/components/hello.vue
简单组件,略过
效果:点哪个导航,切换到哪个上
2.5路由嵌套
第1步,在如下目录创建三个hello.vue的子组件
/src/components/heChild/
hello1.vue、hello2.vue、hello3.vue
内容为简单组件即可例如:
<template>

  <div>

    hello1子组件

  </div>

</template>

<script>

  export default{

    name:'hello1',

    data(){

      return{}

    }

  }

</script>

<style></style>
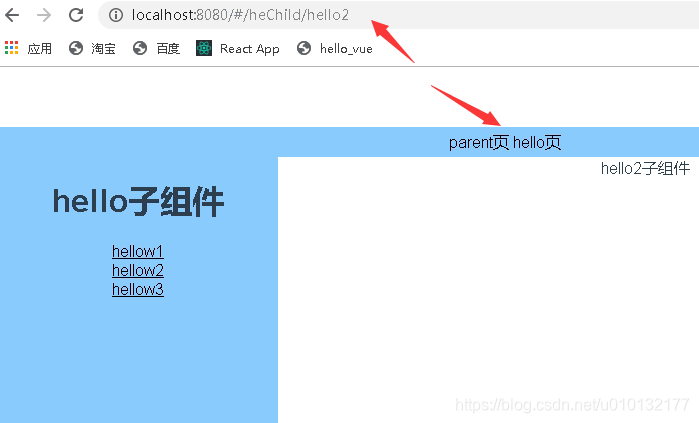
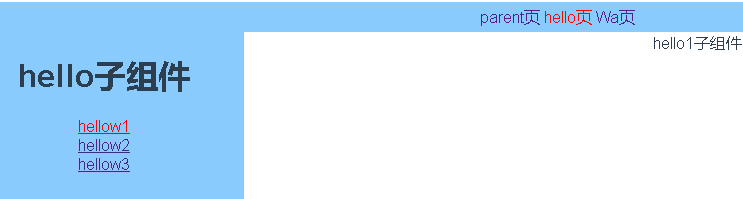
第2步,对src/componets/hello.vue页面布局:
布局要求:有一个左栏,内放子导航
<template>

  <div>

    <div id='left'>

      <h1>hello子组件</h1>

      <!-- 【1】以下是路由链接 注意路径to要加上子组件的文件夹-->

      <router-link to="/heChild/hello1">hellow1</router-link><br/>

      <router-link to="/heChild/hello2">hellow2</router-link><br/>

      <router-link to="/heChild/hello3">hellow3</router-link><br/>

    </div>

    <div id='right'>

      <!-- 【2】点路由后,其视频插入的位置 -->

      <router-view></router-view>

    </div>

  </div>

</template>

<script>

  export default{

    name:'hello',

    data(){

      return{}

    }

  }

</script>

<style scoped>

  /* 【3】对页面进行布局 */

  #left {

    float:left;

    width:280px;

    min-height: 700px;

    background: lightskyblue;

  }

  #left a{

   color:black;

  }

  #right {

    width:100%;

    min-height:700px;

  }

</style>
第3步,配置路由src/router.js【重点】
【3.0】以下3个为引入第1步创建的子组件
【3.1】重定向,用于显示默认子组件
【3.2】 嵌套路由重点:在hello内部加一个children数组,在内部加上路由配置
import Vue from 'vue'

import VueRouter from 'vue-router' //[1]引入路由

import Parent from './components/parent.vue'//[2]引入组件

import Hello from './components/hello.vue'//[2.2]引入组件2

import Hello1 from './components/heChild/hello1.vue'//【3.0】以下3个为引入对应的子组件

import Hello2 from './components/heChild/hello2.vue'

import Hello3 from './components/heChild/hello3.vue'

Vue.use(VueRouter)//[3]使用路由

export default new VueRouter({//[4]创建一个路由实例

  routes: [{

    path: "/",//[5]默认路径组件 / 后不要加parent即可

    component:Parent ,//[6]待控制的组件

  },

  {

    path: "/hello",//[2.5]非默认路径

    component:Hello ,//[2.6]待控制的组件

    redirect:'/heChild/hello1',//【3.1】重定向,用于显示默认子组件

    //【3.2】 嵌套路由重点:在hello内部加一个children数组,在内部加上路由配置

    children:[

      {

        path:'/heChild/hello1',

        component:Hello1,

      },

      {

        path:'/heChild/hello2',

        component:Hello2,

      },

      {

        path:'/heChild/hello3',

        component:Hello3,

      },

    ]

  }]

})
第4步,main.js引入3的路由文件
不重要,所有代码同上例
import Vue from 'vue'

import App from './App'

import router from '@/router.js'//[7]先引入

Vue.config.productionTip = false

new Vue({

  el: '#app',

  template: '<App/>',

  router,//[8]把路由投到vue实例

  components: {

    App

  }

})
第5步,头部导航组件,src/navList.vue
不重要,除加了样式外,大代码同上例
<template>

  <div id="nav">

    <!-- 【重点】路由链接 -->

    <router-link to='/'>parent页</router-link>

    <router-link to="/hello">hello页</router-link>

  </div>

</template>

<script>

  export default{

    name:'navList',

    data(){

      return{

        msg:'导航组件'

      }

    }

  }

</script>

<style scoped>

#nav {

  background-color: lightskyblue;

  width: 100%;

  height: 30px;

  line-height: 30px;

}

#nav a{

  color: #000000;

  text-decoration:none;

}

</style>
第6步,src/App.vue
不重要,所有代码同上例
<template>

  <div id="app">

     <img src="./assets/logo.png" width="80px">

     <navList/>

    <router-view></router-view><!-- [1]路由显示位置 -->

  </div>

</template>

<script>

  import navList from './components/navList'

export default {

  name: 'App',

  components: {

    navList,

  },

  data () {

    return {}

  },

}

</script>

<style>

#app {

  font-family: 'Avenir', Helvetica, Arial, sans-serif;

  -webkit-font-smoothing: antialiased;

  -moz-osx-font-smoothing: grayscale;

  text-align: center;

  color: #2c3e50;

  margin-top: 60px;

}

</style>
第7步,parent.vue同上例
不重要
<template>

  <div class="parent">

    <h1>路由实例parent</h1>

  </div>

</template>

<script>

  export default{

    name:'parent',

    components:{},

    data(){

      return{

        list:[] //定义一个空数组用于存放接收到的数据

      }

    },

    filters:{},

    directives:{},

  }

</script>

<style scoped>

</style>
效果:
2.6用路由router-link传递参数
官方文档:
https://router.vuejs.org/zh/guide/essentials/passing-props.html
第1步,先建立一个src/wa.vue组件,常规组件
代码略过..
第2步,配置src/router.js
【4.0】引入第3个组件wa.vue
【4.1】路由传递参数 (/组件名/:参数名) 下一步到navList.vue里
【4.2】路由的里传参数要用到
import Vue from 'vue'

import VueRouter from 'vue-router' //[1]引入路由

import Parent from './components/parent.vue'//[2]引入组件

import Hello from './components/hello.vue'//[2.2]引入组件2

import Hello1 from './components/heChild/hello1.vue'//[3.0]以下3个为引入对应的子组件

import Hello2 from './components/heChild/hello2.vue'

import Hello3 from './components/heChild/hello3.vue'

import Wa from './components/wa.vue' //【4.0】引入第3个组件

Vue.use(VueRouter)//[3]使用路由

export default new VueRouter({//[4]创建一个路由实例

  routes: [

    {

    path: "/",//[5]默认路径组件 / 后不要加parent即可

    name:'parent',

    component:Parent ,//[6]待控制的组件

    },

    {

    path: "/hello",//[2.5]非默认路径

    name:'hello',

    component:Hello ,//[2.6]待控制的组件

    redirect:'/heChild/hello1',//[3.1]显示默认子组件

    //[3.2 嵌套路由重点]在hello内部加一个children数组,在内部加上路由配置

      children:[{

          path:'/heChild/hello1',

          name:'hello1',

          component:Hello1,

        },

        {

          path:'/heChild/hello2',

          name:'hello2',

          component:Hello2,

        },

        {

          path:'/heChild/hello3',

          name:'hello3',

          component:Hello3,

        }]

    },

    {

      path: "/wa/:count",//【4.1】路由传递参数 (/组件名/:参数名) 下一步到navList.vue里

      name:'wa',//【4.2】路由的<router-link :to="{name:'wa',params:{count:18888}}">里传参数要用到

      component:Wa,//[6]待控制的组件

    },

]

})
第3步,navLink.vue里配置router-link链接的to(重点1)
【1】待传递的参数写法:
<router-link :to="{name:'wa',params:{count:18888}}">Wa页</router-link>
<template>

  <div id="nav">

    <!-- 路由链接 -->

    <router-link to='/'>parent页</router-link>

    <router-link to="/hello">hello页</router-link>

    <router-link :to="{name:'wa',params:{count:18888}}">Wa页</router-link> <!-- 【1】待传递的参数 -->

  </div>

</template>

<script>

  export default{

    name:'navList',

    data(){

      return{

        msg:'导航组件'

      }

    }

  }

</script>

<style scoped>

#nav {

  background-color: lightskyblue;

  width: 100%;

  height: 30px;

  line-height: 30px;

}

#nav a{

  color: #000000;

  text-decoration:none;

}

</style>
第4步,wa.vue接收参数写法(重点2)
【1】接收参数写法(注意route不是router): {{$route.params.count}}
<template>

  <div>

    {{$route.params.count}}<!-- 【1】获取参数 -->

  </div>

</template>

<script>

  export default{

    name:'wa',

    data(){

      return{}

    }

  }

</script>

<style>

</style>
第5步,其它部分代码
main.js
App.js
同上例略过
效果:
点到wa页,将显示从第3步传过来的参数18888

2.6.2 获取多个路由router-link传的参数
1.路由配置src/router.js
其它总分略过只写重点
path: "/wa/:count/:name"
{

      path: "/wa/:count/:name",//【重点】路由传递参数 (/组件名/:参数名) 下一步到navList.vue里

      name:'wa',//路由的<router-link :to="{name:'wa',params:{count:18888}}">里传参数要用到

      component:Wa,//待控制的组件

    },
2.传递配置src/navList.vue
【1】待传递的参数,传递多个参数
<template>

  <div id="nav">

    <!-- 路由链接 -->

    <router-link to='/'>parent页</router-link>

    <router-link to="/hello">hello页</router-link>

    <router-link :to="{name:'wa',params:{count:18888,name:'小明'}}">Wa页</router-link> <!-- 【1】待传递的参数,传递多个参数 -->

  </div>

</template>
3.接收配置src/components/wa.vue
<template>

  <div>

    {{$route.params.count}}----{{$route.params.name}}<!-- 【1】获取参数,获取多个参数 -->

  </div>

</template>
效果
注意地址栏参数写法

2.7 传递参数地址栏是:?参数1=1
详见官方文档:
https://router.vuejs.org/zh/guide/essentials/passing-props.html#函数模式
https://router.vuejs.org/zh/api/#router-link
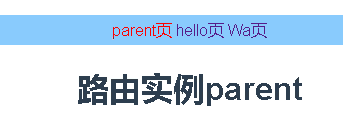
2.8简单路由高亮效果
只要在navList.vue里加个样式即可:
也可以全局设置在:App.vue里设置
<style>

.router-link-active {

  color:red;

}

</style>
效果:
2.9 高级设置路由高亮效果
1. hello.vue
【1】以下是路由链接 注意路径to要加上主组件,这样点到子路由里,主路由设置颜色才不会消失
<template>

  <div>

    <div id='left'>

      <h1>hello子组件</h1>

      <!-- 【1】以下是路由链接 注意路径to要加上主组件,这样点到子路由里,主路由设置颜色才不会消失-->

      <router-link to="/hello/heChild/hello1">hellow1</router-link><br/>

      <router-link to="/hello/heChild/hello2">hellow2</router-link><br/>

      <router-link to="/hello/heChild/hello3">hellow3</router-link><br/>

    </div>

    <div id='right'>

      <!-- 点路由后,其视频插入的位置 -->

      <router-view></router-view>

    </div>

  </div>

</template>

<script>

  export default{

    name:'hello',

    data(){

      return{}

    }

  }

</script>

<style scoped>

  /* 对页面进行布局 */

  #left {

    float:left;

    width:280px;

    min-height: 700px;

    background: lightskyblue;

  }

  #right {

    width:100%;

    min-height:700px;

  }

</style>
2. router.js
重点:【1】-【3】
import Vue from 'vue'

import VueRouter from 'vue-router' //引入路由

import Parent from './components/parent.vue'//引入组件

import Hello from './components/hello.vue'//引入组件2

import Hello1 from './components/heChild/hello1.vue'//以下3个为引入对应的子组件

import Hello2 from './components/heChild/hello2.vue'

import Hello3 from './components/heChild/hello3.vue'

import Wa from './components/wa.vue' //引入第3个组件

Vue.use(VueRouter)//使用路由

export default new VueRouter({

linkActiveClass:'active',//【0】设置路由链接处理激活状态的style样式class名(默认值: "router-link-active"

)

  routes: [

    {

    path: "/",

    name:'parent',

    component:Parent ,

    },

    //【1】带子路由的hello组件配置开始

    {

    path: "/hello",

    name:'hello',

    component:Hello ,

    redirect:'/hello/heChild/hello1',//【2】路径要写完整前面带上主路由 /hello/子路由路径/子路由

    //【3】子路由配置开始

      children:[{

          path:'/hello/heChild/hello1',//【4】子路由,注意路径

          name:'hello1',

          component:Hello1,

        },

        {

          path:'/hello/heChild/hello2',//【5】子路由,注意路径

          name:'hello2',

          component:Hello2,

        },

        {

          path:'/hello/heChild/hello3',// 【6】子路由,注意路径

          name:'hello3',

          component:Hello3,

        }]

    },

    {

      path: "/wa/:count/:name",

      name:'wa',

      component:Wa,

    },

]

})
3. App.vue里设置全局路由处于active状态的样式
<style>

.active {

  color:red;

}

</style>
效果:
2.10 HTML5的history控制路由后退步数
官网:
https://router.vuejs.org/zh/guide/essentials/history-mode.html#后端配置例子
六、Vue-Router:基础路由处理、路由提取成单独文件、路由嵌套、路由传参数、路由高亮、html5的history使用的更多相关文章
- webpack 提取css成单独文件
webpack 提取css成单独文件 // 用来拼接绝对路径的方法 const {resolve} = require('path') const HtmlWebpackPlugin = requir ...
- [Vue 牛刀小试]:第十三章 - Vue Router 基础使用再探(命名路由、命名视图、路由传参)
一.前言 在上一章的学习中,我们简单介绍了前端路由的概念,以及如何在 Vue 中通过使用 Vue Router 来实现我们的前端路由.但是在实际使用中,我们经常会遇到路由传参.或者一个页面是由多个组件 ...
- vue Router——基础篇
vue--Router简介 vue-router是Vue.js官方的路由插件,它和vue.js是深度集成的,适合用于构建单页面应用. vue的单页面应用是基于路由和组件的,路由用于设定访问路径,并将路 ...
- Vue Router基础
路由 安装 vue-router 起步 <router-link to="/foo">Go to Foo</router-link> <router- ...
- Vue技术点整理-Vue Router
路由 Vue Router 对于单页面应用来说,如果涉及到多个页面的话,就必须要使用到路由,一般使用官方支持的 vue-router 库 一,Vue Router 在项目中的安装引用 1,在页面中使用 ...
- vue Router——进阶篇
vue Router--基础篇 1.导航守卫 正如其名,vue-router 提供的导航守卫主要用来通过跳转或取消的方式守卫导航.有多种机会植入路由导航过程中:全局的, 单个路由独享的, 或者组件级的 ...
- Vue Router的官方示例改造
基于Vue Router 2018年8月的官方文档示例,改造一下,通过一个最简单的例子,解决很多初学者的一个困惑. 首先是官方文档示例代码 <!DOCTYPE html> <html ...
- 「vue基础」一篇浅显易懂的 Vue 路由使用指南( Vue Router 上)
大家好,今天的内容,我将和大家一起聊聊 Vue 路由相关的知识,如果你以前做过服务端相关的开发,那你一定会对程序的URL结构有所了解,我没记错的话也是路由映射的概念,需要进行配置. 其实前端这些框架的 ...
- react router @4 和 vue路由 详解(六)vue怎么通过路由传参?
完整版:https://www.cnblogs.com/yangyangxxb/p/10066650.html 8.vue怎么通过路由传参? a.通配符传参数 //在定义路由的时候 { path: ' ...
随机推荐
- redis 高性能的原因
1. redis 数据存储在内存中: 2. redis 是单线程: 3. redis 多路复用: 指令先放到队列里 4.redis 使用resp 协议
- Linux命令:ifconfig命令
ifconfig功能:配置网络接口,CentOS7最小化安装不包含此命令,需要安装net-tools包. ifconfig常见的用法: ifconfig :显示所有活动接口的相关信息 ifconfig ...
- 【PAT甲级】1025 PAT Ranking (25 分)(结构体排序,MAP<string,int>映射)
题意: 输入一个正整数N(N<=100),表示接下来有N组数据.每组数据先输入一个正整数M(M<=300),表示有300名考生,接下来M行每行输入一个考生的ID和分数,ID由13位整数组成 ...
- word无法切换中文输入法的解决方法
问题: 在word编辑文字的时候,莫名其妙地出现只能输入英文字母无法输入中文的现象,输入法状态条也不显示,而输入法是正常的(在其他编辑器中可正常输入汉字) 解决方法如下:word 2003:菜单工具- ...
- 搜索栏UISearchBar的使用
本文结构: 1.首先是对UISearchBar的简介文字 2.初始化展现UISearchBar,并解析它的结构 3.属性.方法.代理等的一一介绍 4.日常的使用,包括单独对UISearchBar的配置 ...
- Python 中的else
在其他程序语言中,else 似乎只是与 if 关键字有缘分.而与其他的关键字没有联系,不能搭配使用,而在python中,else 除了与 if 匹配外, 还可以与for.while/ try等关键字匹 ...
- alerm和pause
pause函数,会让进程进入阻塞状态,收到信号时,会中断这个阻塞的系统调用 alerm(s),会设置进程闹钟,在指定的时间后,进程会收到SIG_ALERM信号,收到这个信号时,可以中断pause阻塞调 ...
- Prometheus组件
Prometheus组件 上一小节,通过部署Node Exporter我们成功的获取到了当前主机的资源使用情况.接下来我们将从Prometheus的架构角度详细介绍Prometheus生态中的各个组件 ...
- 【攻防世界】 高手进阶区 Recho WP
0x00 考察点 考察点有三个: ROP链构造 Got表劫持 pwntools的shutdown功能 0x01 程序分析 上来三板斧 file一下 checksec --file XXX chmod ...
- Outer()函数
转载:https://bbs.pinggu.org/thread-7078237-1-1.html R语言中的outer()函数,名为内积函数,但是他执行的功能并不是解析几何中的内积.那该函数到底发挥 ...