
Mybatis与Spring整合(纯注解)
java1.5版本之后开始支持注解,spring*2开始提供注解配置方式,到spring**4后spring推荐使用注解配置
IOC注解(主要作用就是在spring容器中声明一个Bean,同xml中的Bean节点作用相同,用在类上):
@Repository(标识DAO层)
@Service(标识Service层)
@Conmpent(用在其他组件上)
隐式注入:
@Autowired:根据类型注入
@Qualifier:更具名字注入,但是需要和Autowired连用
@Resource:jdk提供,默认根据名字注入,如果没找到名字则根据类型注入
Aop注解()
@Aspect(作用在类上,标识这是一个切面)
@Before(作用在方法上,前置增强)
@AfterReturing(作用在方法上,后置增强)
@AfterThrowing(作用在方法上,异常抛出增强)
@After(作用在方法上,最终增强)
其他注解
@Configuration:标识作用,表示这个类是一个核心配置类
@MapperScan:扫描Mapper接口,为dao层生成动态代理
@ComponentScan:扫描有注解的类所在的包
@EnableTransactionManagement:开启事务的注解
@EnableAspectJAutoProxy:开启aop的注解
@Transactional表示开启事务,作用在类上为该类所有方法都开启一个事务,也可以作用在方法上,表示当前方法开启一个事务
1.导入依赖
pom节点砸死上一章spring+mybatis整合(xml)配置中有,这里就不重复了。
2.准备数据库
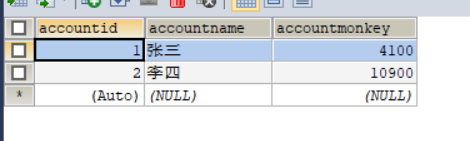
3.业务代码
dao层代码
 public interface AccountDao {

     List<Account>getAll();//查询数据库中所有信息

     @Update("update account set accountmonkey=accountmonkey+1000 where accountid=1")

     int addMonkey();//给id为1的用户加1000块钱

     @Update("update account set accountmonkey=accountmonkey-1000 where accountid=2")

     int subMonkey();//给id为2的用户减1000块钱

 }
service层接口
 public interface AccountService {

     List<Account> getAll();//查询所有

     int changemonkey();//模拟转账

 }
service层实现类
 @Service

 public class AccountServiceImpl implements AccountService {

     //注入dao接口实例

     @Autowired

     private AccountDao dao;

     @Override

     public List<Account> getAll() {

         return dao.getAll();

     }

     @Transactional(propagation = Propagation.REQUIRED,isolation = Isolation.READ_COMMITTED)

     @Override

     public int changemonkey() {

         dao.subMonkey();//id为2的先转出1000

         //int reuslt=5/0;//模拟一个异常,中断交易

         dao.addMonkey();//id为1的收到1000

         return 0;

     }

 }
实体类(建完表一定要先写实体类)
public class Account {

    private int accountid;

    private String accountname;

    private Double accountmonkey;

//省略setter,getter

}
4.核心配置类
 package com.cn.config;

 import com.cn.advisor.AccountAdvisor;

 import org.apache.commons.dbcp2.BasicDataSource;

 import org.mybatis.spring.SqlSessionFactoryBean;

 import org.mybatis.spring.annotation.MapperScan;

 import org.springframework.context.annotation.Bean;

 import org.springframework.context.annotation.ComponentScan;

 import org.springframework.context.annotation.Configuration;

 import org.springframework.context.annotation.EnableAspectJAutoProxy;

 import org.springframework.core.io.support.PathMatchingResourcePatternResolver;

 import org.springframework.jdbc.datasource.DataSourceTransactionManager;

 import org.springframework.transaction.annotation.EnableTransactionManagement;

 import javax.sql.DataSource;

 import java.beans.PropertyVetoException;

 import java.io.IOException;

 import java.net.MalformedURLException;

 @Configuration//指定这是一个核心配置类

 @MapperScan("com.cn.dao")//扫描dao层,生成动态代理

 @ComponentScan("com.cn")//扫描该路径下所有类上的注解

 @EnableTransactionManagement//开启事务

 @EnableAspectJAutoProxy

 public class ApplicationConfig {

     //配置数据源

     @Bean//等同于xml中的<bean>节点

     public DataSource dataSource(JdbcConfig dbcp) throws PropertyVetoException {

         //其中JdbcConfig是自定义的配置类,读取properties文件的类

         BasicDataSource cd = new BasicDataSource();

         cd.setDriverClassName(dbcp.getDriver());

         cd.setUrl(dbcp.getUrl());

         cd.setUsername(dbcp.getName());

         cd.setPassword(dbcp.getPassword());

         return cd;

     }

     //配置核心Mybatis核心工厂

     @Bean

     public SqlSessionFactoryBean sqlSessionFactoryBean(DataSource ds) throws IOException {

         SqlSessionFactoryBean bean = new SqlSessionFactoryBean();

         bean.setDataSource(ds);//配置数据源

         bean.setTypeAliasesPackage("com.cn.entity");//设置实体类别名

         PathMatchingResourcePatternResolver  resolver = new PathMatchingResourcePatternResolver();

         bean.setMapperLocations(resolver.getResources("classpath:/mapper/*.xml"));//配置Mapper映射文件的路径

         return bean;

     }

     //配置事务管理器

     @Bean

     public DataSourceTransactionManager dataSourceTransactionManager(DataSource ds){

         DataSourceTransactionManager dm = new DataSourceTransactionManager();

         dm.setDataSource(ds);

         return dm;

     }

 }
读取连接参数的配置类
package com.cn.config;

import org.springframework.beans.factory.annotation.Value;

import org.springframework.context.annotation.PropertySource;

import org.springframework.stereotype.Component;

import org.springframework.stereotype.Repository;

@Repository//这里就是向证明一下IOC的几个声明bean的注解是可以混用的

@PropertySource("classpath:/database.properties")

public class JdbcConfig {

    @Value("${jdbc.username}")

    private String name;

    @Value("${jdbc.password}")

    private String password;

    @Value("${jdbc.driver}")

    private String driver;

    @Value("${jdbc.url}")

    private String url;

    public String getName() {

        return name;

    }

    public void setName(String name) {

        this.name = name;

    }

    public String getPassword() {

        return password;

    }

    public void setPassword(String password) {

        this.password = password;

    }

    public String getDriver() {

        return driver;

    }

    public void setDriver(String driver) {

        this.driver = driver;

    }

    public String getUrl() {

        return url;

    }

    public void setUrl(String url) {

        this.url = url;

    }

}
切面
@Aspect//标志这是一个切面

@Component//和@Service作用一样,都是在spring容器中声明一个Bean

public class AccountAdvisor {

    @Pointcut("execution(* com.cn.service.*.*(..))")

    public void pointcut(){}

    @Before("pointcut()")

    public void before(JoinPoint jp){

        System.out.println("我是前置增强!!!");

    }

}
编写测试类
public class App

{

    public static void main( String[] args ) {

        ApplicationContext context = new AnnotationConfigApplicationContext(ApplicationConfig.class);

        AccountService bean = context.getBean(AccountService.class);

        System.out.println(bean.getAll());//获取所有用户

        bean.changemonkey();//模拟转账

    }

}
将service层的算术异常的注释解开,模拟一个异常,可以验证事务是否能用!
Mybatis与Spring整合(纯注解)的更多相关文章
- Mybatis与Spring整合,使用了maven管理项目,作为初学者觉得不错,转载下来
转载自:http://www.cnblogs.com/xdp-gacl/p/4271627.html 一.搭建开发环境 1.1.使用Maven创建Web项目 执行如下命令: mvn archetype ...
- Mybatis第五篇【Mybatis与Spring整合】
Mybatis与Spring整合 既然我们已经学了Mybatis的基本开发了,接下来就是Mybatis与Spring的整合了! 以下使用的是Oracle数据库来进行测试 导入jar包 aopallia ...
- MyBatis 与 Spring 整合
MyBatis-Spring 项目 目前大部分的 Java 互联网项目,都是用 Spring MVC + Spring + MyBatis 搭建平台的. 使用 Spring IoC 可以有效的管理各类 ...
- mybatis与spring整合配置
mybatis与spring整合配置: 第一种方式:(此处配置扫描的包路径.注解.每个mapper类上面需要加@Repository才能纳入spring的bean管理器中) <!-- 自动扫描m ...
- MyBatis和Spring整合案例
1.所需要导入的jar文件 !--MyBatis和Spring的整合包 由MyBatis提供--> <dependency> <groupId>org.mybatis&l ...
- MyBatis和Spring整合的奥秘
本篇博客源码分析基于Spring 5.1.16.RELEASE,mybatis-spring 2.0.0,较高版本的mybatis-spring源码有较大区别. Spring之所以是目前Java最受欢 ...
- spring boot纯注解开发模板
简介 spring boot纯注解开发模板 创建项目 pom.xml导入所需依赖 点击查看源码 <dependencies> <dependency> <groupId& ...
- 手写Mybatis和Spring整合简单版示例窥探Spring的强大扩展能力
Spring 扩展点 **本人博客网站 **IT小神 www.itxiaoshen.com 官网地址****:https://spring.io/projects/spring-framework T ...
- MyBatis学习(四)MyBatis和Spring整合
MyBatis和Spring整合 思路 1.让spring管理SqlSessionFactory 2.让spring管理mapper对象和dao. 使用spring和mybatis整合开发mapper ...
- Mybatis+struts2+spring整合
把student项目改造成ssm struts2 +mybatis+spring 1,先添加spring支持:类库三个,applicationContext.xml写在webinf下四个命名空间,监 ...
随机推荐
- python刷LeetCode:5. 最长回文子串
难度等级:中等 题目描述: 给定一个字符串 s,找到 s 中最长的回文子串.你可以假设 s 的最大长度为 1000. 示例 1: 输入: "babad"输出: "bab& ...
- 【leetcode困难】968. 监控二叉树
968. 监控二叉树 瞎**分析评论区Rui大佬的答案,这题想直接递归return min还是有坑的,分计数和状态.有个状态转换的思想
- MyBatis+SpringMVC 框架搭建小结
前言:最近再写一款视频播放器的后台,踩了很多坑,在此总结. 设计顺序: 前提:搭建配置完好的Spring-MyBatis项目 1.流程分析,数据库设计(看似无用,真正做起来真的需要这个东西帮忙整理下思 ...
- Docker部署freeswitch
1. clone配置文件到本地服务器 git clone https://github.com/BetterVoice/freeswitch-container.git 相关Dockerfile如下: ...
- 吴裕雄--天生自然ShellX学习笔记:Shell 函数
linux shell 可以用户定义函数,然后在shell脚本中可以随便调用. shell中函数的定义格式如下: [ function ] funname [()] { action; [return ...
- 12 Spring Data JPA:springDataJpa的运行原理以及基本操作(上)
spring data jpaday1:orm思想和hibernate以及jpa的概述和jpa的基本操作 day2:springdatajpa的运行原理 day2:springdatajpa的基本操作 ...
- 蓝桥杯剪格子dfs
#include<iostream> #include<cstring> #include<iomanip> #include<cmath> #incl ...
- 关于maven的使用总结
maven介绍 项目构建过程 eclipse只是开发工具,虽然提供了创建.编码.编译.测试.运行等功能,但并不是项目构建工具. 项目构建主要过程如下: 实际的项目构建过程要复杂繁琐的多.如果是一个独立 ...
- Python—构造单向链表数据类型
# _*_ coding=utf-8 _*_ class Node: """ 创建链表的属性 """ def __init__(self, ...
- python——print函数
.print()函数概述 print() 方法用于打印输出,是python中最常见的一个函数. 该函数的语法如下: print(*objects, sep=' ', end='\n', file=sy ...