
深度学习 - Torch-TensorRT 推理加速
深度学习 - Torch-TensorRT 推理加速
Torch-TensorRT 作为 TorchScript 的扩展。 它优化并执行兼容的子图,让 PyTorch 执行剩余的图。 PyTorch 全面而灵活的功能集与 Torch-TensorRT 一起使用,解析模型并将优化应用于图的 TensorRT 兼容部分。


其中绿色部分是TensorRT支持的算子,白色的部分是不支持部分,则会在torch中兼容运算。
如果希望整个程序都在 TensorRT 中运算,则需要用到 TensorRT API 和 CUDA Plugin。
环境准备
- 安装 docker (>=19.03)
- 安装 nvidia-docker
- 启动 TensorRT 环境镜像(推荐使用:nvcr.io/nvidia/pytorch:23.01-py3)
- 安装 torch-tensorrt
!nvidia-smi

import torch

import tensorrt

import torch_tensorrt

print(torch.__version__)

print(torch.cuda.is_available())

print (tensorrt.__version__)

print (torch_tensorrt.__version__)
Tue Jul 11 02:11:17 2023

+-----------------------------------------------------------------------------+

| NVIDIA-SMI 525.125.06   Driver Version: 525.125.06   CUDA Version: 12.0     |

|-------------------------------+----------------------+----------------------+

| GPU  Name        Persistence-M| Bus-Id        Disp.A | Volatile Uncorr. ECC |

| Fan  Temp  Perf  Pwr:Usage/Cap|         Memory-Usage | GPU-Util  Compute M. |

|                               |                      |               MIG M. |

|===============================+======================+======================|

|   0  Tesla T4            Off  | 00000000:00:1E.0 Off |                    0 |

| N/A   32C    P8     9W /  70W |      2MiB / 15360MiB |      0%      Default |

|                               |                      |                  N/A |

+-------------------------------+----------------------+----------------------+

+-----------------------------------------------------------------------------+

| Processes:                                                                  |

|  GPU   GI   CI        PID   Type   Process name                  GPU Memory |

|        ID   ID                                                   Usage      |

|=============================================================================|

|  No running processes found                                                 |

+-----------------------------------------------------------------------------+

1.14.0a0+44dac51

True

8.5.2.2

1.4.0dev0
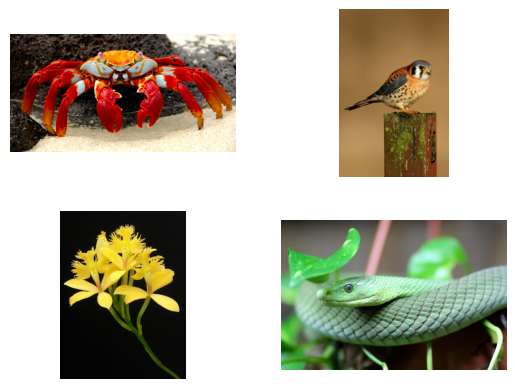
#准备数据(公开数据集下载4张测试图和分类信息)

!mkdir -p ./data

!wget  -O ./data/img0.JPG "https://inaturalist-open-data.s3.amazonaws.com/photos/8698/large.jpg"

!wget  -O ./data/img1.JPG "https://inaturalist-open-data.s3.amazonaws.com/photos/1697/large.jpg"

!wget  -O ./data/img2.JPG "https://inaturalist-open-data.s3.amazonaws.com/photos/7697/large.jpg"

!wget  -O ./data/img3.JPG "https://inaturalist-open-data.s3.amazonaws.com/photos/98797/large.jpg"

!wget  -O ./data/imagenet_class_index.json "https://s3.amazonaws.com/deep-learning-models/image-models/imagenet_class_index.json"
from PIL import Image

from torchvision import transforms

import matplotlib.pyplot as plt

import json

fig, axes = plt.subplots(nrows=2, ncols=2)

'''

图像进行预处理,加载后统一RGB通道,tensor(3, H, W)

缩放到统一尺寸,中心裁剪,将[0,255]像素值进行归一化处理

'''

for i in range(4):

    img_path = './data/img%d.JPG'%i

    img = Image.open(img_path)

    print(img)

    preprocess = transforms.Compose([

        transforms.Resize(256),

        transforms.CenterCrop(224),

        transforms.ToTensor(),

        transforms.Normalize(mean=[0.485, 0.456, 0.406], std=[0.229, 0.224, 0.225]),

    ])

    input_tensor = preprocess(img)

    print(input_tensor.shape)

    plt.subplot(2,2,i+1)

    plt.imshow(img)

    plt.axis('off')
import torch

import torchvision

# 加载分类信息

with open("./data/imagenet_class_index.json") as json_file:

    d = json.load(json_file)

torch.hub._validate_not_a_forked_repo=lambda a,b,c: True

#加载带权重ResNet模型

resnet50_model = torch.hub.load('pytorch/vision:v0.10.0', 'resnet50', weights=True)

resnet50_model.eval()
import numpy as np

import time

import torch.backends.cudnn as cudnn

cudnn.benchmark = True

'''

图像进行预处理,加载后统一RGB通道,tensor(3, H, W)

缩放到统一尺寸,中心裁剪,将[0,255]像素值进行归一化处理

'''

#图片处理,固定输入尺寸 224x224

def rn50_preprocess():

    preprocess = transforms.Compose([

        transforms.Resize(256),

        transforms.CenterCrop(224),

        transforms.ToTensor(),

        transforms.Normalize(mean=[0.485, 0.456, 0.406], std=[0.229, 0.224, 0.225]),

    ])

    return preprocess

# 定义推理函数([predicted class, description], probability)

def predict(img_path, model, dtype='fp32'):

    img = Image.open(img_path)

    preprocess = rn50_preprocess()

    input_tensor = preprocess(img)

    if dtype=='fp16':

        input_tensor = input_tensor.half()

    #print(input_tensor.shape)

    input_batch = input_tensor.unsqueeze(0) #增加一个batch通道,torch.Size([1, 3, 224, 224])

    #print(input_batch.shape)

    if torch.cuda.is_available():

        input_batch = input_batch.to('cuda')

        model.to('cuda')

    with torch.no_grad():

        output = model(input_batch) #进行推理,得到1000个种类,torch.Size([1, 1000])

        #print('output',output.shape)

        sm_output = torch.nn.functional.softmax(output[0], dim=0) #torch.Size([1000])

        #print('sm_output',sm_output.shape)

    ind = torch.argmax(sm_output) #提取1000个种类中概率最高的类,index索引

    #d包涵了所有种类

    return d[str(ind.item())], sm_output[ind] #([predicted class, description], probability)

#测试推理是否正常

for i in range(4):

    img_path = './data/img%d.JPG'%i #模板字符串

    img = Image.open(img_path)

    pred, prob = predict(img_path, resnet50_model)

    print('{} - Predicted: {}, Probablility: {}'.format(img_path, pred, prob))

    plt.subplot(2,2,i+1)

    plt.imshow(img);

    plt.axis('off');

    plt.title(pred[1])
#定义批量测试

def benchmark(model, input_shape=(1024, 1, 224, 224), dtype='fp32', nwarmup=50, nruns=10000):

    input_data = torch.randn(input_shape) #这里采用随机数不是真实图片

    input_data = input_data.to("cuda")

    if dtype=='fp16':

        input_data = input_data.half()

    print("Warm up ...")

    with torch.no_grad():

        for _ in range(nwarmup):

            features = model(input_data)

    torch.cuda.synchronize()

    print("Start timing ...")

    timings = []

    with torch.no_grad():

        for i in range(1, nruns+1):

            start_time = time.time()

            features = model(input_data)

            torch.cuda.synchronize()

            end_time = time.time()

            timings.append(end_time - start_time)

            if i%10==0:

                print('Iteration %d/%d, ave batch time %.2f ms'%(i, nruns, np.mean(timings)*1000))

    print("Input shape:", input_data.size())

    print("Output features size:", features.size())

    print('Average batch time: %.2f ms'%(np.mean(timings)*1000))

#进行测试

model = resnet50_model.eval().to("cuda")

benchmark(model, input_shape=(128, 3, 224, 224), nruns=100)
./data/img0.JPG - Predicted: ['n01978455', 'rock_crab'], Probablility: 0.943118691444397
./data/img1.JPG - Predicted: ['n01608432', 'kite'], Probablility: 0.25734055042266846
./data/img2.JPG - Predicted: ['n11939491', 'daisy'], Probablility: 0.3214719891548157
./data/img3.JPG - Predicted: ['n01749939', 'green_mamba'], Probablility: 0.9004988670349


#定义批量测试

def benchmark(model, input_shape=(1024, 1, 224, 224), dtype='fp32', nwarmup=50, nruns=10000):

    input_data = torch.randn(input_shape) #这里采用随机数不是真实图片

    input_data = input_data.to("cuda")

    if dtype=='fp16':

        input_data = input_data.half()

    print("Warm up ...")

    with torch.no_grad():

        for _ in range(nwarmup):

            features = model(input_data)

    torch.cuda.synchronize()

    print("Start timing ...")

    timings = []

    with torch.no_grad():

        for i in range(1, nruns+1):

            start_time = time.time()

            features = model(input_data)

            torch.cuda.synchronize()

            end_time = time.time()

            timings.append(end_time - start_time)

            if i%10==0:

                print('Iteration %d/%d, ave batch time %.2f ms'%(i, nruns, np.mean(timings)*1000))

    print("Input shape:", input_data.size())

    print("Output features size:", features.size())

    print('Average batch time: %.2f ms'%(np.mean(timings)*1000))

#进行测试

model = resnet50_model.eval().to("cuda")

benchmark(model, input_shape=(128, 3, 224, 224), nruns=100)
//---------------------fp32---------------------------//
Warm up ...
Start timing ...
Iteration 10/100, ave batch time 331.21 ms
Iteration 20/100, ave batch time 331.77 ms
Iteration 30/100, ave batch time 332.27 ms
Iteration 40/100, ave batch time 332.61 ms
Iteration 50/100, ave batch time 332.98 ms
Iteration 60/100, ave batch time 333.25 ms
Iteration 70/100, ave batch time 333.58 ms
Iteration 80/100, ave batch time 333.87 ms
Iteration 90/100, ave batch time 334.19 ms
Iteration 100/100, ave batch time 334.49 ms
Input shape: torch.Size([128, 3, 224, 224])
Output features size: torch.Size([128, 1000])
Average batch time: 334.49 ms
//---------------------fp16---------------------------//
Warm up ...
Start timing ...
Iteration 10/100, ave batch time 149.22 ms
Iteration 20/100, ave batch time 149.37 ms
Iteration 30/100, ave batch time 149.38 ms
Iteration 40/100, ave batch time 149.46 ms
Iteration 50/100, ave batch time 149.51 ms
Iteration 60/100, ave batch time 149.58 ms
Iteration 70/100, ave batch time 149.63 ms
Iteration 80/100, ave batch time 149.69 ms
Iteration 90/100, ave batch time 149.78 ms
Iteration 100/100, ave batch time 149.84 ms
Input shape: torch.Size([128, 3, 224, 224])
Output features size: torch.Size([128, 1000])
Average batch time: 149.84 ms
下面测试 torch_tensorrt
#定义input数据类型和输入尺寸

myinputs = [

    torch_tensorrt.Input( #动态尺寸,这里使用动态batch会报错

        min_shape=[1, 3, 224, 224],

        opt_shape=[1, 3, 224, 224],

        max_shape=[1, 3, 224, 224],

        dtype=torch.float32

    )

]

myinputs = [

    torch_tensorrt.Input( #固定的输入尺寸

        [128, 3, 224, 224],

        dtype=torch.float32

    )

]

myinputs = [

    torch.randn((1, 3, 224, 224),dtype=torch.float16) #通过输入tensor直接推测

]

enabled_precisions = {torch.float32, torch.float16}

model = resnet50_model.eval()

# 将 torch model 转成 tensorrt model

trt_model = torch_tensorrt.compile(model, inputs = myinputs, enabled_precisions = enabled_precisions)

print(trt_model)
RecursiveScriptModule(original_name=ResNet_trt)
#测试推理是否正常

for i in range(4):

    img_path = './data/img%d.JPG'%i #模板字符串

    img = Image.open(img_path)

    pred, prob = predict(img_path, trt_model, dtype='fp16') #这里使用 trt_model

    print('{} - Predicted: {}, Probablility: {}'.format(img_path, pred, prob))

    plt.subplot(2,2,i+1)

    plt.imshow(img);

    plt.axis('off');

    plt.title(pred[1])
./data/img0.JPG - Predicted: ['n01978455', 'rock_crab'], Probablility: 0.9439687728881836
./data/img1.JPG - Predicted: ['n01608432', 'kite'], Probablility: 0.2584533393383026
./data/img2.JPG - Predicted: ['n11939491', 'daisy'], Probablility: 0.32035374641418457
./data/img3.JPG - Predicted: ['n01749939', 'green_mamba'], Probablility: 0.9019732475280762
myinputs = [

    torch.randn((128, 3, 224, 224),dtype=torch.float16) #通过输入tensor直接推测

]

enabled_precisions = {torch.float32, torch.float16}

model = resnet50_model.eval()

trt_model_fp16 = torch_tensorrt.compile(model, inputs = myinputs, enabled_precisions = enabled_precisions)

print(trt_model_fp16)

#进行性能测试

benchmark(trt_model_fp16, input_shape=(128, 3, 224, 224), dtype='fp16', nruns=100)
RecursiveScriptModule(original_name=ResNet_trt)
Warm up ...
Start timing ...
Iteration 10/100, ave batch time 59.09 ms
Iteration 20/100, ave batch time 59.67 ms
Iteration 30/100, ave batch time 59.72 ms
Iteration 40/100, ave batch time 60.00 ms
Iteration 50/100, ave batch time 60.27 ms
Iteration 60/100, ave batch time 60.18 ms
Iteration 70/100, ave batch time 60.36 ms
Iteration 80/100, ave batch time 60.35 ms
Iteration 90/100, ave batch time 60.38 ms
Iteration 100/100, ave batch time 60.45 m
Input shape: torch.Size([128, 3, 224, 224])
Output features size: torch.Size([128, 1000])
Average batch time: 60.45 ms
由此可以得出结论,不对模型做其他改动,在使用 半精度 + torch_tensorrt 的情况下,有5倍多的提升。
同样使用半精度,使用torch_tensorrt后相较于原模型也有1倍多的提升。
深度学习 - Torch-TensorRT 推理加速的更多相关文章
- 阿里开源!轻量级深度学习端侧推理引擎 MNN
阿里妹导读:近日,阿里正式开源轻量级深度学习端侧推理引擎“MNN”. AI科学家贾扬清如此评价道:“与 Tensorflow.Caffe2 等同时覆盖训练和推理的通用框架相比,MNN 更注重在推理时的 ...
- 深度学习的异构加速技术(一):AI 需要一个多大的“心脏”?
欢迎大家前往腾讯云社区,获取更多腾讯海量技术实践干货哦~ 作者:kevinxiaoyu,高级研究员,隶属腾讯TEG-架构平台部,主要研究方向为深度学习异构计算与硬件加速.FPGA云.高速视觉感知等方向 ...
- Nature重磅:Hinton、LeCun、Bengio三巨头权威科普深度学习
http://wallstreetcn.com/node/248376 借助深度学习,多处理层组成的计算模型可通过多层抽象来学习数据表征( representations).这些方法显著推动了语音识别 ...
- 深度学习综述(LeCun、Bengio和Hinton)
原文摘要:深度学习可以让那些拥有多个处理层的计算模型来学习具有多层次抽象的数据的表示.这些方法在很多方面都带来了显著的改善,包含最先进的语音识别.视觉对象识别.对象检測和很多其他领域,比如药物发现和基 ...
- MLPerf结果证实至强® 可有效助力深度学习训练
MLPerf结果证实至强 可有效助力深度学习训练 核心与视觉计算事业部副总裁Wei Li通过博客回顾了英特尔这几年为提升深度学习性能所做的努力. 目前根据英特尔 至强 可扩展处理器的MLPerf结果显 ...
- 深度学习在 CTR 中应用
欢迎大家前往腾讯云技术社区,获取更多腾讯海量技术实践干货哦~ 作者:高航 一. Wide&&Deep 模型 首先给出Wide && Deep [1] 网络结构: 本质上 ...
- CTR深度学习
深度学习在 CTR 中应用 一. Wide&&Deep 模型 首先给出Wide && Deep [1] 网络结构: 本质上是线性模型(左边部分, Wide model) ...
- 完全基于 Java 的开源深度学习平台,亚马逊的大佬带你上手
本文适合有 Java 基础的人群 作者:DJL-Lanking HelloGitHub 推出的<讲解开源项目>系列.有幸邀请到了亚马逊 + Apache 的工程师:Lanking( htt ...
- NVIDIA TensorRT高性能深度学习推理
NVIDIA TensorRT高性能深度学习推理 NVIDIA TensorRT 是用于高性能深度学习推理的 SDK.此 SDK 包含深度学习推理优化器和运行时环境,可为深度学习推理应用提供低延迟和高 ...
- 英特尔与 Facebook 合作采用第三代英特尔® 至强® 可扩展处理器和支持 BFloat16 加速的英特尔® 深度学习加速技术,提高 PyTorch 性能
英特尔与 Facebook 曾联手合作,在多卡训练工作负载中验证了 BFloat16 (BF16) 的优势:在不修改训练超参数的情况下,BFloat16 与单精度 32 位浮点数 (FP32) 得到了 ...
随机推荐
- oracle数据库状态查询
oracle数据库状态查询(表空间,表空间利用率,是否自动扩展,IOPS,MBPS,数据库总大小) 排除了('SYSAUX', 'USERS', 'SYSTEM','UNDOTBS1') 结果示例 - ...
- app专项测试:app弱网测试(网络测试流程)
app专项测试:app弱网测试(网络测试流程) 一.网络测试的一般流程 step1:首先要考虑网络正常的情况 ① 各个模块的功能正常可用 ② 页面元素/数据显示正常 step2:其次要考虑无网络的情况 ...
- 【Java】数组强转问题
问题产生 问题代码: List<String> strs = new LinkedList<String>(); // 中间有添加元素的操作,这里省略... // 这里toAr ...
- nvtop —— GPU使用情况的可视化工具
安装: sudo apt install nvtop
- AI领域的国产显卡如何在现有技术下吸引用户 —— 廉价增加显存 —— 大显存
先给出一个不大准确的但相差不差的背景介绍: 同样性能级别的显卡,NVIDA的24G的要3W,32G的要5W,48G的要7W, 80G的要10W. 国产同同性能的显卡32G的要10W,48G的要15W, ...
- 【转载】 DQN玩Atari游戏安装atari环境bug指南
版权声明:本文为CSDN博主「好程序不脱发」的原创文章,遵循CC 4.0 BY-SA版权协议,转载请附上原文出处链接及本声明.原文链接:https://blog.csdn.net/ningmengzh ...
- [JLOI2015] 城池攻占 题解
前言 题目链接:洛谷. 题目分析 其他人要么倍增,要么左偏树,那我就来讲讲朴实无华的 dfs 序加上线段树的做法. 首先发现题目中明确指出了作乘法的时候一定是乘上一个大于零的数,这是为什么呢?首先把可 ...
- 2024年Apache DolphinScheduler RoadMap:引领开源调度系统的未来
非常欢迎大家来到Apache DolphinScheduler社区!随着开源技术在全球范围内的快速发展,社区的贡献者 "同仁" 一直致力于构建一个强大而活跃的开源调度系统社区,为用 ...
- springcloud feign集成hystrix
本章介绍feign集成hystrix 1.增加pom依赖` <dependency> <groupid>org.springframework.cloud</groupi ...
- springcloud config坑系列一之Connection pool shut down on "zuul.host.*" property change
在使用springcloud config自动刷新功能难免会踩到一些坑,下面来介绍下 在生成中经常需要动态刷新配置,只需要增加@RefreshScope,并且执行手动刷新链接/actuator/ref ...