在阿里云上部署Solid服务器
1、Solid是什么?
Solid(中文文档)是一个令人兴奋的新项目,由万维网发明者 Tim Berners-Lee 爵士在麻省理工学院启动。 该项目旨在从根本上改变 Web 应用程序的中心化趋势, 它将真正地让数据所有权属于用户,并改善隐私问题。
①真正的数据所有权
用户可以自由选择数据存储的地方以及谁可以访问数据,Solid 通过将数据与应用程序分离达到了这一效果。
②模块化设计
由于用户产生的数据与应用程序是分离的,所以用户能够避免互联网服务提供商随意锁定、删除数据,从而在各个应用之间无缝切换而且不会丢失任何数据或社交关系。
③数据重复利用
开发者在创建新应用或改进现有应用时,可以重用现有的数据,其中有些数据可能是由其他程序创建的(但要得到用户的许可才能使用)。
2、在阿里云CentOS Linux上部署Solid服务器
前提必备:阿里云服务器、已备案域名
2.1:安装Certbot
yum install -y epel-release

yum install -y certbot
查看cerbot是否安装成功以及安装版本
certbot --version

certbot 1.11.0
2.2:使用Certbot安装SSL证书
certbot certonly --preferred-challenges dns --manual -d *.cncaq.com --server https://acme-v02.api.letsencrypt.org/directory
参数说明:
- --preferred-challenges dns: 认证方式选择DNS, 泛域名支持DNS
- --manual: 手动模式, 这里为了简单就使用手动认证了, 下面会说自动模式的使用.
- -d *.cncaq.com: 就是你自己申请匹配的泛域名了
- --server https://acme-v02.api.letsencrypt.org/directory: 泛域名证书是新功能, 如果要使用就得加上这个参数
运行会显示【有YES/No选项都输入y】:
-------------------------------------------------------------------------------

NOTE: The IP of this machine will be publicly logged as having requested this

certificate. If you're running certbot in manual mode on a machine that is not

your server, please ensure you're okay with that.

Are you OK with your IP being logged?

-------------------------------------------------------------------------------

(Y)es/(N)o: y
直到出现以下界面先暂停在Liunx机上操作:
-------------------------------------------------------------------------------

Please deploy a DNS TXT record under the name

_acme-challenge.cncaq.com with the following value:

W2Z_PT1RQX8usavprZ1ly43Je2ayst3ShIBxpgicdEA

Before continuing, verify the record is deployed.

-------------------------------------------------------------------------------
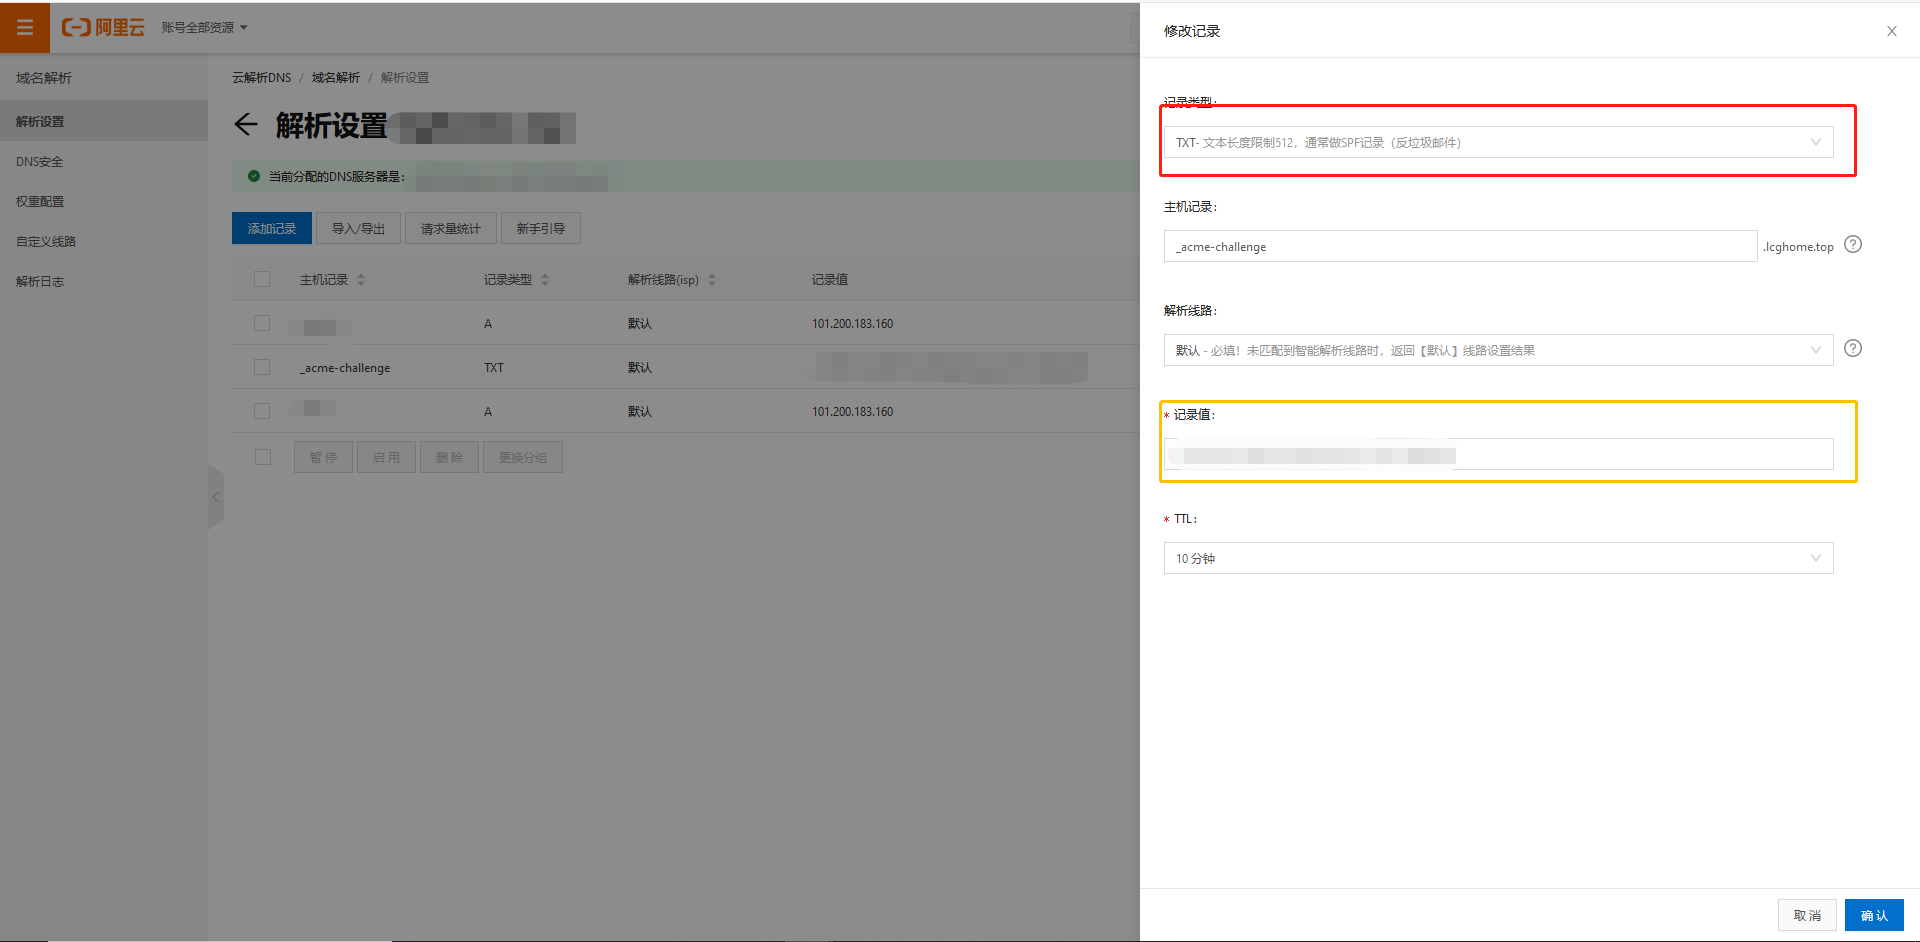
打开阿里云控制台进入【云解析DNS】->【解析设置】->【添加记录】:将记录类型选为TXT类型;将主机记录写为:_acme-challenge【固定的】;将色部位标记的字符串复制填入记录值;点击确定
设置完以后回到云服务操作界面按下Enter建,成功了就会显示以下界面:
Waiting for verification...

Cleaning up challenges

IMPORTANT NOTES:

 - Congratulations! Your certificate and chain have been saved at:

   /etc/letsencrypt/live/cncaq.com/fullchain.pem

   Your key file has been saved at:

   /etc/letsencrypt/live/cncaq.com/privkey.pem

   Your cert will expire on 2020-07-16. To obtain a new or tweaked

   version of this certificate in the future, simply run certbot

   again. To non-interactively renew *all* of your certificates, run

   "certbot renew"

 - If you like Certbot, please consider supporting our work by:

   Donating to ISRG / Let's Encrypt:   https://letsencrypt.org/donate

   Donating to EFF:                    https://eff.org/donate-le
至此SSL证书安装成功。
3、安装运行SoLiD Server
全局下载安装solid-server
npm install -g solid-server
找一个合适的位置创建给Solld初始化的文件夹【位置和文件夹命名随意】,在该文件下运行命令:
solid init
初始化时会要求你提供很多信息,大致入下面这样:
? Path to the folder you want to serve. Default is /var/www/your.host.example.org/data      【文件夹路径不是写死,是根据个人自己创建的文件路径,一般就是当前命令运行路径,所以可以什么都不该直接Enter就行】

? SSL port to run on. Default is 8443 443                                                   【固定:433】

? SoLiD server uri (with protocol, hostname and port) https://your.host.example.org         【https://your.host.example.org格式固定,必须有https://为开头,根据个人网址设定,例如我设置的地址为:www.LCGbuff.com,就写成:https://www.LCGbuff.com】

? Enable WebID authentication Yes                                                           【Yes】

? Serve SoLiD on URL path /                                                                 【默认,按Enter】

? Path to the config directory (for example: /etc/solid-server) /var/www/your.host.example.org/config   【默认,按Enter】

? Path to the config file (for example: ./config.json) /var/www/your.host.example.org/config.json       【默认,按Enter】

? Path to the server metadata db directory (for users/apps etc) /var/www/your.host.example.org/.db      【默认,按Enter】

? Path to the SSL private key in PEM format /etc/letsencrypt/live/your.host.example.org/privkey.pem     【输入:/etc/letsencrypt/live/your.host.example.org/privkey.pem 】

? Path to the SSL certificate key in PEM format /etc/letsencrypt/live/your.host.example.org/fullchain.pem 【输入:/etc/letsencrypt/live/your.host.example.org/fullchain.pem】

? Enable multi-user mode No

? Do you want to have a CORS proxy endpoint? Yes

? Serve the CORS proxy on this path /proxy

? Do you want to set up an email service? No

config created on /root/config.json
以上操作完了之后就已经安装完成solid-server,然后就可以正式启动 SoLiD 了:
solid start
之后根据设定好的地址就可以访问个人Solid服务器,进入后可以进行注册登录定制个人信息。
在阿里云上部署Solid服务器的更多相关文章
- 阿里云上部署了zabbix,突然无法收到报警邮件的解决办法
在阿里云上部署了zabbix,一直能正常接收到zbx发来的报警邮件(报警邮箱是163的),不知是什么原因,突然无法接收到报警邮件了. 但在服务器上手动执行echo "hello"| ...
- 如何在阿里云上部署war包到tomcat服务器
一. 准备工作:xshell和xftp 首先我们得确保,xshell能够远程连接阿里云ECS,xftp能够保证windows和linux之间的文件传输(当然也可以选择FileZilla,但xftp感觉 ...
- 云计算之路-阿里云上:Web服务器遭遇奇怪的“黑色30秒”问题
今天下午访问高峰的时候,主站的Web服务器出现奇怪的问题,开始是2台8核8G的云服务器(ECS),后来又加了1台8核8G的云服务器,问题依旧. 而且3台服务器特地使用了不同的配置:1台是禁用了虚拟内存 ...
- 在腾讯云&阿里云上部署JavaWeb项目(Tomcat+MySQL)
之前做项目都是在本地跑,最近遇到需要在在云服务器(阿里云或者腾讯云都可以,差不多)上部署Java Web项目的问题,一路上遇到了好多坑,在成功部署上去之后写一下部署的步骤与过程,一是帮助自己总结记忆, ...
- 【Centos】【Python】【Flask】阿里云上部署一个 flask 项目
1. 安装 python3 和 pip3 参考:http://www.cnblogs.com/mqxs/p/8692870.html 2.安装 lnmpa 集成开发环境 参考:http://www.c ...
- 云计算之路-阿里云上:部分服务器未及时续费造成docker swarm集群故障
非常非常抱歉,由于我们的疏忽 —— docker swarm 集群中的 2 台服务器没有及时续费,造成在夜里0点被自动关机,从而引发整个 docker swarm 集群故障,造成今天凌晨 0:30 ~ ...
- 在阿里云上部署 Postfix
Postfix 可以很方便的在一台机器上部署 smtp 服务,在 centos 上来说的话可以使用: sudo yum install postfix sudo systemctl enable po ...
- 阿里云上部署kafka--遇到的坑
阿里云防火墙关闭,并且配置规则.不然会导致访问不到服务. 问题一: Caused by: java.net.UnknownHostException: iZuf68tztea6l5ccdz7wemZ: ...
- 云计算之路-阿里云上:Web服务器请求到达量突降
今天下午遇到了自使用阿里云以来首次遇到的新情况——http.sys的ArrivalRate突降(说明请求到达IIS的请求数量少了),而且SLB中的3台ECS都出现了这个问题. 1. 10.161.24 ...
- 阿里云上部署tomcat启动后,通过http不能访问
原因是因为阿里为了安全设置了安全组策略,必须我们授权的端口,其他计算机才能通过http访问 设置流程: 点击安全组 再点击:配置规则 然后点击:添加安全组规则 开始配置:划红线的必写,授权对象:0.0 ...
随机推荐
- 开源超全Lotus Domino Xpages 开发资料,Domino最新资料,lotus资料,xpages资料,Domino开源信息下载
十年Domino资料,不断累积,精彩展示,从维护到开发,从CS到BS再变xpage,都是一步步过来,让Domino后台数据在在多个平台绽放 把这些开发技术文档分享出来,希望通过这个资料,为大家学习开发 ...
- Linux 调用约定
函数调用约定是对函数调用时如何传递参数的一种约定.关于它的约定有许多种,下面我们分 别从内核接口和用户接口两方面介绍32位和64位Linux的调用约定. 一.内核接口 x86-32系统调用约定 ...
- Ascend C sqrt算子实战
摘要:编写一个Ascend C的sqrt算子,并通过内核调用方式在cpu和npu模式下进行验证. 本文分享自华为云社区<[2023 · CANN训练营第一季]--Ascend C sqrt算子实 ...
- JumpServer安装及应用
jumpserver安装 安装所需软件包 [root@localhost ~]# yum -y update [root@localhost ~]# dnf install -y wget curl ...
- Lucene检索全流程学习笔记
一 简介 写作目的 1 为什么学习Lucene lucene是基于倒排索引的检索工具库,倒排索引是典型的文本匹配,它能够精确匹配用户搜索的query,它的缺点是不擅长语义理解,而深度学习检索模型擅长的 ...
- uniapp-chatgpt跨端仿ChatGPT实例|uniapp+vue3+pinia多端聊天模板
基于uniapp+vite4+pinia跨多端实现chatgpt会话模板Uniapp-ChatGPT. uni-chatgpt 使用uni-app+vite4+vue3+pinia+uview-plu ...
- Dlang 并行化
Dlang 并行化 好难受,dlang 生态太差,没办法,学了半天才明白. 我尽量以精炼的语言解释. 采用 定义,例子(代码),解释 的步骤讲解. 所以你可能看到很多代码,一点解释-- 我会省略一些 ...
- 在英特尔 CPU 上微调 Stable Diffusion 模型
扩散模型能够根据文本提示生成逼真的图像,这种能力促进了生成式人工智能的普及.人们已经开始把这些模型用在包括数据合成及内容创建在内的多个应用领域. Hugging Face Hub 包含超过 5 千个预 ...
- .Net 一套接口多实现
.Net 一套接口多实现 接口(interface)可理解为规范.标准.协议.接口是用来约束各方都在同一组规范下工作. 电脑外设USB接口,各个品牌商家生产的U盘.鼠标都能够被电脑主板识别并工作,这是 ...
- Vue错误:Cannot read properties of undefined (reading '$router')
解决方案 这是由于this的指向有问题,我们只需要重新声明一下this就可以重新调用了