用户登录(Material Design + Data-Binding + MVP架构模式)实现
转载请注明出处: http://www.cnblogs.com/cnwutianhao/p/6772759.html
MVP架构模式 大家都不陌生,Google 也给出过相应的参考 Sample,
但是有的人会有疑问为啥 GitHub 上面大神写的 MVP架构模式 和 Google 的不太一样。
Google MVP架构模式 Sample 地址 https://github.com/googlesamples/android-architecture/tree/todo-mvp/
下面我们就仿照 Google 的 Sample 实现用户登录
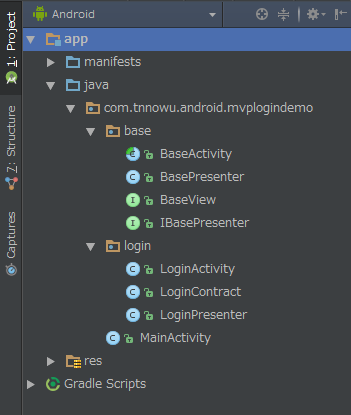
项目结构:
示例演示图:

代码实现:
1.导入必要的开源库
示例项目采用 Material Design + Data-Binding + MVP
android {

    ...

    // Data Binding

    // https://developer.android.google.cn/topic/libraries/data-binding/index.html

    dataBinding {

        enabled true

    }

}
dependencies {

    ...

    // UI

    compile 'com.android.support:appcompat-v7:25.3.1'

    compile 'com.android.support:cardview-v7:25.3.1'

    compile 'com.android.support:design:25.3.1'

}
2.Base类
1) BaseActivity
public abstract class BaseActivity extends AppCompatActivity implements View.OnClickListener {

    @Override

    protected void onCreate(Bundle savedInstanceState) {

        super.onCreate(savedInstanceState);

        initView();

        initData();

        dataProcess();

    }

    protected abstract void initView();

    protected abstract void initData();

    protected abstract void dataProcess();

}
2) BasePresenter
public class BasePresenter {

}
3) BaseView
public interface BaseView {

}
4) IBasePresenter
public interface IBasePresenter {

    void onDestroyView();

}
3.定义一个契约类,连接 P层 和 V层。这样可以使接口一目了然
在这里我要说明一下,用户登录界面,最基本的需要判断用户名是否为空,密码是否为空。
public class LoginContract {

    interface loginView extends BaseView {

        void accountIsNull();

        void passWordIsNull();

        void loginSuccess();

    }

    interface loginPresenter extends IBasePresenter {

        void login(String account, String password);

    }

}
4.定义一个 LoginPresenter ,判断条件在这里实现
public class LoginPresenter extends BasePresenter implements LoginContract.loginPresenter {

    private LoginContract.loginView mView;

    public LoginPresenter(LoginContract.loginView view) {

        mView = view;

    }

    @Override

    public void onDestroyView() {

        mView = null;

    }

    @Override

    public void login(String account, String password) {

        if (TextUtils.isEmpty(account)) {

            mView.accountIsNull();

            return;

        }

        if (TextUtils.isEmpty(password)) {

            mView.passWordIsNull();

            return;

        }

        mView.loginSuccess();

    }

}
5.定义一个 LoginActivity ,可以视其为 View层
public class LoginActivity extends BaseActivity implements LoginContract.loginView {

    private Context mContext;

    private LoginPresenter mLoginPresenter;

    private ActivityLoginBinding mBinding;

    @Override

    protected void initView() {

        mContext = LoginActivity.this;

        mBinding = DataBindingUtil.setContentView(this, R.layout.activity_login);

    }

    @Override

    protected void initData() {

        mLoginPresenter = new LoginPresenter(this);

        mBinding.loginBtn.setOnClickListener(this);

        mBinding.loginChangePassword.setOnClickListener(this);

        mBinding.loginRegister.setOnClickListener(this);

    }

    @Override

    protected void dataProcess() {

    }

    @Override

    public void onClick(View v) {

        switch (v.getId()) {

            case R.id.login_btn:

                mLoginPresenter.login(

                        mBinding.loginAccount.getText().toString(),

                        mBinding.loginPassword.getText().toString());

                break;

            default:

                break;

        }

    }

    @Override

    public void accountIsNull() {

        Toast.makeText(mContext, "请输入您的账户", Toast.LENGTH_LONG).show();

    }

    @Override

    public void passWordIsNull() {

        Toast.makeText(mContext, "请输入您的密码", Toast.LENGTH_LONG).show();

    }

    @Override

    public void loginSuccess() {

        Intent intentRegister = new Intent();

        intentRegister.setClass(LoginActivity.this, MainActivity.class);

        startActivity(intentRegister);

        overridePendingTransition(android.R.anim.fade_in, android.R.anim.fade_out);

        finish();

    }

}
6.布局代码
布局里涉及到 layout(Data-Binding)、CardView(Material Design)、TextInputLayout(Material Design)
<?xml version="1.0" encoding="utf-8"?>

<layout xmlns:android="http://schemas.android.com/apk/res/android">

    <RelativeLayout xmlns:app="http://schemas.android.com/apk/res-auto"

        android:id="@+id/activity_main"

        android:layout_width="match_parent"

        android:layout_height="match_parent"

        android:background="@drawable/splash_image">

        <android.support.v7.widget.CardView

            style="@style/cardElevation"

            android:layout_width="match_parent"

            android:layout_height="wrap_content"

            android:layout_centerInParent="true"

            android:layout_marginLeft="16dp"

            android:layout_marginRight="16dp"

            app:cardCornerRadius="7dp">

            <LinearLayout

                android:layout_width="match_parent"

                android:layout_height="match_parent"

                android:orientation="vertical">

                <TextView

                    style="@style/TextStyle.Heading"

                    android:layout_width="wrap_content"

                    android:layout_height="wrap_content"

                    android:layout_gravity="center|top"

                    android:layout_marginTop="40dp"

                    android:text="登录账号"

                    android:textAllCaps="true"

                    android:textSize="20sp" />

                <LinearLayout

                    android:layout_width="match_parent"

                    android:layout_height="wrap_content"

                    android:layout_gravity="center"

                    android:layout_margin="20dp"

                    android:orientation="vertical">

                    <android.support.design.widget.TextInputLayout

                        android:layout_width="match_parent"

                        android:layout_height="wrap_content"

                        android:hint="账号"

                        android:textColorHint="@color/gray"

                        app:hintTextAppearance="@style/TextAppearance.App.TextInputLayout">

                        <android.support.design.widget.TextInputEditText

                            android:id="@+id/login_account"

                            style="@style/TextStyle"

                            android:layout_width="match_parent"

                            android:layout_height="wrap_content"

                            android:layout_marginLeft="20dp"

                            android:layout_marginRight="20dp"

                            android:background="@drawable/input_border_bottom"

                            android:cursorVisible="true"

                            android:gravity="center|left|bottom"

                            android:inputType="textEmailAddress"

                            android:maxLength="50"

                            android:paddingBottom="10dp"

                            android:textColor="@color/black_effective"

                            android:textSize="18sp" />

                    </android.support.design.widget.TextInputLayout>

                    <android.support.design.widget.TextInputLayout

                        android:layout_width="match_parent"

                        android:layout_height="wrap_content"

                        android:hint="密码"

                        android:textColorHint="@color/gray"

                        app:hintTextAppearance="@style/TextAppearance.App.TextInputLayout"

                        app:passwordToggleEnabled="true">

                        <android.support.design.widget.TextInputEditText

                            android:id="@+id/login_password"

                            style="@style/TextStyle"

                            android:layout_width="match_parent"

                            android:layout_height="wrap_content"

                            android:layout_marginLeft="20dp"

                            android:layout_marginRight="20dp"

                            android:layout_marginTop="30dp"

                            android:background="@drawable/input_border_bottom"

                            android:cursorVisible="true"

                            android:gravity="center|left|bottom"

                            android:inputType="textPassword"

                            android:maxLength="50"

                            android:paddingBottom="10dp"

                            android:textColor="@color/black_effective"

                            android:textSize="18sp" />

                    </android.support.design.widget.TextInputLayout>

                    <Button

                        android:id="@+id/login_btn"

                        style="@style/Button.Primary"

                        android:layout_width="match_parent"

                        android:layout_height="wrap_content"

                        android:layout_gravity="center"

                        android:layout_marginLeft="15dp"

                        android:layout_marginRight="15dp"

                        android:layout_marginTop="20dp"

                        android:padding="10dp"

                        android:text="登录"

                        android:textSize="18dp" />

                </LinearLayout>

                <RelativeLayout

                    android:layout_width="match_parent"

                    android:layout_height="wrap_content"

                    android:layout_margin="35dp">

                    <TextView

                        android:id="@+id/login_change_password"

                        android:layout_width="wrap_content"

                        android:layout_height="wrap_content"

                        android:layout_alignParentLeft="true"

                        android:text="修改密码" />

                    <TextView

                        android:id="@+id/login_register"

                        android:layout_width="wrap_content"

                        android:layout_height="wrap_content"

                        android:layout_alignParentRight="true"

                        android:text="注册账号" />

                </RelativeLayout>

            </LinearLayout>

        </android.support.v7.widget.CardView>

    </RelativeLayout>

</layout>
示例Sample下载:Material Design风格登录界面
7.总结
MVP架构模式 作为 MVC架构模式 的替代产物,是当今 Android开发 的趋势。Google 都在推荐开发者去用这种模式,作为开发者没有理由拒绝。
现在生产出来的安卓手机我觉得99.9%的系统都是Android 5.0+,所以开发者们更应该多了解Material Design。而不是做个页面像Android 2.x 甚至 1.x的样式。
Data-Binding 是 Google 推荐开发者使用的替代 findViewById 的产物。
总之一句话,Google官方推荐,就是开发者们要在App中重点使用的技术,早晚都要使用,你不用,不会用,就要被会用的人淘汰。
关注我的新浪微博,请认准黄V认证,获取最新安卓开发资讯。
关注科技评论家,领略科技、创新、教育以及最大化人类智慧与想象力!
用户登录(Material Design + Data-Binding + MVP架构模式)实现的更多相关文章
- 开发 Material Design+RxJava+Retrofit+MVP App 参考资料
前言 在开发一个基于 Material Design+RxJava+Retrofit+MVP 框架的 App 过程中学习的资料整理 —— 由G军仔分享 这里记录了我开发 大象 项目时,所学习的 ...
- iOS - MVP 架构模式
1.MVP 从字面意思来理解,MVP 即 Modal View Presenter(模型 视图 协调器),MVP 实现了 Cocoa 的 MVC 的愿景.MVP 的协调器 Presenter 并没有对 ...
- MVP架构模式
概念解释 MVP是Model(数据) View(界面) Presenter(表现层)的缩写,它是MVC架构的变种,强调Model和View的最大化解耦和单一职责原则 Model:负责数据的来源和封装, ...
- 设计模式笔记之一:MVP架构模式入门(转)
写在前面:昨天晚上,公司请来专家讲解了下MVP,并要求今后各自负责的模块都要慢慢的转到MVP模式上来.以前由于能力有限,没有认真关注过设计模式.框架什么的,昨晚突然兴趣大发,故这两天空闲时间一直在学习 ...
- 死磕安卓前序:MVP架构探究之旅—基础篇
前言 了解相关更多技术,可参考<我就死磕安卓了,怎么了?>,接下来谈一谈我们来学习一下MVP的基本认识. 大家对MVC的架构模式再熟悉不过.今天我们就学习一下MVP架构模式. MVC和MV ...
- 一文彻底搞清楚 Material Design
一文彻底搞清楚 Material Design 首先声明以下介绍的关于 Material Design 的介绍,都是基于在 Android 环境下,其实 Material Design 是一种为了让 ...
- Android Data Binding高级用法-Observable、动态生成Binding Class(三)
设置View的id 虽然说Data Binding这种分层模式使得我们对数据的传递简单明了,一般情况下我们可以不设置View的id,不使用findViewById即可对View进行数据上一系列的操作, ...
- android -------- Data Binding的使用(一)
Google推出自己官方的数据绑定框架Data Binding Library 已经很久了,很多企业也在使用 面试的时候也有问到,所以也去学习了一番,特来分享一下,希望对各位有所帮助 描述: Data ...
- Android MVP开发模式及Retrofit + RxJava封装
代码已上传到Github,因为接口都是模拟无法进行测试,明白大概的逻辑就行了! 欢迎浏览我的博客--https://pushy.site 1. MVP模式 1.1 介绍 如果熟悉MVP模式架构的话,对 ...
随机推荐
- win10如何合并硬盘分区
好多人都会讲电脑硬盘分成几个不同的区,以方便自己的资料的存储和查找,但不少人不知道如何合并已经分出的硬盘分区.以下是我的经验,与大家分享: 1. 首先,右击“此电脑”,在弹出来的右键菜单这种选择“ ...
- @Autowired 注释对在哪里和如何完成自动连接提供了更多的细微的控制。
1.@Autowired 可以用在多个地方,在 setter 方法上,属性上 或者 带有多个参数的任意方法上. Setter 方法中的 @Autowired. 当 Spring遇到一个在 setter ...
- C# 在PDF中创建和填充域
C# 在PDF中创建和填充域 众所周知,PDF文档通常是不能编辑和修改的.如果用户需要在PDF文档中签名或者填写其他内容时,就需要PDF文档中有可编辑的域.开发者也经常会遇到将数据以编程的方式填充到P ...
- cordova原理与插件制作
---恢复内容开始--- cordova插件打包教程: http://www.jianshu.com/p/96855e009e95 www.itnose.net/detail/6245407.html ...
- php文件基本操作与文件管理功能
文件的基本操作 先来看一下PHP文件基础操作,请看强大注释 <body> <?php var_dump(filetype("./img/11.png")); // ...
- Static语句块和初始语句块的使用---2015年10月恒生电子笔试试卷
package lhm.test; /** * @author lenovo * */public class Person { private int id; private static int ...
- HDFS入门(1)
2015.07.12笔记 1.HDFS Distributed File System(操作系统实现人机交互,最重要的功能是文件管理,使用文件管理系统,windows.Linux文件管理系统有共性:用 ...
- FastDFS分布文件系统相关资料索引
FastDFS是为互联网应用量身定做的一套分布式文件存储系统,非常适合用来存储用户图片.视频.文档等文件.对于互联网应用,和其他分布式文件系统相比,优势非常明显.具体情况大家可以看相关的介绍文档,包括 ...
- CentOS7 更换yum源
yum源调整为163wget http://mirrors.163.com/.help/CentOS7-Base-163.repo[root@admin yum.repos.d]# mv CentOS ...
- 在 WPF 中使用 Path 路径
在 WPF 中总会修改 Button 的 Style,比如一个自定义的 Close 按钮.刚入门的可能会用一张 PNG 格式的图片来做这个按钮的 Icon,但这个是不优雅的.而且你要改的时候还得去操作 ...