
Google免费GPU使用教程
今天突然看到一篇推文,里面讲解了如何薅资本主义羊毛,即如何免费使用Google免费提供的GPU使用权。
可以免费使用的方式就是通过Google Colab,全名Colaboratory。我们可以用它来提高Python技能,也可以用Keras、TensorFlow、PyTorch、OpenCV等等流行的深度学习库来练习开发深度学习的应用。
现在我们介绍如何免费的使用这个非常非常给力的应用!!!
一 项目建立与配置
(1)在Google Drive上创建文件夹:这项功能的使用主要是通过Google Drive,首先需要在Google Drive里面创建新的文件夹,因为我们所有的操作都是通过Google Drive文件的方式进行的,这里我们创建了一个名为gpu的文件夹,然后打开文件夹;
(2)创建新的Colaboratory:右键更多选择Colaboratory, 如果更多没有的话,可以点击关联更多应用搜索添加即可!
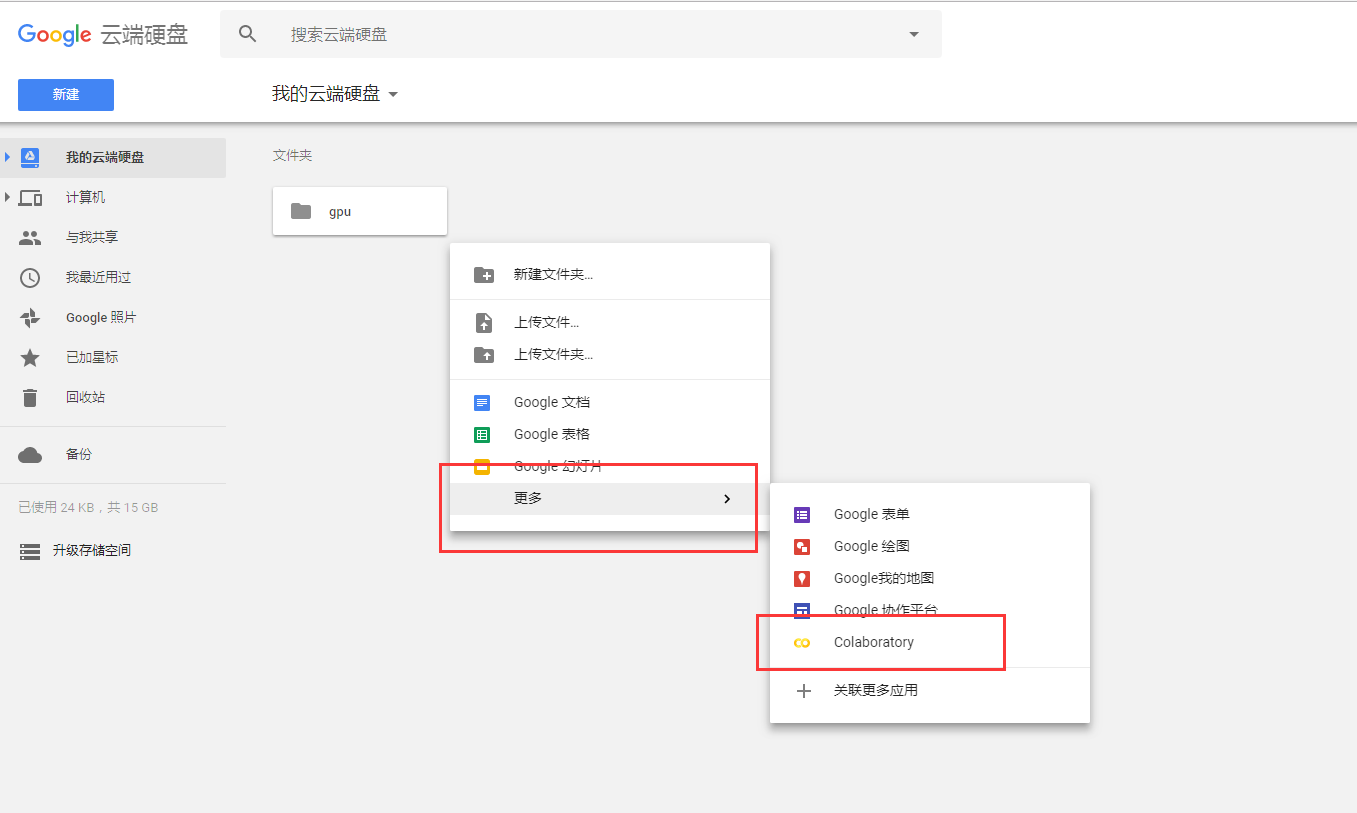
并且这里可以随意修改文件名

(3)设置后端Python版本和免费的GPU使用:然后就可以进行代码编写了~~~
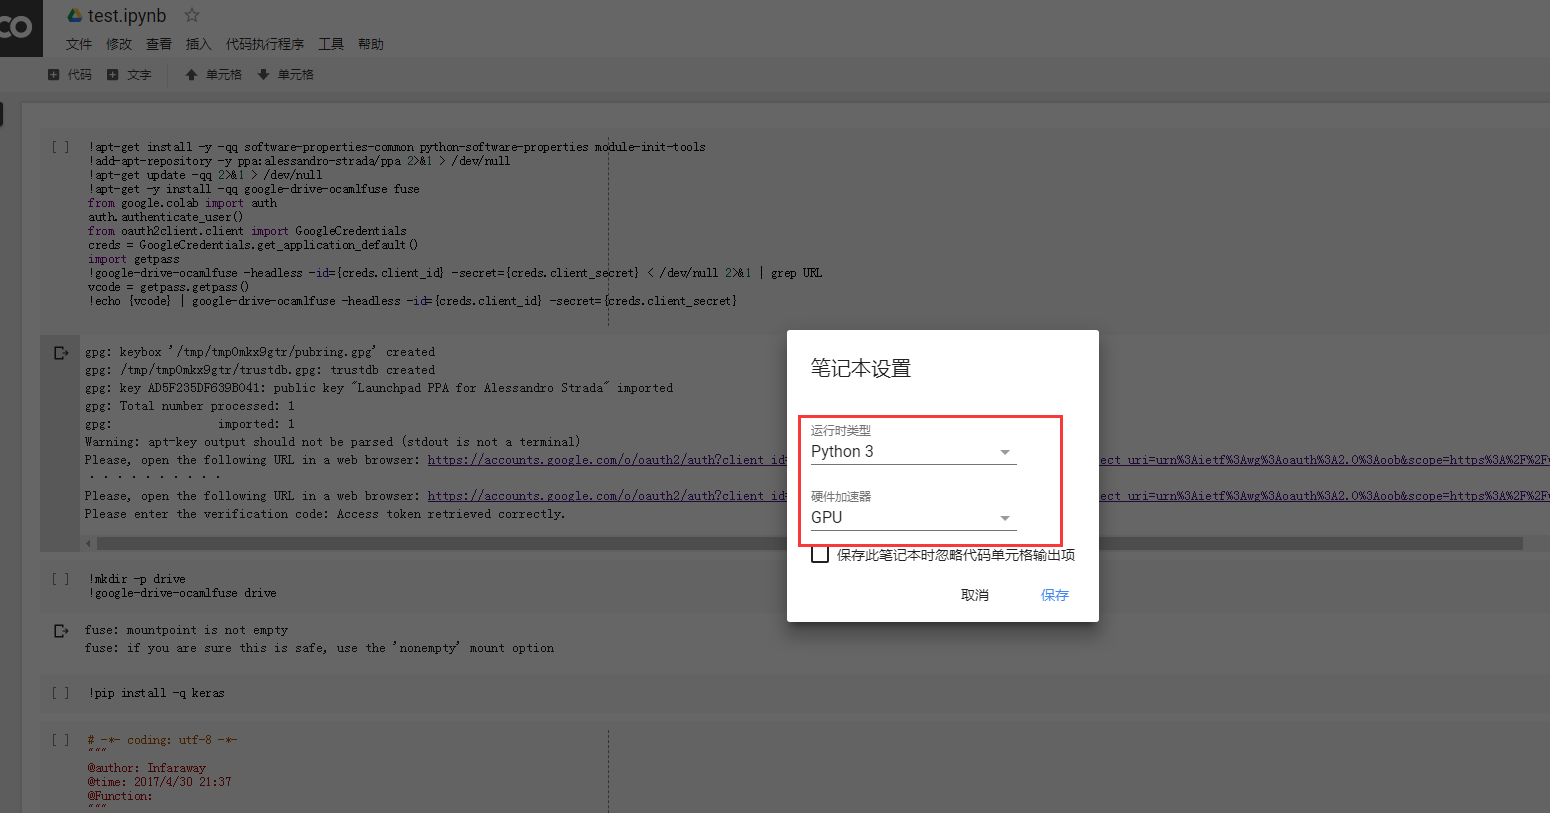
二 授权与挂载
(4)当完成基本的文件建立和配置后,就需要先运行下面这些代码,来安装必要的库、执行授权:

 !apt-get install -y -qq software-properties-common python-software-properties module-init-tools

 !add-apt-repository -y ppa:alessandro-strada/ppa 2>&1 > /dev/null

 !apt-get update -qq 2>&1 > /dev/null

 !apt-get -y install -qq google-drive-ocamlfuse fuse

 from google.colab import auth

 auth.authenticate_user()

 from oauth2client.client import GoogleCredentials

 creds = GoogleCredentials.get_application_default()

 import getpass

 !google-drive-ocamlfuse -headless -id={creds.client_id} -secret={creds.client_secret} < /dev/null 2>&1 | grep URL

 vcode = getpass.getpass()

 !echo {vcode} | google-drive-ocamlfuse -headless -id={creds.client_id} -secret={creds.client_secret}
点击运行可以看到如下结果:此时,点击链接地址,获取验证码。
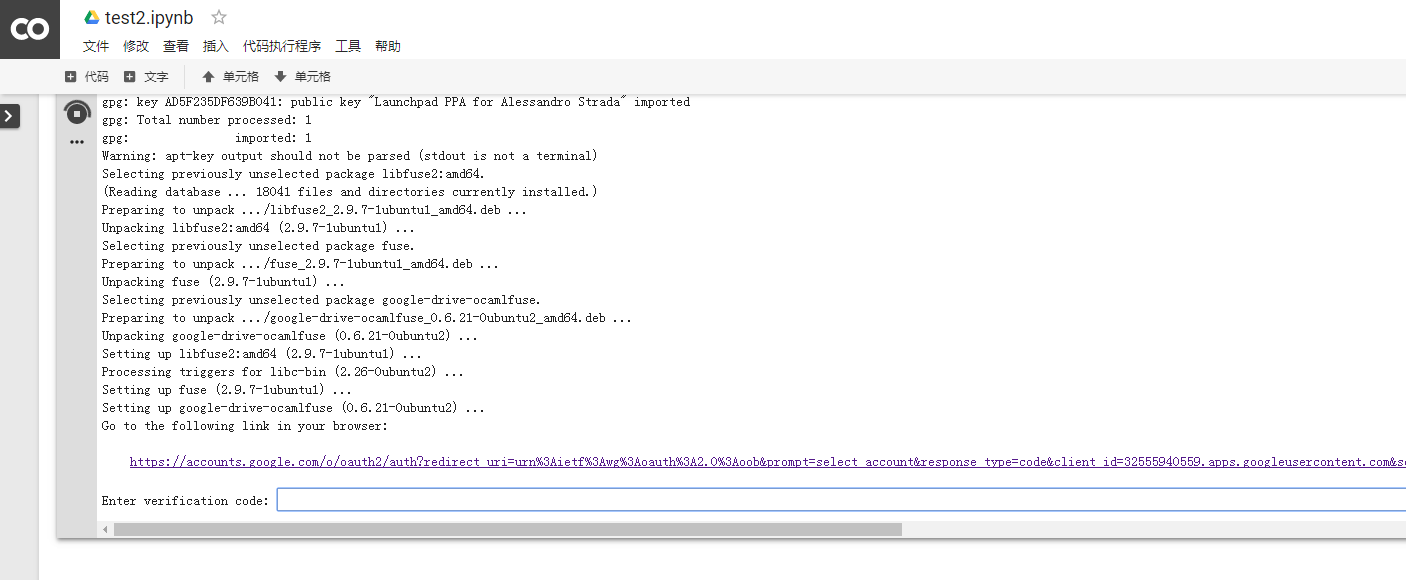
点击链接地址,获取验证码。
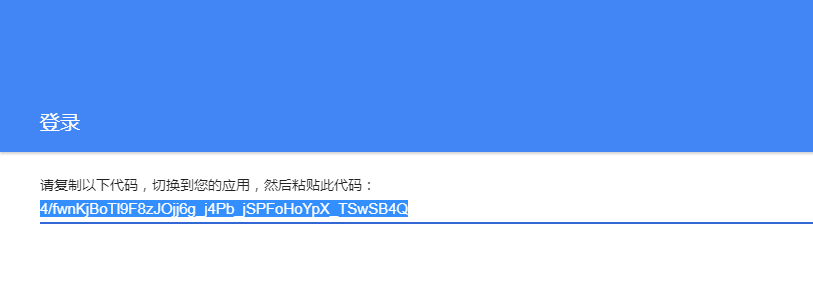
提示成功!
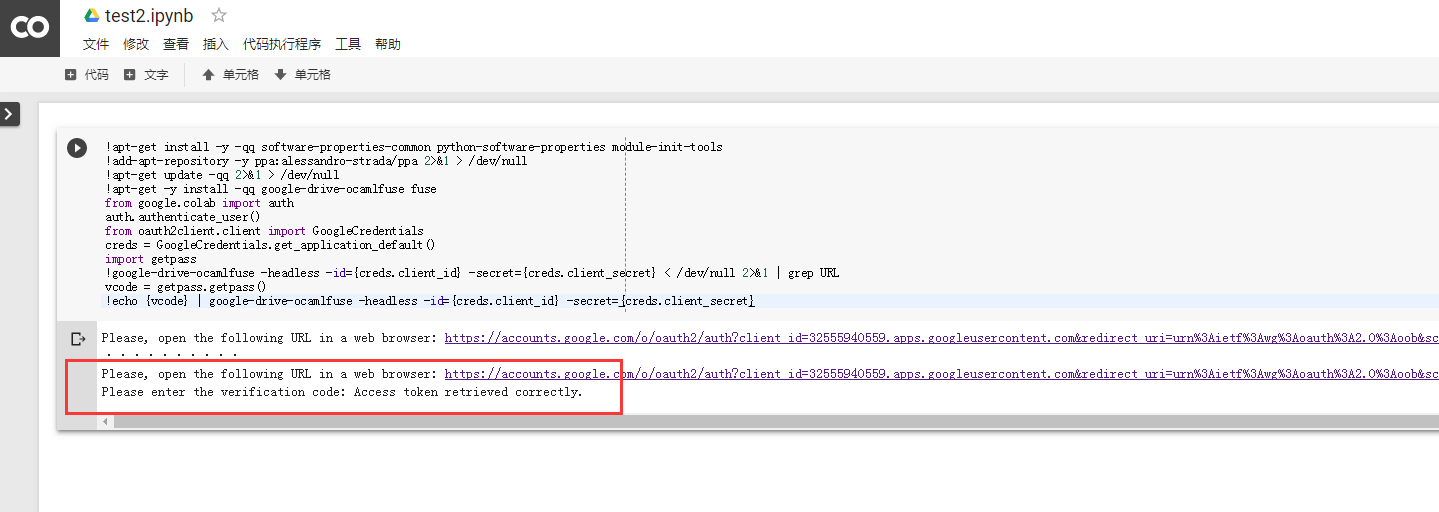
(5)授权完成后,就可以挂载Google Drive了
 !mkdir -p drive

 !google-drive-ocamlfuse drive
三 测试阶段
我们使用安装Keras中的测试样例代码进行效果的测试:
 # -*- coding: utf-8 -*-

 '''Trains a simple convnet on the MNIST dataset.

 Gets to 99.25% test accuracy after 12 epochs

 (there is still a lot of margin for parameter tuning).

 16 seconds per epoch on a GRID K520 GPU.

 '''

 from __future__ import print_function

 import keras

 from keras.datasets import mnist

 from keras.models import Sequential

 from keras.layers import Dense, Dropout, Flatten

 from keras.layers import Conv2D, MaxPooling2D

 from keras import backend as K

 batch_size = 128

 num_classes = 10

 epochs = 12

 # input image dimensions

 img_rows, img_cols = 28, 28

 # the data, shuffled and split between train and test sets

 (x_train, y_train), (x_test, y_test) = mnist.load_data()

 if K.image_data_format() == 'channels_first':

     x_train = x_train.reshape(x_train.shape[0], 1, img_rows, img_cols)

     x_test = x_test.reshape(x_test.shape[0], 1, img_rows, img_cols)

     input_shape = (1, img_rows, img_cols)

 else:

     x_train = x_train.reshape(x_train.shape[0], img_rows, img_cols, 1)

     x_test = x_test.reshape(x_test.shape[0], img_rows, img_cols, 1)

     input_shape = (img_rows, img_cols, 1)

 x_train = x_train.astype('float32')

 x_test = x_test.astype('float32')

 x_train /= 255

 x_test /= 255

 print('x_train shape:', x_train.shape)

 print(x_train.shape[0], 'train samples')

 print(x_test.shape[0], 'test samples')

 # convert class vectors to binary class matrices

 y_train = keras.utils.to_categorical(y_train, num_classes)

 y_test = keras.utils.to_categorical(y_test, num_classes)

 model = Sequential()

 model.add(Conv2D(32, kernel_size=(3, 3),

                  activation='relu',

                  input_shape=input_shape))

 model.add(Conv2D(64, (3, 3), activation='relu'))

 model.add(MaxPooling2D(pool_size=(2, 2)))

 model.add(Dropout(0.25))

 model.add(Flatten())

 model.add(Dense(128, activation='relu'))

 model.add(Dropout(0.5))

 model.add(Dense(num_classes, activation='softmax'))

 model.compile(loss=keras.losses.categorical_crossentropy,

               optimizer=keras.optimizers.Adadelta(),

               metrics=['accuracy'])

 model.fit(x_train, y_train,

           batch_size=batch_size,

           epochs=epochs,

           verbose=1,

           validation_data=(x_test, y_test))

 score = model.evaluate(x_test, y_test, verbose=0)

 print('Test loss:', score[0])

 print('Test accuracy:', score[1])
这里使用Google GPU的效率每个Epoch大概需要11s左右即可完成
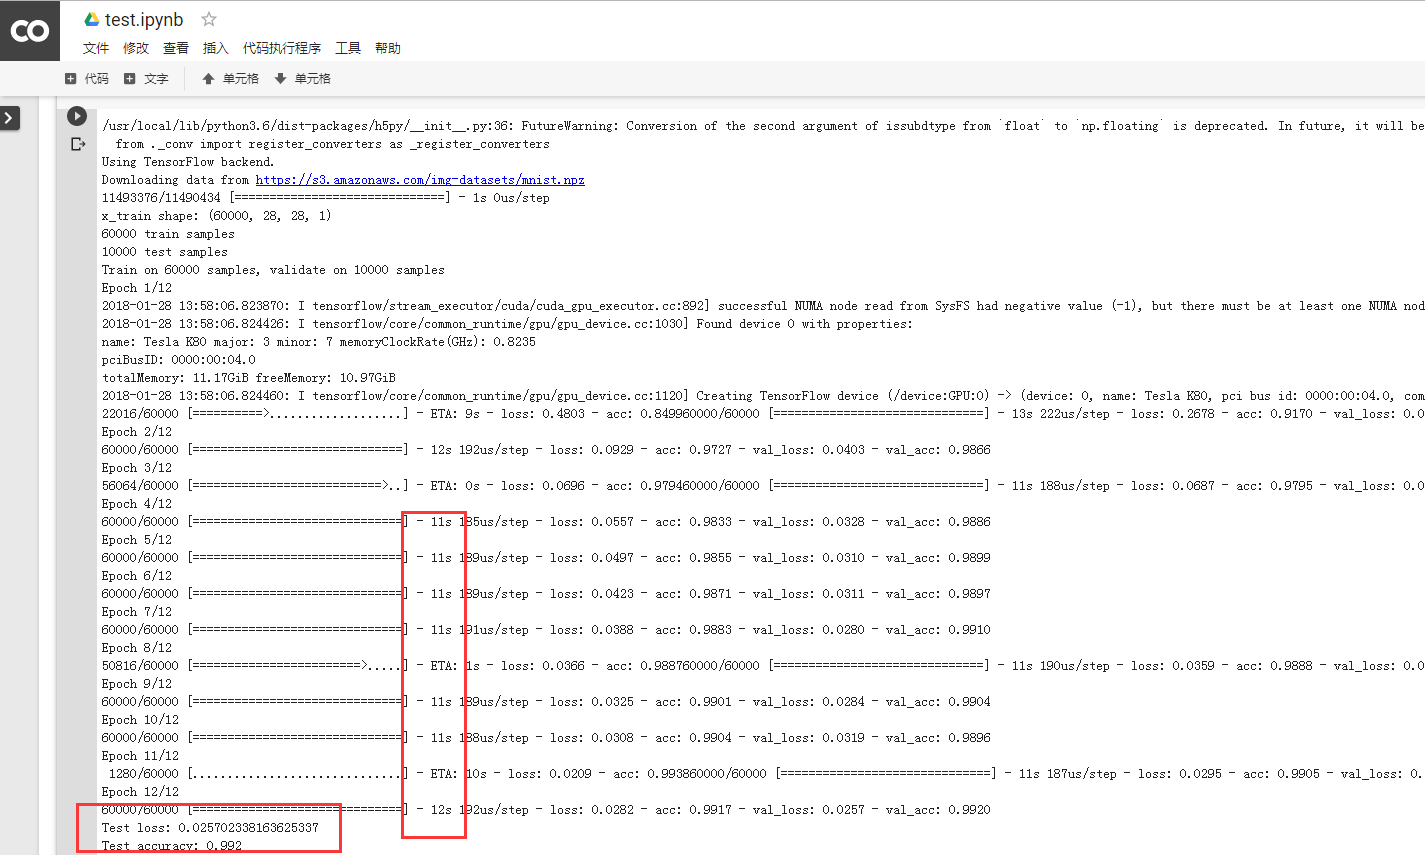
而我们使用实验室的工作站
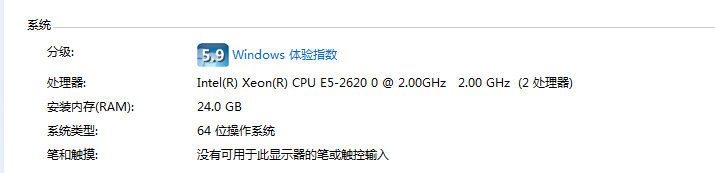
每个率每个Epoch大概需要130s+完成

四 相关命令
(1)查看是否使用GPU:
 import tensorflow as tf

 tf.test.gpu_device_name()
(2)在使用哪个GPU:
 from tensorflow.python.client import device_lib

 device_lib.list_local_devices()
(3)RAM大小:
!cat /proc/meminfo
当然Google的使用需要自备翻墙工具!
原文链接:https://medium.com/deep-learning-turkey/google-colab-free-gpu-tutorial-e113627b9f5d
Google免费GPU使用教程的更多相关文章
- Google免费GPU使用教程(Google Colab Colaboratory)
参考: https://www.234du.com/1154.html https://mp.weixin.qq.com/s/TGTToLYSQJui94-bQC4HIQ 注册gmail时遇到手机号无 ...
- Google Colab免费GPU使用教程(一)
一.前言 现在你可以开发Deep Learning Applications在Google Colaboratory,它自带免费的Tesla K80 GPU.重点是免费.免费!(国内可能需要tz) 这 ...
- Google Colab 免费GPU服务器使用教程 挂载云端硬盘
一.前言二.Google Colab特征三.开始使用3.1在谷歌云盘上创建文件夹3.2创建Colaboratory3.3创建完成四.设置GPU运行五.运行.py文件5.1安装必要库5.2 挂载云端硬盘 ...
- Google Colab 免费GPU服务器使用教程
Google免费GPU使用教程(亲测可用) 今天突然看到一篇推文,里面讲解了如何薅资本主义羊毛,即如何免费使用Google免费提供的GPU使用权. 可以免费使用的方式就是通过Google Cola ...
- 深度学习,机器学习神器,白嫖免费GPU
深度学习,机器学习神器,白嫖免费GPU! 最近在学习计算机视觉,自己的小本本没有那么高的算力,层级尝试过Google的Colab,以及移动云的GPU算力,都不算理想.如果数据集比较小,可以试试Cola ...
- Google免费的SVN服务器管理VS2010代码
原文:Google免费的SVN服务器管理VS2010代码 前言 Google免费为我们提供了代码管理的SVN服务器.首先我这里用的Win7 64的电脑系统,用VS2010进行的代码开发.这里管理代码需 ...
- [海蜘蛛] 海蜘蛛 V8 全线无限试用版 免费发布破解教程
http://bbs.p52.cn/forum.php?mod=viewthread&tid=3499&extra=page%3D1&page=1&_dsign=79c ...
- [转载]Google Android开发精华教程
原文地址:Android开发精华教程">Google Android开发精华教程作者:huiyi8zai Android是Google于2007年11月5日宣布的基于Linux平台的开 ...
- Google 免费公共 DNS 服务器
Google 免费公共 DNS 服务器 http://googleblog.blogspot.com/2009/12/introducing-google-public-dns.html DNS 8. ...
随机推荐
- windows64 系统下安装Nodejs
1.nodejs安装: 版本号: node-v8.9.3-x64 检测安装成功:(这个版本已经集成了npm) 2.npm作为一个NodeJS的模块管理,先配置npm的全局模块的存放路径以及cache的 ...
- Head First设计模式之状态模式
一.定义 定义:允许对象在内部状态改变时改变它的行为, 对象看起来好像修改了它的类. 主要解决:对象的行为依赖于它的状态(属性),并且可以根据它的状态改变而改变它的相关行为. 何时使用:代码中包含大量 ...
- python_第2课
前言 回顾一下python+selenium基础,并整理相关知识点,分享给有需要,在前进道路上的朋友. 由于不是在python中敲的代码,有可能有缩进等相关错误,请自行检查 数据类型 #python中 ...
- angular4.0运行在微信端的坑坑洼洼
最近的一个项目,我用ng4操刀,踩了超多的坑: 坑1:项目build后,刷新后404错误: 解决方案:<angular4.0项目build发布后,刷新页面报错404> 坑2:微信分享: 运 ...
- LindDotNetCore~Mock对实际应用中的意义
回到目录 Mock在单元测试里的意义 Mock测试就是在测试过程中,对于某些不容易构造或者不容易获取的对象,用一个虚拟的对象来创建以 便测试的测试方法.一个闹钟根据时间来进行提醒服务,如果过了下午5点 ...
- Flask知识点二
一 模板 1.模板的使用 Flask使用的是Jinja2模板,所以其语法和Django无差别 2.自定义模板方法 Flask中自定义模板方法的方式和Bottle相似,创建一个函数并通过参数的形式传入 ...
- windows 下文件的高级操作
本文主要说明在Windows下操作文件的高级方法,比如直接读写磁盘,文件的异步操作,而文件普通的读写方式在网上可以找到一大堆资料,在这也就不再进行专门的说明. 判断文件是否存在 在Windows中并没 ...
- CSS中的块级元素(block)与行内元素(inline)
css中有3种基本的定位机制:普通流(相对定位实际上看做普通流定位模型的一部分)浮动(float)绝对定位(固定定位是绝对定位的一种)所以在学习浮动之前,我们先要了解块级元素与内联元素(行内元素).块 ...
- Java的参数传递是值传递还是引用传递
当一个对象被当作参数传递到一个方法后,在此方法内可以改变这个对象的属性,那么这里到底是值传递还是引用传递? 答:是值传递.Java 语言的参数传递只有值传递.当一个对象实例作为一个参数被传递到方法中 ...
- Android Studio | 详细安装教程
Windows和Mac系统下的安装教程差不多,需要注意的是确保系统中已经安装了JDK,并且JDK版本为1.7或1.7以上版本,如果没有,请自行更新下载安装,地址如下: Java SE Develop ...