Android7.0 Phone应用源码分析(三) phone拒接流程分析
接上篇博文:Android7.0 Phone应用源码分析(二) phone来电流程分析
今天我们再来分析下Android7.0 的phone的拒接流程

下面先来看一下拒接电话流程时序图
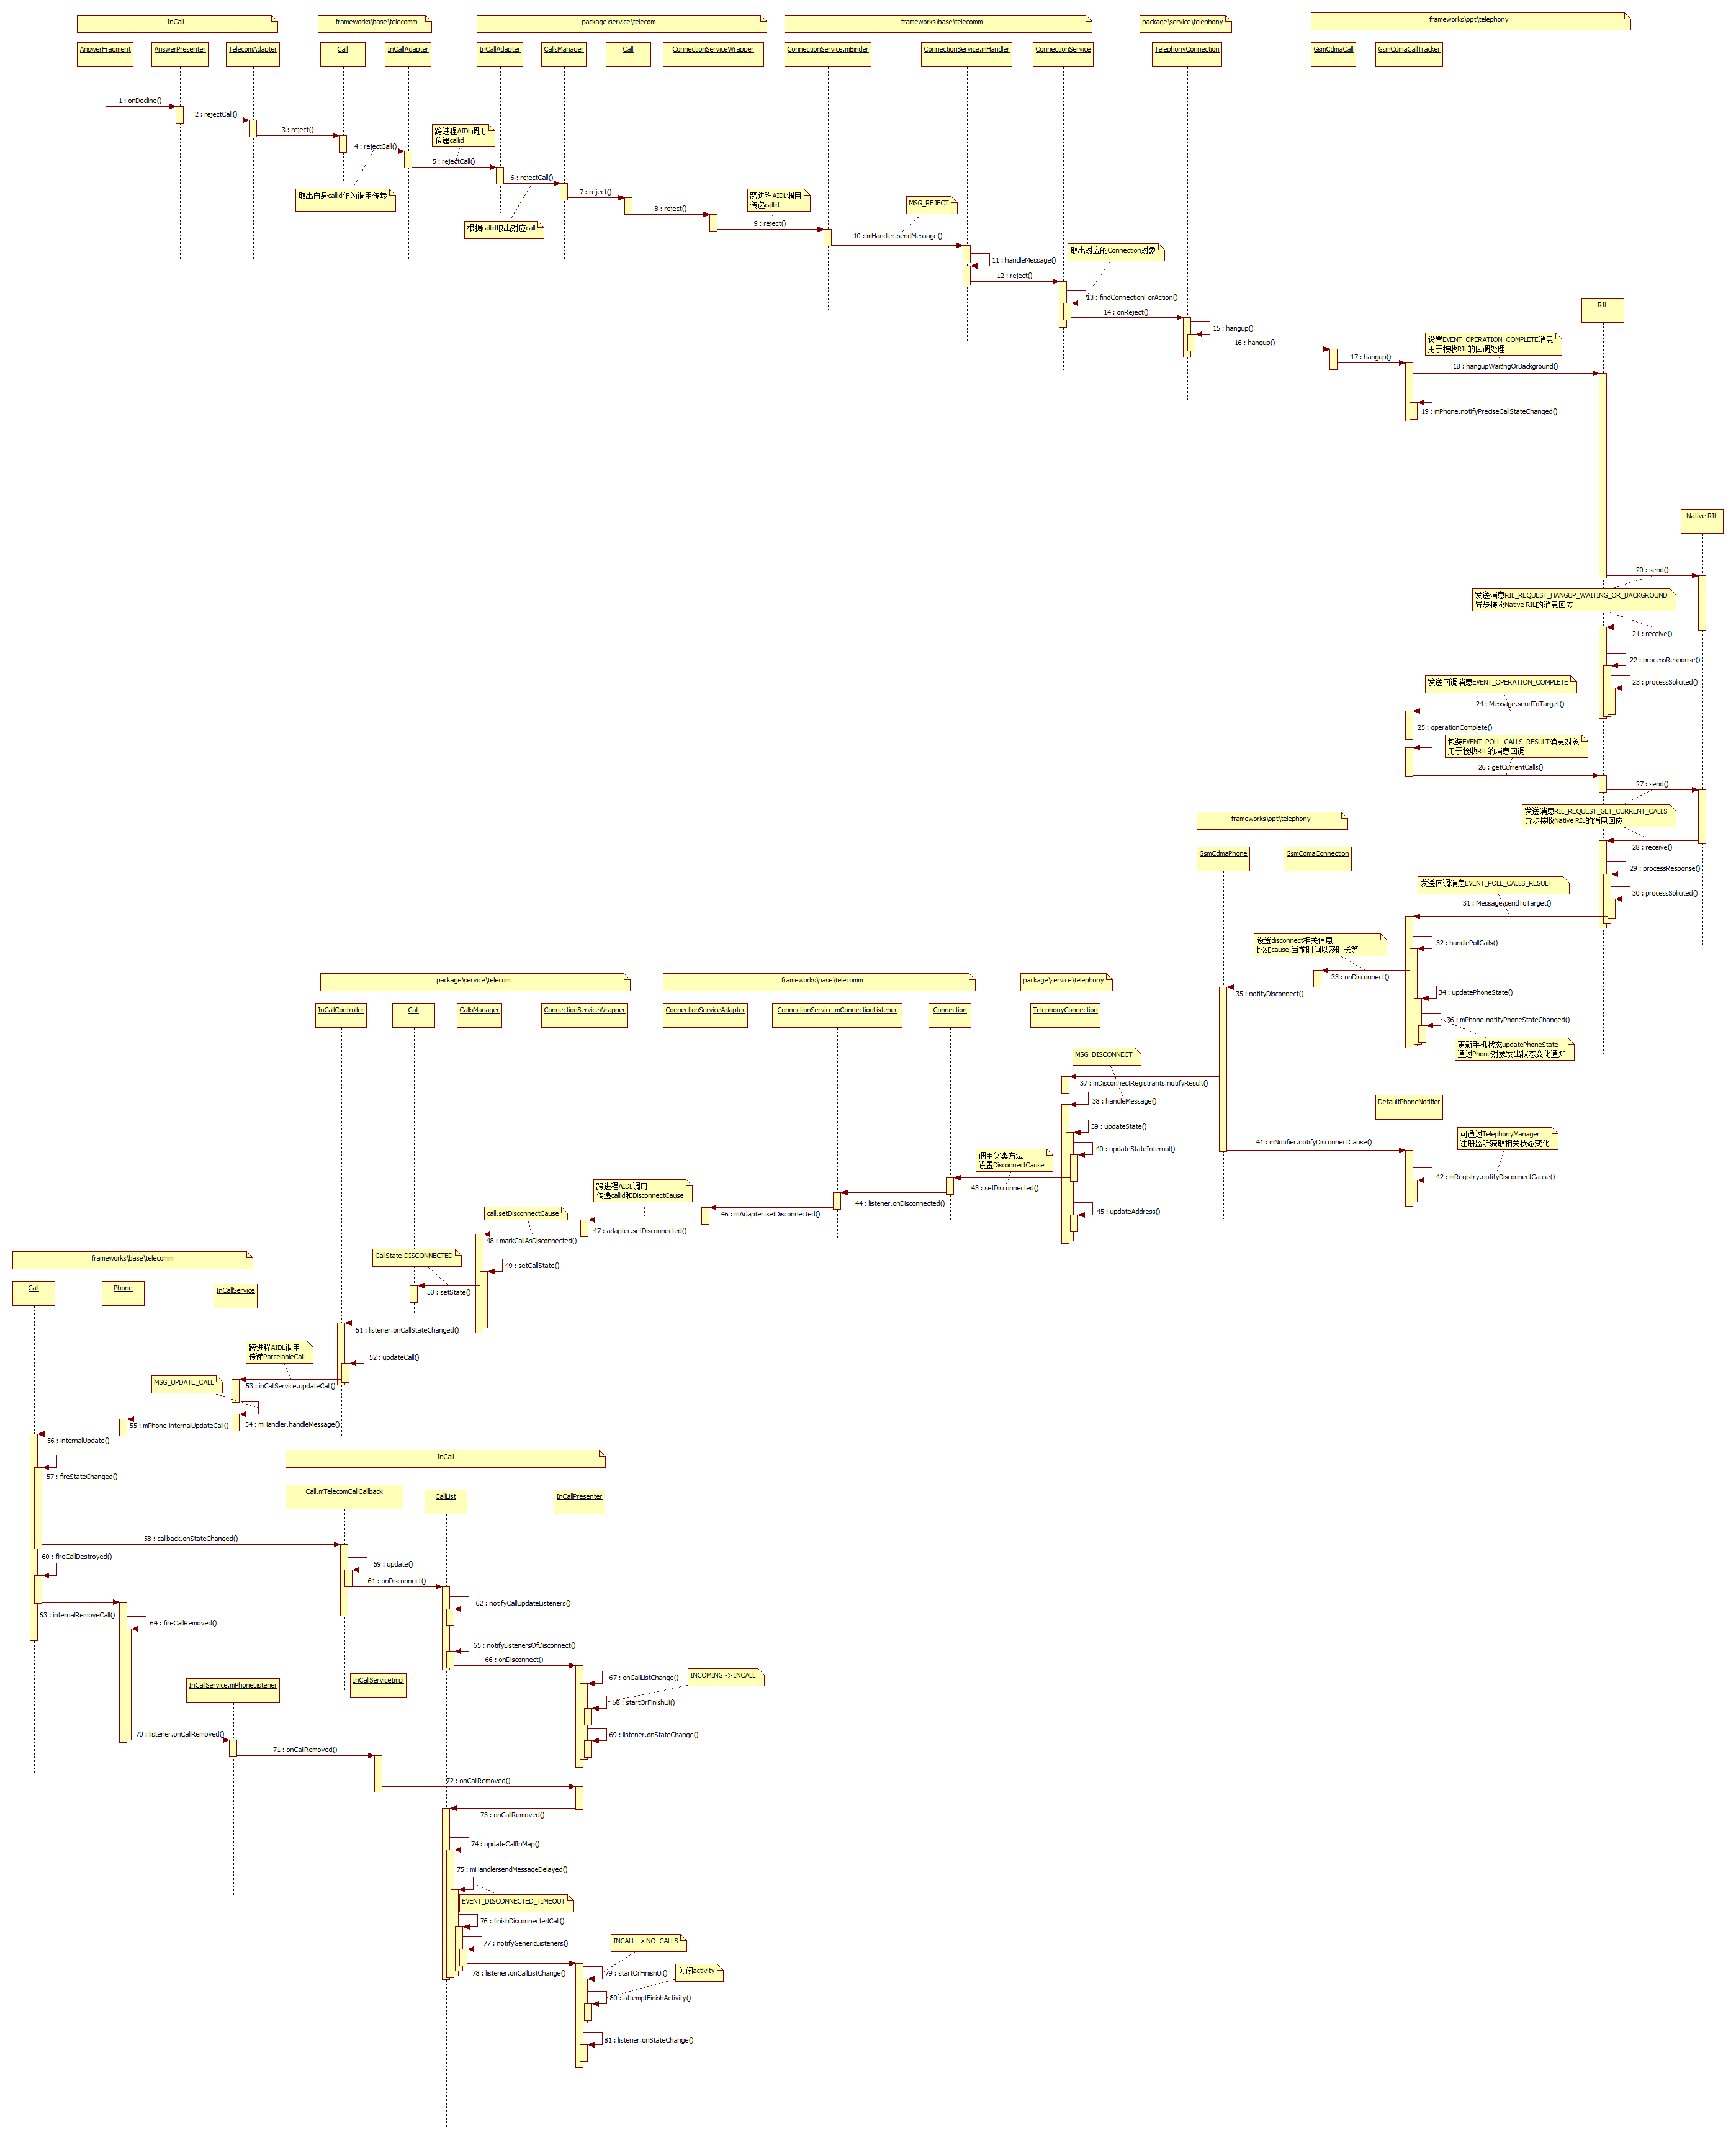
步骤1:滑动按钮到拒接图标,会调用到AnswerFragment的onDecline方法
com.android.incallui.AnswerFragment
public void onDecline(Context context) {

        getPresenter().onDecline(context);

 }
最后是调用到AnswerPresenteronDecline方法
com.android.incallui.AnswerPresenter

 public void onDecline(Context context) {

        Log.d(this, "onDecline " + mCallId);

        if (mCall.getSessionModificationState()

                == Call.SessionModificationState.RECEIVED_UPGRADE_TO_VIDEO_REQUEST) {

            InCallPresenter.getInstance().declineUpgradeRequest(context);

        } else {

            TelecomAdapter.getInstance().rejectCall(mCall.getId(), false, null);

        }

 }
步骤2:进入TelecomAdapter的rejectCall方法
com.android.incallui.TelecomAdapter

void rejectCall(String callId, boolean rejectWithMessage, String message) {

        android.telecom.Call call = getTelecomCallById(callId);

        if (call != null) {

            call.reject(rejectWithMessage, message);

        } else {

            Log.e(this, "error rejectCall, call not in call list: " + callId);

        }

}
TelecomAdapter是incallui与telecom通信的代理类,这里通过callid取出对应的Call对象(android.telecom.Call)
步骤3:调用到framework里Call的reject方法
android.telecom.Call

public void reject(boolean rejectWithMessage, String textMessage) {

        mInCallAdapter.rejectCall(mTelecomCallId, rejectWithMessage, textMessage);

 }
这里mInCallAdapter是android.telecom.InCallAdapter类,是在Call对象创建的时候由外部传入的参数
在telecom绑定InCallService服务的时候,会传递一个AIDL接口对象,InCallService会生成InCallAdapter对象来保存这个接口对象
步骤4:InCallAdapter的rejectCall方法
android.telecom.InCallAdapter
public void rejectCall(String callId, boolean rejectWithMessage, String textMessage) {

        try {

            mAdapter.rejectCall(callId, rejectWithMessage, textMessage);

        } catch (RemoteException e) {

        }

 }
mAdapter就是incallui与telecom通信的AIDL接口
步骤5:跨进程调用进入telecom进程,该AIDL接口具体实现类是InCallAdapter,虽然类名一样但是不同的包名,这里需要注意一下
com.android.server.telecom.InCallAdapter

 public void rejectCall(String callId, boolean rejectWithMessage, String textMessage) {

        try {

            Log.startSession("ICA.rC", mOwnerComponentName);

            long token = Binder.clearCallingIdentity();

            try {

                synchronized (mLock) {

                    Log.d(this, "rejectCall(%s,%b,%s)", callId, rejectWithMessage, textMessage);

                    Call call = mCallIdMapper.getCall(callId);

                    if (call != null) {

                        mCallsManager.rejectCall(call, rejectWithMessage, textMessage);

                    } else {

                        Log.w(this, "setRingback, unknown call id: %s", callId);

                    }

                }

            } finally {

                Binder.restoreCallingIdentity(token);

            }

        } finally {

            Log.endSession();

        }

 }
这里同样是根据callid取出对应Call(com.android.server.telecom.Call),最后调用CallsManager的rejectCall方法传入call
步骤6:CallsManager的rejectCall方法
com.android.server.telecom.CallsManager

public void rejectCall(Call call, boolean rejectWithMessage, String textMessage) {

        if (!mCalls.contains(call)) {

            Log.i(this, "Request to reject a non-existent call %s", call);

        } else {

            for (CallsManagerListener listener : mListeners) {

                listener.onIncomingCallRejected(call, rejectWithMessage, textMessage);

            }

            call.reject(rejectWithMessage, textMessage);

        }

 }
这里先通知观察者来电拒接事件,比如CallAudioManager对该事件感兴趣,它的处理是停止播放来电铃声和来电等待声
com.android.server.telecom.CallAudioManager

 public void onIncomingCallRejected(Call call, boolean rejectWithMessage, String message) {

        maybeStopRingingAndCallWaitingForAnsweredOrRejectedCall(call);

}

private void maybeStopRingingAndCallWaitingForAnsweredOrRejectedCall(Call call) {

        // Check to see if the call being answered/rejected is the only ringing call, since this

        // will be called before the connection service acknowledges the state change.

        if (mRingingCalls.size() == 0 ||

                (mRingingCalls.size() == 1 && call == mRingingCalls.iterator().next())) {

            mRinger.stopRinging();

            mRinger.stopCallWaiting();

        }

 }
最后再调用前面传进来的call对象的reject方法
步骤7:Call的reject方法
com.android.server.telecom.Call

public void reject(boolean rejectWithMessage, String textMessage) {

        Preconditions.checkNotNull(mConnectionService);

        // Check to verify that the call is still in the ringing state. A call can change states

        // between the time the user hits 'reject' and Telecomm receives the command.

        if (isRinging("reject")) {

            // Ensure video state history tracks video state at time of rejection.

            mVideoStateHistory |= mVideoState;

            mConnectionService.reject(this, rejectWithMessage, textMessage);

            Log.event(this, Log.Events.REQUEST_REJECT);

        }

}
这里的mConnectionService是ConnectionServiceWrapper类,是telecom与telephony通信的代理类
步骤8:ConnectionServiceWrapper的reject方法
com.android.server.telecom.ConnectionServiceWrapper

void reject(Call call, boolean rejectWithMessage, String message) {

        final String callId = mCallIdMapper.getCallId(call);

        if (callId != null && isServiceValid("reject")) {

            try {

                logOutgoing("reject %s", callId);

                if (rejectWithMessage && call.can(

                        Connection.CAPABILITY_CAN_SEND_RESPONSE_VIA_CONNECTION)) {

                    mServiceInterface.rejectWithMessage(callId, message);

                } else {

                    mServiceInterface.reject(callId);

                }

            } catch (RemoteException e) {

            }

        }

 }
这里mServiceInterface就是telephony提供给telecom调用的AIDL接口
步骤9:跨进程调用进入telephony进程,telephony进程实际服务类是TelephonyConnectionService继承于ConnectionService类在manifest声明如下:
<service

         android:singleUser="true"

         android:name="com.android.services.telephony.TelephonyConnectionService"

         android:label="@string/pstn_connection_service_label"

         android:permission="android.permission.BIND_TELECOM_CONNECTION_SERVICE" >

          <intent-filter>

              <action android:name="android.telecom.ConnectionService" />

          </intent-filter>

</service>
而AIDL接口具体实现是其父类ConnectionService的mBinder成员变量
android.telecom.ConnectionService

 private final IBinder mBinder = new IConnectionService.Stub() {

        @Override

        public void reject(String callId) {

            mHandler.obtainMessage(MSG_REJECT, callId).sendToTarget();

        }

}
步骤10~13:发送MSG_REJECT消息到队列里处理
private void reject(String callId) {

        Log.d(this, "reject %s", callId);

        findConnectionForAction(callId, "reject").onReject();

 }

 private Connection findConnectionForAction(String callId, String action) {

        if (mConnectionById.containsKey(callId)) {

            return mConnectionById.get(callId);

        }

        Log.w(this, "%s - Cannot find Connection %s", action, callId);

        return getNullConnection();

}
根据callid找到对应的connection对象(android.telecom.Connection),调用onReject方法
步骤14:TelephonyConnection继承于connection
com.android.services.telephony.TelephonyConnection

public void onReject() {

        Log.v(this, "onReject");

        if (isValidRingingCall()) {

            hangup(android.telephony.DisconnectCause.INCOMING_REJECTED);

        }

        super.onReject();

}
protected void hangup(int telephonyDisconnectCode) {

        if (mOriginalConnection != null) {

            try {

                // Hanging up a ringing call requires that we invoke call.hangup() as opposed to

                // connection.hangup(). Without this change, the party originating the call will not

                // get sent to voicemail if the user opts to reject the call.

                if (isValidRingingCall()) {

                    Call call = getCall();

                    if (call != null) {

                        call.hangup();

                    } else {

                        Log.w(this, "Attempting to hangup a connection without backing call.");

                    }

                } else {

                    // We still prefer to call connection.hangup() for non-ringing calls in order

                    // to support hanging-up specific calls within a conference call. If we invoked

                    // call.hangup() while in a conference, we would end up hanging up the entire

                    // conference call instead of the specific connection.

                    mOriginalConnection.hangup();

                }

            } catch (CallStateException e) {

                Log.e(this, e, "Call to Connection.hangup failed with exception");

            }

        }

 }
步骤15,16:这获取mOriginalConnection的call(com.android.internal.telephony.Call)对象,并调用hangup方法
protected Call getCall() {

        if (mOriginalConnection != null) {

            return mOriginalConnection.getCall();

        }

        return null;

 }
Call是抽象类,具体子类是GsmCdmaCall
com.android.internal.telephony.GsmCdmaCall

public void hangup() throws CallStateException {

        mOwner.hangup(this);

 }
mOwner是GsmCdmaCallTracker对象
步骤17:GsmCdmaCallTracker的hangup方法
com.android.internal.telephony.GsmCdmaCallTracker

public void hangup(GsmCdmaCall call) throws CallStateException {

        if (call.getConnections().size() == 0) {

            throw new CallStateException("no connections in call");

        }

        if (call == mRingingCall) {

            if (Phone.DEBUG_PHONE) log("(ringing) hangup waiting or background");

            mCi.hangupWaitingOrBackground(obtainCompleteMessage());

        } else if (call == mForegroundCall) {

            if (call.isDialingOrAlerting()) {

                if (Phone.DEBUG_PHONE) {

                    log("(foregnd) hangup dialing or alerting...");

                }

                hangup((GsmCdmaConnection)(call.getConnections().get(0)));

            } else if (isPhoneTypeGsm()

                    && mRingingCall.isRinging()) {

                // Do not auto-answer ringing on CHUP, instead just end active calls

                log("hangup all conns in active/background call, without affecting ringing call");

                hangupAllConnections(call);

            } else {

                hangupForegroundResumeBackground();

            }

        } else if (call == mBackgroundCall) {

            if (mRingingCall.isRinging()) {

                if (Phone.DEBUG_PHONE) {

                    log("hangup all conns in background call");

                }

                hangupAllConnections(call);

            } else {

                hangupWaitingOrBackground();

            }

        } else {

            throw new RuntimeException ("GsmCdmaCall " + call +

                    "does not belong to GsmCdmaCallTracker " + this);

        }

        call.onHangupLocal();

        mPhone.notifyPreciseCallStateChanged();

 }
由于是ringcall,这里调用mCi.hangupWaitingOrBackground(obtainCompleteMessage());
mCi是CommandsInterface即RILJ接口,包装了一个EVENT_OPERATION_COMPLETE回调消息,发送给RIL
步骤18:RIL的hangupWaitingOrBackground方法
com.android.internal.telephony.RIL
hangupWaitingOrBackground (Message result) {

        RILRequest rr = RILRequest.obtain(RIL_REQUEST_HANGUP_WAITING_OR_BACKGROUND,

                                        result);

        if (RILJ_LOGD) riljLog(rr.serialString() + "> " + requestToString(rr.mRequest));

        mEventLog.writeRilHangup(rr.mSerial, RIL_REQUEST_HANGUP_WAITING_OR_BACKGROUND, -1);

        send(rr);

 }
给RIL层发送RIL_REQUEST_HANGUP_WAITING_OR_BACKGROUND消息
步骤19:mPhone.notifyPreciseCallStateChanged通知Phone状态监听事件
步骤20~24:收到RIL层的回应消息并处理,最后发送回调消息EVENT_OPERATION_COMPLETE给GsmCdmaCallTracker
步骤25:GsmCdmaCallTracker处理回调消息EVENT_OPERATION_COMPLETE
com.android.internal.telephony.GsmCdmaCallTracker

 private void operationComplete() {

        mPendingOperations--;

        if (DBG_POLL) log("operationComplete: pendingOperations=" +

                mPendingOperations + ", needsPoll=" + mNeedsPoll);

        if (mPendingOperations == 0 && mNeedsPoll) {

            mLastRelevantPoll = obtainMessage(EVENT_POLL_CALLS_RESULT);

            mCi.getCurrentCalls(mLastRelevantPoll);

        } else if (mPendingOperations < 0) {

            // this should never happen

            Rlog.e(LOG_TAG,"GsmCdmaCallTracker.pendingOperations < 0");

            mPendingOperations = 0;

        }

 }
这里再次向RIL发送消息主动获取当前Call状态,包装的回调消息为EVENT_POLL_CALLS_RESULT
步骤26~32:RIL返回消息,GsmCdmaCallTracker接收EVENT_POLL_CALLS_RESULT消息并处理
protected synchronized void handlePollCalls(AsyncResult ar) {

     ...................

     for (int i = mDroppedDuringPoll.size() - 1; i >= 0 ; i--) {

            GsmCdmaConnection conn = mDroppedDuringPoll.get(i);

            //CDMA

            boolean wasDisconnected = false;

            if (conn.isIncoming() && conn.getConnectTime() == 0) {

                // Missed or rejected call

                int cause;

                if (conn.mCause == DisconnectCause.LOCAL) {

                    cause = DisconnectCause.INCOMING_REJECTED;

                } else {

                    cause = DisconnectCause.INCOMING_MISSED;

                }

                if (Phone.DEBUG_PHONE) {

                    log("missed/rejected call, conn.cause=" + conn.mCause);

                    log("setting cause to " + cause);

                }

                mDroppedDuringPoll.remove(i);

                hasAnyCallDisconnected |= conn.onDisconnect(cause);

                wasDisconnected = true;

            } else if (conn.mCause == DisconnectCause.LOCAL

                    || conn.mCause == DisconnectCause.INVALID_NUMBER) {

                mDroppedDuringPoll.remove(i);

                hasAnyCallDisconnected |= conn.onDisconnect(conn.mCause);

                wasDisconnected = true;

            }

            if (!isPhoneTypeGsm() && wasDisconnected && unknownConnectionAppeared

                    && conn == newUnknownConnectionCdma) {

                unknownConnectionAppeared = false;

                newUnknownConnectionCdma = null;

            }

     ...................

     ...................

       updatePhoneState();

        if (unknownConnectionAppeared) {

            if (isPhoneTypeGsm()) {

                for (Connection c : newUnknownConnectionsGsm) {

                    log("Notify unknown for " + c);

                    mPhone.notifyUnknownConnection(c);

                }

            } else {

                mPhone.notifyUnknownConnection(newUnknownConnectionCdma);

            }

        }

        if (hasNonHangupStateChanged || newRinging != null || hasAnyCallDisconnected) {

            mPhone.notifyPreciseCallStateChanged();

        }

}
这里设置DisconnectCause.INCOMING_REJECTED为连接断开的cause并调用GsmCdmaConnection的onDisconnect方法
步骤33:GsmCdmaConnection的onDisconnect方法
com.android.internal.telephony.GsmCdmaConnection

 public boolean onDisconnect(int cause) {

        boolean changed = false;

        mCause = cause;

        if (!mDisconnected) {

            doDisconnect();

            if (DBG) Rlog.d(LOG_TAG, "onDisconnect: cause=" + cause);

            mOwner.getPhone().notifyDisconnect(this);

            if (mParent != null) {

                changed = mParent.connectionDisconnected(this);

            }

            mOrigConnection = null;

        }

        clearPostDialListeners();

        releaseWakeLock();

        return changed;

  }
doDisconnect方法设置断开时间以及通话时长
private void  doDisconnect() {

        mIndex = -1;

        mDisconnectTime = System.currentTimeMillis();

        mDuration = SystemClock.elapsedRealtime() - mConnectTimeReal;

        mDisconnected = true;

        clearPostDialListeners();

}
最后通知注册者断开事件mOwner.getPhone().notifyDisconnect(this);
步骤34,36:通知phone状态变化事件给相关监听者
步骤35:GsmCdmaPhone通知通话断开事件
com.android.internal.telephony.GsmCdmaPhone

 public void notifyDisconnect(Connection cn) {

        mDisconnectRegistrants.notifyResult(cn);

        mNotifier.notifyDisconnectCause(cn.getDisconnectCause(), cn.getPreciseDisconnectCause());

}
步骤37~40:TelephonyConnection注册了断开事件监听,接收并处理断开消息
com.android.services.telephony.TelephonyConnection

void setOriginalConnection(com.android.internal.telephony.Connection originalConnection) {

        Log.v(this, "new TelephonyConnection, originalConnection: " + originalConnection);

 ......

 getPhone().registerForDisconnect(mHandler, MSG_DISCONNECT, null);

 ......

}
void updateState() {

        if (mOriginalConnection == null) {

            return;

        }

        updateStateInternal();

        updateStatusHints();

        updateConnectionCapabilities();

        updateConnectionProperties();

        updateAddress();

        updateMultiparty();

 }
void updateStateInternal() {

        if (mOriginalConnection == null) {

            return;

        }

        Call.State newState;

        // If the state is overridden and the state of the original connection hasn't changed since,

        // then we continue in the overridden state, else we go to the original connection's state.

        if (mIsStateOverridden && mOriginalConnectionState == mOriginalConnection.getState()) {

            newState = mConnectionOverriddenState;

        } else {

            newState = mOriginalConnection.getState();

        }

        Log.v(this, "Update state from %s to %s for %s", mConnectionState, newState, this);

        if (mConnectionState != newState) {

            mConnectionState = newState;

            switch (newState) {

                case IDLE:

                    break;

                case ACTIVE:

                    setActiveInternal();

                    break;

                case HOLDING:

                    setOnHold();

                    break;

                case DIALING:

                case ALERTING:

                    setDialing();

                    break;

                case INCOMING:

                case WAITING:

                    setRinging();

                    break;

                case DISCONNECTED:

                    setDisconnected(DisconnectCauseUtil.toTelecomDisconnectCause(

                            mOriginalConnection.getDisconnectCause(),

                            mOriginalConnection.getVendorDisconnectCause()));

                    close();

                    break;

                case DISCONNECTING:

                    break;

            }

        }

}
通过DisconnectCauseUtil的toTelecomDisconnectCause方法生成DisconnectCause(android.telecom.DisconnectCause)对象
包含code, label, description, reason,toneToPlay信息
步骤41,42:通知外部监听者断开事件mNotifier.notifyDisconnectCause
步骤43:调用父类Connection的setDisconnected方法
public final void setDisconnected(DisconnectCause disconnectCause) {

        checkImmutable();

        mDisconnectCause = disconnectCause;

        setState(STATE_DISCONNECTED);

        Log.d(this, "Disconnected with cause %s", disconnectCause);

        for (Listener l : mListeners) {

            l.onDisconnected(this, disconnectCause);

        }

    }
回调通知观察者ConnectionService注册了该事件,mConnectionListener接收处理
步骤44:mConnectionListener处理onDisconnected事件
android.telecom.ConnectionService

private final Connection.Listener mConnectionListener = new Connection.Listener() {

 ......

 @Override

        public void onDisconnected(Connection c, DisconnectCause disconnectCause) {

            String id = mIdByConnection.get(c);

            Log.d(this, "Adapter set disconnected %s", disconnectCause);

            mAdapter.setDisconnected(id, disconnectCause);

        }

}
根据connection对象取出对应的callid
步骤45:TelephonyConnection的updateAddress方法更新connection信息
步骤46:ConnectionServiceAdapter的setDisconnected方法
android.telecom.ConnectionServiceAdapter

 void setDisconnected(String callId, DisconnectCause disconnectCause) {

        for (IConnectionServiceAdapter adapter : mAdapters) {

            try {

                adapter.setDisconnected(callId, disconnectCause);

            } catch (RemoteException e) {

            }

        }

}
telecom在绑定TelephonyConnectionService的时候,会设置AIDL回调接口对象给telephony即ConnectionServiceWrapper的Adapter成员变量
步骤47:跨进程调用到telecom进程,ConnectionServiceWrapper的Adapter处理setDisconnected
com.android.server.telecom.ConnectionServiceWrapper

 private final class Adapter extends IConnectionServiceAdapter.Stub {

......

  @Override

        public void setDisconnected(String callId, DisconnectCause disconnectCause) {

            Log.startSession("CSW.sD");

            long token = Binder.clearCallingIdentity();

            try {

                synchronized (mLock) {

                    logIncoming("setDisconnected %s %s", callId, disconnectCause);

                    Call call = mCallIdMapper.getCall(callId);

                    Log.d(this, "disconnect call %s %s", disconnectCause, call);

                    if (call != null) {

                        mCallsManager.markCallAsDisconnected(call, disconnectCause);

                    } else {

                        // Log.w(this, "setDisconnected, unknown call id: %s", args.arg1);

                    }

                }

            } finally {

                Binder.restoreCallingIdentity(token);

                Log.endSession();

            }

        }

......

}
根据callid取出Call(com.android.server.telecom.Call)对象,给CallsManager传递Call和disconnectCause
步骤48,49,50:CallsManager的markCallAsDisconnected方法
com.android.server.telecom.CallsManager

void markCallAsDisconnected(Call call, DisconnectCause disconnectCause) {

        call.setDisconnectCause(disconnectCause);

        setCallState(call, CallState.DISCONNECTED, "disconnected set explicitly");

}
给Call设置disconnectCause,同时设置callstate
private void setCallState(Call call, int newState, String tag) {

        if (call == null) {

            return;

        }

        int oldState = call.getState();

        Log.i(this, "setCallState %s -> %s, call: %s", CallState.toString(oldState),

                CallState.toString(newState), call);

        if (newState != oldState) {

            // Unfortunately, in the telephony world the radio is king. So if the call notifies

            // us that the call is in a particular state, we allow it even if it doesn't make

            // sense (e.g., STATE_ACTIVE -> STATE_RINGING).

            // TODO: Consider putting a stop to the above and turning CallState

            // into a well-defined state machine.

            // TODO: Define expected state transitions here, and log when an

            // unexpected transition occurs.

            call.setState(newState, tag);

            maybeShowErrorDialogOnDisconnect(call);

            Trace.beginSection("onCallStateChanged");

            // Only broadcast state change for calls that are being tracked.

            if (mCalls.contains(call)) {

                updateCallsManagerState();

                for (CallsManagerListener listener : mListeners) {

                    if (Log.SYSTRACE_DEBUG) {

                        Trace.beginSection(listener.getClass().toString() + " onCallStateChanged");

                    }

                    listener.onCallStateChanged(call, oldState, newState);

                    if (Log.SYSTRACE_DEBUG) {

                        Trace.endSection();

                    }

                }

            }

            Trace.endSection();

        }

}
最后回调onCallStateChanged方法通知监听者,这里监听call状态变化的对象有很多,我们看下InCallController的处理
步骤51,52:InCallController的onCallStateChanged方法
com.android.server.telecom.InCallController

 @Override

    public void onCallStateChanged(Call call, int oldState, int newState) {

        updateCall(call);

    }
private void updateCall(Call call, boolean videoProviderChanged) {

        if (!mInCallServices.isEmpty()) {

            ParcelableCall parcelableCall = ParcelableCallUtils.toParcelableCall(

                    call,

                    videoProviderChanged /* includeVideoProvider */,

                    mCallsManager.getPhoneAccountRegistrar());

            Log.i(this, "Sending updateCall %s ==> %s", call, parcelableCall);

            List<ComponentName> componentsUpdated = new ArrayList<>();

            for (Map.Entry<ComponentName, IInCallService> entry : mInCallServices.entrySet()) {

                ComponentName componentName = entry.getKey();

                IInCallService inCallService = entry.getValue();

                componentsUpdated.add(componentName);

                try {

                    inCallService.updateCall(parcelableCall);

                } catch (RemoteException ignored) {

                }

            }

            Log.i(this, "Components updated: %s", componentsUpdated);

        }

    }

}
根据call信息生成ParcelableCall对象,给incallservice传递ParcelableCall
步骤53,54:InCallService的updateCall方法
android.telecom.InCallService

 @Override

        public void updateCall(ParcelableCall call) {

            mHandler.obtainMessage(MSG_UPDATE_CALL, call).sendToTarget();

 }
private final Handler mHandler = new Handler(Looper.getMainLooper()) {

        @Override

        public void handleMessage(Message msg) {

 ......

                case MSG_UPDATE_CALL:

                    mPhone.internalUpdateCall((ParcelableCall) msg.obj);

                    break;

}
步骤55:Phone的internalUpdateCall方法
android.telecom.Phone

 final void internalUpdateCall(ParcelableCall parcelableCall) {

         Call call = mCallByTelecomCallId.get(parcelableCall.getId());

         if (call != null) {

             checkCallTree(parcelableCall);

             call.internalUpdate(parcelableCall, mCallByTelecomCallId);

         }

}
这里的Phone对象只是一个管理类,保存call列表信息和与telecom通信的AIDL接口对象,通过callid取出Call(android.telecom.Call)对象
步骤56:Call的internalUpdate方法
android.telecom.Call

final void internalUpdate(ParcelableCall parcelableCall, Map<String, Call> callIdMap) {

        Details details = Details.createFromParcelableCall(parcelableCall);

        ......

        ......

        // Now we fire updates, ensuring that any client who listens to any of these notifications

        // gets the most up-to-date state.

        if (stateChanged) {

            fireStateChanged(mState);

        }

        if (detailsChanged) {

            fireDetailsChanged(mDetails);

        }

        if (cannedTextResponsesChanged) {

            fireCannedTextResponsesLoaded(mCannedTextResponses);

        }

        if (videoCallChanged) {

            fireVideoCallChanged(mVideoCallImpl);

        }

        if (parentChanged) {

            fireParentChanged(getParent());

        }

        if (childrenChanged) {

            fireChildrenChanged(getChildren());

        }

        // If we have transitioned to DISCONNECTED, that means we need to notify clients and

        // remove ourselves from the Phone. Note that we do this after completing all state updates

        // so a client can cleanly transition all their UI to the state appropriate for a

        // DISCONNECTED Call while still relying on the existence of that Call in the Phone's list.

        if (mState == STATE_DISCONNECTED) {

            fireCallDestroyed();

        }

}
步骤57:转化ParcelableCall 信息为Detail信息,判断call状态是否有变化,有则进入fireStateChanged
private void fireStateChanged(final int newState) {

        for (CallbackRecord<Callback> record : mCallbackRecords) {

            final Call call = this;

            final Callback callback = record.getCallback();

            record.getHandler().post(new Runnable() {

                @Override

                public void run() {

                    callback.onStateChanged(call, newState);

                }

            });

        }

}
步骤58:这里遍历Call(android.telecom.Call)对象里的回调监听者
private final List<CallbackRecord<Callback>> mCallbackRecords = new CopyOnWriteArrayList<>();
也就是每次InCallPresenter添加Call(android.telecom.Call)时添加的注册回调事件
com.android.incallui.InCallPresenter

public void onCallAdded(final android.telecom.Call call) {

        if (shouldAttemptBlocking(call)) {

            maybeBlockCall(call);

        } else {

            mCallList.onCallAdded(call);

        }

        // Since a call has been added we are no longer waiting for Telecom to send us a call.

        setBoundAndWaitingForOutgoingCall(false, null);

        call.registerCallback(mCallCallback);

 }
这里有两个地方注册了事件回调,一个是在CallList的onCallAdd方法里转化Call(android.telecom.Call)创建了Call(com.android.incallui.Call)对象时注册的
com.android.incallui.CallList

 public void onCallAdded(final android.telecom.Call telecomCall) {

        Trace.beginSection("onCallAdded");

        final Call call = new Call(telecomCall);

        Log.d(this, "onCallAdded: callState=" + call.getState());

        if (call.getState() == Call.State.INCOMING ||

                call.getState() == Call.State.CALL_WAITING) {

            onIncoming(call, call.getCannedSmsResponses());

        } else {

            onUpdate(call);

        }

        call.logCallInitiationType();

        Trace.endSection();

 }
com.android.incallui.Call

public Call(android.telecom.Call telecomCall) {

        mTelecomCall = telecomCall;

        mId = ID_PREFIX + Integer.toString(sIdCounter++);

        updateFromTelecomCall();

        mTelecomCall.registerCallback(mTelecomCallCallback);

        mTimeAddedMs = System.currentTimeMillis();

   }
还有就是InCallPresenter的成员变量mCallCallback的注册
这里onStateChange只有Call(com.android.incallui.Call)的成员变量mTelecomCallCallback有处理
com.android.incallui.Call

private final android.telecom.Call.Callback mTelecomCallCallback =

        new android.telecom.Call.Callback() {

         ......

        ......

            @Override

            public void onStateChanged(android.telecom.Call call, int newState) {

                Log.d(this, "TelecomCallCallback onStateChanged call=" + call + " newState="

                        + newState);

                update();

            }

            @Override

            public void onCallDestroyed(android.telecom.Call call) {

                Log.d(this, "TelecomCallCallback onStateChanged call=" + call);

                call.unregisterCallback(this);

            }

 };
步骤59:进入Call(com.android.incallui.Call)的update方法
private void update() {

        Trace.beginSection("Update");

        int oldState = getState();

        updateFromTelecomCall();

        if (oldState != getState() && getState() == Call.State.DISCONNECTED) {

            CallList.getInstance().onDisconnect(this);

        } else {

            CallList.getInstance().onUpdate(this);

        }

        Trace.endSection();

}
步骤61~69:由于是DISCONNECTED状态,进入CallList的onDisconnect,最后回调到InCallPresenter的onDisconnect方法
com.android.incallui.InCallPresenter

 @Override

    public void onDisconnect(Call call) {

        maybeShowErrorDialogOnDisconnect(call);

        // We need to do the run the same code as onCallListChange.

        onCallListChange(mCallList);

        if (isActivityStarted()) {

            mInCallActivity.dismissKeyguard(false);

        }

        if (call.isEmergencyCall()) {

            FilteredNumbersUtil.recordLastEmergencyCallTime(mContext);

        }

}
InCallPresenter内部更新call状态事件并触发回调通知,细节再次就不一一罗列了
回调步骤57在执行完fireStateChanged方法后,后续还有fireDetailsChanged等事件(如果有变化的话),这里我们关注下fireCallDestroyed
android.telecom.Call

private void fireCallDestroyed() {

        final Call call = this;

        if (mCallbackRecords.isEmpty()) {

            // No callbacks registered, remove the call from Phone's record.

            mPhone.internalRemoveCall(call);

        }

        for (final CallbackRecord<Callback> record : mCallbackRecords) {

            final Callback callback = record.getCallback();

            record.getHandler().post(new Runnable() {

                @Override

                public void run() {

                    boolean isFinalRemoval = false;

                    RuntimeException toThrow = null;

                    try {

                        callback.onCallDestroyed(call);

                    } catch (RuntimeException e) {

                            toThrow = e;

                    }

                    synchronized(Call.this) {

                        mCallbackRecords.remove(record);

                        if (mCallbackRecords.isEmpty()) {

                            isFinalRemoval = true;

                        }

                    }

                    if (isFinalRemoval) {

                        mPhone.internalRemoveCall(call);

                    }

                    if (toThrow != null) {

                        throw toThrow;

                    }

                }

            });

        }

 }
这里 callback.onCallDestroyed(call);通知call销毁事件
步骤60:反注册Call(android.telecom.Call )的监听事件
com.android.incallui.Call

            @Override

            public void onCallDestroyed(android.telecom.Call call) {

                Log.d(this, "TelecomCallCallback onStateChanged call=" + call);

                call.unregisterCallback(this);

  }
步骤63,64:mPhone.internalRemoveCall(call); 把Call(android.telecom.Call)对象从列表中移除,通知onCallRemoved事件
android.telecom.Phone

final void internalRemoveCall(Call call) {

        mCallByTelecomCallId.remove(call.internalGetCallId());

        mCalls.remove(call);

        InCallService.VideoCall videoCall = call.getVideoCall();

        if (videoCall != null) {

            videoCall.destroy();

        }

        fireCallRemoved(call);

 }
private void fireCallRemoved(Call call) {

        for (Listener listener : mListeners) {

            listener.onCallRemoved(this, call);

        }

 }
步骤70,71:InCallService处理onCallRemoved事件
com.android.incallui.InCallServiceImpl

@Override

    public void onCallAdded(Call call) {

        InCallPresenter.getInstance().onCallAdded(call);

  }
步骤72:进入InCallPresenter的onCallRemoved方法
com.android.incallui.InCallPresenter

public void onCallRemoved(android.telecom.Call call) {

        mCallList.onCallRemoved(call);

        call.unregisterCallback(mCallCallback);

 }
步骤73~78:CallList的onCallRemoved方法:
com.android.incallui.CallList

public void onCallRemoved(android.telecom.Call telecomCall) {

        if (mCallByTelecomCall.containsKey(telecomCall)) {

            Call call = mCallByTelecomCall.get(telecomCall);

            Logger.logCall(call);

            if (updateCallInMap(call)) {

                Log.w(this, "Removing call not previously disconnected " + call.getId());

            }

            updateCallTextMap(call, null);

        }

}
CallList内部更新状态最终回调InCallPresenter的onCallListChange方法
com.android.incallui.InCallPresenter

public void onCallListChange(CallList callList) {

        if (mInCallActivity != null && mInCallActivity.getCallCardFragment() != null &&

                mInCallActivity.getCallCardFragment().isAnimating()) {

            mAwaitingCallListUpdate = true;

            return;

        }

        if (callList == null) {

            return;

        }

        mAwaitingCallListUpdate = false;

        InCallState newState = getPotentialStateFromCallList(callList);

        InCallState oldState = mInCallState;

        Log.d(this, "onCallListChange oldState= " + oldState + " newState=" + newState);

        newState = startOrFinishUi(newState);

        Log.d(this, "onCallListChange newState changed to " + newState);

        // Set the new state before announcing it to the world

        Log.i(this, "Phone switching state: " + oldState + " -> " + newState);

        mInCallState = newState;

        // notify listeners of new state

        for (InCallStateListener listener : mListeners) {

            Log.d(this, "Notify " + listener + " of state " + mInCallState.toString());

            listener.onStateChange(oldState, mInCallState, callList);

        }

        if (isActivityStarted()) {

            final boolean hasCall = callList.getActiveOrBackgroundCall() != null ||

                    callList.getOutgoingCall() != null;

            mInCallActivity.dismissKeyguard(hasCall);

        }

  }
步骤79,80,81:InCallPresenter处理disconnected事件并触发相关回调更新界面等
至此,一个来电的整体流程都分析完了,大致流程如下:
InCallUI →TeleComService→TeleponyService→TelephonyFramework →RIL→
RIL→TelephonyFramework →TeleponyService→TeleComFramework→TeleComService→TeleComFramework-->InCallUI
下一章节:Android7.0 Phone应用源码分析(四) phone挂断流程分析
Android7.0 Phone应用源码分析(三) phone拒接流程分析的更多相关文章
- Android7.0 Phone应用源码分析(二) phone来电流程分析
接上篇博文:Android7.0 Phone应用源码分析(一) phone拨号流程分析 今天我们再来分析下Android7.0 的phone的来电流程 1.1TelephonyFramework 当有 ...
- Android7.0 Phone应用源码分析(一) phone拨号流程分析
1.1 dialer拨号 拨号盘点击拨号DialpadFragment的onClick方法会被调用 public void onClick(View view) { int resId = view. ...
- Android7.0 Phone应用源码分析(四) phone挂断流程分析
电话挂断分为本地挂断和远程挂断,下面我们就针对这两种情况各做分析 先来看下本地挂断电话的时序图: 步骤1:点击通话界面的挂断按钮,会调用到CallCardPresenter的endCallClicke ...
- Android7.0 拨号盘应用源码分析(一) 界面浅析
前言 android拨号盘的源码目录在package/app/Dialer 自7.0以后Incallui的源码直接放到了Dialer目录下,虽然在7.0以前incallui有自己独立的目录,但实际编译 ...
- spring-boot-2.0.3启动源码篇三 - run方法(二)之prepareEnvironment
前言 此系列是针对springboot的启动,旨在于和大家一起来看看springboot启动的过程中到底做了一些什么事.如果大家对springboot的源码有所研究,可以挑些自己感兴趣或者对自己有帮助 ...
- spring-boot-2.0.3启动源码篇 - 阶段总结
前言 开心一刻 朋友喜欢去按摩,第一次推门进来的是一个学生美眉,感觉还不错:后来经常去,有时是护士,有时是空姐,有时候是教师.昨天晚上推门进去的是一个女警察,长得贼好看,身材也很好,朋友嗷的一声就扑上 ...
- 助力SpringBoot自动配置的条件注解ConditionalOnXXX分析--SpringBoot源码(三)
注:该源码分析对应SpringBoot版本为2.1.0.RELEASE 1 前言 本篇接 如何分析SpringBoot源码模块及结构?--SpringBoot源码(二) 上一篇分析了SpringBoo ...
- jdk源码剖析三:锁Synchronized
一.Synchronized作用 (1)确保线程互斥的访问同步代码 (2)保证共享变量的修改能够及时可见 (3)有效解决重排序问题.(Synchronized同步中的代码JVM不会轻易优化重排序) 二 ...
- HashMap源码深度剖析,手把手带你分析每一行代码,包会!!!
HashMap源码深度剖析,手把手带你分析每一行代码! 在前面的两篇文章哈希表的原理和200行代码带你写自己的HashMap(如果你阅读这篇文章感觉有点困难,可以先阅读这两篇文章)当中我们仔细谈到了哈 ...
随机推荐
- Linux 软件包安装管理
转自:http://www.cnblogs.com/Quains/archive/2012/01/03/2311049.html 本文主要是记录下RedHat系列的软件包管理. 内容分为以下三个部分: ...
- android gridview画分割线
dongyangzhang android gridview画分割线,如图: 1.先上图: 2.具体实现代码: public class LineGridView extends GridView { ...
- Leetcode题1
Given an array of integers, find two numbers such that they add up to a specific target number. The ...
- angular中的$http配置和参数
依赖:$httpBackend $cacheFactory $rootScope $q $injector 使用:$http(config); 参数: method:字符串,请求方法. url:字符串 ...
- STM32标准IIC驱动
IIC(Inter-Integrated Circuit)总线是一种由 PHILIPS 公司开发的两线式串行总线,用于连接 微控制器及其外围设备.也是目前很流行的通讯总线,使用IIC总线做产品能够很大 ...
- UIButton常用属性小结(编辑中。。。)
Button的功能很黄很暴力,即能显示文字,又能显示图片,还能随时调整内部图片和文字的位置,用的地方很多. (1)按钮常用的四种状态: normal(普通状态) 默认情况(Default) 对应的枚举 ...
- 分页。php 引用代码
<?php /** file: page.class.php 完美分页类 Page */ class Page { private $total; //数据表中总记录数 private $lis ...
- IOS开发中UITableView(表视图)的滚动优化及自定义Cell
IOS开发中UITableView(表视图)的滚动优化及自定义Cell IOS 开发中UITableView是非常常用的一个控件,我们平时在手机上看到的联系人列表,微信好友列表等都是通过UITable ...
- iOS bug 之 H5 页面没有弹出提示框
描述:在安卓上有提示框,但是在iOS上没有提示框. step 1: 失误,是我没有在正确的位置设置网址. step 2: 修改之后,测试页能弹出提示框,但是正式的页面没有提示框. step 3: 我输 ...
- POST请求中参数以form data和request payload形式+清空数组方式
测试与服务端ajax时用的dva封装的request方法,而后端怎么也拿不到参数.结果返现参数在request payload里. HTTP POST表单请求提交时:Content-Typeappli ...