eclipse luna maven搭建spring mvc
1、 环境配置
a) Java 1.7
b) Eclipse luna
c) Maven3.2.5
d) Spring 4.1.4
2、 创建maven工程
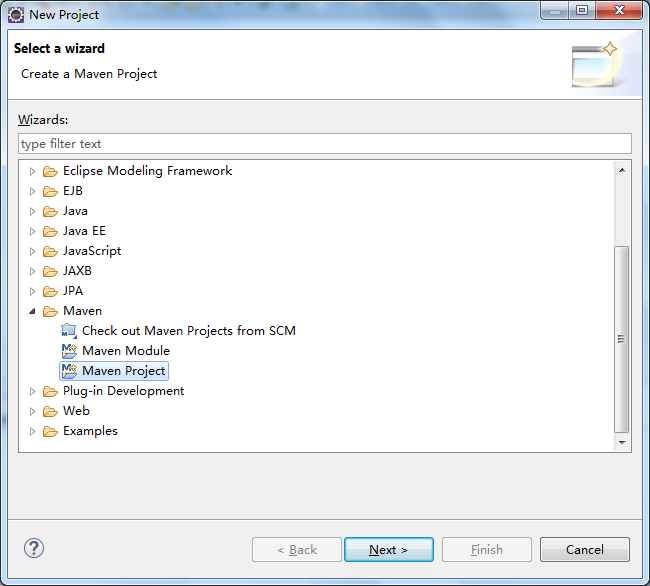
a) 打开eclipse,file->new->project->Maven->Maven Project
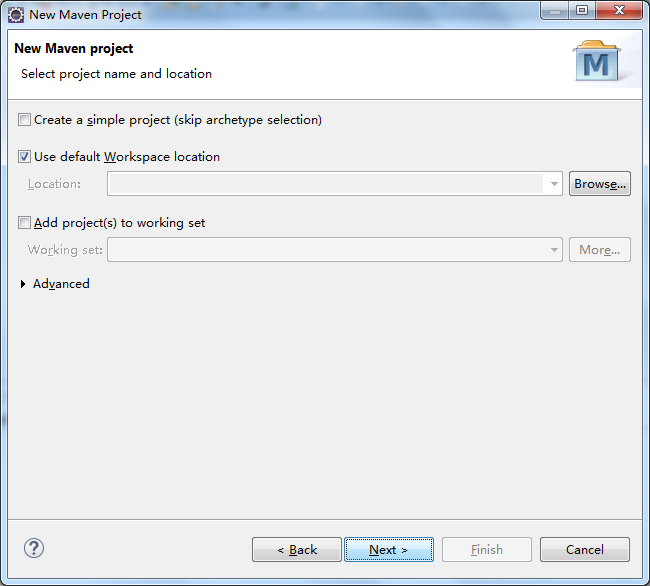
b) 下一步
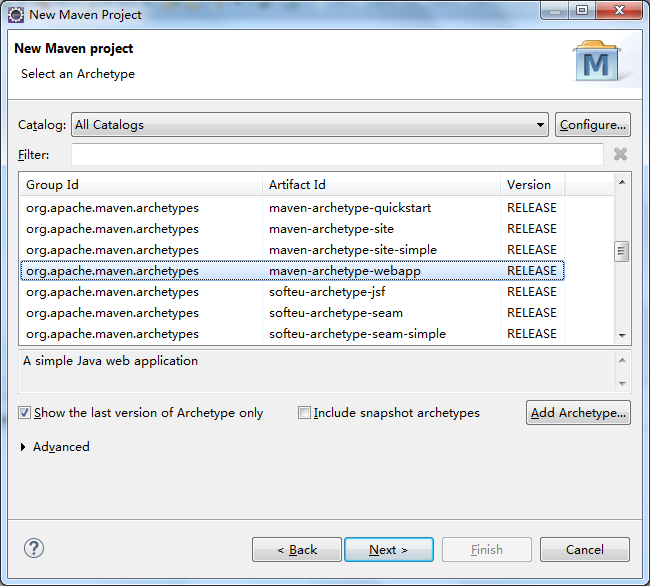
c) 选择创建的工程为webapp,下一步
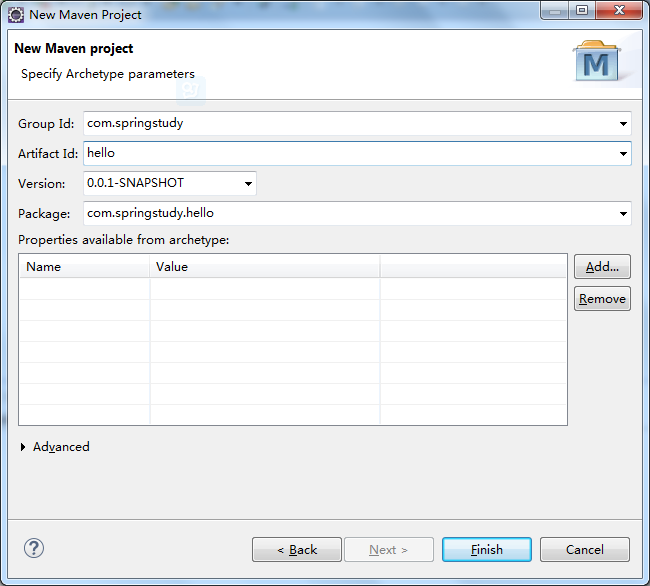
d) 填写项目的group id和artifact id。一般情况下,group id写域名的倒序,artifact id写项目名称即可。最后点完成。
e) 最初建好后,项目目录结构如下
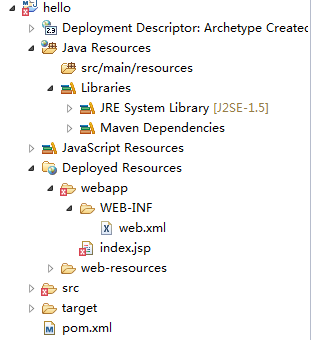
f) 一般的项目目录中,在java Resources目录下,还有src/main/java,src/main/test/java,src/main/test/resources这三个source folder,需要手动创建。在下面的步骤中会讲到如何补齐这三个目录。
3、 修改项目基本设置
a) 右键此项目名称->Properties->Java Build path,点击source标签。
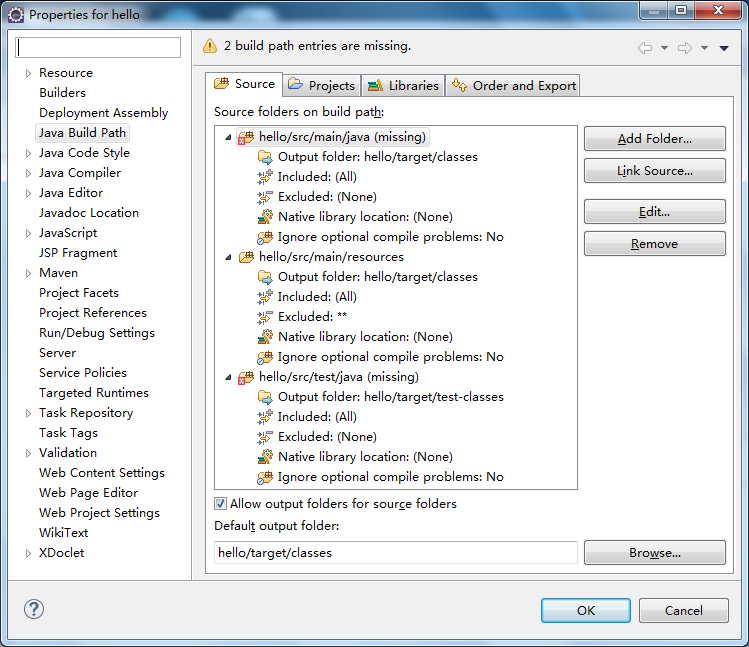
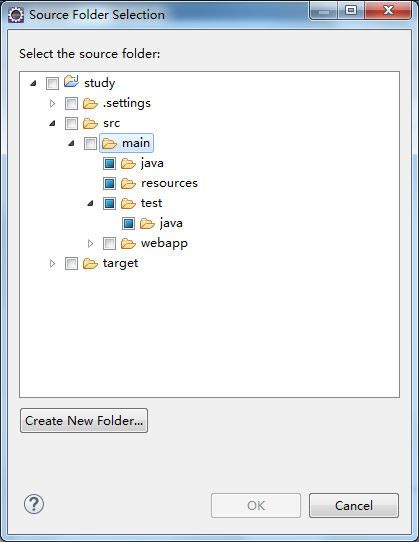
b) 提示 hello/src/main/java (missing)和hello/src/test/java (missing)。一般的项目目录中,在java Resources目录下,还会有src/main/test/resources这个source folder。将missing的先删除,再重新创建,缺少的直接创建。点右键操作按键进行删除和添加。
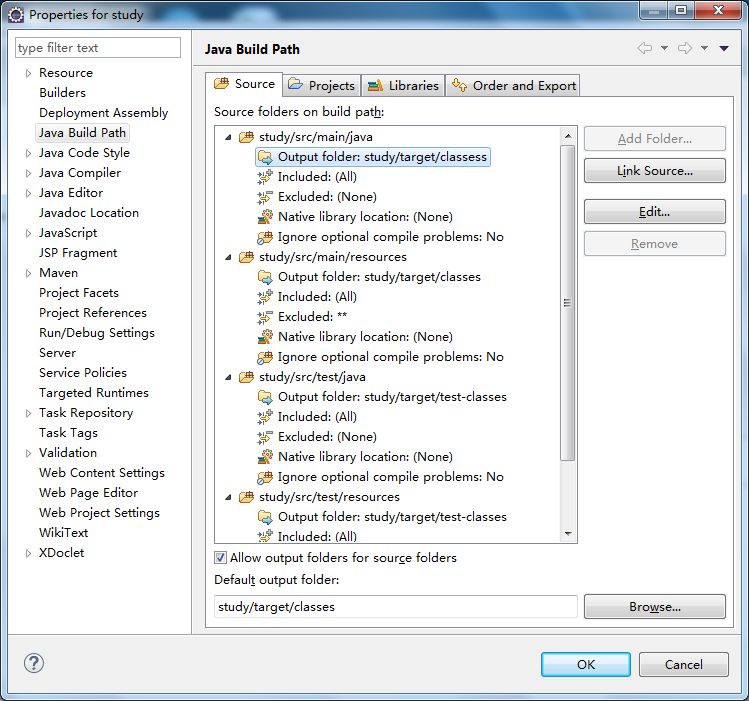
c) 修改完整,效果如下图
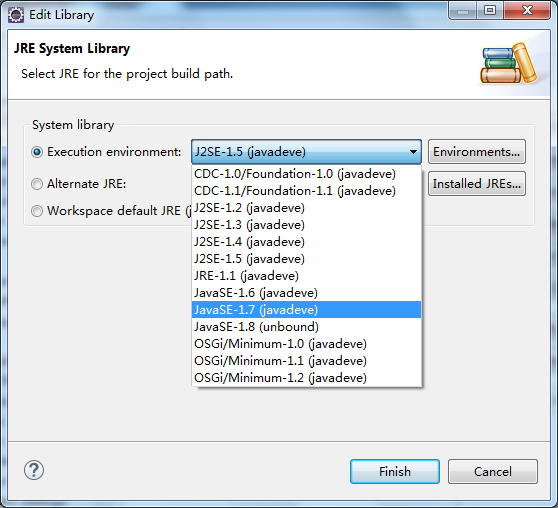
d) 接下来再修改libraries的配置,jre使用1.7版本。选中JRE System Library->edit ,更换版本。
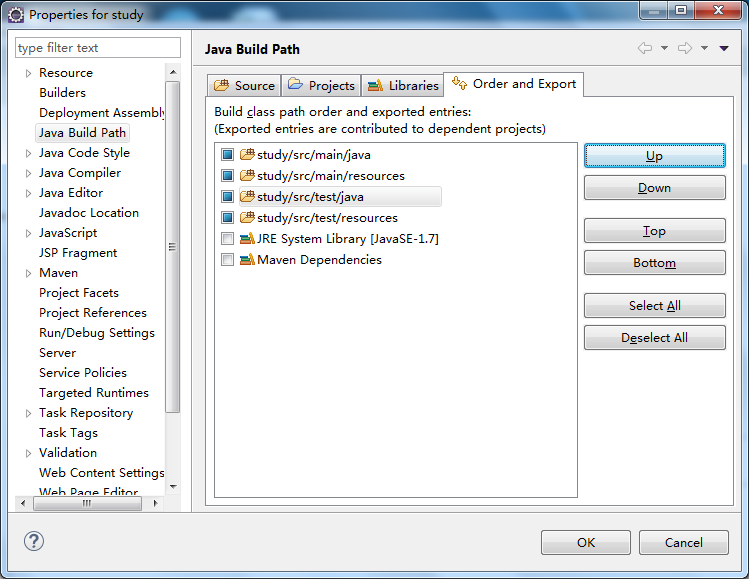
e) 再修改一下order and export里的配置,主要是调整这四个目录的显示顺序,调为自己喜欢的顺序即可
f) 接下来再修改project facets,先将java修改为1.7。
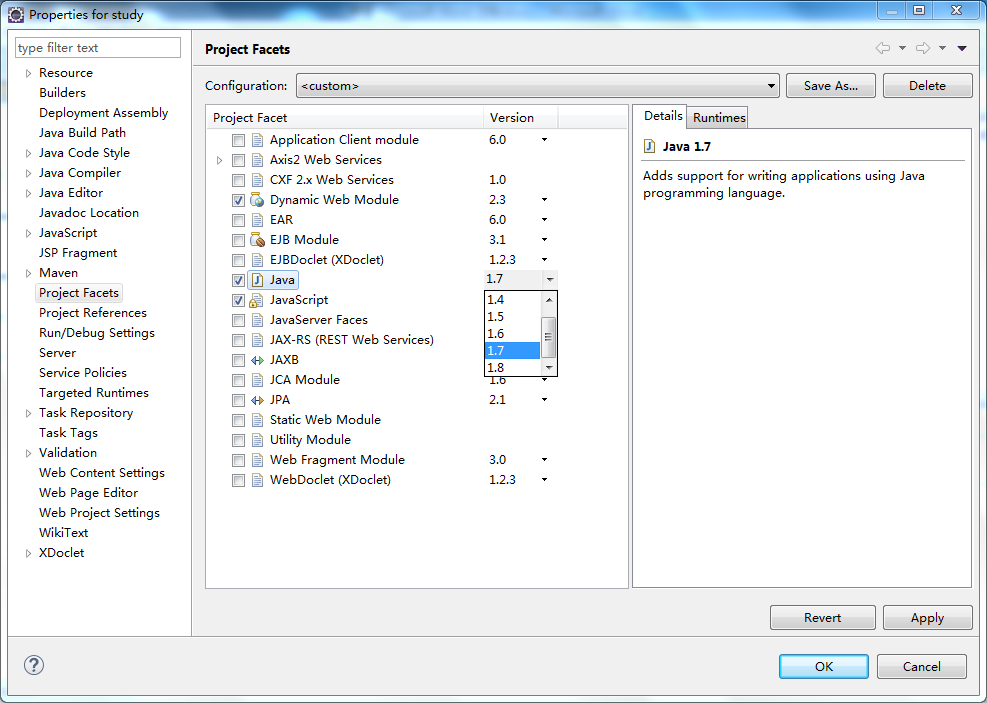
Dynamic Web Module无法在这里直接修改为3.0,需要打开工程目录下有一个.settings文件夹,打开org.eclipse.wst.common.project.facet.core.xml,做如下修改:
<installed facet="jst.web" version="3.0"/>
重启eclipe就可以看到更改生效了。
4、 Eclipse中maven的配置
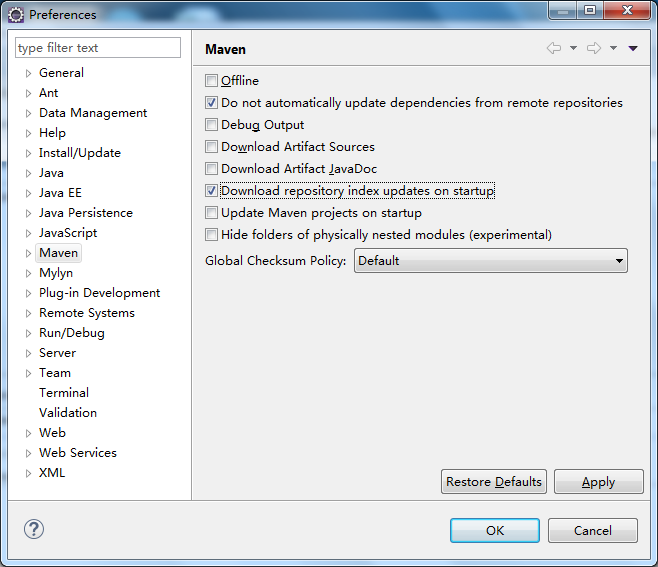
a) window->properties->maven,勾选 download repository index updates on startup
5、 简单Spring mvc的配置
a) 打开项目中的pom.xml文件,并点击Dependencies标签,点击add添加新的依赖
b) 如果知道依赖的group id和artifact id,可以直接填写,如果不清楚,可以输入关键字进行查询,或是到http://search.maven.org网站查询
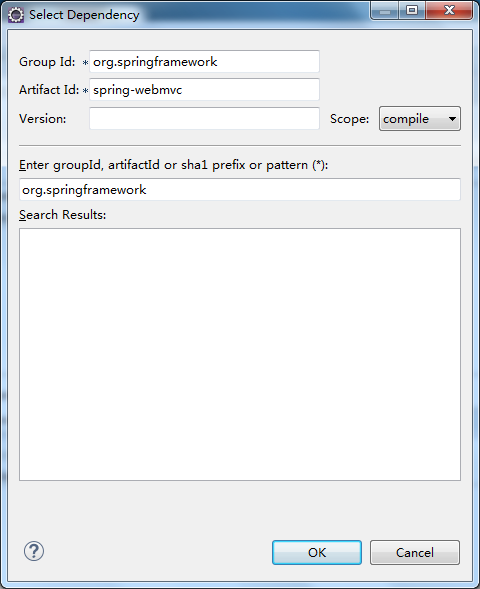
c) 需要添加的依赖有:spring-webmvc,版本为4.1.4. RELEASE。完整的POM.XML文件内容如下:

<project xmlns="http://maven.apache.org/POM/4.0.0" xmlns:xsi="http://www.w3.org/2001/XMLSchema-instance"

  xsi:schemaLocation="http://maven.apache.org/POM/4.0.0 http://maven.apache.org/maven-v4_0_0.xsd">

  <modelVersion>4.0.0</modelVersion>

  <groupId>com.springstudy</groupId>

  <artifactId>study</artifactId>

  <packaging>war</packaging>

  <version>0.0.1-SNAPSHOT</version>

  <name>study Maven Webapp</name>

  <url>http://maven.apache.org</url>

  <properties>

                   <spring.version>4.1.4.RELEASE</spring.version>

         </properties>

  <dependencies>

    <dependency>

      <groupId>junit</groupId>

      <artifactId>junit</artifactId>

      <version>3.8.1</version>

      <scope>test</scope>

    </dependency>

    <dependency>

    <groupId>org.springframework</groupId>

    <artifactId>spring-webmvc</artifactId>

    <version>${spring.version}</version>

    </dependency>

  </dependencies>

  <build>

    <finalName>study</finalName>

  </build>

</project>
d) 打开src/main/webapp/WEB-INF/web.xml文件,最终修改如如下内容:
<?xml version="1.0" encoding="UTF-8"?>

<web-app xmlns:xsi="http://www.w3.org/2001/XMLSchema-instance"

         xmlns="http://java.sun.com/xml/ns/javaee" xmlns:web="http://java.sun.com/xml/ns/javaee/web-app_2_5.xsd"

         xsi:schemaLocation="http://java.sun.com/xml/ns/javaee http://java.sun.com/xml/ns/javaee/web-app_2_5.xsd"

         id="study" version="2.5">

         <display-name>Archetype Created Web Application</display-name>

         <description>sprintMVC环境搭建</description>

         <!-- 加载Spring配置文件 -->

         <context-param>

                   <param-name>contextConfigLocation</param-name>

                   <param-value>classpath:/configs/spring-*.xml</param-value>

         </context-param>

         <!-- Spring监听 -->

         <listener>

                   <listener-class>org.springframework.web.context.ContextLoaderListener</listener-class>

         </listener>

         <!-- Spring MVC配置 -->

         <servlet>

                   <servlet-name>Dispatcher</servlet-name>

                   <servlet-class>org.springframework.web.servlet.DispatcherServlet</servlet-class>

                   <!-- 自定义spring mvc的配置文件名称和路径 -->

                   <init-param>

                            <param-name>contextConfigLocation</param-name>

                            <param-value>classpath:configs/spring-servlet.xml</param-value>

                   </init-param>

                   <load-on-startup>1</load-on-startup>

         </servlet>

         <!-- spring mvc 请求后缀 -->

         <servlet-mapping>

                   <servlet-name>Dispatcher</servlet-name>

                   <url-pattern>/</url-pattern>

         </servlet-mapping>

         <welcome-file-list>

                   <welcome-file>index.jsp</welcome-file>

         </welcome-file-list>

</web-app>
e) 在Java Resources/scr/main/resources目录下,创建configs文件夹,以便存放在web.xml中声明的配置路径
f) 在Java Resources/scr/main/resources/configs目录下,创建spring-servlet.xml,内容如下:
<?xml version="1.0" encoding="UTF-8"?>

<beans xmlns="http://www.springframework.org/schema/beans"

         xmlns:xsi="http://www.w3.org/2001/XMLSchema-instance" xmlns:jee="http://www.springframework.org/schema/jee"

         xmlns:context="http://www.springframework.org/schema/context" xmlns:p="http://www.springframework.org/schema/p"

         xmlns:mvc="http://www.springframework.org/schema/mvc" xmlns:util="http://www.springframework.org/schema/util"

         xsi:schemaLocation="http://www.springframework.org/schema/beans

                                           http://www.springframework.org/schema/beans/spring-beans-4.1.xsd

                                                   http://www.springframework.org/schema/context

                                                   http://www.springframework.org/schema/context/spring-context-4.0.xsd

                                                   http://www.springframework.org/schema/jee

                                                        http://www.springframework.org/schema/jee/spring-jee-4.1.xsd

                                                        http://www.springframework.org/schema/mvc

                                                   http://www.springframework.org/schema/mvc/spring-mvc-4.1.xsd

                                                   http://www.springframework.org/schema/util

                                                   http://www.springframework.org/schema/util/spring-util-4.1.xsd">

         <context:annotation-config/>

         <context:component-scan base-package="com.springstudy.controller" />

         <mvc:annotation-driven />

         <mvc:resources mapping="/styles/**" location="/styles/" />

         <mvc:resources mapping="/scripts/**" location="/scripts/" />

         <mvc:resources mapping="/images/**" location="/images/" />

         <bean

                   class="org.springframework.web.servlet.view.InternalResourceViewResolver">

                   <property name="prefix" value="/WEB-INF/views/" />

                   <property name="suffix" value=".jsp" />

         </bean>

</beans>
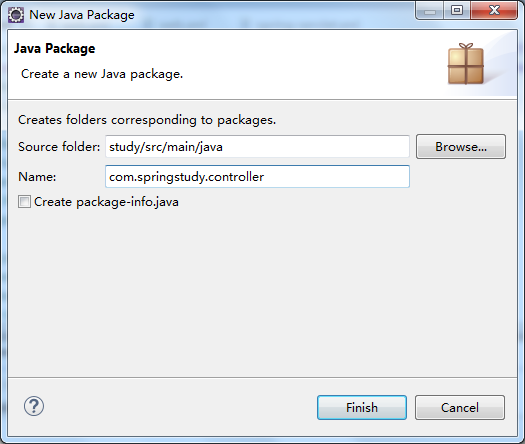
g) 创建controller包,在spring-servlet.xml文件中,<context:component-scan base-package="com.springstudy.controller" />已经指定了路径
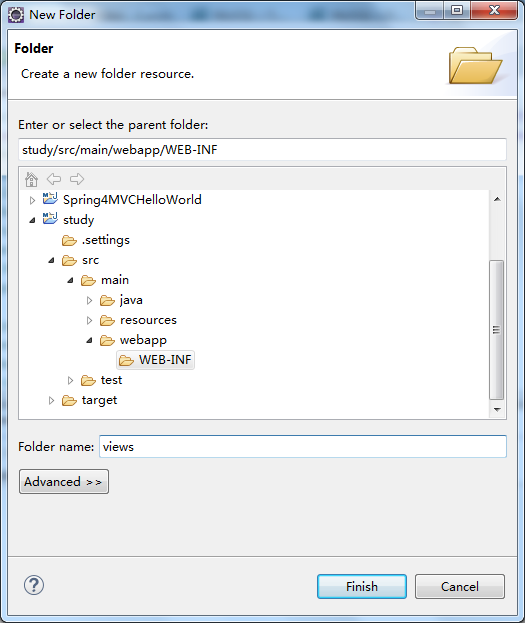
h) 在src/main/webapp/WEB-INF目录下,创建views文件,在spring-servlet.xml文件中,<property name="prefix" value="/WEB-INF/views/" />已指定了视图文件路径
i) 创建第一个controller文件HelloController.java,完整的文件内容如下:
package com.springstudy.controller;

import org.springframework.stereotype.Controller;

import org.springframework.web.bind.annotation.RequestMapping;

import org.springframework.web.servlet.ModelAndView;

@Controller

public class HelloController {

         @RequestMapping("/hello")

         public ModelAndView hello(){

                   ModelAndView mv =new ModelAndView();

                   mv.addObject("spring", "spring mvc");

                   mv.setViewName("hello");

                   return mv;

         }

}
j) 添加src/main/webapp/WEB-INF/views/hello.jsp文件,内容如下:
<!DOCTYPE html>

<html>

         <head>

                   <meta charset="utf-8">

                   <title>sprint hello</title>

         </head>

         <body>hello ${spring}!

         </body>

</html>
6、 将项目发布到tomcat
a) 在eclipse中添加tomcat 7
b) 在tomcat添加完成后,双击,设置overview选项卡中Server Locations的设置。
i. 将 Use Tomcat installation(takes control of Tomcat installation)选中
ii. 将Deploy path的内容改为:webapps
iii. 保存
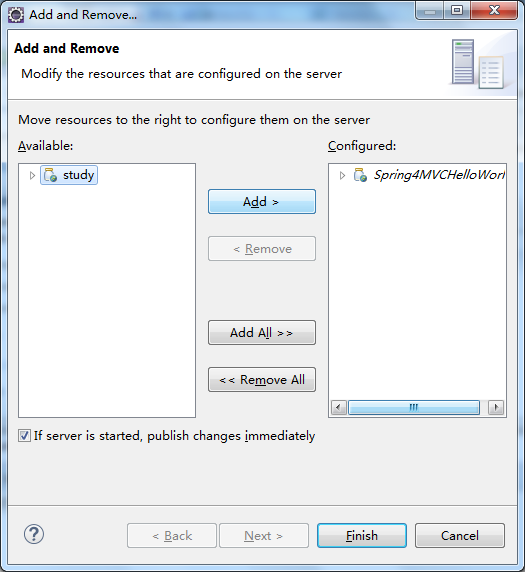
c) 右键tomcat,Add and Remove… ,添加study
d) 启动tomcat
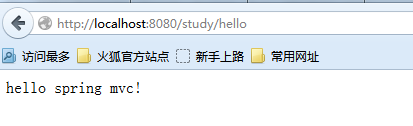
e) 浏览器打开http://localhost:8080/study/hello,访问成功!如下图
eclipse luna maven搭建spring mvc的更多相关文章
- 使用maven搭建Spring MVC
在maven项目中搭建SpringMvc 1.pom文件 <span style="white-space:pre"> </span><propert ...
- Maven搭建Spring MVC
Maven搭建SpringMVC 点击Enable Auto Import 下面配置文件 配置两个文件 web.app-->Web-INF--web.xml <!DOCTYPE web-a ...
- Maven搭建Spring MVC时使用jstl无效
1 Maven引入依赖jar包:jstl.jar和standard.jar <dependency> <groupId>javax.servlet</groupId> ...
- 零基础搭建 spring mvc 4 项目(本文基于 Servlet 3.0)
作者各必备工具的版本如下: Tomcat:apache-tomcat-7.0.63 (下载链接) Java EE - Eclipse:Luna Service Release 1 v4.4.1 (下载 ...
- 利用Intellij+MAVEN搭建Spring+Mybatis+MySql+SpringMVC项目详解
http://blog.csdn.net/noaman_wgs/article/details/53893948 利用Intellij+MAVEN搭建Spring+Mybatis+MySql+Spri ...
- 从零开始学 Java - 搭建 Spring MVC 框架
没有什么比一个时代的没落更令人伤感的了 整个社会和人都在追求创新.进步.成长,没有人愿意停步不前,一个个老事物慢慢从我们生活中消失掉真的令人那么伤感么?或者说被取代?我想有些是的,但有些东西其实并不是 ...
- MAC OS X El CAPITAN 搭建SPRING MVC (1)- 目录、包名、创建web.xml
一. 下载STS(Spring Tool Suite) 官方地址:http://spring.io/tools/sts 下载spring tool suite for mac 最新版本.这个IDE是很 ...
- Maven 搭建spring boot多模块项目(附源码),亲测可以,感谢原创
原创地址:https://segmentfault.com/a/1190000005020589 我的DEMO码云地址,持续添加新功能: https://gitee.com/itbase/Spring ...
- Myeclipse下使用Maven搭建spring boot项目
开发环境:Myeclipse2017.JDK1.6.Tomcat 8.0.Myeclipse下使用Maven搭建spring boot项目,详细过程如下: 1. New -> Project.. ...
随机推荐
- Java 集合深入理解(15):AbstractMap
点击查看 Java 集合框架深入理解 系列, - ( ゜- ゜)つロ 乾杯~ 今天来了解下 AbstractMap. 什么是 AbstractMap AbstractMap 是 Map 接口的的实现类 ...
- php <? ?> <?php ?>
/******************************************************************** * php <? ?> <?php ?&g ...
- dubbo管理控制台安装和使用
dubbo管理控制台安装和使用 标签: dubbo 2014-08-19 16:31 2436人阅读 评论(1) 收藏 举报 分类: dubbo(6) 版权声明:本文为博主原创文章,未经博主允许不 ...
- 华为"128为大整数相加"机试题
最近正直春招,偶尔接触到了华为的这道大整数相加的测试题,在网上找了一个算法,然后自己尝试进行了优化,最后也对memmove()函数效率有了进一步把握. #include <time.h># ...
- (实用篇)PHP缓存类完整实例
本文完整描述了一个简洁实用的PHP缓存类,可用来检查缓存文件是否在设置更新时间之内.清除缓存文件.根据当前动态文件生成缓存文件名.连续创建目录.缓存文件输出静态等功能.对于采用PHP开发CMS系统来说 ...
- 用Rprofile文件配置打开时R的设置
R中经常会使用一些命令,而且需要重复输入,非常麻烦.如果能够一打开R就直接使用会方便很多. 通过配置一个.Rprofile文件,可以达到我们的目的. 注:本文仅适用于Mac # 创建一个.Rprofi ...
- vmware上的Linux获取uuid
在挂载asm硬盘时需要硬盘的UUID 虚拟机配置中需要增加对UUID的支持. 在配置文件vmx文件中增加如下内容 disk.locking="FALSE" disk.EnableU ...
- Java自带的keytool命令
使用Java自带的keytool命令,在命令行生成. 1.生成服务器端私钥kserver.keystore文件 keytool -genkey -alias serverkey -validity 1 ...
- iOS学习笔记---oc语言第八天
属性 能在一定程度上简化代码,并且增强实例变量的访问安全性 属性的声明:使用@property声明属性 eg:@property NSSstring *name;相当于@interface中声明了两 ...
- Centos6下DRBD的安装配置
导读 Distributed Replicated Block Device(DRBD)是一个用软件实现的.无共享的.服务器之间镜像块设备内容的存储复制解决方案.数据镜像:实时.透明.同步(所有服务器 ...