vue2.0+vue-dplayer实现hls播放
vue2.0+vue-dplayer实现hls播放
开始
安装依赖
npm install vue-dplayer -S
1,编写组件HelloWorld.vue
<template>

    <div class="hello">

      <d-player ref="player" @play="play" :logo="logo" :lang="lang" :video="video" :contextmenu="contextmenu"></d-player>

    </div>

</template>

<script>

import VueDPlayer from './VueDPlayerHls';

import logoImg from '@/assets/logo.png';

export default {

 name: 'HelloWorld',

 data () {

  return {

   video: {

     quality: [{

        name: '240P',

        url: 'https://video-dev.github.io/streams/x36xhzz/x36xhzz.m3u8',

     },{

        name: '360P',

        url: 'https://video-dev.github.io/streams/x36xhzz/x36xhzz.m3u8',

     },{

        name: '720P',

        url: 'https://video-dev.github.io/streams/x36xhzz/x36xhzz.m3u8',

     }],

     pic: 'http://static.smartisanos.cn/pr/img/video/video_03_cc87ce5bdb.jpg',

     defaultQuality: 1,

     thumbnails: logoImg,

     type: 'hls'

    },

    lang: 'zh-cn',

    logo: logoImg,

    autoplay: false,

    player: null,

    contextmenu: [

      {

        text: '博客园',

        link: 'http://www.cnblogs.com/maqingyuan/'

      },{

        text: '博客园',

        link: 'http://www.cnblogs.com/maqingyuan/'

      },{

        text: '博客园',

        link: 'http://www.cnblogs.com/maqingyuan/'

      }

    ]

  }

 },

 components: {

  'd-player': VueDPlayer

 },

 methods: {

  play() {

    // console.log('开始播放...')

   }

 },

 mounted() {

  // this.player = this.$refs.player.dp;

  // console.log(this.player);

  // var hls = new Hls();

  // hls.loadSource('https://video-dev.github.io/streams/x36xhzz/x36xhzz.m3u8');

  // hls.attachMedia(this.player);

 }

}

</script>

<style scoped>

h1, h2 {

  font-weight: normal;

}

ul {

  list-style-type: none;

  padding: 0;

}

li {

  display: inline-block;

  margin: 0 10px;

}

a {

  color: #42b983;

}

.hello{

    width: 750px;

    margin: 0 auto 50px;

}

@media only screen and (max-width: 640px){

  .hello{

      width: 100%;

  }

}

</style>
2,引入hls.js (在main.js引入)
window.Hls = require('hls.js');
3,自定义一个组件VueDPlayerHls.vue
<template>

 <div class="dplayer"></div>

</template>

<script>

 require('../../node_modules/dplayer/dist/DPlayer.min.css');

 import DPlayer from 'DPlayer'

 export default {

  props: {

   autoplay: {

    type: Boolean,

    default: false

   },

   theme: {

    type: String,

    default: '#FADFA3'

   },

   loop: {

    type: Boolean,

    default: false

   },

   lang: {

    type: String,

    default: 'zh'

   },

   screenshot: {

    type: Boolean,

    default: false

   },

   hotkey: {

    type: Boolean,

    default: true

   },

   preload: {

    type: String,

    default: 'auto'

   },

   contextmenu: {

    type: Array

   },

   logo: {

    type: String

   },

   video: {

    type: Object

    // required: true,

    // validator(value) {

    //  return typeof value.url === 'string'

    // }

   }

  },

  data() {

   return {

    dp: null

   }

  },

  mounted() {

   const player = this.dp = new DPlayer({

    element: this.$el,

    autoplay: this.autoplay,

    theme: this.theme,

    loop: this.loop,

    lang: this.lang,

    screenshot: this.screenshot,

    hotkey: this.hotkey,

    preload: this.preload,

    contextmenu: this.contextmenu,

    logo: this.logo,

    video: {

     pic: this.video.pic,

     defaultQuality: this.video.defaultQuality,

     quality: [{

       url: this.video.quality[0].url,

       name: this.video.quality[0].name

     },{

       url: this.video.quality[1].url,

       name: this.video.quality[1].name

     },{

       url: this.video.quality[2].url,

       name: this.video.quality[2].name

     }],

     thumbnails: this.video.thumbnails,

     type: this.video.type

    }

   })

   player.on('play', () => {

    this.$emit('play')

   })

   player.on('quality_start', () => {

    this.$emit('quality_start')

    player.on('play')

   })

   player.on('pause', () => {

    this.$emit('pause')

   })

   player.on('canplay', () => {

    this.$emit('canplay')

   })

   player.on('playing', () => {

    this.$emit('playing')

   })

   player.on('ended', () => {

    this.$emit('ended')

   })

   player.on('error', () => {

    this.$emit('error')

   })

  }

 }

</script>

<style scoped>

</style>
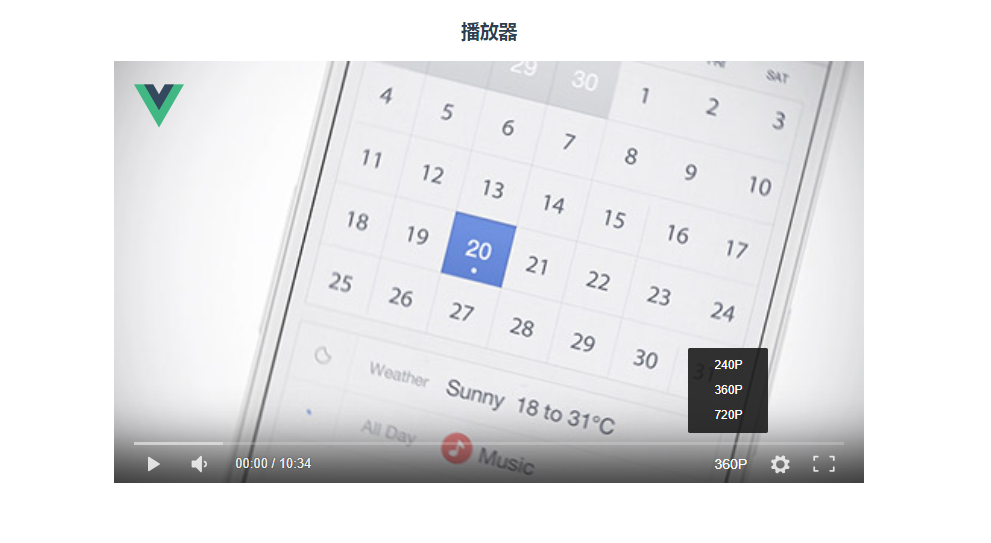
4,实现播放(如下图) :
最后
github地址:https://github.com/whiskyma/vue-dplayer
以上就是本文的全部内容,希望对大家的学习有所帮助,谢谢大家,记得点赞哦!!!
vue2.0+vue-dplayer实现hls播放的更多相关文章
- vue2.0 vue.set()
<!DOCTYPE html> <html lang="en"> <head> <meta charset="UTF-8&quo ...
- vue2.0 vue.extend()的拓展
<!DOCTYPE html> <html lang="en"> <head> <meta charset="UTF-8&quo ...
- Vue2.0 Vue.set的使用
原文链接: https://blog.csdn.net/qq_30455841/article/details/78666571
- vue1.0和vue2.0的区别(二)
这篇我们继续之前的vue1.0和vue2.0的区别(一)继续说 四.循环 学过vue的同学应该知道vue1.0是不能添加重复数据的,否则它会报错,想让它重复添加也不是不可以,不过需要定义别的东西 而v ...
- VUE2.0学习总结
摘要: 年后公司项目开始上vue2.0,自己对学习进行了总结,希望对大家有帮助! VUE2.0学习 vue介绍 vue是什么? https://vuefe.cn/guide vue也是一个数据驱动框架 ...
- vue 专题 vue2.0各大前端移动端ui框架组件展示
Vue 专题 一个数据驱动的组件,为现代化的 Web 界面而生.具有可扩展的数据绑定机制,原生对象即模型,简洁明了的 API 组件化 UI 构建 多个轻量库搭配使用 请访问链接: https://ww ...
- Vue2.0音乐播放器
学习了几周的vuejs,学习的过程中做了一个音乐播放器WebApp (顺便听听音乐~) ,过程中也有借鉴过别人做的,感觉受益匪浅 链接 项目在线地址 : 音乐播放器 github : https:// ...
- vue2.0实践 —— Node + vue 实现移动官网
简介 使用 Node + vue 对公司的官网进行了一个简单的移动端的实现. 源码 https://github.com/wx1993/node-vue-fabaocn 效果 组件 轮播图(使用 vu ...
- 从壹开始前后端分离 [ Vue2.0+.NET Core2.1] 十五 ║Vue基础:JS面向对象&字面量& this字
缘起 书接上文<从壹开始前后端分离 [ Vue2.0+.NET Core2.1] 十四 ║ VUE 计划书 & 我的前后端开发简史>,昨天咱们说到了以我的经历说明的web开发经历的 ...
随机推荐
- 服务器IP与个人IP的特点
服务器IP:系统类型.开放的端口及运行的服务.C段同类机器数量.是否机房.IDC服务商 个人IP:系统类型.开放的端口及运行的服务……
- FreeRTOS调度器
FreeRTOS----调度器 调度器的启动流程分析 当创建完任务之后,会调用vTaskStartScheduler()函数,启动任务调度器: void vTaskStartScheduler( vo ...
- linux 终端命令学习
Linux 的版本不同,其终端下命令也有所差异的. cal -y / -d /-m 查看日历的 free -m /df -m 查剩余空间的 passwd -l / -u 用户名 -锁定,解锁 ...
- How to resolve the 403 error when send POST request from Postman
Root cause: the site refused the connection from the http request origin, by default it is setted as ...
- 登录授权、TCP/IP、HTTPS
今天继续纯理论的东东,比较枯燥,但是又很重要,坚持.. 登录和授权 登录和授权的区别: 登录:身份认证,即确认「你是你」的过程. 授权:由身份或持有的令牌确认享有某些权限(例如获取用户信息).登录过程 ...
- django--没有整理,笔记
https://docs.djangoproject.com/en/2.2/常用的数据路命令:python manage.py makemigrations 数据移植准备python manage.p ...
- Java中String为什么是不可变
什么是不可变对象? 众所周知, 在Java中, String类是不可变的.那么到底什么是不可变的对象呢? 可以这样认为:如果一个对象,在它创建完成之后,不能再改变它的状态,那么这个对象就是不可变的.不 ...
- 2018HDU多校联赛第六场 6373 Pinball——水题&&物理题
题意 给定一个斜面,从某处让一个小球作自由落体运动,求小球与斜面的碰撞次数(假设都为弹性碰撞). 分析 题图如下,x轴.y轴是虚拟的. 根据高中物理的套路,沿斜面方向分解重力加速度即可. #inclu ...
- KETTLE 更新表的两种方式-更新控件和sql更新 2种方式的实现比较
在实际工作中,我们有可能遇见只更新不插入的情况,可以由以下2种方式去实现: 1.更新控件 如下图所示,根据id字段,更新name和cjsj时间字段 该控件不足的地方是,用来查询关键值得字段不够灵活,一 ...
- P5358 [SDOI2019]快速查询
思路:...乱搞数据结构?? 提交:1次 题解: 观察到除了单点就是全局操作,所以我们维护一个全局加法标记add和乘法标记mul和答案sum. 单点修改时,比如我们要把 \(pos\) 位置改成 \( ...