Ubuntu - Ubuntu应用记录(1)
1、发生dpkg status database is locked by another process
原因是包管理器没有正确关闭。需要重启计算机或者重新打开终端 输入:
sudo rm /var/lib/dpkg/lock

sudo dpkg --configure -a
2、ubuntu配置初始root密码
sudo passwd #然后根据提示修改root密码即可
3、virtualbox给ubuntu设置共享文件夹
1》首先安装增强设置,然后在物理机选择一个文件夹作为设置的共享文件夹

2》ctrl+alt+t打开终端,切换到root用户,进入/mnt目录,执行命令:
lfy@lfy-pc:~$ su

密码:

root@lfy-pc:/home/lfy# ls

examples.desktop  fyliu  公共的  模板  视频  图片  文档  下载  音乐  桌面

root@lfy-pc:/home/lfy# cd /

root@lfy-pc:/# ls

bin    dev   initrd.img  lost+found  opt   run   srv  usr

boot   etc   lib         media       proc  sbin  sys  var

cdrom  home  lib64       mnt         root  snap  tmp  vmlinuz

root@lfy-pc:/# cd mnt

root@lfy-pc:/mnt# ls

root@lfy-pc:/mnt# mkdir share     #新建目录

root@lfy-pc:/mnt# ls

share

root@lfy-pc:/mnt# mount -t vboxsf sharefolder /mnt/share/   #挂载

root@lfy-pc:/mnt# ls

share

root@lfy-pc:/mnt# cd share

root@lfy-pc:/mnt/share# ls

sogoupinyin_2.3.1.0112_amd64.deb    #可以看到共享文件夹中的文件了

root@lfy-pc:/mnt/share#
3》设置自动加载
打开/etc/fstab文件,需要使用管理员权限
sudo vi /etc/fstab
然后在末尾另起一行,加上
share /mnt/share vboxsf rw,gid=,uid=,auto
4》 卸载
sudo umount -f /mnt/share
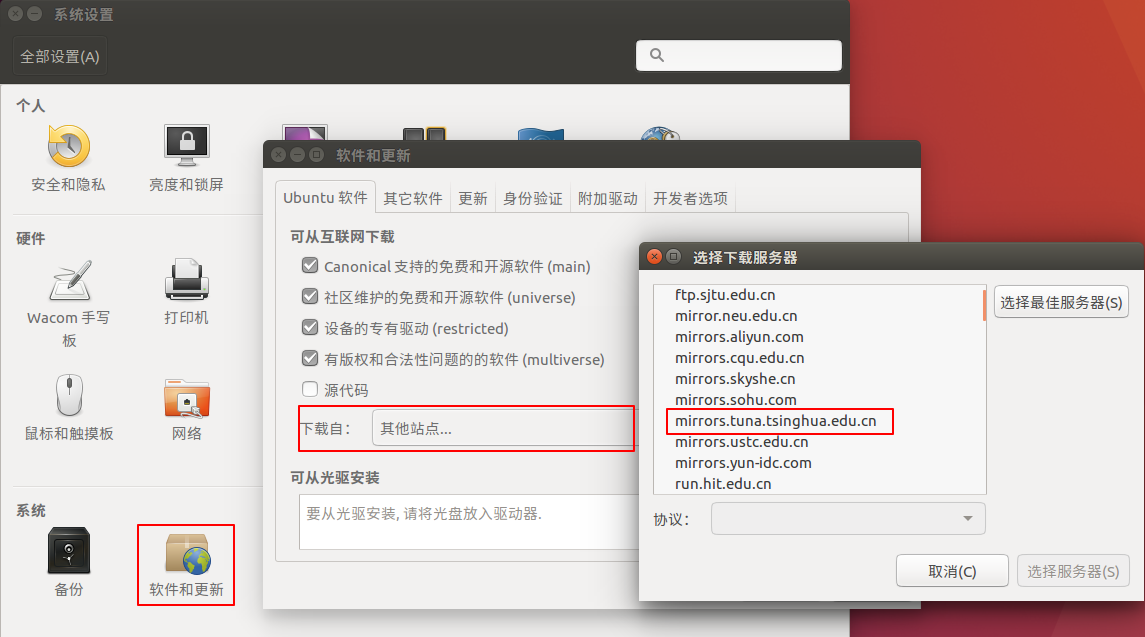
4、配置ubuntu软件源,使用国内的清华大学的镜像
5、ubuntu安装docker并使用加速hub镜像
1》在上一步我们已经选择了软件的镜像源为国内清华大学镜像源(软件源)。接下来
lfy@lfy-pc:~$ sudo apt-get update

[sudo] lfy 的密码:

命中: http://mirrors.tuna.tsinghua.edu.cn/ubuntu xenial InRelease

获取: http://mirrors.tuna.tsinghua.edu.cn/ubuntu xenial-updates InRelease [109 kB]

获取: http://mirrors.tuna.tsinghua.edu.cn/ubuntu xenial-backports InRelease [107 kB]

获取: http://mirrors.tuna.tsinghua.edu.cn/ubuntu xenial-security InRelease [109 kB]

获取: http://mirrors.tuna.tsinghua.edu.cn/ubuntu xenial/main Translation-zh_CN [74.8 kB]

获取: http://mirrors.tuna.tsinghua.edu.cn/ubuntu xenial/restricted Translation-zh_CN [1,652 B]

获取: http://mirrors.tuna.tsinghua.edu.cn/ubuntu xenial/universe Translation-zh_CN [172 kB]

获取: http://mirrors.tuna.tsinghua.edu.cn/ubuntu xenial/multiverse Translation-zh_CN [4,984 B]

已下载  kB,耗时 2秒 ( kB/s)

正在读取软件包列表... 完成

lfy@lfy-pc:~$ sudo apt install docker.io

正在读取软件包列表... 完成

正在分析软件包的依赖关系树

正在读取状态信息... 完成

将会同时安装下列软件:

  bridge-utils cgroupfs-mount containerd git git-man liberror-perl libseccomp2

  pigz runc ubuntu-fan

建议安装:

  aufs-tools btrfs-tools debootstrap docker-doc rinse zfs-fuse | zfsutils

  git-daemon-run | git-daemon-sysvinit git-doc git-el git-email git-gui gitk

  gitweb git-arch git-cvs git-mediawiki git-svn

下列【新】软件包将被安装:

  bridge-utils cgroupfs-mount containerd docker.io git git-man liberror-perl

  pigz runc ubuntu-fan

下列软件包将被升级:

  libseccomp2

升级了  个软件包,新安装了  个软件包,要卸载  个软件包,有  个软件包未被升级。

需要下载 56.2 MB 的归档。

解压缩后会消耗  MB 的额外空间。

您希望继续执行吗? [Y/n] Y
...
2》然后,就安装好了老版本的docker
lfy@lfy-pc:~$ docker ps

Got permission denied while trying to connect to the Docker daemon socket at unix:...   #权限不足

lfy@lfy-pc:~$ su

密码:

root@lfy-pc:/home/lfy# docker ps

CONTAINER ID        IMAGE               COMMAND             CREATED             STATUS              PORTS               NAMES

root@lfy-pc:/home/lfy# docker version

Client:

 Version:           18.09.

 API version:       1.39

 Go version:        go1.10.4

 Git commit:        2d0083d

 Built:             Fri Aug  ::

 OS/Arch:           linux/amd64

 Experimental:      false

Server:

 Engine:

  Version:          18.09.

  API version:      1.39 (minimum version 1.12)

  Go version:       go1.10.4

  Git commit:       2d0083d

  Built:            Thu Aug  ::

  OS/Arch:          linux/amd64

  Experimental:     false

root@lfy-pc:/home/lfy#
3》配置docker hub国内加速镜像,用于拉取docker镜像
root@lfy-pc:/home/lfy# cd /

root@lfy-pc:/# ls

bin    dev   initrd.img  lost+found  opt   run   srv  usr

boot   etc   lib         media       proc  sbin  sys  var

cdrom  home  lib64       mnt         root  snap  tmp  vmlinuz

root@lfy-pc:/# cd etc

root@lfy-pc:/etc# ls
...

root@lfy-pc:/etc# cd docker

root@lfy-pc:/etc/docker# ls

key.json

root@lfy-pc:/etc/docker# vim daemon.json

root@lfy-pc:/etc/docker# cat daemon.json

{

  "registry-mirrors":["http://hub-mirror.c.163.com"]

}

root@lfy-pc:/etc/docker# reboot
4》重启完成之后,尝试拉取mysql镜像
root@lfy-pc:/home/lfy# docker pull mysql:5.6

5.6: Pulling from library/mysql

80369df48736: Pull complete

e8f52315cb10: Pull complete

cf2189b391fc: Pull complete

cc98f645c682: Pull complete

27a27ac83f74: Pull complete

f3f8d5bb9498: Pull complete

bbfacbe5a185: Pull complete

9db7adff1e15: Pull complete

f8402500c236: Pull complete

b0319efc9cd8: Pull complete

d19ab308a635: Pull complete

Digest: sha256:411c...

Status: Downloaded newer image for mysql:5.6

root@lfy-pc:/home/lfy# docker images

REPOSITORY          TAG                 IMAGE ID            CREATED             SIZE

mysql               5.6                 b3983ab...         days ago         302MB

root@lfy-pc:/home/lfy# docker run -p : --name mysql56 -v $PWD/conf:/etc/mysql/conf.d -v $PWD/logs:/logs -v $PWD/data:/var/lib/mysql -e MYSQL_ROOT_PASSWORD=root -d mysql:5.6  #启动容器

4717...

root@lfy-pc:/home/lfy# docker ps -a

CONTAINER ID        IMAGE               COMMAND                  CREATED             STATUS              PORTS                    NAMES

4717...        mysql:5.6           "docker-entrypoint.s…"    seconds ago      Up  seconds       0.0.0.0:->/tcp   mysql56

root@lfy-pc:/home/lfy# docker exec -it mysql56 bash      #登录容器命令行

root@47178154ee3b:/# mysql -uroot -p

Enter password:

Welcome to the MySQL monitor.  Commands end with ; or \g.

Your MySQL connection id is

Server version: 5.6. MySQL Community Server (GPL)

Copyright (c) , , Oracle and/or its affiliates. All rights reserved.

Oracle is a registered trademark of Oracle Corporation and/or its

affiliates. Other names may be trademarks of their respective

owners.

Type 'help;' or '\h' for help. Type '\c' to clear the current input statement.

mysql> show databases;

+--------------------+

| Database           |

+--------------------+

| information_schema |

| mysql              |

| performance_schema |

+--------------------+

 rows in set (0.00 sec)

mysql>
参数说明:
  -p ::将容器的  端口映射到主机的  端口。

  -v $PWD/conf:/etc/mysql/conf.d:将主机当前目录下的 conf/my.cnf 挂载到容器的 /etc/mysql/my.cnf。

  -v $PWD/logs:/logs:将主机当前目录下的 logs 目录挂载到容器的 /logs。

  -v $PWD/data:/var/lib/mysql :将主机当前目录下的data目录挂载到容器的 /var/lib/mysql 。

  -e MYSQL_ROOT_PASSWORD=root:初始化 root 用户的密码。

  -d : 后台运行容器,并返回容器id
5》将普通用户添加到docker组,使他可以运行docker命令
lfy@lfy-pc:~$ docker images

Got permission denied while trying to connect to the Docker daemon socket at ...

lfy@lfy-pc:~$ sudo docker images

REPOSITORY          TAG                 IMAGE ID            CREATED             SIZE

mysql               5.6                 b3983abaa3fe         days ago         302MB

lfy@lfy-pc:~$ sudo groupadd docker

groupadd:“docker”组已存在

lfy@lfy-pc:~$ sudo usermod -aG docker ${USER_NAME}  #这里应该是 sudo usermod -aG docker ${USER}

用法:usermod [选项] 登录

选项:

  -c, --comment 注释            GECOS 字段的新值

  -d, --home HOME_DIR           用户的新主目录

  -e, --expiredate EXPIRE_DATE  设定帐户过期的日期为 EXPIRE_DATE

  -f, --inactive INACTIVE       过期 INACTIVE 天数后,设定密码为失效状态

  -g, --gid GROUP               强制使用 GROUP 为新主组

  -G, --groups GROUPS           新的附加组列表 GROUPS

  -a, --append GROUP            将用户追加至上边 -G 中提到的附加组中,

                                并不从其它组中删除此用户

  -h, --help                    显示此帮助信息并推出

  -l, --login LOGIN             新的登录名称

  -L, --lock                    锁定用户帐号

  -m, --move-home               将家目录内容移至新位置 (仅于 -d 一起使用)

  -o, --non-unique              允许使用重复的(非唯一的) UID

  -p, --password PASSWORD       将加密过的密码 (PASSWORD) 设为新密码

  -R, --root CHROOT_DIR         chroot 到的目录

  -s, --shell SHELL             该用户帐号的新登录 shell

  -u, --uid UID                 用户帐号的新 UID

  -U, --unlock                  解锁用户帐号

  -v, --add-subuids FIRST-LAST  add range of subordinate uids

  -V, --del-subuids FIRST-LAST  remove range of subordinate uids

  -w, --add-subgids FIRST-LAST  add range of subordinate gids

  -W, --del-subgids FIRST-LAST  remove range of subordinate gids

  -Z, --selinux-user  SEUSER       用户账户的新 SELinux 用户映射
lfy@lfy-pc:~$ sudo usermod -aG docker lfy
lfy@lfy-pc:~$ sudo systemctl restart docker        #或者重启系统

lfy@lfy-pc:~$ docker ps
CONTAINER ID    IMAGE    COMMAND    CREATED    STATUS    PORTS    NAMES

lfy@lfy-pc:~$
#或者通过以下方法

#sudo gpasswd -a ${USER} docker

eg: sudo apasswd -a lfy docker 或 sudo gpasswd -a ${USER} docker
Ubuntu - Ubuntu应用记录(1)的更多相关文章
- Configure Always On Availability Group for SQL Server on Ubuntu——Ubuntu上配置SQL Server Always On Availability Group
下面简单介绍一下如何在Ubuntu上一步一步创建一个SQL Server AG(Always On Availability Group),以及配置过程中遇到的坑的填充方法. 目前在Linux上可以搭 ...
- 开源物联网框架ServerSuperIO 3.0正式发布(C#),跨平台:Win&Win10 Iot&Ubuntu&Ubuntu Mate,一套设备驱动跨平台挂载,附:开发套件和教程。
3.0版本主要更新内容: 1.增加跨平台能力:Win&Win10 Iot&Ubuntu&Ubuntu Mate 2.统一设备驱动接口:可以一套设备驱动,跨平台挂载运行,降低人力 ...
- 在Ubuntu / Ubuntu Kylin下安装和卸载 Nodepadqq
在Ubuntu / Ubuntu Kylin下安装和卸载 Nodepadqq 对于Ubuntu发行版本可以通过PPA安装,命令如下: sudo add-apt-repository p ...
- 使用SecureCRT连接虚拟机(ubuntu)配置记录
这种配置方法,可以非常方便的操作虚拟机里的Linux系统,且让VMware在后台运行,因为有时候我直接在虚拟机里操作会稍微卡顿,或者切换速度不理想,使用该方法亲测本机效果确实ok,特此记录. Secu ...
- Ubuntu系统使用记录(持续更新)
本篇文章记录在虚拟机上跑Ubuntu16.04遇到的一系列问题,熟悉一下Ubuntu的相关操作,进入终端的方法ctrl+alt+t. 1.修改屏幕分辨率,进入系统默认的是800x600 即便能够进入s ...
- UBuntu安装配置记录
记得是06年左右第一次安装的 Linux,当时是下载的 Fedora镜像,版本已经记不清了,在商业街的电脑维修店刻的盘,回来后兴冲冲地和XP一起安装的双系统.其实就是直接的体验了一把,只是看了看X-W ...
- ubuntu安装过程记录
[DNS修改] 新下载的ubuntu 17.04 安装后DNS是指向谷歌DNS的,谷歌被屏蔽啦,所以无法解析域名.解决办法: ctrl+alt+t 启动终端 : sudo su 输入管理員密碼,或去 ...
- ubuntu常用命令记录集
1.查找当前目录下包含某字符串的文件 #find ./ -type f |xargs grep "string" 2.查找文件 #find ./ -name filename 3. ...
- Ubuntu lnmp安装记录
参考了: Ubuntu 14.04 LTS 安装 LNMP Nginx\PHP5 (PHP-FPM)\MySQL 在访问 info.php的时候,我显示的是502错误.后面我参考了: Ubuntu15 ...
- Ubuntu 18.04 记录
登录后死机,关机时死机的解决方法 更新内核并安装 Nvidia 显卡驱动可解决. 在内核更新为 4.15.18,Nvidia 显卡驱动为 390 时,问题解决. 使用 LiveCD 启动,然后 mou ...
随机推荐
- less命令:查看文件内容
less 命令的作用和 more 十分类似,都用来浏览文本文件中的内容,不同之处在于,使用 more 命令浏览文件内容时,只能不断向后翻看,而使用 less 命令浏览,既可以向后翻看,也可以向前翻看. ...
- Jmeter(十)断言
断言是我们在做自动化测试中常用的一个功能,用于检查测试中响应数据是否符合预期. 使用断言的目的:在request的返回层面增加一层判断机制:因为request成功了,并不代表结果一定正确. 下面我们就 ...
- 我要学习Python
现在是2017年6月7号北京时间20点57分,不知道从什么时候我想学习Python了,我现在做的工作是运维工程师,为了成为一个优秀点的运维人员,也为了以后能有更好的发展机会,我想学习一下Python, ...
- [CSP-S模拟测试]:装饰(数学)
题目传送门(内部题147) 输入格式 每个测试点第一行一个正整数$T$,表示该测试点内的数据组数. 接下来$T$行,每行三个非负整数$a,b,c$,含义如题目中所示. 输出格式 对每组数据输出一行一个 ...
- Spring Boot注入RestTemplate ,出现空指针解决办法
SpringBoot 注入RestTemplate 我看了一下大都是让我们在启动类里面加一个Bean配置代码如下 @Autowired private RestTemplateBuilder buil ...
- Druid连接池(无框架)
关于连接池有不少技术可以用,例如c3p0,druid等等,因为druid有监控平台,性能在同类产品中算top0的.所以我采用的事druid连接池. 首先熟悉一个技术,我们要搞明白,为什么要用他, 他能 ...
- Windows10 修改键位映射
https://blog.csdn.net/lhdalhd1996/article/details/90741092 1.为什么要修改键位我的笔记本键盘上下键是这样的: 很想捶死产品经理,你是从来不用 ...
- Orcal数据类型总结
一.Oracle中的varchar2类型 我们在Oracle数据库存储的字符数据一般是用VARCHAR2.VARCHAR2既分PL/SQL Data Types中的变量类型,也分Oracle Data ...
- LC 425. Word Squares 【lock,hard】
Given a set of words (without duplicates), find all word squares you can build from them. A sequence ...
- vue 添加一个二级目录
原先的: http://xxx.xx.xxx.xxx:xxx/#/ 现在的: http://xxx.xx.xxx.xxx:xxx/guangfu/#/