
SpringCloud之Eureka
【前面的话】SpringCloud为开发人员提供了快速构建分布式系统的一些工具,包括配置管理、服务发现、断路器、路由、微代理、事件总线、全局锁、决策竞选、分布式会话等等。它配置简单,上手快,而且生态成熟,便于应用。但是它对SpringBoot有很强的依赖,需要有一定基础,但是SpringBoot俩小时就可以入门。另外对于“微服务架构” 不了解的话,可以通过搜索引擎搜索“微服务架构”了解下。另外这是SpringCloud的版本为Greenwich.SR2,JDK版本为1.8,SpringBoot的版本为2.1.7.RELEASE。
壹、新建父工程
- 新建一个Maven父工程lovincloud,便于版本管理,然后删除src文件夹
- 添加pom依赖和SpringCloud和SpringBoot的版本
<parent>

        <groupId>org.springframework.boot</groupId>

        <artifactId>spring-boot-starter-parent</artifactId>

        <version>2.1.7.RELEASE</version>

        <relativePath/> <!-- lookup parent from repository -->

    </parent>

    <groupId>com.eelve.lovincloud</groupId>

    <artifactId>lovincloud</artifactId>

    <version>1.0-SNAPSHOT</version>

    <packaging>pom</packaging>

    <name>lovincloud</name>

    <url>http://maven.apache.org</url>

    <properties>

        <project.build.sourceEncoding>UTF-8</project.build.sourceEncoding>

        <spring-cloud.version>Greenwich.SR2</spring-cloud.version>

        <java.version>1.8</java.version>

    </properties>

    <dependencies>

        <dependency>

            <groupId>org.springframework.boot</groupId>

            <artifactId>spring-boot-starter-test</artifactId>

            <scope>test</scope>

        </dependency>

    </dependencies>

    <dependencyManagement>

        <dependencies>

            <dependency>

                <groupId>org.springframework.cloud</groupId>

                <artifactId>spring-cloud-dependencies</artifactId>

                <version>${spring-cloud.version}</version>

                <type>pom</type>

                <scope>import</scope>

            </dependency>

        </dependencies>

    </dependencyManagement>

    <build>

        <plugins>

            <plugin>

                <groupId>org.springframework.boot</groupId>

                <artifactId>spring-boot-maven-plugin</artifactId>

            </plugin>

        </plugins>

    </build>
贰、添加一个注册中心
在这里,我们需要用的的组件上Spring Cloud Netflix的Eureka ,eureka是一个服务注册和发现模块。
- 新建一个子工程lovin-eureka-server作为服务的注册中心
<parent>

        <artifactId>lovincloud</artifactId>

        <groupId>com.eelve.lovincloud</groupId>

        <version>1.0-SNAPSHOT</version>

    </parent>

    <modelVersion>4.0.0</modelVersion>

    <artifactId>lovin-eureka-server</artifactId>

    <packaging>jar</packaging>

    <name>eurekaserver</name>

    <version>0.0.1</version>

    <description>eureka服务端</description>

    <dependencies>

        <dependency>

            <groupId>org.springframework.cloud</groupId>

            <artifactId>spring-cloud-starter-netflix-eureka-server</artifactId>

        </dependency>

        <dependency>

            <groupId>org.springframework.boot</groupId>

            <artifactId>spring-boot-starter-test</artifactId>

            <scope>test</scope>

        </dependency>

    </dependencies>

    <dependencyManagement>

        <dependencies>

            <dependency>

                <groupId>org.springframework.cloud</groupId>

                <artifactId>spring-cloud-dependencies</artifactId>

                <version>${spring-cloud.version}</version>

                <type>pom</type>

                <scope>import</scope>

            </dependency>

        </dependencies>

    </dependencyManagement>

    <build>

        <plugins>

            <plugin>

                <groupId>org.springframework.boot</groupId>

                <artifactId>spring-boot-maven-plugin</artifactId>

            </plugin>

        </plugins>

    </build>
- 然后在启动类上添加@EnableEurekaServer注解:
package com.eelve.lovin;

import org.springframework.boot.SpringApplication;

import org.springframework.boot.autoconfigure.SpringBootApplication;

import org.springframework.cloud.netflix.eureka.server.EnableEurekaServer;

/**

 * @ClassName LovinEurekaServerApplication

 * @Description TDO

 * @Author zhao.zhilue

 * @Date 2019/8/15 16:20

 * @Version 1.0

 **/

@EnableEurekaServer

@SpringBootApplication

public class LovinEurekaServerApplication {

    public static void main(String[] args) {

        SpringApplication.run(LovinEurekaServerApplication.class,args);

    }

}
- eureka是一个高可用的组件,它没有后端缓存,每一个实例注册之后需要向注册中心发送心跳(因此可以在内存中完成),在默认情况下erureka server也是一个eureka client ,必须要指定一个 server。eureka server的配置文件appication.yml:
spring:

  application:

    naem: lovineurkaserver  # 服务模块名称

server:

  port: 8881  # 设置的eureka端口号

eureka:

  instance:

    hostname: localhost   # 设置eureka的主机地址

  client:

    registerWithEureka: false  #表示是否将自己注册到Eureka Server,默认为true。由于当前应用就是Eureka Server,故而设置为false

    fetchRegistry: false  #表示是否从Eureka Server获取注册信息,默认为true。因为这是一个单点的Eureka Server,不需要同步其他的Eureka Server节点的数据,故而设置为false

    serviceUrl:

      defaultZone: http://${eureka.instance.hostname}:${server.port}/eureka/   #Eureka server地址,查询服务和注册服务都需要依赖这个地址,多个地址可用逗号(英文的)分割
叁、添加一个服务消费端
- 新建一个子工程lovin-eureka-server作为服务的注册中心
<parent>

        <artifactId>lovincloud</artifactId>

        <groupId>com.eelve.lovincloud</groupId>

        <version>1.0-SNAPSHOT</version>

    </parent>

    <modelVersion>4.0.0</modelVersion>

    <artifactId>lovin-eureka-client</artifactId>

    <packaging>jar</packaging>

    <name>eurekaclient</name>

    <version>0.0.1</version>

    <description>eureka的一个消费端</description>

    <dependencies>

        <dependency>

            <groupId>org.springframework.cloud</groupId>

            <artifactId>spring-cloud-starter-netflix-eureka-client</artifactId>

        </dependency>

        <dependency>

            <groupId>org.springframework.boot</groupId>

            <artifactId>spring-boot-starter-web</artifactId>

        </dependency>

    </dependencies>

    <build>

        <plugins>

            <plugin>

                <groupId>org.springframework.boot</groupId>

                <artifactId>spring-boot-maven-plugin</artifactId>

            </plugin>

        </plugins>

    </build>
- 然后在启动类上添加@EnableEurekaClient注解:
package com.eelve.lovin;

import org.springframework.boot.SpringApplication;

import org.springframework.boot.autoconfigure.SpringBootApplication;

import org.springframework.cloud.netflix.eureka.EnableEurekaClient;

/**

 * @ClassName LovinEurekaClientApplication

 * @Description TDO

 * @Author zhao.zhilue

 * @Date 2019/8/15 16:37

 * @Version 1.0

 **/

@SpringBootApplication

@EnableEurekaClient

public class LovinEurekaClientApplication {

    public static void main(String[] args) {

        SpringApplication.run(LovinEurekaClientApplication.class,args);

    }

}
- 然后我们需要连接到服务端,具体配置如下
server:

  port: 8801   # 服务端口号

spring:

  application:

    name: lovineurkaclient     # 服务名称

eureka:

  client:

    serviceUrl:

      defaultZone: http://localhost:8881/eureka/   # 注册到的eureka服务地址
- 新建一个Controller写一个测试接口
package com.eelve.lovin.controller;

import com.eelve.lovin.config.ServerConfig;

import org.springframework.beans.factory.annotation.Autowired;

import org.springframework.web.bind.annotation.RequestMapping;

import org.springframework.web.bind.annotation.RestController;

/**

 * @ClassName HelloController

 * @Description TDO应用默认访问接口

 * @Author zhao.zhilue

 * @Date 2019/8/15 16:45

 * @Version 1.0

 **/

@RestController

public class HelloController {

    @Autowired

    ServerConfig serverConfig;

    @RequestMapping("hello")

    public String hello(){

        return serverConfig.getUrl()+"###"+ HelloController.class.getName();

    }

}
肆、分别启动注册中心的服务端和客户端
访问localhost:8881查看结果
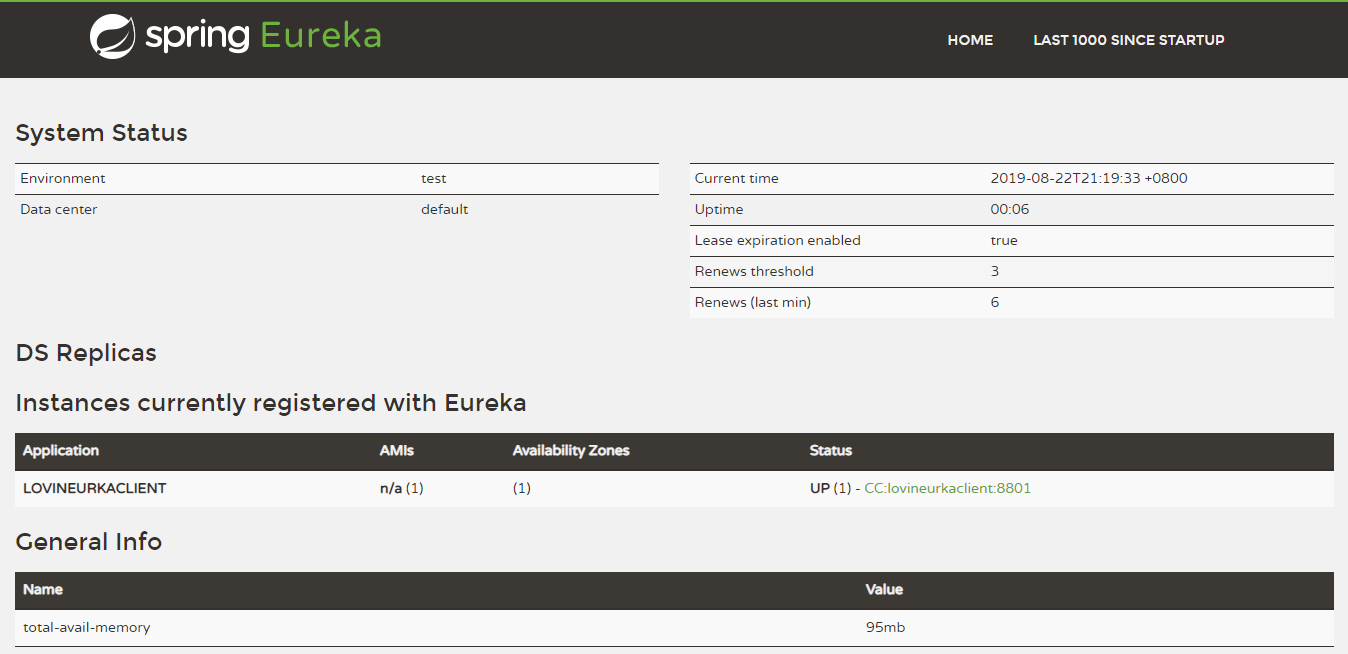
到这里我们可以已经看到已经成功将客户端注册到服务端了,然后我们访问测试接口
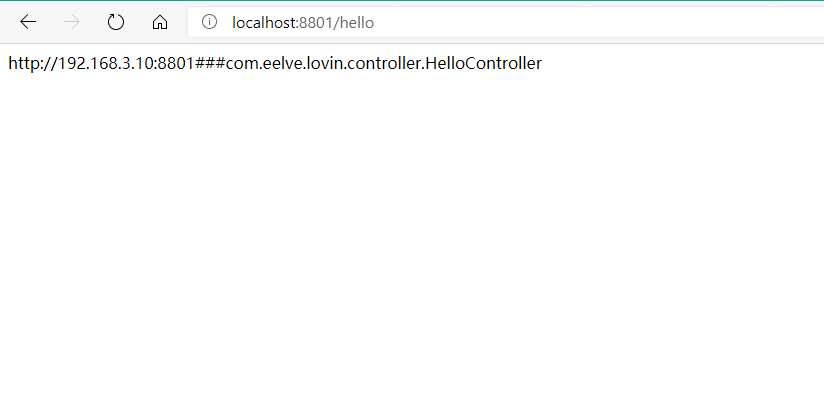
可以看到已经访问成功,至此Eureka的搭建已经完成。
伍、加入安全配置
在互联网中我们一般都会考虑安全性,尤其是管理服务的注册中心,所以我们可以用spring-boot-starter-security来做安全限制
- 给lovin-eureka-server添加spring-boot-starter-security的pom依赖
<dependency>

    <groupId>org.springframework.boot</groupId>

    <artifactId>spring-boot-starter-security</artifactId>

</dependency>
- 修改配置文件
spring:

  application:

    naem: lovineurkaserver  # 服务模块名称

  security:

    basic:

      enabled: true

    user:

      name: lovin

      password: ${REGISTRY_SERVER_PASSWORD:lovin}

server:

  port: 8881  # 设置的eureka端口号

eureka:

  instance:

    hostname: localhost   # 设置eureka的主机地址

    metadata-map:

      user.name: ${security.user.name}

      user.password: ${security.user.password}

  client:

    registerWithEureka: false  #表示是否将自己注册到Eureka Server,默认为true。由于当前应用就是Eureka Server,故而设置为false

    fetchRegistry: false  #表示是否从Eureka Server获取注册信息,默认为true。因为这是一个单点的Eureka Server,不需要同步其他的Eureka Server节点的数据,故而设置为false

    serviceUrl:

      defaultZone: http://${spring.security.user.name}:${spring.security.user.password}@${eureka.instance.hostname}:${server.port}/eureka/   #Eureka server地址,查询服务和注册服务都需要依赖这个地址,多个地址可用逗号(英文的)分割
- 添加security配置
package com.eelve.lovin.config;

import org.springframework.context.annotation.Configuration;

import org.springframework.security.config.annotation.web.builders.HttpSecurity;

import org.springframework.security.config.annotation.web.configuration.EnableWebSecurity;

import org.springframework.security.config.annotation.web.configuration.WebSecurityConfigurerAdapter;

/**

 * @ClassName SecurityConfig

 * @Description TDO

 * @Author zhao.zhilue

 * @Date 2019/8/16 14:13

 * @Version 1.0

 **/

@EnableWebSecurity

public class WebSecurityConfig extends WebSecurityConfigurerAdapter {

    @Override

    protected void configure(HttpSecurity http) throws Exception {

        http.csrf().disable();

        http.authorizeRequests()

                .antMatchers("/css/**").permitAll()

                .anyRequest().authenticated()

                .and()

                .formLogin()

                .and()

                .httpBasic();

        super.configure(http);

    }

}
- 给lovin-eureka-client添加spring-boot-starter-security的pom依赖
<dependency>

    <groupId>org.springframework.boot</groupId>

    <artifactId>spring-boot-starter-security</artifactId>

</dependency>
- 修改yaml配置文件
server:

  port: 8801   # 服务端口号

spring:

  application:

    name: lovineurkaclient     # 服务名称

  security:

    basic:

      enabled: true

    user:

      name: lovin

      password: ${REGISTRY_SERVER_PASSWORD:lovin}

eureka:

  client:

    serviceUrl:

      defaultZone: http://lovin:lovin@localhost:8881/eureka/   # 注册到的eureka服务地址

  instance:

    leaseRenewalIntervalInSeconds: 10

    health-check-url-path: /actuator/health

    metadata-map:

      user.name: lovin

      user.password: lovin
- 添加security配置
package com.eelve.lovin.config;

import org.springframework.context.annotation.Configuration;

import org.springframework.security.config.annotation.web.builders.HttpSecurity;

import org.springframework.security.config.annotation.web.configuration.WebSecurityConfigurerAdapter;

/**

 * @ClassName SecurityConfig

 * @Description TDO

 * @Author zhao.zhilue

 * @Date 2019/8/16 14:13

 * @Version 1.0

 **/

@Configuration

public class WebSecurityConfig extends WebSecurityConfigurerAdapter {

    @Override

    protected void configure(HttpSecurity http) throws Exception {

        http.authorizeRequests().anyRequest().permitAll()

                .and().csrf().disable();

    }

}
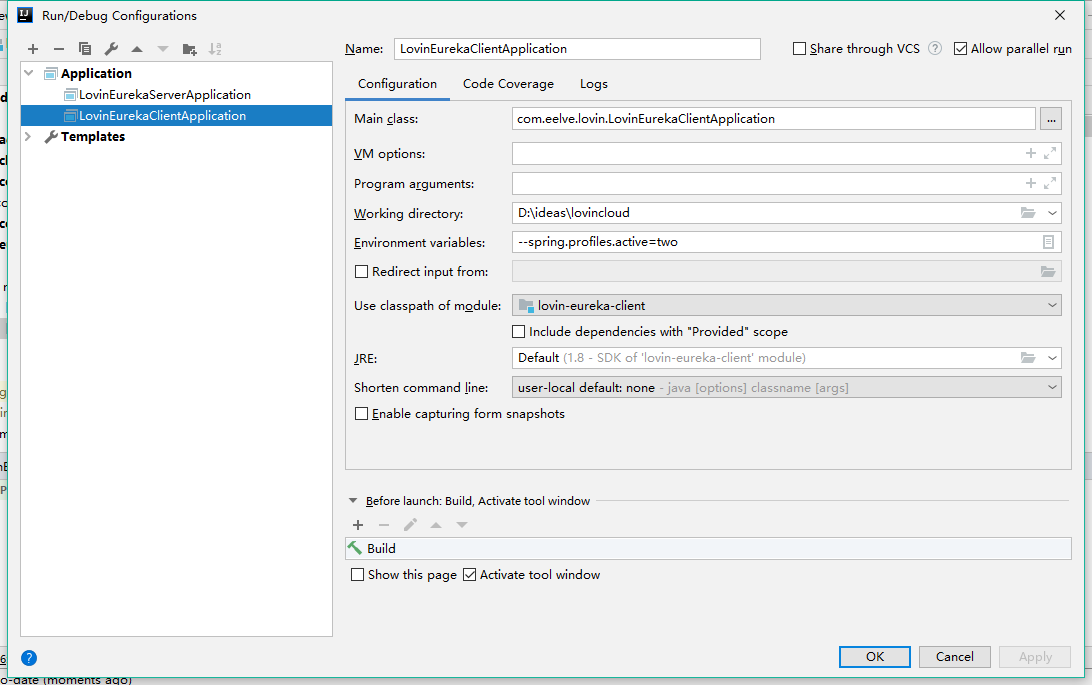
- 另外为了测试多客服端注册,我们可以修改再给客户端新建一个配置文件,然后开启IDEA的多节点运行,如下图所示勾选Allow parallel run
- 然后为了区分是哪个节点的请求我们可以添加获取端口
package com.eelve.lovin.config;

import org.springframework.boot.web.context.WebServerInitializedEvent;

import org.springframework.context.ApplicationListener;

import org.springframework.stereotype.Component;

import java.net.InetAddress;

import java.net.UnknownHostException;

/**

 * @ClassName ServerConfig

 * @Description TDO

 * @Author zhao.zhilue

 * @Date 2019/8/18 12:03

 * @Version 1.0

 **/

@Component

public class ServerConfig  implements ApplicationListener<WebServerInitializedEvent> {

    private int serverPort;

    public String getUrl() {

        InetAddress address = null;

        try {

            address = InetAddress.getLocalHost();

        } catch (UnknownHostException e) {

            e.printStackTrace();

        }

        return "http://"+address.getHostAddress() +":"+this.serverPort;

    }

    @Override

    public void onApplicationEvent(WebServerInitializedEvent event) {

        this.serverPort = event.getWebServer().getPort();

    }

}
- 然后我们一次重启服务端和两个客户端,这个时候我们访问http://localhost:8881/
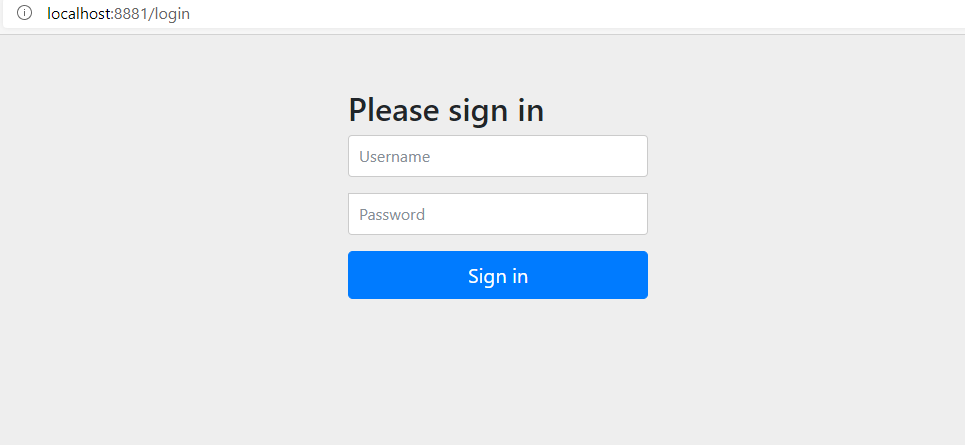
可以看到,这里已经让我们输入用户名和密码了,说明spring-boot-starter-security已经配置成功,这时我们输入配置的用户名:lovin和密码:lovin
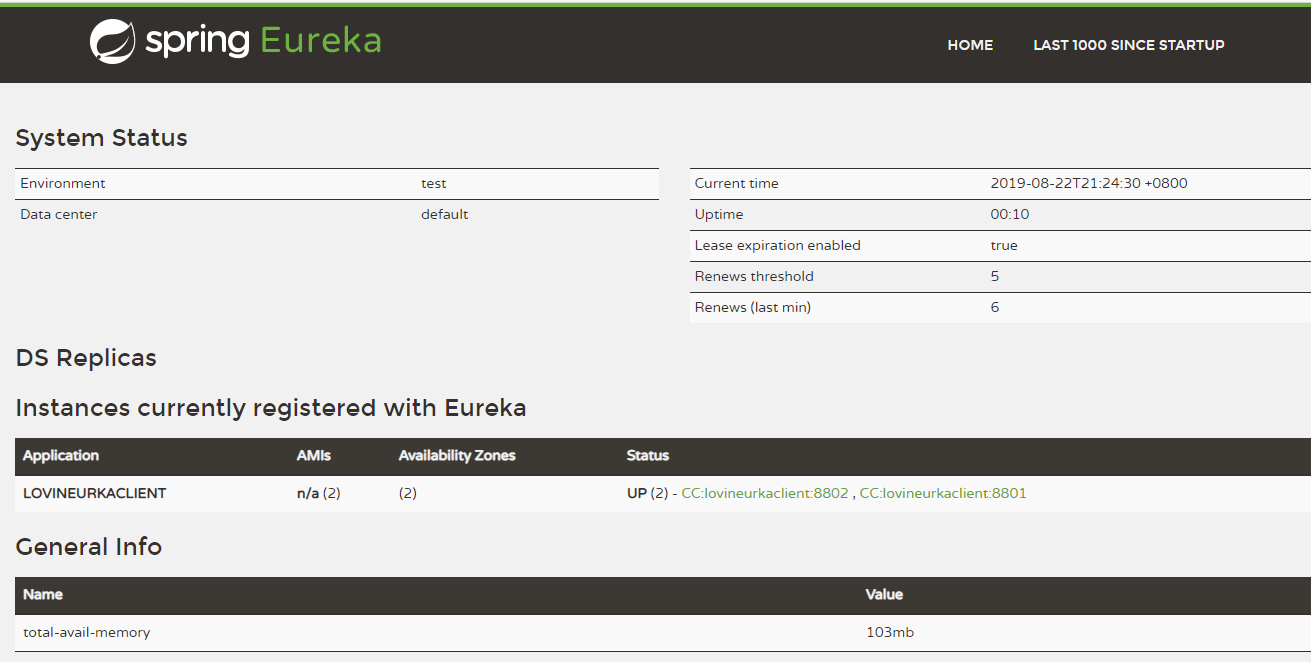
这里我们可以看到已经成功了,那么到这里Eureka的配置已经全部成功了。
SpringCloud之Eureka的更多相关文章
- SpringCloud中eureka配置心跳和剔除下线的服务的时间
在默认的springCloud中eureka注册中心在服务下线时表现的非常不灵敏,用惯了dubbo的zk注册中心表示很不习惯,eureka设计的本意是在服务不会频繁上下线和网络稳定的内网,这种设计在生 ...
- springcloud(二) eureka的使用
上一节讲到order微服务是通过rest调用user微服务的地址.但是,user微服务的地址是写死的, 如果user微服务集群的话,那么order微服务该如何调用呢?这个时候注册中心该上场了 演示eu ...
- spring-cloud配置eureka客户端
spring-cloud配置eureka客户端 eureka用来发现其他程序 需要提前配置eureka服务端,具体看 https://www.cnblogs.com/ye-hcj/p/10292944 ...
- 浅谈SpringCloud (二) Eureka服务发现组件
上面学习到了如何由一个程序访问另一个程序,那么如果使用SpringCloud来进行访问,该如何访问呐? 可以借助Eureka服务发现组件进行访问. 可以借助官方文档:https://spring.io ...
- SpringCloud之Eureka:集群搭建
上篇文章<SpringCloud之Eureka:服务发布与调用例子>实现了一个简单例子,这次对其进行改造,运行两个服务器实例.两个服务提供者实例,服务调用者请求服务,使其可以进行集群部署. ...
- SpringCloud学习笔记(三、SpringCloud Netflix Eureka)
目录: 服务发现简介 SpringCloud Netflix Eureka应用 Eureka高可用 Eureka源码分析 >>> Eureka Client初始化(客户端定时获取服务 ...
- springCloud 之 Eureka注册中心高可用配置
springCloud的eureka高可用配置方案思路是:几个服务中心之间相互注册,比如两个注册中心,A注册到B上,B注册到A上,如果是三个注册中心则是:A注册到BC上,B注册到AC上,C注册到AB上 ...
- SpringCloud创建Eureka模块集群
1.说明 本文详细介绍Spring Cloud创建Eureka模块集群的方法, 基于已经创建好的Spring Cloud Eureka Server模块, 请参考SpringCloud创建Eureka ...
- SpringCloud(3)---Eureka服务注册与发现
Eureka服务注册与发现 一.Eureka概述 1.Eureka特点 (1) Eureka是一个基于REST的服务,用于定位服务,以实现云端中间层服务发现和故障转移. (2) Eureka 主管服务 ...
- SpringCloud系列——Eureka 服务注册与发现
前言 Eureka是一种基于REST(具像状态传输)的服务,主要用于AWS云中定位服务,以实现中间层服务器的负载平衡和故障转移.本文记录一个简单的服务注册与发现实例. GitHub地址:https:/ ...
随机推荐
- 12点睛Spring4.1-Spring Aware
12.1 Aware 我们设计的准则是解耦,这就意味着我们不能对Spring的IoC容器有直接的依赖,但是我们还是想我们的bean能识别容器的资源; 使用aware能让我们在应用的任意位置获得spri ...
- upload-labs 上传漏洞靶场环境以及writeup
一个帮你总结所有类型的上传漏洞的靶场 https://github.com/c0ny1/upload-labs 靶场环境(基于phpstudy这个php集成环境) https://github.com ...
- LeetCode 142. 环形链表 II(Linked List Cycle II)
142. 环形链表 II 142. Linked List Cycle II 题目描述 给定一个链表,返回链表开始入环的第一个节点.如果链表无环,则返回 null. 为了表示给定链表中的环,我们使用整 ...
- 01 web概念概述
1.JavaWeb: 使用Java语言开发基于互联网的项目 2.软件架构:(1) C/S: Client/Server 客户端/服务器端在用户本地有一个客户端程序,在远程有一个服务器端程序如:QQ,迅 ...
- STM32之spi管理模式
1)sip管理模式分为:硬件管理和软件管理:主要由NSS .SSI.SSM决定: NSS是芯片上一个实实在在的引脚,SSI和SSM是SPI_CR1控制器里的的位. 值得注意的是:NSS分外部引脚和内部 ...
- typedef用法和陷阱
一.typedef的用法 1.用typedef来声明新的类型名,来代替已有的类型名,也就是给类型起别名.比如 typedef float REAL; //用REAL来代表float类型 REAL a; ...
- ESP32 - GPIO中断触发与事件回调
最近为项目增加了GPIO外部触发中断功能,原理是为GPIO32注册了上升沿触发事件,事件触发后,会向RTOS队列写入数据.在RTOS事件中检测到该队列中有新加入的事件,就读出,并执行相应代码. #de ...
- 用jquery和php实现ajax异步请求响应
ajax技术可以实现异步请求和响应,下面的是用jquery向一个php脚本发送异步请求,并得到响应. 第一步,准备好前台的html表单,和jquery实现的ajax请求 <html lang=& ...
- cookie设置中文时的编码问题
cookie设置中文时的编码问题:cookie在设置时不允许出现中文.非要设置中文的怎么办,看下面的解决方案: 方式1 def login(request): ret = HttpResponse(' ...
- 微信小程序的页面跳转==编程式导航传参 和 标签的方法传参==以及如何过去传递过来的参数
小程序导航传参接收传递过来的参数 在onload中 实例