第2章 Spring中的Bean
2.1 Bean的配置
Bean本质是Java中的类。Spring可以被看做一个大型工厂,这个工厂的作用就是生产和管理Spring容器zho中的Bean。想在项目中使用这个工厂,就需要对Spring的配置文件进行配置。
Spring支持XML和Properties两种格式的配置文件。常用XML文件配置,该方式通过XML文件来注册并管理Bean之间的依赖关系。
XML配置文件的根元素是<beans>,包含了多个<bean>子元素,每个子元素地定义一个Bean。
<bean>元素的常用属性及其子元素
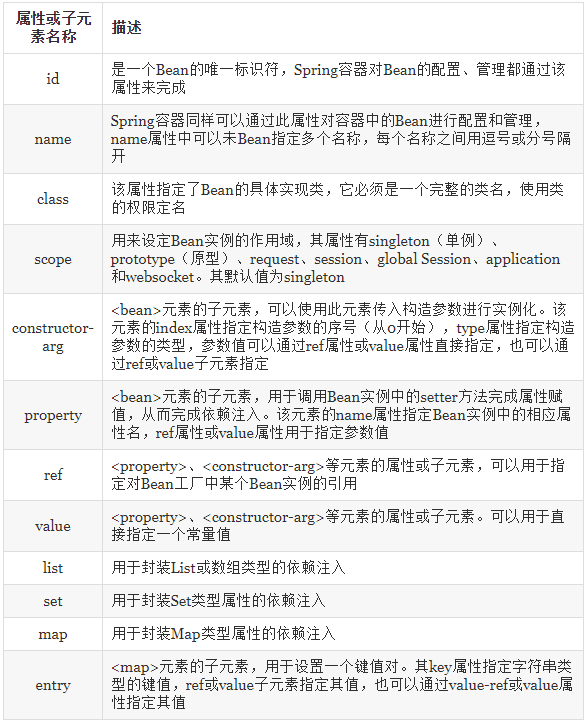
如果在Bean中未指定id和name,则Spring会把class的值当做id使用。
getBean( id/name/class );
2.2 Bean的实例化:
2.21 构造器实例化:Spring容器通过Bean对应类中默认的无参构造方法来实例化Bean
package com.itheima.instance.constructor;
public class Bean1 {

<?xml version="1.0" encoding="UTF-8"?>
<beans xmlns="http://www.springframework.org/schema/beans"

    xmlns:xsi="http://www.w3.org/2001/XMLSchema-instance"

    xsi:schemaLocation="http://www.springframework.org/schema/beans

     http://www.springframework.org/schema/beans/spring-beans-4.3.xsd">

    <bean id="bean1" class="com.itheima.instance.constructor.Bean1" />

</beans package com.itheima.instance.constructor;
package com.itheima.instance.constructor;

import org.springframework.context.ApplicationContext;

import

    org.springframework.context.support.ClassPathXmlApplicationContext;

public class InstanceTest1 {

    public static void main(String[] args) {

        // 定义配置文件路径

        String xmlPath = "com/itheima/instance/constructor/beans1.xml";

        // ApplicationContext在加载配置文件时,对Bean进行实例化

        ApplicationContext applicationContext = new ClassPathXmlApplicationContext(xmlPath);

        Bean1 bean = (Bean1) applicationContext.getBean("bean1");

        System.out.println(bean);

    }

}
如果xml文件不在包里,就不需要在路径上加入包名;如果在包里,需要加上包名。
输出类Bean1的地址:
com.itheima.instance.constructor.Bean1@234bef66
2.22静态工厂方式实例化:要求开发者创建一个静态工厂的方法来创建Bean的实例,其Bean配置中的class属性所指定的不再是Bean实例的实现类,而是静态工厂类,同时还需要使用factory-method属性来指定所创建的静态工厂方法。
package com.itheima.instance.static_factory;

public class Bean2 {

}
package com.itheima.instance.static_factory;

public class MyBean2Factory {

    //使用自己的工厂创建Bean2实例

    public static Bean2 createBean222(){

        return new Bean2();

    }

}
<?xml version="1.0" encoding="UTF-8"?>

<beans xmlns="http://www.springframework.org/schema/beans"

    xmlns:xsi="http://www.w3.org/2001/XMLSchema-instance"

    xsi:schemaLocation="http://www.springframework.org/schema/beans

    http://www.springframework.org/schema/beans/spring-beans-4.3.xsd">

    <bean id="bean2" class="com.itheima.instance.static_factory.MyBean2Factory"

        factory-method="createBean222" />

    <!-- factory-method后面等于的东西是方法 -->

</beans>
package com.itheima.instance.static_factory;

public class MyBean2Factory {

    //使用自己的工厂创建Bean2实例

    public static Bean2 createBean222(){

        return new Bean2();

    }

}
输出类Bean2的地址:
com.itheima.instance.static_factory.Bean2@7921b0a2
说白了就是,有一个类叫Bean2,要实例化Bean2,这种方法不直接实例化它,要再创一个工厂类MyBean2Factory,工厂类里有个方法返回实例化的Bean2,return new Bean2(),先new再返回,并且这个方法名和Factory-method对应。
2.23实例工厂方法实例化:采用实例工厂,不再是静态工厂,采用直接创建Bean实例的方式。
package com.itheima.instance.factory;

public class Bean3  {

}
package com.itheima.instance.factory;

public class MyBean3Factory {

    public MyBean3Factory() {

        System.out.println("bean3工厂实例化中");

    }

    //创建Bean3实例的方法

    public Bean3 createBean111(){

        return new Bean3();

    }

}
<?xml version="1.0" encoding="UTF-8"?>

<beans xmlns="http://www.springframework.org/schema/beans"

    xmlns:xsi="http://www.w3.org/2001/XMLSchema-instance"

    xsi:schemaLocation="http://www.springframework.org/schema/beans

    http://www.springframework.org/schema/beans/spring-beans-4.3.xsd">

    <!-- 配置工厂 -->

    <bean id="myBean3Factory"

            class="com.itheima.instance.factory.MyBean3Factory" />

    <!-- 使用factory-bean属性指向配置的实例工厂,

          使用factory-method属性确定使用工厂中的哪个方法-->

    <bean id="bean3" factory-bean="myBean3Factory"

           factory-method="createBean111" />

</beans>
package com.itheima.instance.factory;

import org.springframework.context.ApplicationContext;

import

    org.springframework.context.support.ClassPathXmlApplicationContext;

public class InstanceTest3 {

    public static void main(String[] args) {

        // 指定配置文件路径

        String xmlPath = "com/itheima/instance/factory/beans3.xml";

        // ApplicationContext在加载配置文件时,对Bean进行实例化

        ApplicationContext applicationContext =

                new ClassPathXmlApplicationContext(xmlPath);

        System.out.println(applicationContext.getBean("bean3"));

        //顺便尝试构造器实例化

        String xmlPath2 = "com/itheima/instance/factory/beans3.xml";

        ApplicationContext applicationContext2 =

                new ClassPathXmlApplicationContext(xmlPath2);

        System.out.println(applicationContext2.getBean("myBean3Factory"));

    }

}
输出:
bean3工厂实例化中
com.itheima.instance.factory.Bean3@7921b0a2
bean3工厂实例化中
com.itheima.instance.factory.MyBean3Factory@32d992b2
这种方式说白了就是:有一个类Bean3,要实例化它,不直接实例化,再造一个工厂类MyBean3Factory来return new Bean3();
在xml文件中,先配置实例工厂类的bean;再配置要类Bean3的bean,并通过factory-bean指明是哪个实例工厂类(谁)要实例它,再通过factory-method指明是哪个方法来返回实例后的它。
(回顾旧知识:实例工厂类MyBean3Factory里面有一个无参构造函数,在实例MyBean3Factory的时候自动执行该方法,构造函数要求是无参无返回值,方法名和类名一样)
2.3 Bean的作用域
Spring 4.3中为Bean的实例定义了7种作用域。
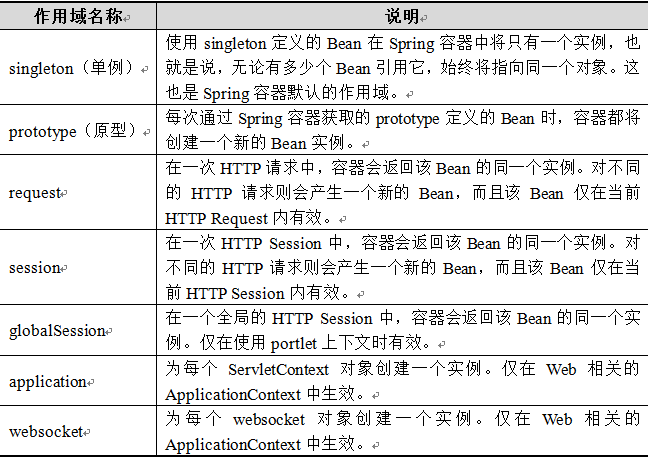
singleton和prototype最常用,解释如下。
1.singleton作用域:
Spring容器默认的作用域,当Bean作用域为singleton时,Spring容器就会存在一个共享的Bean实例,并且所有对Bean的请求,只要id与该Bean的id属性相匹配,就会返回同一个Bean实例。singleton作用域对于无会话状态的Bean(如Dao组件、Service组件)来说,是最理想的选择。演示如下:
package com.itheima.scope;

public class Scope  {

}
<?xml version="1.0" encoding="UTF-8"?>

<beans xmlns="http://www.springframework.org/schema/beans"

    xmlns:xsi="http://www.w3.org/2001/XMLSchema-instance"

    xsi:schemaLocation="http://www.springframework.org/schema/beans

            http://www.springframework.org/schema/beans/spring-beans.xsd">

    <bean id="scope" class="com.itheima.scope.Scope" scope="singleton"/>

</beans>
package com.itheima.scope;

import org.springframework.context.ApplicationContext;

import

    org.springframework.context.support.ClassPathXmlApplicationContext;

public class ScopeTest {

    public static void main(String[] args) {

        // 定义配置文件路径

        String xmlPath = "com/itheima/scope/beans4.xml";

        // 加载配置文件

        ApplicationContext applicationContext =

                    new ClassPathXmlApplicationContext(xmlPath);

        // 输出获得实例

        System.out.println(applicationContext.getBean("scope"));

        System.out.println(applicationContext.getBean("scope"));

    }

}
输出:
com.itheima.scope.Scope@234bef66
com.itheima.scope.Scope@234bef66
2.prototype作用域:
对需要保持会话状态的Bean(如Struts2的Action类)应该使用prototype作用域。在使用prototype作用域时,Spring容器会为每个对该Bean的请求都创建一个新的实例。
xml文件中的<bean>改一下,<bean id="scope" class="com.itheima.scope.Scope" scope="prototype" />
输出:
com.itheima.scope.Scope@5a61f5df
com.itheima.scope.Scope@3551a94
2.4 Bean的生命周期
例如singleton和prototype作用域的生命周期。
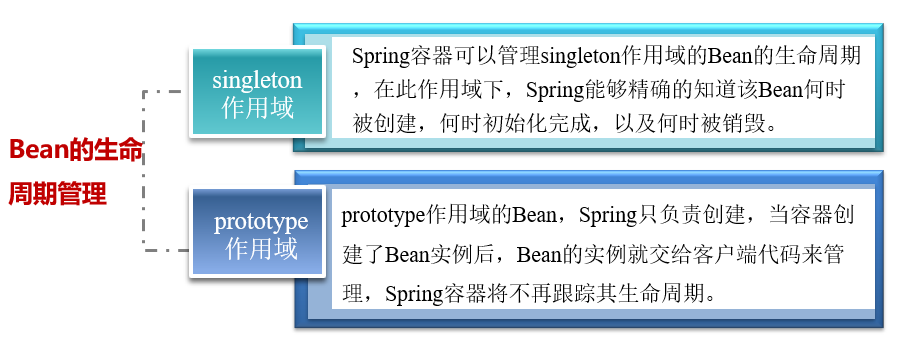
singleton关闭时销毁,prototype长时间不用自动销毁。
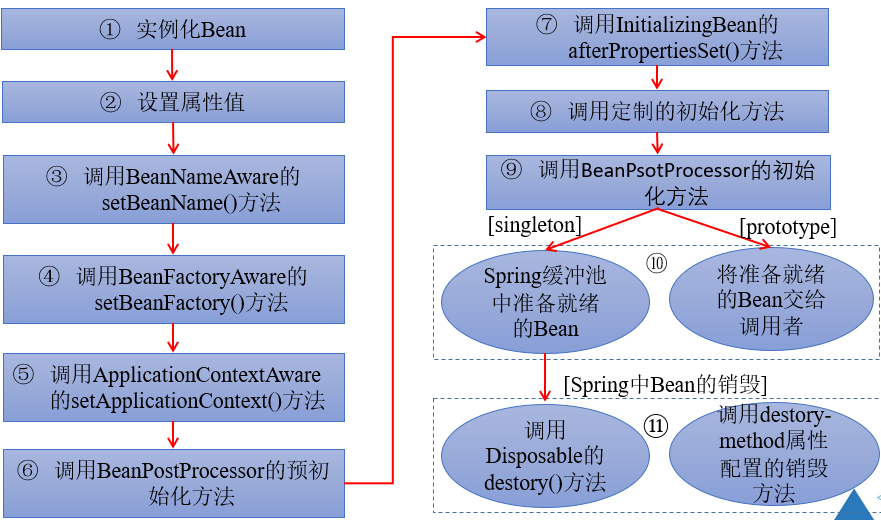
Bean生命周期流程图:
2.5 Bean的装配方式:
Bean的装配可以理解为依赖关系注入,Bean的装配方式即Bean依赖注入的方式。Spring容器支持多种形式的Bean的装配方式,如基于XML的装配、基于注解(Annotation)的装配和自动装配(其中最常用的是基于注解的装配)。
2.51 基于XML的装配:设值注入(Setter Injectiion)和构造注入(Constructor Injection)
构造注入要求:提供默认无参构造方法,为所有属性提供setter方法
设值注入要求:Bean类必须提供一个默认的无参构造方法,并且为需要注入的属性提供对应的setter方法
package com.itheima.assemble;

import java.util.List;

public class User {

    private String username;

    private Integer password;

    private List<String> list;

    /**

     * 1.使用构造注入

     * 1.1提供带所有参数的有参构造方法。

     */

    public User(String username, Integer password, List<String> list) {

        super();// 调用父类的无参构造方法,可以不写

        this.username = username;

        this.password = password;

        this.list = list;

    }

    /**

     * 2.使用设值注入

     * 2.1提供默认空参构造方法 ;

     * 2.2为所有属性提供setter方法。

     */

    public User() {//无参构造方法

        super();//// 调用父类Object的无参构造方法,可以不写

    }

    public void setUsername(String username) {

        this.username = username;

    }

    public void setPassword(Integer password) {

        this.password = password;

    }

    public void setList(List<String> list) {

        this.list = list;

    }

    @Override

    public String toString() { // 重写父类的Object的toString方法

        return "User [username=" + username + ", password=" + password +

                ", list=" + list + "]";

    }

}
<?xml version="1.0" encoding="UTF-8"?>

<beans xmlns="http://www.springframework.org/schema/beans"

    xmlns:xsi="http://www.w3.org/2001/XMLSchema-instance"

    xsi:schemaLocation="http://www.springframework.org/schema/beans

     http://www.springframework.org/schema/beans/spring-beans-4.3.xsd">

    <!--1.使用构造注入方式装配User实例 -->

    <bean id="user1" class="com.itheima.assemble.User">

        <constructor-arg index="0" value="tom" />

        <constructor-arg index="1" value="123456" />

        <constructor-arg index="2">

            <list>

                <value>"constructorvalue1"</value>

                <value>"constructorvalue2"</value>

            </list>

        </constructor-arg>

    </bean>

    <!--2.使用设值注入方式装配User实例 -->

    <bean id="user2" class="com.itheima.assemble.User">

        <property name="username" value="张三"></property>

        <property name="password" value="654321"></property>

        <!-- 注入list集合 -->

        <property name="list">

            <list>

                <value>"setlistvalue1"</value>

                <value>"setlistvalue2"</value>

            </list>

        </property>

    </bean>

</beans>
构造注入:constructor-arg元素中的index表示的是有参构造方法的参数顺序,value表示注入的值。
设值注入:property元素中的name表示要注入的属性名,value表示要注入的值,子元素list同样表示要注入的值。
package com.itheima.assemble;

import org.springframework.context.ApplicationContext;

import

    org.springframework.context.support.ClassPathXmlApplicationContext;

public class XmlBeanAssembleTest {

    public static void main(String[] args) {

        // 定义配置文件路径

        String xmlPath = "com/itheima/assemble/beans5.xml";

        // 加载配置文件

        ApplicationContext applicationContext = new ClassPathXmlApplicationContext(xmlPath);

        // 构造方式输出结果

        System.out.println(applicationContext.getBean("user1"));

        // 设值方式输出结果

        System.out.println(applicationContext.getBean("user2"));

    }

}
为了能看到结果,重写toString方法。
输出:
User [username=tom, password=123456, list=["constructorvalue1", "constructorvalue2"]]
User [username=张三, password=654321, list=["setlistvalue1", "setlistvalue2"]]
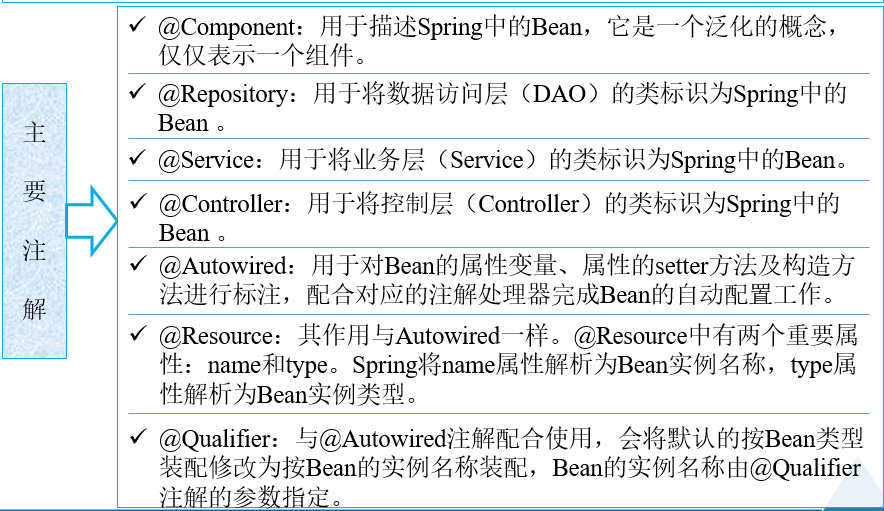
2.52 基于注解(Annotation)的装配
XML文件可以实现Bean的装配工作,但是Bean多时,XML文件臃肿巨大,为后续的维护和升级带来困难。为此,提供了对注解技术的全面支持。
package com.itheima.annotation;

public interface UserDao {

    public void save();

}
package com.itheima.annotation;

import org.springframework.stereotype.Repository;

/**首先使用@Repository注解将UserDaoImpl类标识为Spring中的Bean,相当于配置文件中的

<bean id="userDao" class="com.itheima.annotation.UserDaoImpl"/> 很普通的配置

*/

@Repository("userDao")

public class UserDaoImpl implements UserDao{

   public void save(){

      System.out.println("userdao...save...");

   }

}
package com.itheima.annotation;

public interface UserService {

    public void save();

}
package com.itheima.annotation;

import javax.annotation.Resource;

import org.springframework.stereotype.Service;

/**使用@Service注解将UserServiceImpl类标识为Spring中的Bean,相当于

<bean id="userService" class="com.itheima.annotation.UserServiceImpl"/> 很普通的配置*/

@Service("userService")

public class UserServiceImpl implements UserService{

    /**使用@Resource注解标注属性uesrDao上,相当于配置文件中的

     <property name="userDao" ref="userDao"/>,

     不是普通的配置,依赖注入,将id为userDao的Bean实例注入到userService实例中

     */

    @Resource(name="userDao")

    private UserDao userDao;

    public void save() {

         //调用userDao中的save方法

        this.userDao.save();

        System.out.println("userservice....save...");

    }

    public void setUserDao(UserDao userDao) {

        this.userDao = userDao;

    }

}
package com.itheima.annotation;

import javax.annotation.Resource;

import org.springframework.stereotype.Controller;

/**使用@Controller 注解标注了 UserController类,这相当于配置文件中编写

 <bean id="userController" class="com.itheima.annotation.UserController"/>;普通配置

*/

@Controller("userController")

public class UserController {

    /**

     @Resource 注解标注在userService属性上,相当于配置文件中编写

     <property name="userService" ref="userService"/>,依赖注入

     */

    @Resource(name="userService")

    private UserService userService;

    public void save(){

        this.userService.save();

        System.out.println("userController...save...");

    }

    public void setUserService(UserService userService) {

        this.userService = userService;

    }

}
<?xml version="1.0" encoding="UTF-8"?>

<beans xmlns="http://www.springframework.org/schema/beans"

      xmlns:xsi="http://www.w3.org/2001/XMLSchema-instance"

      xmlns:context="http://www.springframework.org/schema/context"

      xsi:schemaLocation="http://www.springframework.org/schema/beans

         http://www.springframework.org/schema/beans/spring-beans-4.3.xsd

            http://www.springframework.org/schema/context

           http://www.springframework.org/schema/context/spring-context-4.3.xsd">

     <!-- 凡出现context都是约束信息,使用 context 命名空间 ,在配置文件中开启相应的注解处理器 -->

     <context:annotation-config />

    <!--使用 context 命名空间 ,通知Spring扫描指定包下所有Bean类,进行注解解析-->

     <context:component-scan base-package="com.itheima.annotation" />

</beans>
package com.itheima.annotation;

import org.springframework.context.ApplicationContext;

import

   org.springframework.context.support.ClassPathXmlApplicationContext;

public class AnnotationAssembleTest {

    public static void main(String[] args) {

        // 定义配置文件路径

        String xmlPath = "com/itheima/annotation/beans6.xml";

        // 加载配置文件

        ApplicationContext applicationContext =

                new ClassPathXmlApplicationContext(xmlPath);

        // 获取UserController实例

        UserController userController =

          (UserController) applicationContext.getBean("userController");

        // 调用UserController中的save()方法

        userController.save();

    }

}
输出:
userdao...save...
userservice....save...
userController...save...
说白了,先配置类Dao,再把Dao用依赖注入的方式注入到Service,再把Service用依赖注入的方式注入到Controller。注解的配置和注入形式不一样,最后在控制层调用say方法,层层往下,先到服务层,再到数据层,数据层(Dao层)是底层,再层层往上分别调用say方法,因此输出顺序是Dao,Service,Controller。
(上述案例中用@Autowired注解替换@Resource也可以达到同样效果)
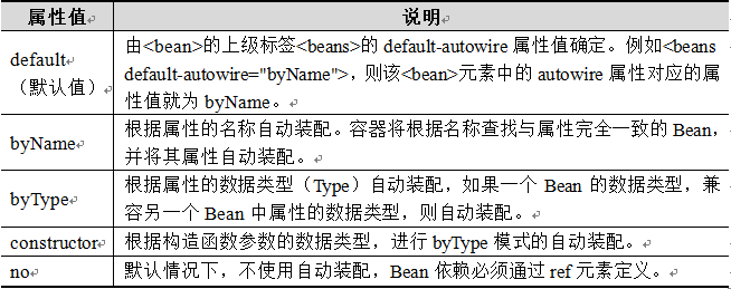
2.53 自动装配
注解方式装配一定程度减少配置文件的代码量,但是也有企业项目是没有使用注解方式开发的,自动装配也可以减少代码量。
Bean元素中包含一个autowire属性,通过属性值来自动装配Bean元素。所谓自动装配,就是将一个Bean自动地注入到其他Bean的Property中。autowire属性有5个值。
XML文件:
<?xml version="1.0" encoding="UTF-8"?>

<beans xmlns="http://www.springframework.org/schema/beans"

      xmlns:xsi="http://www.w3.org/2001/XMLSchema-instance"

      xmlns:context="http://www.springframework.org/schema/context"

      xsi:schemaLocation="http://www.springframework.org/schema/beans

         http://www.springframework.org/schema/beans/spring-beans-4.3.xsd

            http://www.springframework.org/schema/context

           http://www.springframework.org/schema/context/spring-context-4.3.xsd">

        <!-- 使用bean元素的autowire属性完成自动装配 -->

    <bean id="userDao" class="com.itheima.annotation.UserDaoImpl" />

    <bean id="userService"

      class="com.itheima.annotation.UserServiceImpl" autowire="byName" />

    <bean id="userController"

      class="com.itheima.annotation.UserController" autowire="byName"/>

</beans>
用于配置userService和userController的<bean>元素中除了id和class属性外,还增加了autowire属性,并将其属性值设置为byName。在默认情况下,配置文件中要通过ref来装配Bean,但设置了autowire=“byName”后,Spring会自动寻找userService Bean中的属性,并将其属性名称与配置文件中定义的Bean做匹配。由于UserServiceImpl中定义了userDao属性及其setter方法,这与配置文件中的id为userDao的Bean相匹配,所以Spring会自动地将id为userDao的Bean装配到id为userService的Bean中。自动装配同样能完成依赖注入。
第2章 Spring中的Bean的更多相关文章
- spring(四):spring中给bean的属性赋值
spring中给bean的属性赋值 xml文件properties标签设置 <bean id="student" class="com.enjoy.study.ca ...
- JSP访问Spring中的bean
JSP访问Spring中的bean <%@page import="com.sai.comment.po.TSdComment"%> <%@page import ...
- 传统javabean与spring中的bean的区别
javabean已经没人用了 springbean可以说是javabean的发展, 但已经完全不是一回事儿了 用处不同:传统javabean更多地作为值传递参数,而spring中的bean用处几乎无处 ...
- 1.2(Spring学习笔记)Spring中的Bean
一.<Bean>的属性及子元素 在1.1中我们对<Bean>有了初步的认识,了解了一些基本用法. 现在我们进一步理解<Bean>属性及子元素. 我们先来看下< ...
- spring扩展点之二:spring中关于bean初始化、销毁等使用汇总,ApplicationContextAware将ApplicationContext注入
<spring扩展点之二:spring中关于bean初始化.销毁等使用汇总,ApplicationContextAware将ApplicationContext注入> <spring ...
- spring 中的 bean 是线程安全的吗?
spring 中的 bean 是线程安全的吗? Spring 不保证 bean 的线程安全. 默认 spring 容器中的 bean 是单例的.当单例中存在竞态条件,即有线程安全问题.如下面的例子 计 ...
- Spring 中的bean 是线程安全的吗?
结论: 不是线程安全的 Spring容器中的Bean是否线程安全,容器本身并没有提供Bean的线程安全策略,因此可以说Spring容器中的Bean本身不具备线程安全的特性,但是具体还是要结合具体sco ...
- Spring中与bean有关的生命周期
前言 记得以前的时候,每次提起Spring中的bean相关的生命周期时,内心都无比的恐惧,因为好像有很多,自己又理不清楚,然后看网上的帖子,好像都是那么一套,什么beanFactory啊,aware接 ...
- 【Spring】Spring中的Bean - 5、Bean的装配方式(XML、注解(Annotation)、自动装配)
Bean的装配方式 简单记录-Java EE企业级应用开发教程(Spring+Spring MVC+MyBatis)-Spring中的Bean 文章目录 Bean的装配方式 基于XML的装配 基于注解 ...
随机推荐
- 025 Linux基础入门-----历史、简介、版本、安装
1.linux历史 Linux最初是由芬兰赫尔辛基大学学生Linus Torvalds由于自己不满意教学中使用的MINIX操作系统, 所以在1990年底由于个人爱好设计出了LINUX系统核心.后来发布 ...
- 显示 Uncaught TypeError: Cannot read property 'dialog' of undefined”的错误解决方法
最近在做一个基于easyUI的列表,新增功能的弹出框是以这样的方式: 运行测试的时候,报了这一堆的错误Uncaught TypeError: Cannot read property 'dialog' ...
- Linux学习笔记之Linux磁盘及文件系统管理笔记
Linux磁盘及文件系统管理 CPU,memory(RAM),I/O i/o: disks,ehtercard disks:持久存储数据 接口类型: IDE(ata): 并口,133MB/s;并行总线 ...
- c# 基本类型存储方式的研究
基本单位 二进制,当前的计算机系统使用的基本上是二进制系统.二进制的单位是位,每一位可以表示2个数: 0或1.byte(字节) 有8位,可以表示的数为2的8次方,即256个数,范围为[0-255]. ...
- CorelDRAW 学习笔记(一)
基本图形 等比例图形:按住 Ctrl 拖拽 以中心为起点等比例缩放:按住 Shift 拖拽 快捷键: 矩形:F6 圆形:F7 多边形:Y 双击矩形工具,可以直接创建一个页面大小的矩形对象: 对象对齐 ...
- C# Dapper 的简单实用
首先引入dapper PM>Install-Package Dapper -Version 2.0.4 (可能会出现因版本问题而安装失败详情见官网:https://stackexchange. ...
- wangeditor视频
wangeditor网址http://www.wangeditor.com/ 目前使用的是3.11版本 使用步骤 1.引用wangEditor.min.js 2.代码 2.1 取得函数var E = ...
- Python进阶----pymysql模块的使用,单表查询
Python进阶----pymysql模块的使用,单表查询 一丶使用pymysql 1.下载pymysql包: pip3 install pymysql 2.编写代码 ...
- Java虚拟机是怎么new的对象?
本文涉及:Java中的new命令之后发生的事 类加载检查 java虚拟机在遇到一条 new 指令时,首先会检查是否能在常量池中定位到这个类的符号引用,并且是否已被加载过.解析和初始化过.如果没有,那必 ...
- DataPipeline数据融合重磅功能丨一对多实时分发、批量读取模式
为能更好地服务用户,DataPipeline最新版本支持: 1. 一个数据源数据同时分发(实时或定时)到多个目的地: 2. 提升Hive的使用场景: 写入Hive目的地时,支持选择任意目标表字段作为 ...