
.net core 使用ClaimsIdentity实现登录授权
一、新建用户
1、先新建一个用户表,用户存储用户信息。
     public class UserInfo

     {

         public const string Salt = "cesi";

         [Key]

         [DatabaseGenerated(DatabaseGeneratedOption.Identity)]

         public Guid Id { get; set; }

         [Required]

         public string UserName { get; set; }

         [Required]

         public string PassWord { get; set; }

         public string CreateTime { get; set; }

     }
2、新建一个添加用户的接口,添加一个用户,方便后面测试。
         [HttpPost]

         public async Task<IActionResult> AddUser([FromForm]UserInfo model)

         {

             if (_context.UserInfo.Any(s => model.UserName.Equals(s.UserName)))

             {

                 return Ok(new

                 {

                     code = ResultCode.Error,

                     message = "用户名称已存在,请确认!"

                 });

             }

             model.CreateTime = DateTime.Now.ToString("yyyy-MM-dd HH:mm:ss");

             var pwd = model.PassWord;

             var passWordAndSaltBytes = Encoding.UTF8.GetBytes(pwd + UserInfo.Salt);

             var hashBytes = new SHA256Managed().ComputeHash(passWordAndSaltBytes);

             string hashString = Convert.ToBase64String(hashBytes);

             model.PassWord = hashString;

             await _context.AddAsync(model);

             await _context.SaveChangesAsync();

             return Ok(new

             {

                 code = ResultCode.Success,

                 message = "创建用户信息成功!"

             });

         }
3、调用接口添加用户信息。
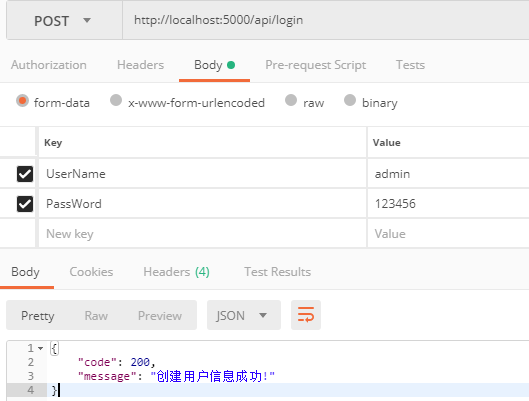
二、实现用户登录
1、实现用户登录
         [HttpPost("login")]

         public async Task<IActionResult> Login([FromForm]LoginModel model)

         {

             var passWordAndSaltBytes = Encoding.UTF8.GetBytes(model.PassWord + UserInfo.Salt);

             var hashBytes = new SHA256Managed().ComputeHash(passWordAndSaltBytes);

             string hashString = Convert.ToBase64String(hashBytes);

             var userInfo = _context.UserInfo.AsNoTracking().FirstOrDefault(p => p.UserName == model.UserName && p.PassWord == hashString);

             if (userInfo == null)

             {

                 return Ok(new { code = ResultCode.NotLogin, message = "用户名或密码错误" });

             }

             var httpcontext = _httpContextAccessor.HttpContext;

             var claimsIdentity = new ClaimsIdentity("Cookie");

             claimsIdentity.AddClaim(new Claim(ClaimTypes.NameIdentifier, userInfo.Id.ToString()));

             claimsIdentity.AddClaim(new Claim(ClaimTypes.Name, model.UserName));

             var claimsPrincipal = new ClaimsPrincipal(claimsIdentity);

             await HttpContext.SignInAsync(CookieAuthenticationDefaults.AuthenticationScheme, claimsPrincipal);

             return Ok(new { code = ResultCode.Success, message = "登录成功", data = userInfo });

         }
2、调用登录接口,测试

三、Setup配置
         public void ConfigureServices(IServiceCollection services)

         {

             services.Configure<CookiePolicyOptions>(options =>

             {

                 options.CheckConsentNeeded = context => true;

                 options.MinimumSameSitePolicy = SameSiteMode.None;

             });

             services.AddAuthentication(CookieAuthenticationDefaults.AuthenticationScheme)

             .AddCookie(options =>

             {

                 options.LoginPath = "/api/Login/Index";

                 options.AccessDeniedPath = "/api/Login/Denied";

             });

             services.AddSession(options =>

             {

                 options.IdleTimeout = TimeSpan.FromSeconds();

                 options.Cookie.HttpOnly = true;

             });

             services.AddCors(options =>

             {

                 string[] CorsOrigins = Configuration["CorsOrigins"].Split(';');

                 options.AddPolicy("AnyCors",

                     policy => policy.WithOrigins(CorsOrigins)

                     .AllowAnyHeader()

                     .AllowAnyMethod()

                     .AllowCredentials());

             });

             string connecttext = Configuration.GetConnectionString("Sqlite");

             services.AddDbContext<SqlContext>(options => options.UseSqlite(connecttext), ServiceLifetime.Singleton);

             services.AddSingleton<IHttpContextAccessor, HttpContextAccessor>();

             services.AddMvc().SetCompatibilityVersion(CompatibilityVersion.Version_2_2);

         }

         public void Configure(IApplicationBuilder app, IHostingEnvironment env)

         {

             if (env.IsDevelopment())

             {

                 app.UseDeveloperExceptionPage();

             }

             else

             {

                app.UseHsts();

             }

             app.UseAuthentication();

             app.UseCors("AnyCors");

             app.UseHttpsRedirection();

             app.UseCookiePolicy();

             app.UseStaticFiles();

             app.UseMvc();

         }
.net core 使用ClaimsIdentity实现登录授权的更多相关文章
- ASP.Net Core 2.1+ Cookie 登录授权验证【简单Cookie验证】
介绍 本文章发布于博客园:https://www.cnblogs.com/fallstar/p/11310749.html 作者:fallstar 本文章适用于:ASP.NET Core 2.1 + ...
- Asp.Net Core 2.0 项目实战(10) 基于cookie登录授权认证并实现前台会员、后台管理员同时登录
1.登录的实现 登录功能实现起来有哪些常用的方式,大家首先想到的肯定是cookie或session或cookie+session,当然还有其他模式,今天主要探讨一下在Asp.net core 2.0下 ...
- net core体系-web应用程序-4asp.net core2.0 项目实战(1)-12基于cookie登录授权认证并实现前台会员、后台管理员同时登录
1.登录的实现 登录功能实现起来有哪些常用的方式,大家首先想到的肯定是cookie或session或cookie+session,当然还有其他模式,今天主要探讨一下在Asp.net core 2.0下 ...
- Asp .Net Core 2.0 登录授权以及多用户登录
用户登录是一个非常常见的应用场景 .net core 2.0 的登录方式发生了点变化,应该是属于是良性的变化,变得更方便,更容易扩展. 配置 打开项目中的Startup.cs文件,找到Configur ...
- Asp .Net Core 2.0 登录授权以及前后台多用户登录
用户登录是一个非常常见的应用场景 .net core 2.0 的登录方式发生了点变化,应该是属于是良性的变化,变得更方便,更容易扩展. 配置 打开项目中的Startup.cs文件,找到Configur ...
- 零开始:NetCore项目权限管理系统:登录授权
喜欢NetCore的朋友,欢迎加群QQ:86594082 源码地址:https://github.com/feiyit/SoaProJect 管理员的模型 namespace FytSoa.Core. ...
- 使用JWT的ASP.NET CORE令牌身份验证和授权(无Cookie)——第1部分
原文:使用JWT的ASP.NET CORE令牌身份验证和授权(无Cookie)--第1部分 原文链接:https://www.codeproject.com/Articles/5160941/ASP- ...
- .NET Core中的鉴权授权正确方式(.NET5)
一.简介 前后端分离的站点一般都会用jwt或IdentityServer4之类的生成token的方式进行登录鉴权.这里要说的是小项目没有做前后端分离的时站点登录授权的正确方式. 一.传统的授权方式 这 ...
- 网站微信登录授权 ASP.NET
最新做一些项目都有微信登录注册什么的,今天就把自己整理的demo提供给大家 微信认证流程(我自己简称三次握手): 1.用户同意授权,获取code 2.通过code换取网页授权access_token, ...
随机推荐
- Python学习之--列表
一.列表表示: 用方括号([] )来表示列表,并用逗号来分隔其中的元素,索引从0开始,如下 二.修改元素 三.添加元素: 1. append 2. insert 四. 删除元素: 1. del 2. ...
- orm-配置不启动项目自动查询orm
配置 #!/usr/bin/env python import os import sys if __name__ == "__main__": os.environ.setdef ...
- Ubuntu16.4 内核降级
.cp /etc/apt/sources.list /etc/apt/sources.list.bak #备份sources.list .vi /etc/apt/sources.list #在sour ...
- ORA-01033:ORACLE initialization or shutdown
ora-01033 错误处理:DOS下依次执行以下命令sqlplus/nologconnect sys/密码@orcl as sysdbashutdown normalstartup mountSQL ...
- CAN信号转以太网究竟怎么回事?TCP转CAN又是什么?
首先说说can总线. can总线是目前工业控制领域应用最广的现场总线,它可以实现远距离信息的传输,是各种设备和各类功能部件之间传送信息的公用通道,它是由导线组成的传输线束,用于连接体统中的各个节点,传 ...
- note_4.10
单位根反演 \[ \frac{1}{k}\sum_{i=0}^{k-1}\omega_k^{in}=[k|n] \] 所以 \[ \begin{equation} \begin{split} \sum ...
- el-select定义初始值并且可以修改
[](https://img2018.cnblogs.com/blog/1338470/201811/1338470-20181112152013318-1731627947.png <el-f ...
- 怎么样在vue-cli的项目里面引入element ui
第一步:先进入到项目里面 npm i element-ui -S 第二步: import Vue from 'vue'; import ElementUI from 'element-ui'; //这 ...
- CSS(1)
使用CSS的注意点: 1.style标签必须写在head标签的开始标签和结束标签之间(也就是必须和title标签是兄弟关系). 2.style标签中的type属性其实可以不用写,默认就是type=&q ...
- 网络IPC:套接字接口概述
网络IPC:套接字接口概述 套接字接口实现了通过网络连接的不同计算机之间的进程相互通信的机制. 套接字描述符(创建套接字) 套接字是通信端点的抽象,为创建套接字,调用socket函数 #include ...