python接口自动化框架
接口测框架
安装教程
- 需要3.5及以上版本的python
- pip install -r requirements.txt
使用说明
- 运行manage.py创建项目
- 创建的项目在projects目录下
- 在项目的cases目录下编写测试用例,可以参考litemall项目中如何编写测试用例
- 执行项目目录下的run.py运行所有测试用例
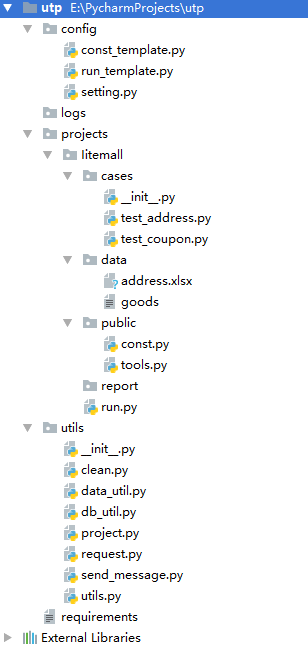
一、config配置文件
三个文件:
const_template.py
run_template.py
setting.py
文件代码:
const_template.py
 import os

 host = 'http://ip:port'  # 测试环境地址

 project_path = os.path.dirname(os.path.dirname(os.path.abspath(__file__)))

 data_path = os.path.join(project_path, 'data')  # 存测试数据的目录
 report_path = os.path.join(project_path, 'report')  # 存报告的目录
 case_path = os.path.join(project_path, 'cases')  # 存测试用例的目录
run_template.py
 from utils.send_message import send_mail
 from config.setting import email_template
 from projects.Iitemall.public.const import case_path, report_path
 import nnreport as bf
 import datetime
 import unittest
 import os
 import sys

 root_dir = os.path.dirname(
     os.path.dirname(
         os.path.dirname(
             os.path.abspath(__file__))))
 # 项目根目录,加入环境变量,否则直接在命令行里面运行的时候有问题, 找不到其他的模块
 sys.path.insert(0, root_dir)

 def run():
     test_suite = unittest.defaultTestLoader.discover(case_path, 'test*.py')
     # 这里是指定找什么开头的.py文件,运行用例的时候可以自己改
     report = bf.BeautifulReport(test_suite)
     title = '{project_name}_测试报告'
     filename = title + '_' + datetime.datetime.now().strftime('%Y%m%d%H%M%S') + '.html'
     report.report(description=title,
                   filename=filename,
                   log_path=report_path)
     email_content = email_template.format(pass_count=report.success_count,
                                           fail_count=report.failure_count,
                                           all_count=report.success_count + report.failure_count)

     report_abs_path = os.path.join(report_path, filename)
     send_mail(filename, email_content, report_abs_path)

 if __name__ == '__main__':
     run()
setting.py
 import os
 import nnlog

 mysql_info = {
     'default':
         {
             'host': 'ip',
             'port': 3306,
             'user': 'dbuser',
             'password': 'dbpassword',
             'db': 'db',
             'charset': 'utf8',
         }
 }  # 数据库配置,多个数据库,在字典里加key就可以了

 redis_info = {
     'default': {
         'host': 'ip',
         'port': 6379,
         'db': 0,
         'decode_responses': True
     }
 }  # redis配置,多个数据库,在字典里加key就可以了

 email_info = {
     'host': 'smtp.163.com',  #
     'user': 'binzi_chen@163.com',  # 用户
     'password': '5tgb6yhn',  # 密码
     'port': 465,
 }

 email_to = ['binzichen@126.com']
 email_cc = ['zibin.chen@mhp.com']

 base_path = os.path.dirname(os.path.dirname(os.path.abspath(__file__)))
 log_path = os.path.join(base_path, 'logs', 'utp.log')  # 指定日志文件
 projects_path = os.path.join(base_path, 'projects')  # 项目目录
 log = nnlog.Logger(log_path)

 email_template = '''
 各位好:
     本次接口测试结果如下:总共运行{all_count}条用例,通过{pass_count}条,失败【{fail_count}】条。
     详细信息请查看附件。
 '''  # 邮件模板
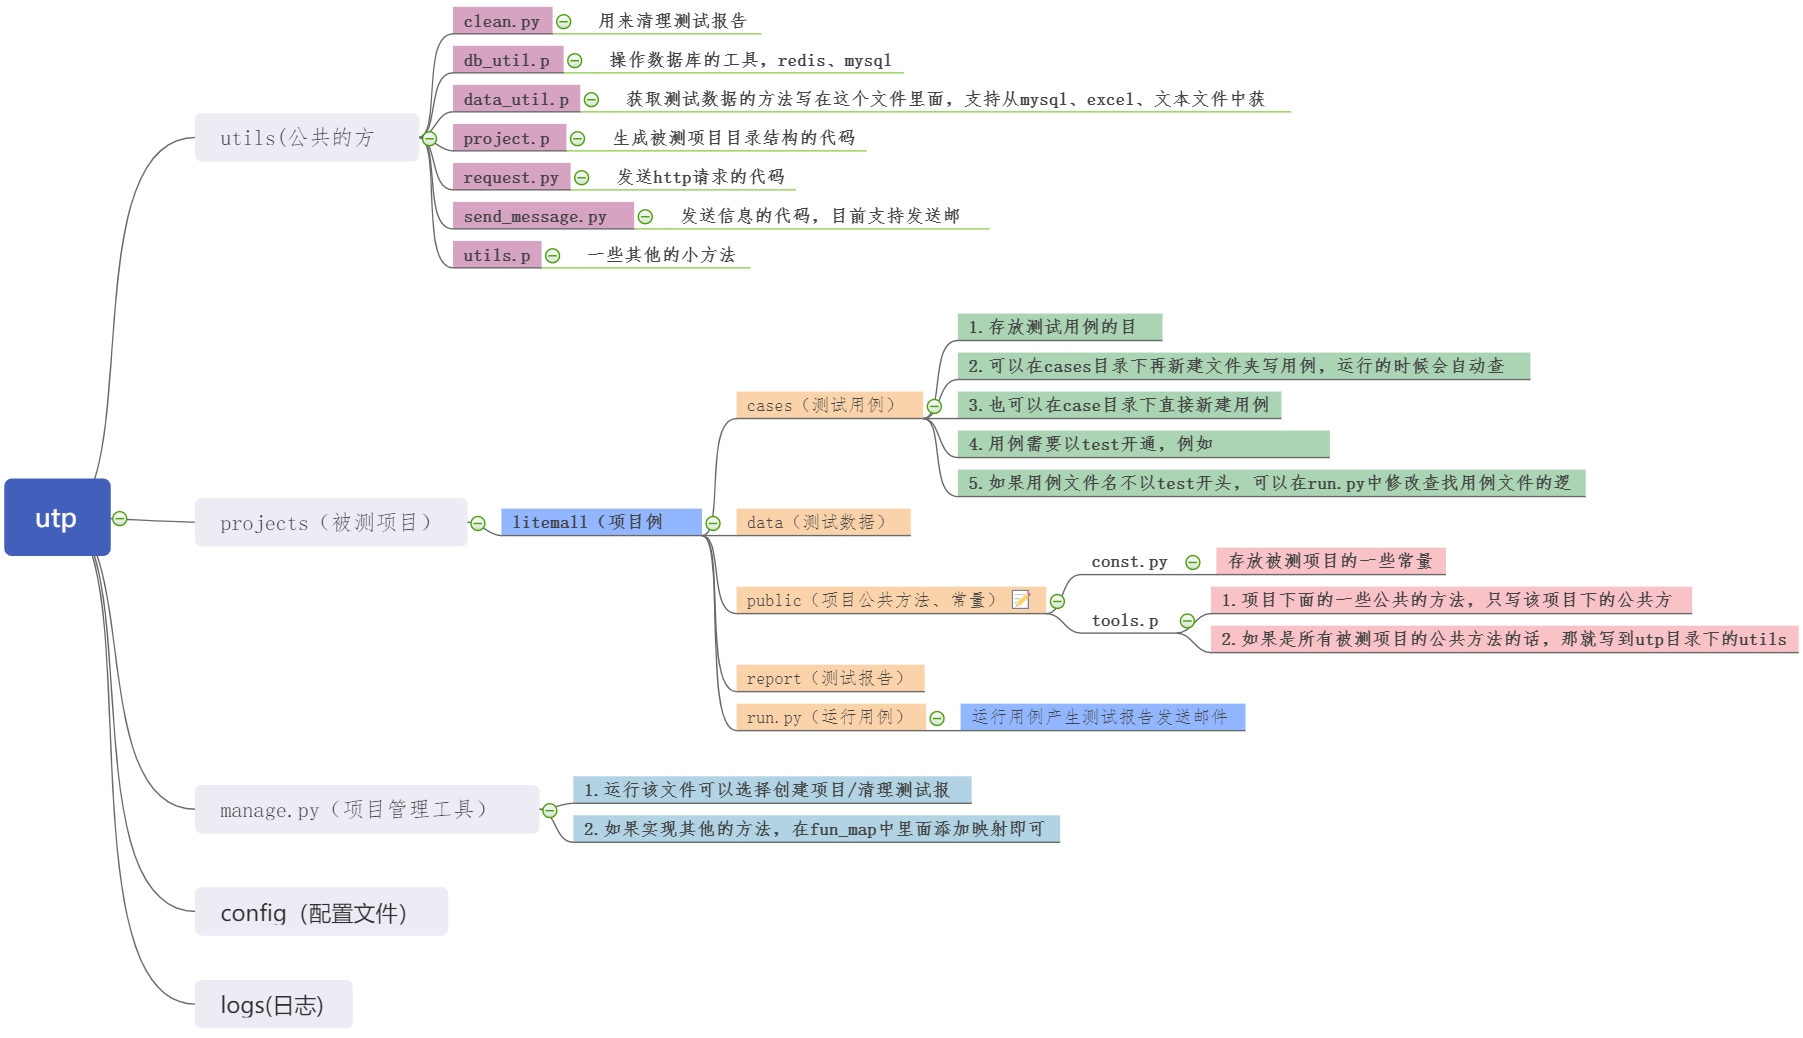
一、utils公共方法
该文件夹为python文件夹,需待__init__.py文件
七个文件:
clean.py
data_util.py
db_util.py
project.py
request.py
send_message.py
utils.py
文件代码:
clean.py
 import os
 import time
 from config.setting import projects_path

 def clean_report(days=10):
     '''清理测试报告'''
     for cur_dir, dirs, files in os.walk(projects_path):  # 递归获取项目目录下所有文件夹
         if cur_dir.endswith('report'):  # 判断如果文件夹是report的话,获取文件夹下面的文件
             for report in files:
                 if report.endswith('.html'):  # 如果是.html结尾的
                     report_path = os.path.join(cur_dir, report)
                     if os.path.getctime(
                             report_path) < time.time() - 60 * 60 * 24 * days:
                         os.remove(report_path)
data_util.py
 import os
 import xlrd

 from config.setting import log
 from .db_util import get_mysql_connect

 class GetTestData:
     @staticmethod
     def data_for_txt(file_name):
         '''
         从文本文件里面获取参数化数据
         :param file_name: 文件名
         :return:二维数组
         '''
         log.debug('开始读取参数化文件%s' % file_name)
         if os.path.exists(file_name):
             with open(file_name, encoding='utf-8') as fr:
                 data = []
                 for line in fr:
                     if line.strip():
                         line_data = line.strip().split(',')
                         data.append(line_data)
             return data
         log.error('%s参数化文件不存在' % file_name)
         raise Exception('%s参数化文件不存在' % file_name)

     @staticmethod
     def data_for_excel(file_name, sheet_name=None):
         '''
         从excel里面读参数化数据
         :param file_name: 文件名
         :param sheet_name: sheet页名字,默认不写取第一个sheet页
         :return: 二维数组
         '''
         log.debug('开始读取参数化文件%s' % file_name)
         if os.path.exists(file_name):
             data = []
             book = xlrd.open_workbook(file_name)
             if sheet_name:
                 sheet = book.sheet_by_name(sheet_name)
             else:
                 sheet = book.sheet_by_index(0)
             for row_num in range(1, sheet.nrows):
                 row_data = sheet.row_values(row_num)
                 data.append(row_data)
             return data
         log.error('%s参数化文件不存在' % file_name)
         raise Exception('%s参数化文件不存在' % file_name)

     @staticmethod
     def data_for_mysql(sql, db_config='default'):
         '''
         从数据库里面获取测试数据
         :param sql:sql语句
         :param db_config:从配置文件里面配置的mysql信息
         :return:从数据库里面查出来的二维数组
         '''
         mysql = get_mysql_connect(db_config)
         return mysql.get_list_data(sql)
db_util.py
 import pymysql
 import redis
 from config.setting import mysql_info, redis_info

 class Mysql:
     def __init__(self, host, user, password, db, port=3306, charset='utf8'):
         # 构造函数,类在实例化的时候会自动执行构造函数
         self.db_info = {'user': user, 'password': password, "db": db, "port": port, 'charset': charset,
                         'autocommit': True, 'host': host}
         self.__connect()

     def __del__(self):
         self.__close()

     def __connect(self):
         try:
             self.conn = pymysql.connect(**self.db_info)  # 建立连接
         except Exception as e:
             raise Exception("连接不上数据库,请检查数据库连接信息")

         else:
             self.__set_cur()  # 设置游标

     def execute_many(self, sql):
         self.cur.execute(sql)
         return self.cur.fetchall()

     def execute_one(self, sql):
         self.cur.execute(sql)
         return self.cur.fetchone()

     def __set_cur(self, type=pymysql.cursors.DictCursor):  # 设置游标,默认是字典类型
         self.cur = self.conn.cursor(cursor=type)

     def get_list_data(self, sql):
         '''从数据库获取到的数据是list'''
         self.__set_cur(type=None)  # 设置游标为空,返回的就不是字典了
         self.cur.execute(sql)
         self.__set_cur()  # 查完之后重新设置游标为字典类型
         return self.cur.fetchall()

     def __close(self):
         self.conn.close()
         self.cur.close()

 def get_redis_connect(name='default'):
     '''获取redis连接,如果不传name,获取默认的链接'''
     redis_config = redis_info.get(name)
     return redis.Redis(**redis_config)

 def get_mysql_connect(name='default'):
     '''获取mysql连接,如果不传name,获取默认的链接'''
     mysql_config = mysql_info.get(name)
     return Mysql(**mysql_config)
project.py
 import os

 class Project:
     base_path = os.path.dirname(
         os.path.dirname(
             os.path.abspath(__file__)))  # 工程目录
     projects_path = os.path.join(base_path, 'projects')  # 项目目录
     child_dirs = ['cases', 'data', 'report', 'public']

     def __init__(self, project_name):
         self.project_name = project_name
         self.project_path = os.path.join(
             self.projects_path, project_name)  # 要创建的项目目录

     def create_project(self):
         '''校验项目是否存在,不存在的话,创建'''
         if os.path.exists(self.project_path):
             raise Exception("项目已经存在!")
         else:
             os.mkdir(self.project_path)

     def create_init_py(self, path):
         '''
         创建__init__.py文件
         :param path: 路径
         :return:
         '''
         py_file_path = os.path.join(path, '__init__.py')
         self.write_content(py_file_path, '')  # 打开一个空文件

     def create_dir(self, ):
         '''创建项目下面的子目录'''
         for dir in self.child_dirs:
             dir_path = os.path.join(self.project_path, dir)
             os.mkdir(dir_path)
             if dir == 'cases':  # 如果是cases文件夹的话,创建__init__.py
                 # cases是个package查找用例的时候才会找到那个目录下所有子目录里面的测试用例
                 self.create_init_py(dir_path)

     def create_run_py(self):
         '''生成run.py'''
         run_template_path = os.path.join(
             self.base_path, 'config', 'run_template')
         content = self.get_template_content(
             run_template_path).format(project_name=self.project_name)
         run_file_path = os.path.join(self.project_path, 'run.py')
         self.write_content(run_file_path, content)

     def create_const_py(self):
         '''生成const.py'''
         run_template_path = os.path.join(
             self.base_path, 'config', 'const_template')
         content = self.get_template_content(run_template_path)
         run_file_path = os.path.join(self.project_path, 'public', 'const.py')
         self.write_content(run_file_path, content)

     def main(self):
         '''创建项目'''
         self.create_project()  # 创建项目
         self.create_dir()  # 创建项目下面的文件夹
         self.create_run_py()  # 创建run.py
         self.create_const_py()  # 创建const.py

     @staticmethod
     def get_template_content(file_name):
         '''读取文件内容'''
         with open(file_name, encoding='utf-8') as fr:
             return fr.read()

     @staticmethod
     def write_content(file, content):
         '''写入文件'''
         with open(file, 'w', encoding='utf-8') as fw:
             fw.write(content)
request.py
 import requests
 # 反射

 class MyRequest:
     def __init__(self, url, method='get', data=None,
                  headers=None, is_json=True):
         method = method.lower()
         self.url = url
         self.data = data
         self.headers = headers
         self.is_json = is_json
         if hasattr(self, method):
             getattr(self, method)()

     def get(self):
         try:
             req = requests.get(
                 self.url,
                 self.data,
                 headers=self.headers).json()
         except Exception as e:
             self.response = {"error": "接口请求出错%s" % e}
         else:
             self.response = req

     def post(self):
         try:
             if self.is_json:
                 req = requests.post(
                     self.url,
                     json=self.data,
                     headers=self.headers).json()
             else:
                 req = requests.post(
                     self.url, self.data, headers=self.headers).json()
         except Exception as e:
             self.response = {"error": "接口请求出错%s" % e}
         else:
             self.response = req
send_message.py
 import yamail
 import traceback
 from config.setting import email_info, email_cc, email_to, log

 def send_mail(subject, content, files=None):
     '''
     发送邮件
     :param subject:主题
     :param content: 内容
     :param files: 附件
     :return:
     '''
     try:
         smtp = yamail.SMTP(**email_info)
         smtp.send(subject=subject, contents=content,
                   to=email_to, cc=email_cc, attachments=files)
     except Exception as e:
         log.error("发送邮件失败+%s" % traceback.format_exc())

 def send_sms():
     '''
     发送短信验证码
     :return:
     '''
     pass
utils.py
 import jsonpath

 def get_value(dic, key):
     '''
     这个函数是从一个字典里面,根据key获取vlaue
     :param dic:传一个字典
     :param key:传一个
     :return:如果有,返回key取到value,如果key没有,返回空字符串
     '''
     result = jsonpath.jsonpath(dic, '$..%s' % key)
     if result:
         return result[0]
     return ''
三、 Projects项目模块(litemall项目)
四个文件夹和一个python文件:
cases(python文件夹)
test_address.py
test_coupon.py
data (存放测试数据)
address.xlsx
goods.txt
public
const.py (存放测试常量)
tools.py
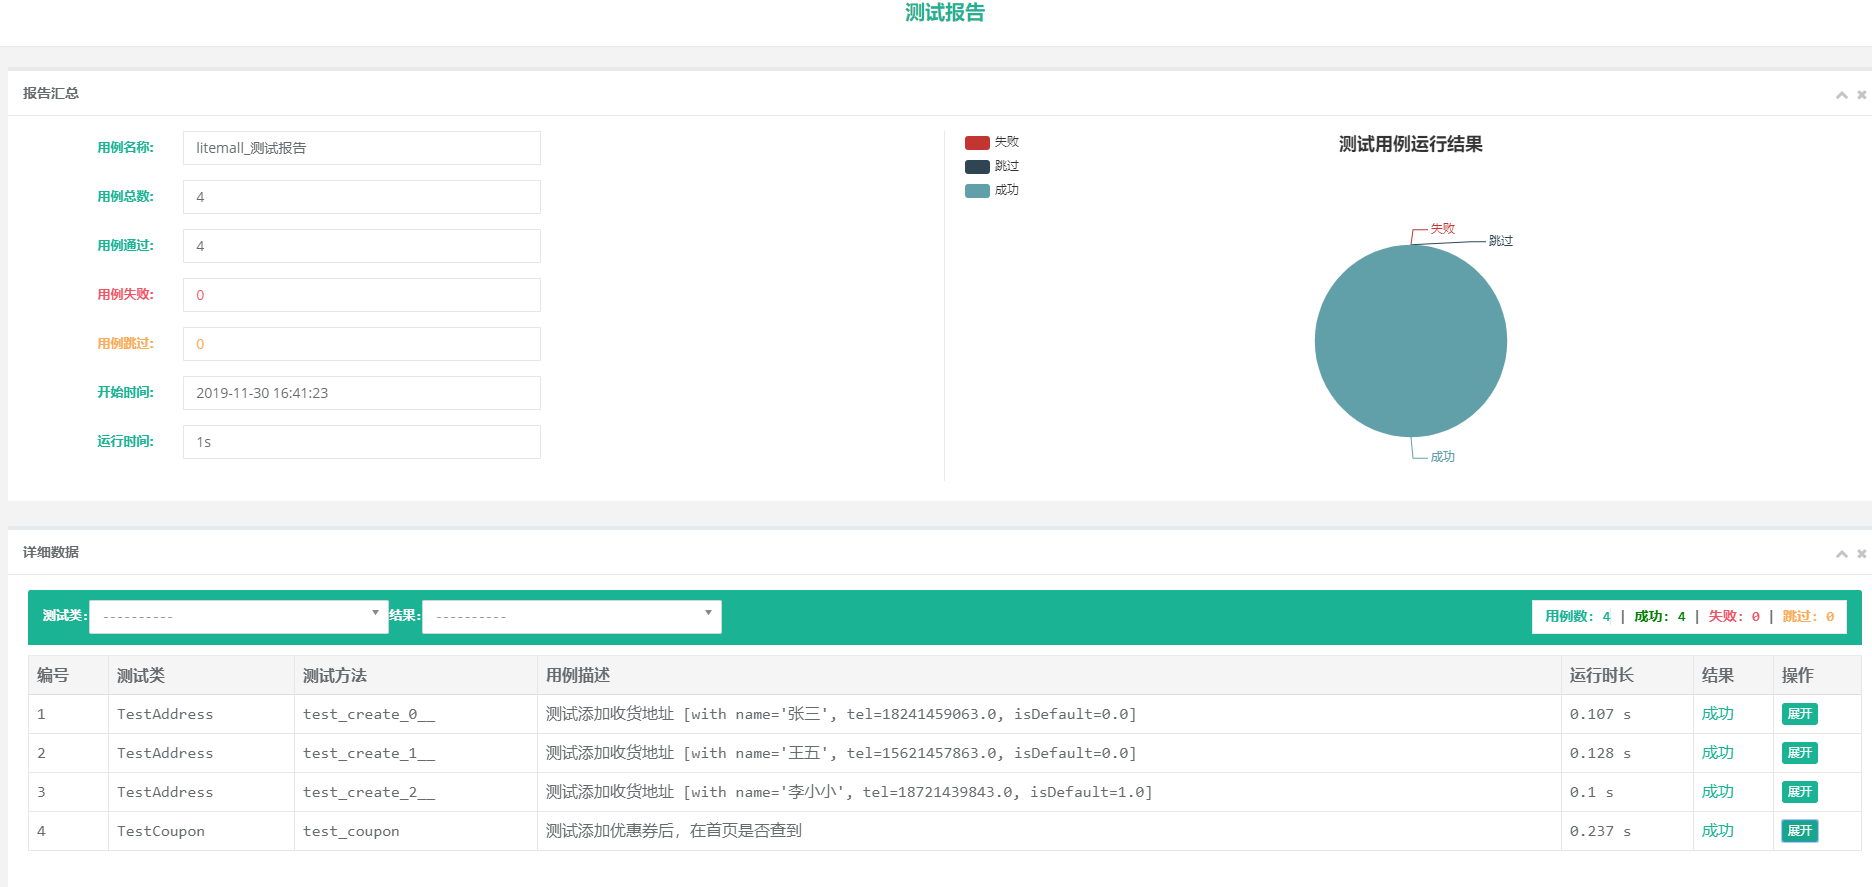
report
run.py
文件代码:
test_address.py
 import unittest
 import parameterized
 import os
 from urllib.parse import urljoin
 from projects.litemall.public.const import host, test_user, data_path
 from projects.litemall.public import tools
 from utils.request import MyRequest
 from utils.db_util import get_mysql_connect
 from utils.data_util import GetTestData

 address_data_path = os.path.join(data_path, 'address.xlsx')  # 拼接测试数据文件的路径
 test_address_data = GetTestData.data_for_excel(address_data_path)  # 获取参数化使用的数据

 class TestAddress(unittest.TestCase):
     url = urljoin(host, '/wx/address/save')

     @classmethod
     def setUpClass(cls):
         # cls.mysql = get_mysql_connect()  # 获取mysql连接
         token = tools.WxLogin(**test_user).get_token()  # 登录获取token
         cls.header = {'X-Litemall-Token': token}  # 拼header

     @parameterized.parameterized.expand(test_address_data)  # 参数化
     def test_create(self, name, tel, isDefault):
         '''测试添加收货地址'''
         is_default = True ' else False
         data = {
             "name": name,
             "tel": "%d" % tel,
             "country": "",
             "province": "北京市",
             "city": "市辖区",
             "county": "东城区",
             ",
             "postalCode": "",
             "addressDetail": "西二旗",
             "isDefault": is_default
         }
         req = MyRequest(
             self.url,
             'post',
             data=data,
             headers=self.header)  # 发请求
         self.assertEqual(0, req.response.get('errno'), msg='添加失败')  # 校验错误码是否为0
         address_id = req.response.get('data')
         # sql = 'select name from litemall_address where id = %s;' % address_id
         # db_data = self.mysql.execute_one(sql)
         # self.assertIsNotNone(db_data, msg='litemall:查询地址不存在')#校验是否从数据库查到数据
         # self.assertEqual(db_data.get('name'), name) #判断数据库存的名字和添加的名字是否一样
test_coupon.py
 import unittest
 from urllib.parse import urljoin
 from projects.Iitemall.public.const import host, test_admin_user
 from projects.Iitemall.public import tools
 from utils.request import MyRequest
 from utils.utils import get_value

 class TestCoupon(unittest.TestCase):

     @classmethod
     def setUpClass(cls):
         token = tools.AdminLogin(**test_admin_user).get_token()  # 登录获取token
         cls.header = {'X-Litemall-Admin-Token': token}  # 拼header

     def add_coupon(self):
         url = urljoin(host, '/admin/coupon/create')
         name = 'Python自动化测试优惠券'
         data = {
             "name": name,
             "desc": "介绍",
             ",
             ",
             ",
             "limit": 1,
             "type": 0,
             "status": 0,
             "goodsType": 0,
             "goodsValue": [],
             "timeType": 0,
             ",
             "startTime": None,
             "endTime": None
         }
         req = MyRequest(url, 'post', data=data, headers=self.header)
         print(req.response)
         self.assertEqual(0, req.response.get('errno'), msg='添加失败')
         coupon_id = get_value(req.response, 'id')
         return name, coupon_id

     def test_coupon(self):
         '''测试添加优惠券后,在首页是否查到'''
         url = urljoin(host, '/wx/coupon/list')
         name, id = self.add_coupon()  # 添加优惠券
         req = MyRequest(url)
         coupon_list = get_value(req.response, 'list')
         tag = False
         for coupon in coupon_list:
             if name == coupon.get('name') and coupon.get('id') == id:
                 tag = True
                 break
         self.assertTrue(tag, msg='添加的优惠券查不到')
const.py
 import os
 host = 'http://proxy.nnzhp.cn'

 test_user = {
     'username': 'user123',
     'password': 'user123'
 }  # 测试用户

 test_admin_user = {
     'username': 'admin123',
     'password': 'admin123'
 }  # 测试用户

 project_path = os.path.dirname(os.path.dirname(os.path.abspath(__file__)))

 data_path = os.path.join(project_path, 'data')  # 存测试数据的目录
 report_path = os.path.join(project_path, 'report')  # 存报告的目录
 case_path = os.path.join(project_path, 'cases')  # 存测试用例的目录
tools.py
 from utils.utils import get_value
 from utils.request import MyRequest
 from config.setting import log
 from urllib import parse
 from .const import host

 class AdminLogin:
     '''admin登录'''
     url = parse.urljoin(host, '/admin/auth/login')  # 拼接url

     def __init__(self, username, password):
         self.username = username
         self.password = password

     def get_token(self):
         data = {'username': self.username, 'password': self.password}
         req = MyRequest(self.url, 'post', data=data, is_json=True)
         token = get_value(req.response, 'token')
         log.debug("登录的返回结果,%s" % req.response)
         if token:
             return token
         log.error('litemall:登录失败' % req.response)
         raise Exception('登录失败,错误信息%s' % req.response)

 class WxLogin(AdminLogin):
     '''Wx登录'''
     url = parse.urljoin(host, '/wx/auth/login')
run.py
 import unittest
 import datetime
 import os
 import nnreport
 from projects.Iitemall.public.const import case_path, report_path
 from config.setting import email_template
 from utils.send_message import send_mail

 def run():
     test_suite = unittest.defaultTestLoader.discover(case_path, 'test*.py')
     # 这里是指定找什么开头的.py文件,运行用例的时候可以自己改
     report = nnreport.BeautifulReport(test_suite)
     title = 'litemall_测试报告'
     filename = title + '_' + datetime.datetime.now().strftime('%Y%m%d%H%M%S') + '.html'
     report.report(description=title,
                   filename=filename,
                   log_path=report_path)
     email_content = email_template.format(pass_count=report.success_count,
                                           fail_count=report.failure_count,
                                           all_count=report.success_count + report.failure_count)

     report_abs_path = os.path.join(report_path, filename)
     send_mail(filename, email_content, report_abs_path)

 if __name__ == '__main__':
     run()
四、必装第三方模块
requirement.txt
nnreport
pymysql
yamail
requests
jsonpath
nnlog
xlrd
redis
parameterized
python接口自动化框架的更多相关文章
- python接口自动化框架搭建
一.在搭建接口自动化测试框架前,我觉得先需要想明白以下几点: ① 目前情况下,绝大部分接口协议是http,所以需要对http协议有个基本的了解,如:http协议请求.响应由哪些部分组成,常用的meth ...
- 【python接口自动化框架-unittest】【一】unittest单元测试框架概念
一.unittst单元测试框架 概念参考:https://docs.python.org/2/library/unittest.html 使用方法:import unittest (引入unittes ...
- 【python接口自动化框架-unittest】如何传参数到下一个case
1.前提 平时我们用unittest的时候,都知道每个test_ 都是相互独立的,但是很多现实情况是,我们下一个接口参数,可能会用到上一个接口返回的json字段,那么,我们怎么去实现呢 2.实例 1. ...
- python3+request接口自动化框架
首次书写博客,记录下写的自动化接口框架,框架比较简单,哈哈哈,算是记录下历程把!~~~ 一.本次框架由python3.6 书写 1.准备代码环境,下载python3.6 下载地址:https:/ ...
- python+request接口自动化框架
python+request接口自动化框架搭建 1.数据准备2.用python获取Excel文件中测试用例数据3.通过requests测试接口4.根据接口返回的code值和Excel对比 但本章只讲整 ...
- 转载:python + requests实现的接口自动化框架详细教程
转自https://my.oschina.net/u/3041656/blog/820023 摘要: python + requests实现的接口自动化框架详细教程 前段时间由于公司测试方向的转型,由 ...
- python接口自动化28-requests-html爬虫框架
前言 requests库的好,只有用过的人才知道,最近这个库的作者又出了一个好用的爬虫框架requests-html.之前解析html页面用过了lxml和bs4, requests-html集成了一些 ...
- python接口自动化24-有token的接口项目使用unittest框架设计
获取token 在做接口自动化的时候,经常会遇到多个用例需要用同一个参数token,并且这些测试用例跨.py脚本了. 一般token只需要获取一次就行了,然后其它使用unittest框架的测试用例全部 ...
- python + requests实现的接口自动化框架详细教程
前段时间由于公司测试方向的转型,由原来的web页面功能测试转变成接口测试,之前大多都是手工进行,利用postman和jmeter进行的接口测试,后来,组内有人讲原先web自动化的测试框架移驾成接口的自 ...
随机推荐
- 慕课网springboot博客系统开发(一)----spring initializr的使用 gradle构建项目
spring initializr工具的地址:https://start.spring.io/:通过它可以很方便的创建springboot项目 这里我们选择使用gradle作为项目的构建工具,此spr ...
- Java连载17-赋值类运算符&字符串的连接运算符
一.赋值运算符 1.赋值类运算符包括两种: (1)基本赋值运算符:= (2)扩展的赋值运算符: += -= *= /= &= 赋值类的运算符优先级:先执行等号右边的表 ...
- 奥展项目笔记01--不同网站,点击工具--开发人员工具F12,显示的页面怎么不一样
开发人员工具F12,显示的页面不一样: 样式1: 样式2: 解决方案:兼容模式和极速模式的开发者工具不一样,改成极速模式就ok了.
- java中的对象、类、包、模块、组件、容器、框架、架构的概念入门
在Java中有那么一些概念:对象.类.包.模块.组件.容器.框架.这些概念都有一个共同的特点,就是[容纳]. 对象(Object) 在Java的世界里,对象是通过属性和方法来分别对应事务所具有的静态属 ...
- js计算两经纬度之间的距离
js如下: // 方法定义 lat,lng function GetDistance( lat1, lng1, lat2, lng2){ var radLat1 = lat1*Math.PI / ...
- python——CSV转Excel
在转换之前,事先需要将csv文件另存为此格式 import pandas as pd def csv_to_xlsx_pd(): csv = pd.read_csv(r'C:\Users\Jery\D ...
- iOS11里判断Safari浏览器是无痕模式还是正常模式?
var isPrivate = false; try { window.openDatabase(null, null, null, null); } catch (_) { isPrivate = ...
- javascript中常用函数
1.js 获取文件后缀名 <script type="text/javascript"> var filename="www/data/index.php&q ...
- 英语cabardine麝香cabardine单词
麝香(cabardine)是麝科动物林麝Moschus berezovskii Flerov. 马麝M. sifanicusPrzewalski或原麝M.moschiferus L.雄体香囊中的干燥分 ...
- 实验吧简单的sql注入3
今天早上起来发现有人评论说我没更新实验吧sql注入3,主要是因为前段时间都去做bugku去了 但是重做这道题发现以前的姿势不行了,exp()报错不再溢出,现在不能用这个姿势,所以这里重新整理了一遍思路 ...