mongodb的分片
分片是把大型数据集合进行分区成更小的可管理的片的过程。
副本集的每一个成员(仲裁节点除外)都一份数据的完整拷贝!
分片的目的:在节省硬件成本的基础上,提高系统的整体性能。但是却增加了管理和性能的开销。
分片集群中的组件:
几个组件协同工作才可以让分片集群正常工作。当他们正常工作时,这个整体就叫做分片集群。
分片集群是由分片,mongos路由器,配置服务器组成。
一个简单的分片集群,结构如下:
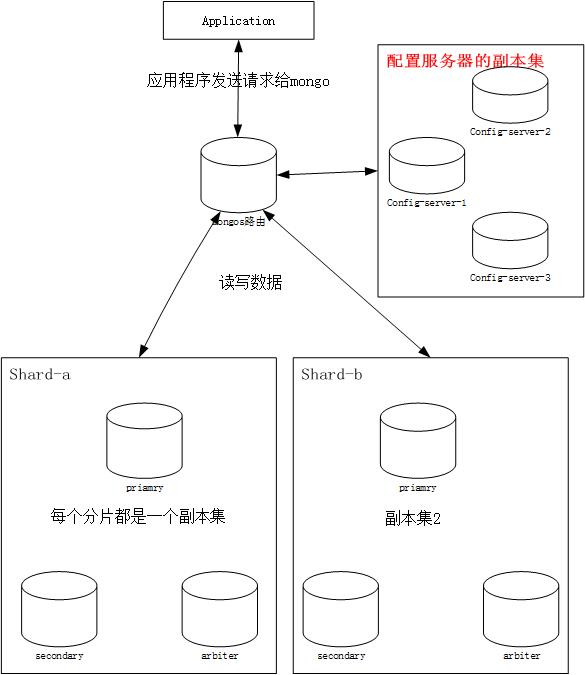
图片中有两个分片: 存储了应用数据。在分片集群中,只有mongos路由器或者系统管理员可以直接连接分片服务器节点。每个分片是个单独的副本集。
mongos路由器:每个分片包含的只是总数据的一部分,所以需要某个东西来路由操作到适当的分片上,这就是路由的作用。mongos缓存了集群元数据并使用它来路由操作到正确的分片路由器。mongos提供给库互端单点连接集群的方式,这使得整个集群看起来像个单点。mongos是个轻量级的,不持久化的。他们通常需要部署在应用程序服务器上。
配置服务器(config-server):存储集群的元数据,包括那个分片包含哪些数据集。这些元数据包含集群配置信息,每个数据库,集合,特定数据的范围位置,以及保存了跨片数据迁移历史的一个修改日志。
配置服务器保存的元数据时集群正常工作和更新维护的关键。例如,每次mongodb启动,mongos都会从配置服务器获取一份元数据拷贝。没有这些数据,就没有办法完整预览这个集群。配置服务器必须部署在单独的冗余机器上。
【从MongoDB 3.2开始,可以将分片群集的配置服务器部署为副本集(CSRS),而不是三个镜像配置服务器(SCCC)。使用配置服务器的副本集可以提高配置服务器的一致性,因为MongoDB可以利用配置数据的标准副本集读写协议。此外,使用配置服务器的副本集允许分片群集具有3个以上的配置服务器,因为副本集最多可包含50个成员。要将配置服务器部署为副本集,配置服务器必须运行WiredTiger存储引擎。mongodb3.4已经删除对SCCC的支持,配置服务器需要配置成副本集】
mongodb的分片方式?
mongodb的数据单元:
- 文档:mongodb中最小的数据单元。文档表示系统中不可再分的单个对象。我们可以把他与关系型数据库中的行比较。
- 块:是一个逻辑概念,根据文档中某个字段的值划分的一个集合。块只在分片集群中存在的概念。分解一个或者一组字段的值进行分片,这些字段称为分片键。
- 集合:数据库中一组命名的文档。类比mysql中表的概念。
- 数据库: 类比MySQL中库的概念。这是系统中最顶级的命名组。组合数据库名字和集合的名字提供了系统中的唯一性,这通常也叫做命名空间。通常是数据库名字和集合名字连接在一起,中间用圆点分割。
mongodb的分片正是基于上面提到的逻辑概念块来分片操作的。
构建一个分片集群
首先我们搭建一个3个分片,一个mongos路由,一个config集群的副本集。在这个基础上对mongos做HA,完成了HA之后,会测试mongo集群之间的认证模式!
有5台测试机,规划如下:
|
10.0.102.195 |
10.0.102.202 |
10.0.102.204 |
10.0.102.214 |
10.0.102.220 |
|
rp1-p:30001 |
rp1-s:30001 |
rp1-a:30001 |
rp2-p:30002 |
rp2-s:30002 |
|
rp2-a:30002 |
rp3-s:30003 |
rp3-p:30003 |
rp3-a:30003 |
config-p:30004 |
|
config-a:30004 |
config-s:30004 |
mongos:27017 |
rp:表示副本集, rpx-p:表示副本集的主,rpx-s:表示副本集的secondary, rpx-a:表示副本集的仲裁节点。config:表示配置服务器,mognos:表示mongos服务器。
1:首先搭建三个分片副本集
按照上面的划分,每个物理机中只有一个副本集中的一个成员,因此我们在每个物理机中创建对应/data/nodeX目录,在里面保存分别创建conf,log,db目录来保存对应配置文件,日志,和数据文件。
[root@test4 ~]# mkdir -p /data/node1

[root@test4 ~]# cd /data/node1/

......

[root@test4 node1]# ls

conf  db  log

其余的目录创建省略
编写配置文件,配置文件如下:
# for documentation of all options, see:

#   http://docs.mongodb.org/manual/reference/configuration-options/

# where to write logging data.

systemLog:

   destination: file

   logAppend: true

   path: /data/node1/log/mongodb.log

# Where and how to store data.

storage:

   dbPath: /data/node1/db

   journal:

      enabled: true

#  engine:

#  mmapv1:

#  wiredTiger:

# how the process runs

processManagement:

   fork: true  # fork and run in background

   pidFilePath: /data/node1/log/mongod.pid  # location of pidfile

# network interfaces

net:

   port:

   bindIp:    # Listen to local interface only, comment to listen on all interfaces.

#security:

#operationProfiling:

replication:

   replSetName: shard1      #当前副本集的名字

#sharding:

sharding:

   clusterRole: shardsvr     #集群中的角色是分片服务器

## Enterprise-Only Options

#auditLog:

#snmp:
shard1副本集配置文件
# for documentation of all options, see:

#   http://docs.mongodb.org/manual/reference/configuration-options/

# where to write logging data.

systemLog:

   destination: file

   logAppend: true

   path: ../log/mongodb.log

# Where and how to store data.

storage:

   dbPath: ../db

   journal:

      enabled: true

#  engine:

#  mmapv1:

#  wiredTiger:

# how the process runs

processManagement:

   fork: true  # fork and run in background

   pidFilePath: ../log/mongod.pid  # location of pidfile

# network interfaces

net:

   port:

   bindIp:    # Listen to local interface only, comment to listen on all interfaces.

#security:

#operationProfiling:

replication:

   replSetName: shard1      #当前副本集的名字

#sharding:

sharding:

   clusterRole: shardsvr     #集群中的角色是分片服务器

## Enterprise-Only Options

#auditLog:

#snm
#直接把node1目录拷贝到副本集的另外两个成员上

[root@test4 data]# tree node1

node1

├── conf

│   └── mongod.conf

├── db

└── log

 directories,  file

[root@test4 data]# for ip in  ;

> do

> scp -r node1  10.0..${ip}:/data/

> done

The authenticity of host '10.0.102.202 (10.0.102.202)' can't be established.

RSA key fingerprint is 5b:a5::::4d::e6::cf::ff::3d::ef.

Are you sure you want to continue connecting (yes/no)? yes

Warning: Permanently added '10.0.102.202' (RSA) to the list of known hosts.

root@10.0.102.202's password:

mongod.conf                                                                                                                       %       .8KB/s   :

The authenticity of host '10.0.102.204 (10.0.102.204)' can't be established.

RSA key fingerprint is 5b:a5::::4d::e6::cf::ff::3d::ef.

Are you sure you want to continue connecting (yes/no)? yes

Warning: Permanently added '10.0.102.204' (RSA) to the list of known hosts.

root@10.0.102.204's password:

mongod.conf
配置文件拷贝之后不用做任何更改,然后就是启动每个mongo进程,配置副本集:
cd /usr/local/mongodb/

./mongod -f /data/node1/conf/mongod.conf

about to fork child process, waiting until server is ready for connections.

forked process:

child process started successfully, parent exiting

#配置副本集

> rs.initiate()

{

    "info2" : "no configuration specified. Using a default configuration for the set",

    "me" : "test4:30001",

    "ok" :

}

shard1:PRIMARY> rs.add("10.0.102.202:30001")

{ "ok" :  }

shard1:PRIMARY> rs.addArb("10.0.102.204:30001")

{ "ok" :  }

#副本集的详细搭建地址: https://www.cnblogs.com/wxzhe/p/9916111.html
第一个副本集已经搭建完成,然后依照上面步骤搭建第二个副本集,第三个副本集。配置文件如下:
# for documentation of all options, see:

#   http://docs.mongodb.org/manual/reference/configuration-options/

# where to write logging data.

systemLog:

   destination: file

   logAppend: true

   path: /data/node2/log/mongodb.log

# Where and how to store data.

storage:

   dbPath: /data/node2/db

   journal:

      enabled: true

#  engine:

#  mmapv1:

#  wiredTiger:

# how the process runs

processManagement:

   fork: true  # fork and run in background

   pidFilePath: /data/node2/log/mongod.pid  # location of pidfile

# network interfaces

net:

   port:

   bindIp:    # Listen to local interface only, comment to listen on all interfaces.

#security:

#operationProfiling:

replication:

   replSetName: shard2     #当前副本集的名字

#sharding:

sharding:

   clusterRole: shardsvr     #集群中的角色是分片服务器

## Enterprise-Only Options

#auditLog:

#snmp:
shard2的配置文件
# for documentation of all options, see:

#   http://docs.mongodb.org/manual/reference/configuration-options/

# where to write logging data.

systemLog:

   destination: file

   logAppend: true

   path: /data/node3/log/mongodb.log

# Where and how to store data.

storage:

   dbPath: /data/node3/db

   journal:

      enabled: true

#  engine:

#  mmapv1:

#  wiredTiger:

# how the process runs

processManagement:

   fork: true  # fork and run in background

   pidFilePath: /data/node3/log/mongod.pid  # location of pidfile

# network interfaces

net:

   port:

   bindIp:    # Listen to local interface only, comment to listen on all interfaces.

#security:

#operationProfiling:

replication:

   replSetName: shard3     #当前副本集的名字

#sharding:

sharding:

   clusterRole: shardsvr     #集群中的角色是分片服务器

## Enterprise-Only Options

#auditLog:

#snmp:
shard3的配置文件
注意上面配置文件更改的参数,除了端口和副本集名字外,还有指定参数的位置!
此时三个副本集已经搭建完毕,开始搭建配置服务器的副本集!
根据官方文档介绍:
配置服务器的副本集有以下特征:
- 没有仲裁者
- 必须构建索引
- 没有延迟成员
副本集的构建与之前类似只是在添加成员是不添加仲裁节点!
> cfg = {_id: "shard_cfg", members: []}

{ "_id" : "shard_cfg", "members" : [ ] }

> cfg.members.push({_id: , host: "10.0.102.220:30004"})

> cfg.members.push({_id: , host: "10.0.102.195:30004"})

> cfg.members.push({_id: , host: "10.0.102.202:30004"})

> rs.initiate(cfg)

{ "ok" :  }
配置服务器副本集搭建完成之后,然后搭建mongos路由,在集群中mongos路由可以做HA,这里我们先搭建一个mongos服务器!
mongos服务器的配置文件如下:
# for documentation of all options, see:

#   http://docs.mongodb.org/manual/reference/configuration-options/

# where to write logging data.

systemLog:

   destination: file

   logAppend: true

   path: /data/mongos/log/mongos.log

# how the process runs

processManagement:

   fork: true  # fork and run in background

   pidFilePath: /data/mongos/log/mongos.pid  # location of pidfile

# network interfaces

net:

   port:

   bindIp:    # Listen to local interface only, comment to listen on all interfaces.

#security:

#operationProfiling:

#sharding:

sharding:

   configDB:  shard_cfg/10.0.102.220:,10.0.102.195:,10.0.102.202:

## Enterprise-Only Options

#auditLog:

#snmp:
mongos配置文件
然后启动mongos:
[root@test1 bin]# ./mongos -f /data/mongos/conf/mongos.conf

about to fork child process, waiting until server is ready for connections.

forked process:

child process started successfully, parent exiting

[root@test1 bin]#

[root@test1 bin]# netstat -lntp

Active Internet connections (only servers)

Proto Recv-Q Send-Q Local Address               Foreign Address             State       PID/Program name

tcp               0.0.0.0:               0.0.0.0:*                   LISTEN      /./mongod

tcp               0.0.0.0:               0.0.0.0:*                   LISTEN      /./mongod

tcp               0.0.0.0:                  0.0.0.0:*                   LISTEN      /sshd

tcp               127.0.0.1:                0.0.0.0:*                   LISTEN      /master

tcp               0.0.0.0:               0.0.0.0:*                   LISTEN      /./mongos

tcp               :::                       :::*                        LISTEN      /sshd

[root@test1 bin]# ./mongo

MongoDB shell version v3.4.2

connecting to: mongodb://127.0.0.1:27017

MongoDB server version: 3.4.

Server has startup warnings:

--07T19::27.695+ I CONTROL  [main]

--07T19::27.695+ I CONTROL  [main] ** WARNING: Access control is not enabled for the database.

--07T19::27.695+ I CONTROL  [main] **          Read and write access to data and configuration is unrestricted.

--07T19::27.695+ I CONTROL  [main] ** WARNING: You are running this process as the root user, which is not recommended.

--07T19::27.695+ I CONTROL  [main]

mongos>
给路由添加分片:
mongos> sh.addShard("shard1/10.0.102.195:30001,10.0.102.202:30001")     #添加的时候不需要添加仲裁节点

{ "shardAdded" : "shard1", "ok" :  }

mongos> sh.addShard("shard2/10.0.102.214:30002,10.0.102.220:30002")

{ "shardAdded" : "shard2", "ok" :  }

mongos> sh.addShard("shard3/10.0.102.204:30003,10.0.102.202:30003")

{ "shardAdded" : "shard3", "ok" :  }

#查看分片的信息

mongos> sh.status()

--- Sharding Status ---

  sharding version: {

    "_id" : ,

    "minCompatibleVersion" : ,

    "currentVersion" : ,

    "clusterId" : ObjectId("5be2a93b4c4972e711620a02")

}

  shards:

    {  "_id" : "shard1",  "host" : "shard1/10.0.102.202:30001,test4:30001",  "state" :  }

    {  "_id" : "shard2",  "host" : "shard2/10.0.102.220:30002,test3:30002",  "state" :  }

    {  "_id" : "shard3",  "host" : "shard3/10.0.102.202:30003,test2:30003",  "state" :  }

  active mongoses:

    "3.4.2" :

 autosplit:

    Currently enabled: yes

  balancer:

    Currently enabled:  yes

    Currently running:  no

        Balancer lock taken at Wed Nov   :: GMT+ (CST) by ConfigServer:Balancer

    Failed balancer rounds in last  attempts:

    Migration Results for the last  hours:

        No recent migrations

  databases:
这时候集群已经运行起来,分片页已经搭建成功,做一个简单的测试!
分片不会自动设置,需要手动完成。
mongos> sh.enableSharding("mytest")              #启用分片的数据库

{ "ok" :  }

mongos> sh.shardCollection("mytest.test", {id: })  #要分片的集合和分片键值

{ "collectionsharded" : "mytest.test", "ok" :  }

mongos> use mytest

switched to db mytest

mongos> for(var i = ; i <= ; i++){          #插入数据测试

... db.test.save({id: i, name: "test"});

... }
WriteResult({ "nInserted" : 1 })
mongos> sh.status()
--- Sharding Status ---
  sharding version: {
    "_id" : 1,
    "minCompatibleVersion" : 5,
    "currentVersion" : 6,
    "clusterId" : ObjectId("5be2a93b4c4972e711620a02")
}
  shards:
    {  "_id" : "shard1",  "host" : "shard1/10.0.102.202:30001,test4:30001",  "state" : 1 }
    {  "_id" : "shard2",  "host" : "shard2/10.0.102.220:30002,test3:30002",  "state" : 1 }
    {  "_id" : "shard3",  "host" : "shard3/10.0.102.202:30003,test2:30003",  "state" : 1 }
  active mongoses:
    "3.4.2" : 1
 autosplit:
    Currently enabled: yes
  balancer:
    Currently enabled:  yes
    Currently running:  no
        Balancer lock taken at Wed Nov 07 2018 18:26:23 GMT+0800 (CST) by ConfigServer:Balancer
    Failed balancer rounds in last 5 attempts:  0
    Migration Results for the last 24 hours:
        4 : Success
  databases:
    {  "_id" : "mytest",  "primary" : "shard2",  "partitioned" : true }
        mytest.test
            shard key: { "id" : 1 }
            unique: false
            balancing: true
            chunks:
                shard1    3
                shard2    2
                shard3    2
            { "id" : { "$minKey" : 1 } } -->> { "id" : 2 } on : shard1 Timestamp(5, 1)
            { "id" : 2 } -->> { "id" : 22 } on : shard3 Timestamp(3, 0)
            { "id" : 22 } -->> { "id" : 171218 } on : shard2 Timestamp(4, 1)
            { "id" : 171218 } -->> { "id" : 373212 } on : shard2 Timestamp(3, 3)
            { "id" : 373212 } -->> { "id" : 544408 } on : shard1 Timestamp(4, 2)
            { "id" : 544408 } -->> { "id" : 742999 } on : shard1 Timestamp(4, 3)
            { "id" : 742999 } -->> { "id" : { "$maxKey" : 1 } } on : shard3 Timestamp(5, 0)

#在上面提到过,mongo分片是基于块的,这里可以看到每个分片中的块数!
【实际上采用单独的自增键作为分片没有任何作用】
mongodb的分片的更多相关文章
- mongodb(分片)
分片(即sharding)是将数据拆分至不同数据节点的方式. 1.在mongoDB中提供了自动分片的方式,它会根据数据块(chunk)大小的设定,对片键进行拆分: 2.mongoDB配置分片,要配置三 ...
- 【MongoDB】在windows平台下mongodb的分片集群(五)
本篇接着上面的四篇继续讲述在window平台下mongodb的分片集群搭建. 在分片集群中也照样能够创建索引,创建索引的方式与在单独数据库中创建索引的方式一样.因此这不再多说.本篇主要聚焦在分片键的选 ...
- MongoDB之分片集群(Sharding)
MongoDB之分片集群(Sharding) 一.基本概念 分片(sharding)是一个通过多台机器分配数据的方法.MongoDB使用分片支持大数据集和高吞吐量的操作.大数据集和高吞吐量的数据库系统 ...
- mongodb的分片(2)
在上一片博客,详细说明了mongodb的分片搭建的详细过程:分片搭建 在这里会说一些分片的维护与操作! 在集群搭建完,我们使用了sh.status()查看分片之后的数据,如下: #连接的是mongos ...
- MongoDB 自动分片 auto sharding
MongoDB部署实验系列文章 MongoDB做为NoSQL数据库,最近几年持续升温,越来越多的企业都开始尝试用MongoDB代替原有Database做一些事情.MongoDB也在集群,分片,复制上也 ...
- OpenStack Ceilometer -- 后台数据存储优化之MongoDB的分片存储设置
https://xiaofandh12.github.io/Mongo-Shard 关于MongoDB MongoDB中的概念与关系型数据库之间的对应: Database --> Databas ...
- 转】MongoDB 自动分片 auto sharding
原博文出自于: http://blog.fens.me/category/%E6%95%B0%E6%8D%AE%E5%BA%93/page/4/ 感谢! MongoDB 自动分片 auto shard ...
- MongoDB的分片(9)
什么是分片 分片是指将数据库拆分,将其分散在不同的机器上的过程.将数据分散到不同的机器上,不需要功能强大的服务器就可以存储更多的数据和处理更大的负载.基本思想就是将集合切成小块,这些块分散到若干片里, ...
- MongoDB 搭建分片集群
在MongoDB(版本 3.2.9)中,分片是指将collection分散存储到不同的Server中,每个Server只存储collection的一部分,服务分片的所有服务器组成分片集群.分片集群(S ...
随机推荐
- php上传文件中文文件名乱码的解决方法
文件上传是我们在处理表单提交时候最常用的功能之一,今天写了一个小小的demo,如下: 先看结构: html为表单提交的页面,php为处理表单的文件,upload为上传文件所放的位置 html: < ...
- [转]C++结构体|类 内存对齐详解
内存地址对齐,是一种在计算机内存中排列数据(表现为变量的地址).访问数据(表现为CPU读取数据)的一种方式,包含了两种相互独立又相互关联的部分:基本数据对齐和结构体数据对齐 . 为什么需要内存对齐?对 ...
- HTTP/2笔记之开篇
前言 本系列基于HTTP/2第17个草案文档,地址就是:https://tools.ietf.org/html/draft-ietf-httpbis-http2-17. HTTP/2规范已经通过发布批 ...
- struts2漏洞原理
一.struts2简介: 目前web框架中非常流行的都是mvc设计模式.经典例子例如:python的Django.Flask:java的ssm等.因为使用MVC设计模式,所以在框架内部处理用户数据流参 ...
- JQuery操作Select标签
jQuery获取Select选择的Text和Value: 1. $("#select_id").change(function(){//code...}); //为Select添加 ...
- ATDD和TDD的区别是什么?
最近看到一个新名词"ATDD",全称"Acceptance Test Driven Development ",中文称"验收测试驱动开发". ...
- JSP教程
http://www.runoob.com/jsp/jsp-tutorial.html
- Yii2框架添加API Modules
原文链接:http://www.itnose.net/detail/6459353.html : 一.环境部署 1. read fucking Yii Documents. http://www.yi ...
- nginx解决带_的head内容丢失
若请求 Head 信息中存在自定义信息并且以 "_" 下划线间隔,则必须配置underscores_in_headers 否则 Head 无法向 Tomcat 转发 解决办法: 在 ...
- Git源码安装
系统自带yum安装的git版本较老,需要安装最新版本可以使用源码安装 下载最新安装包,下载地址https://github.com/git/git/releases 安装依赖包 yum install ...