Linux 安装 MantisBT 详解
https://www.cnblogs.com/qdwyg2013/p/6030157.html
在工作中,选用了MantisBT作为公司的BTS工具。MantisBT的作为一款缺陷跟踪管理系统,有以下优点:
开源、 免费;
可与开源的testlink集成,便于统计bug的用例发现率;
具有bug关联功能;
权限设置灵活,不同角色有不同权限;
具有邮件通知功能,每个用户可根据自身的工作特点只订阅相关缺陷状态邮件;
提供多维度,多种表现形式的统计数据;
软件环境:
CentOS 6.5 ;
MantisBT-1.2.18 ;
xampp-linux-x64-5.6.3 ;
注:xampp能快速搭建LAMP环境,提高部署效率。
1. xampp环境搭建
1.1. 下载xampp安装包
[root@iserver1 tmp]#
执行命令:
|
wget http://sourceforge.net/projects/xampp/files/XAMPP%20Linux/5.6.3/xampp-linux-x64-5.6.3-0-installer.run |
执行过程:
|
http://sourceforge.net/projects/xampp/files/XAMPP%20Linux/5.6.3/xampp-linux-x64-5.6.3-0-installer.run Resolving sourceforge.net... 216.34.181.60 Connecting to sourceforge.net|216.34.181.60|:80... connected. 。。。。。。。 Connecting to jaist.dl.sourceforge.net|150.65.7.130|:80... connected. HTTP request sent, awaiting response... 200 OK Length: 128831805 (123M) [application/x-makeself] Saving to: “xampp-linux-x64-5.6.3-0-installer.run” 100%[=============================================================================================================================>] 128,831,805 4.06M/s in 26s 2015-01-27 21:49:31 (4.71 MB/s) - “xampp-linux-x64-5.6.3-0-installer.run” saved [128831805/128831805] |
1.2. 安装xampp
[root@iserver1 tmp]#
执行命令:
|
chmod +x xampp-linux-x64-5.6.3-0-installer.run ./xampp-linux-x64-5.6.3-0-installer.run |
执行过程,交互的过程如粗体部分。
|
---------------------------------------------------------------------------- Welcome to the XAMPP Setup Wizard. ---------------------------------------------------------------------------- Select the components you want to install; clear the components you do not want to install. Click Next when you are ready to continue. XAMPP Core Files : Y (Cannot be edited) XAMPP Developer Files [Y/n] :y Is the selection above correct? [Y/n]: y ---------------------------------------------------------------------------- Installation Directory XAMPP will be installed to /opt/lampp Press [Enter] to continue: ---------------------------------------------------------------------------- Setup is now ready to begin installing XAMPP on your computer. Do you want to continue? [Y/n]: y ---------------------------------------------------------------------------- Please wait while Setup installs XAMPP on your computer. Installing 0% ______________ 50% ______________ 100% ######################################### ---------------------------------------------------------------------------- Setup has finished installing XAMPP on your computer. |
1.3. 配置xmapp安全策略
[root@iserver1 htdocs]#
执行命令:
|
/opt/lampp/xampp security |
执行内容, 交互的过程如粗体部分。
|
XAMPP: Quick security check... XAMPP: Your XAMPP pages are NOT secured by a password. XAMPP: Do you want to set a password? [yes] yes XAMPP: Password: XXXXX XAMPP: Password (again): XAMPP: Password protection active. Please use 'xampp' as user name! XAMPP: MySQL is accessable via network. XAMPP: Normaly that's not recommended. Do you want me to turn it off? [yes] y XAMPP: Turned off. XAMPP: MySQL has to run before I can check the security. XAMPP: MySQL has to run before I can check the security. XAMPP: MySQL has a root passwort set. Fine! :) XAMPP: The FTP password for user 'daemon' is still set to 'xampp'. XAMPP: Do you want to change the password? [yes] yes XAMPP: Password: XXXXX XAMPP: Password (again): XAMPP: Reload ProFTPD...not running. XAMPP: Done. |
至此,LAMP环境搭建完成。
1.4. 运维xampp
1. 设置xampp开机自启,执行以下命令:
|
ln -s /opt/lampp/lampp /etc/rc.d/rc3.d/S99lampp ln -s /opt/lampp/lampp /etc/rc.d/rc4.d/S99lampp ln -s /opt/lampp/lampp /etc/rc.d/rc5.d/S99lampp |
2. 查看xampp运行状态
|
[root@localhost ~]# /opt/lampp/lampp start #启动lampp [root@localhost ~]# /opt/lampp/lampp stop #停止lampp [root@localhost htdocs]# /opt/lampp/lampp restart #重启lampp [root@localhost ~]# /opt/lampp/lampp status #查看状态 |
2. 安装部署mantisbt
2.1. 安装mantisbt
2.1.1. 下载mantisbt
1. cd /tmp
2. 执行命令,获取mantisbt的安装包:
|
wget http://sourceforge.net/projects/mantisbt/files/mantis-stable/1.2.18/mantisbt-1.2.18.tar.gz |
3. 解压mantisbt的压缩包,执行命令
|
tar –zxvf mantisbt-1.2.18.tar.gz |
2.1.2. 部署mantisbt
1. 执行命令
|
mv /tmp/mantisbt-1.2.18 /opt/lampp/htdocs/ |
2.1.3. 创建mantisbt的数据库
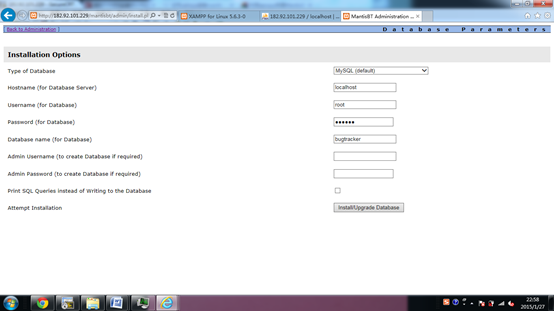
1. 访问http://serverIP/mantisbt/index.php,自动跳转到http://serverIP/mantisbt/admin/install.php页面,在该页面建立mantisbt的数据库;
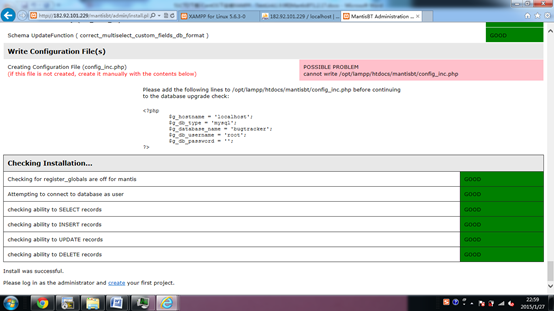
2. 在以下页面,root的密码为“xx”,直接点击“INSTALL/update database”即可。
3. 数据库创建成功,通过http://serverIP/phpmyadmin/,可查看bugtracker数据库的创建情况。
2.2. 配置mantisbt
2.2.1. 配置数据库连接
1. [root@localhost mantisbt]#
执行以下命令:
|
vi config_inc.php 修改数据库连接信息 <?php $g_hostname = 'localhost'; $g_db_type = 'mysql'; $g_database_name = 'xx'; #填写设置的数据名称,与2.1.3章节中填写的Database Name一致 $g_db_username = 'xx'; #填写数据库用户名 $g_db_password = 'xx'; #填写数据库密码 ?> |
2. [root@localhost mantisbt]#
执行以下命令:
|
cp config_inc.php.sample config_inc.php |
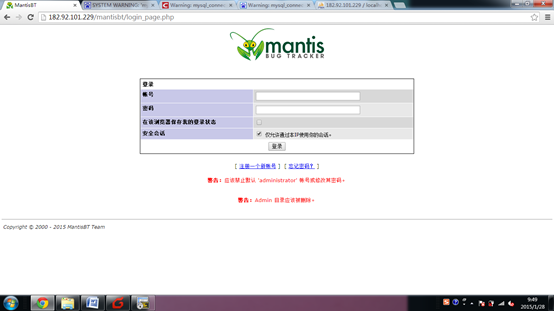
2.2.2. Mantisbt汉化
1. 执行命令:
|
vi /opt/lampp/htdocs/mantisbt/config_defaults_inc.php 修改:$g_default_language, 将english 改为chinese_simplified |
2. 在个人资料内,点击:更改个人设置,选择界面语言:chinese_simplified
3. 界面更新为中文版
2.2.3. 设置时区
1. 执行命令:
|
vi /opt/lampp/htdocs/mantisbt/config_defaults_inc.php 修改为 $g_default_timezone = 'Asia/Shanghai'; |
2. 在个人资料内,点击:更改个人设置,选择时区:shanghai
2.2.4. 配置mantis邮件
1. 执行命令
|
vi /opt/lampp/htdocs/mantisbt/ config_inc.ini 修改邮件配置信息 # --- Email Configuration --- $g_phpMailer_method = PHPMAILER_METHOD_SMTP; # or PHPMAILER_METHOD_SMTP, PHPMAILER_METHOD_SENDMAIL $g_smtp_host = 'smtp.ym.163.com'; # used with PHPMAILER_METHOD_SMTP $g_smtp_username = 'mantisbt.admin@xxx.com'; # used with PHPMAILER_METHOD_SMTP $g_smtp_password = 'xxxx'; # used with PHPMAILER_METHOD_SMTP $g_administrator_email = 'mantisbt.admin@xxx.com'; $g_webmaster_email = 'mantisbt.admin@xxx.com'; $g_from_email = 'mantisbt.admin@xxx.com'; # the "From: " field in emails $g_return_path_email = 'mantisbt.admin@xxx.com'; # the return address for bounced mail # $g_from_name = 'Mantis Bug Tracker'; # $g_email_receive_own = OFF; # $g_email_send_using_cronjob = OFF; |
测试新用户注册,给管理员发送邮件成功。
至此,MantisBT的安装部署已经完成。
另附:
linux下用xampp安装php集成环境,并修改各自端口号
http://blog.51cto.com/2338053/1969446
一:安装xampp
1.到官网下载linux版xampp https://www.apachefriends.org/zh_cn/index.html
下载后为:xampp-linux-x64-5.6.24-1-installer.run
2.将下载的xampp的安装文件放到linux系统对应目录中,并切换到文件的存放目录。
输入命令:ls查看文件是否存在,接着输入安装命令,如图所示进行安装
注意:先修改文件xampp-linux-x64-5.6.24-1-installer.run的权限,否则无法运行安装

直到进度条走完,显示安装完成,进入安装目录,由于上面默认安装,安装目录在/opt/lampp下,我们打开看看

运行命令/opt/lampp/lampp start 启动web服务器,从图中可以看到apache、mysql、ftp服务都启动OK了
启动:./lampp start
重启:./lampp restart
停止:./lampp stop

二:解决端口号占用问题
安装完成后启动时可能会遇到端口号占用,1-4根据自己启动时报错决定是否修改,若1-4有修改的,5必须修改
1. Another web server is already running
说明apache端口号被占用
进入/opt/lampp/etc目录下,找到文件httpd.conf,此文件中有两个地方需要修改
a.找到Listen行修改,如:1211
b.找到ServerName行修改,如:10.0.0.251:1211
2. Another web server with SSL is already running
说明SSL端口号被占用
进入/opt/lampp/etc/extra目录下,找到文件httpd-ssl.conf,此文件中有三个地方需要修改
a.找到Listen行修改,如:1212
b.找到ServerName行修改,如:10.0.0.251:1212
c.找到节点VirtualHost行修改,如:_default_:1212
3. Another MySQL daemon is already running
说明MySQL端口号被占用
进入/opt/lampp/etc目录下,找到文件my.cnf,此文件中有两个地方需要修改
a.分别找到port行修改,如:1213
4. Another FTP daemon is already running
说明FTP端口号被占用
进入/opt/lampp/etc目录下,找到文件proftpd.conf,此文件中有一个地方需要修改
a.找到Port行修改,如:1214
5.修改完上面各自的配置文件端口号后,再修改xampp中的配置端口号
进入/opt/lampp目录下,找到文件xampp,此文件中有四个地方需要修改
找到testport,总共有四个,分别对应apache、SSL、MySql、FTP的端口号根据上面修改的端口号,对应修改此配置文件中的端口号(上面没有修改的端口,则对应的不需要改动)
修改完之后重新启动就ok了
Linux 安装 MantisBT 详解的更多相关文章
- linux 安装nginx 详解
1 nginx安装环境 nginx是C语言开发,建议在linux上运行,本教程使用Centos6.5作为安装环境. n gcc 安装nginx需要先将官网下载的源码进行编译,编译依赖gcc环境,如果没 ...
- Linux 安装 MySQL 详解(rpm 包)
说明:Linux 系统中软件的安装在 root 用户下进行,此安装方式为 rpm 包方式,安装的版本为:MySQL-5.6.25-1.linux_glibc2.5.x86_64.rpm-bundle. ...
- Linux 安装 Tomcat 详解
说明:安装的 tomcat 为解压版(即免安装版):apache-tomcat-8.5.15.tar.gz (1)使用 root 用户登录虚拟机,在根目录下的 opt 文件夹新建一个 software ...
- Linux 安装Ruby详解(在线和离线安装)
很多时候我们会发现,真实的生成环境很多都没有外网,只有内网环境,这个时候我们又需要安装Ruby,则不能提供yum命令进行在线安装了,这个时候我们就需要下载安装包进行离线安装.本文主要简单介绍如果离线安 ...
- Linux 安装 JDK 详解
安装 JDK 说明:Linux 系统中安装软件需在 root 用户下进行. (1) 首先下载 jdk-8u131-linux-x64.rpm (2)将用户切换至 root,在 opt 文件夹下新建 s ...
- linux PHP 编译安装参数详解
linux PHP 编译安装参数详解 ./configure --prefix=/usr/local/php --with-config-file-path=/usr/local/php/etc -- ...
- 【转】postgresql 9.4 在linux环境的安装步骤详解
本文章来为各位介绍一篇关于postgresql 9.4 在linux环境的安装步骤详解,希望文章能够对各位新手朋友带来帮助的哦. 环境说明系统:centos 6.4 64位软件:postgresql ...
- Linux /dev目录详解和Linux系统各个目录的作用
Linux /dev目录详解(转http://blog.csdn.net/maopig/article/details/7195048) 在linux下,/dev目录是很重要的,各种设备都在下面.下面 ...
- Linux crontab 命令详解
在 Linux 中,任务可以被配置在指定的时间段.指定的日期.或系统平均载量低于指定的数量时自动运行.红帽企业 Linux 预配置了对重要系统任务的运行,以便使系统能够时时被更新.譬如,被 locat ...
随机推荐
- linux -- ubuntu 通过命令行,设置文件及其子文件的权限
想一次修改某个目录下所有文件的权限,包括子目录中的文件权限也要修改,要使用参数-R表示启动递归处理. 例如: [root@localhost ~]# chmod 777 /home/user 注:仅把 ...
- 今天搞log4net插入错误日志去mysql数据库的时候出现了点问题,已解决。记录下解决方案
先上图 配置log4net的时候要填这项,可是这个value我不知道啊.....上图里的value是我用下面的方法获取的 MySqlConnection con = new MySqlConnecti ...
- 【Java面试题】26 多线程有几种实现方法?同步有几种实现方法? 当一个线程进入一个对象的一个synchronized方法后,其它线程是否可进入此对象的其它方法?
问题一:多线程有几种实现方法?同步有几种实现方法? 多线程有两种实现方法,分别是继承Thread类与实现Runnable接口 同步的实现方面有两种,分别是synchronized,wait与not ...
- Linux 权限修改
chown -R 用户名:组名 文件夹名chown -R xu:hadoop hadoop 将hadoop目录(以及其下的所有子目录/文件)的属主用户设为xu, xu 的组名为group
- VC实现波形不闪烁动态绘图 .
http://blog.csdn.net/xuyongbeijing2008/article/details/8064284 源代码:http://www.vckbase.com/index.php/ ...
- 如何用MathType编辑化学等式
MathType在数学中应用非常广泛,被大量用于编辑数学公式,MathType不仅可以用来编辑数学公式,还可以编辑化学反应式,那么MathType编辑化学等式怎么操作的呢? 具体操作如下: 1.打开M ...
- 怎么输入MathType不等号
MathType是一款比较常用的数学公式编辑器,我们在使用这款软件的时候常常需要输入各种符号.有些新用户对这款软件不是很熟悉,对于一些符号不知道怎么输入,下面我们来给大家介绍介绍MathType不等号 ...
- Facebook开源技术识别网购评论
1.自然语言处理2.情感分析3.监督学习模型4.词向量 5.fasttext 汉藏语系,是语言系属分类(Language family)的一种,分为汉语族和藏缅语族,是用汉语和藏语的名称概括与其有亲属 ...
- 在可部署到brew真机上的程序包构建完之后又要如何将该程序包发布到真机上呢
1.到brew官网上去申请含有classid的bid文件,以及.sig文件 2.根据申请到的bid文件重新生成mif文件. 3.将mif文件部署到brew真机上的mif文件夹下. 4.在真机上的bre ...
- ADO.net方法
using System; using System.Collections.Generic; using System.Data; using System.Data.SqlClient; usin ...