nginx+tomcat实现负载均衡以及session共享(linux centos7环境)
一、nginx的安装
1.准备三份tomcat
tomcat1 设置端口 8080
tomcat2 设置端口 8081
tomcat3 设置端口 8082
2.
3.
解压到/home目录下 并重命名为nginx
4.
cd /home/nginx 进入nginx目录
5.
./configure --with-http_stub_status_module
进行初始化配置。
如提示PCRE错误,需要手动安装PCRE,见 http://www.linuxidc.com/Linux/2015-03/114986.htm
安装完PCRE后,再次运行
./configure --with-http_stub_status_module
进行初始化即可
6.
make 编译
make install 编译安装。
7.
完成第六步 会出现如以下提示
  ......

  nginx path prefix: "/usr/local/nginx"

  nginx binary file: "/usr/local/nginx/sbin/nginx"

  nginx modules path: "/usr/local/nginx/modules"

  nginx configuration prefix: "/usr/local/nginx/conf"

  nginx configuration file: "/usr/local/nginx/conf/nginx.conf"

  nginx pid file: "/usr/local/nginx/logs/nginx.pid"

  nginx error log file: "/usr/local/nginx/logs/error.log"

  nginx http access log file: "/usr/local/nginx/logs/access.log"

  nginx http client request body temporary files: "client_body_temp"

  nginx http proxy temporary files: "proxy_temp"

  nginx http fastcgi temporary files: "fastcgi_temp"

  nginx http uwsgi temporary files: "uwsgi_temp"

  nginx http scgi temporary files: "scgi_temp"

  ......
8.
./usr/local/nginx/sbin/nginx 启动nginx
如出现下面所述的错误,在已安装PCRE库的情况下,需要配置PCRE共享库。具体操作看这里 http://www.linuxidc.com/Linux/2015-03/114985.htm 。
./usr/local/nginx/sbin/nginx: error while loading shared libraries: libpcre.so.1: cannot open shared object file: No such file or directory
9.
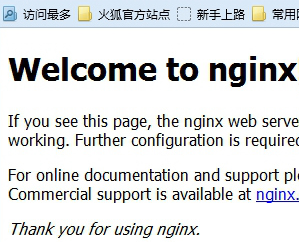
在浏览器中输入IP:80,出现如下图所示,说明安装成功。
10.
nginx操作:
启动
./usr/local/nginx/sbin/nginx
重启
./usr/local/nginx/sbin/nginx -s reload
关闭nginx
./usr/local/nginx/sbin/nginx -s stop
11.
vi /usr/local/nginx/conf/nginx.conf 修改nginx配置
如下:
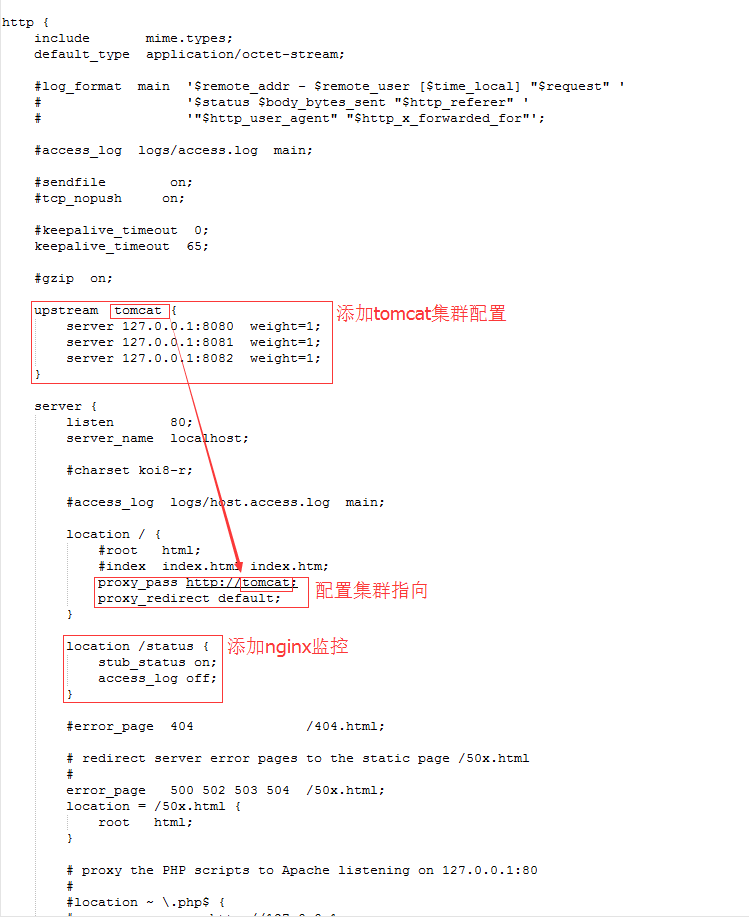
监控访问路径 ip:80/status
配置好以后的nginx.conf文件内容:
#user  nobody;

worker_processes  1;

#error_log  logs/error.log;

#error_log  logs/error.log  notice;

#error_log  logs/error.log  info;

#pid        logs/nginx.pid;

events {

    worker_connections  1024;

}

http {
    client_max_body_size 100M;

    include       mime.types;

    default_type  application/octet-stream;

    #log_format  main  '$remote_addr - $remote_user [$time_local] "$request" '

    #                  '$status $body_bytes_sent "$http_referer" '

    #                  '"$http_user_agent" "$http_x_forwarded_for"';

    #access_log  logs/access.log  main;

    #sendfile        on;

    #tcp_nopush     on;

    #keepalive_timeout  0;

    keepalive_timeout  65;

    #gzip  on;

    upstream  tomcat {

        server 127.0.0.1:8080  weight=1;

        server 127.0.0.1:8081  weight=1;

        server 127.0.0.1:8082  weight=1;

    }

    server {

        listen       80;

        server_name  localhost;

        #charset koi8-r;

        #access_log  logs/host.access.log  main;

        location / {

            #root   html;

            #index  index.html index.htm;

            proxy_pass http://tomcat;

            proxy_redirect default;

            #设置主机头和客户端真实地址,以便服务器获取客户端真实IP

            proxy_set_header Host $host;

            proxy_set_header X-Real-IP $remote_addr;

            proxy_set_header X-Forwarded-For $proxy_add_x_forwarded_for;

        }

        location /status {

            stub_status on;

            access_log off;

        }

        #error_page  404              /404.html;

        # redirect server error pages to the static page /50x.html

        #

        error_page   500 502 503 504  /50x.html;

        location = /50x.html {

            root   html;

        }

        # proxy the PHP scripts to Apache listening on 127.0.0.1:80

        #

        #location ~ \.php$ {

        #    proxy_pass   http://127.0.0.1;

        #}

        # pass the PHP scripts to FastCGI server listening on 127.0.0.1:9000

        #

        #location ~ \.php$ {

        #    root           html;

        #    fastcgi_pass   127.0.0.1:9000;

        #    fastcgi_index  index.php;

        #    fastcgi_param  SCRIPT_FILENAME  /scripts$fastcgi_script_name;

        #    include        fastcgi_params;

        #}

        # deny access to .htaccess files, if Apache's document root

        # concurs with nginx's one

        #

        #location ~ /\.ht {

        #    deny  all;

        #}

    }

    # another virtual host using mix of IP-, name-, and port-based configuration

    #

    #server {

    #    listen       8000;

    #    listen       somename:8080;

    #    server_name  somename  alias  another.alias;

    #    location / {

    #        root   html;

    #        index  index.html index.htm;

    #    }

    #}

    # HTTPS server

    #

    #server {

    #    listen       443 ssl;

    #    server_name  localhost;

    #    ssl_certificate      cert.pem;

    #    ssl_certificate_key  cert.key;

    #    ssl_session_cache    shared:SSL:1m;

    #    ssl_session_timeout  5m;

    #    ssl_ciphers  HIGH:!aNULL:!MD5;

    #    ssl_prefer_server_ciphers  on;

    #    location / {

    #        root   html;

    #        index  index.html index.htm;

    #    }

    #}

}
二、设置tomcat集群session共享
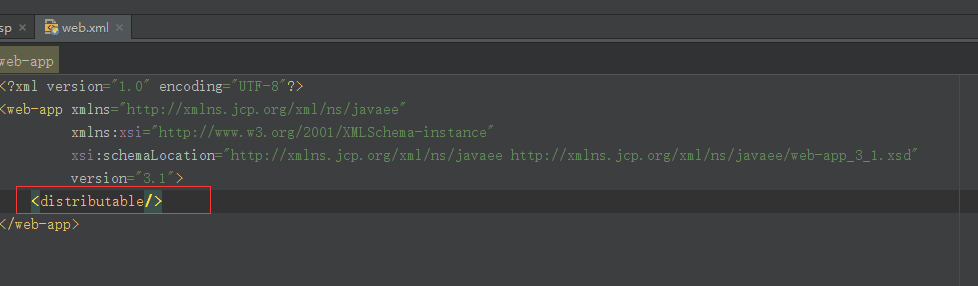
0.如果是服务端集群,首先在项目目录下WEB-INF目录中的web.xml中配置:
<distributable/>
如图:
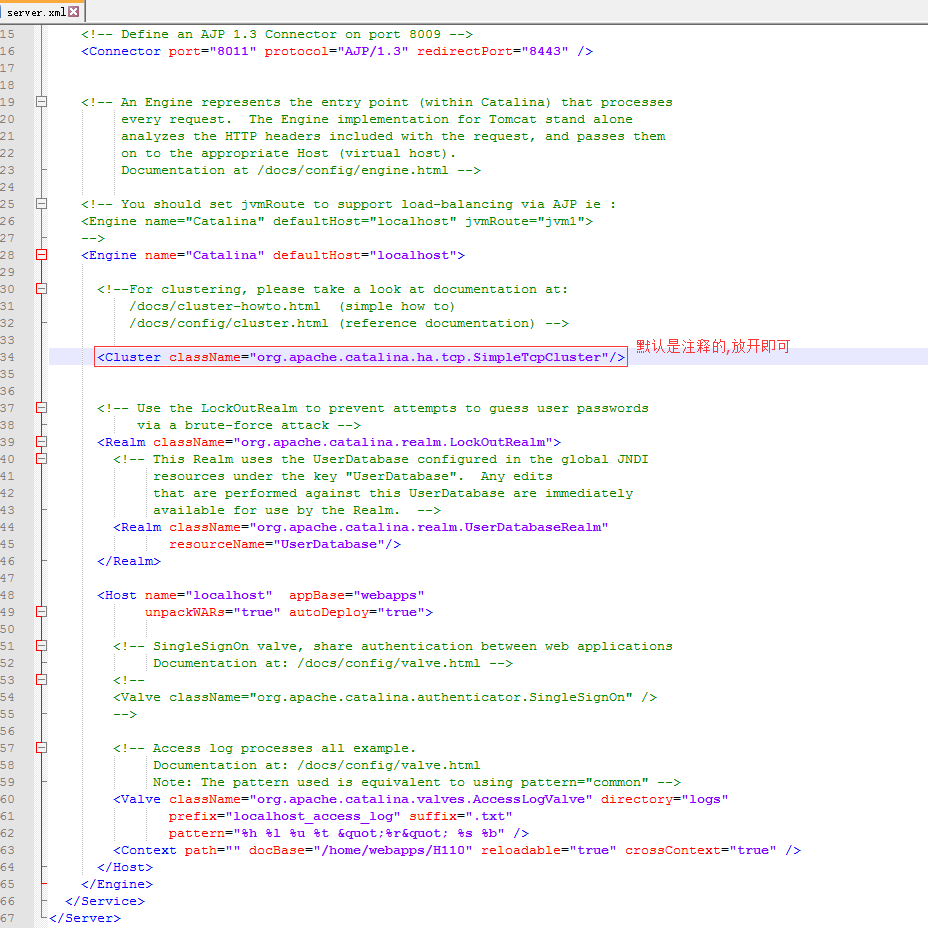
1.
修改三个tomcat目录下conf/server.xml 端口
以及如图:tomcat 1、2、3
2.
分别启动tomcat 123 以及nginx,访问ip:80进入项目则成功
session是否共享成功测试jsp页面代码为:刷新session不变说明成功。(测试时要在jsp平行目录新建WEB-INF/web.xml)
<%@ page contentType="text/html; charset=GBK" %>

<%@ page import="java.util.*" %>

<html><head><title>Cluster App Test</title></head>

<body>

Server Info:

<%

  out.println(request.getLocalAddr() + " : " + request.getLocalPort()+"<br>");

%>

<%

  out.println("<br> ID " + session.getId()+"<br>");

  // 如果有新的 Session 属性设置

  String dataName = request.getParameter("dataName");

  if (dataName != null && dataName.length() > 0) {

    String dataValue = request.getParameter("dataValue");

    session.setAttribute(dataName, dataValue);

  }

  out.println("<b>Session 列表</b><br>");

  System.out.println("============================");

  Enumeration e = session.getAttributeNames();

  while (e.hasMoreElements()) {

    String name = (String)e.nextElement();

    String value = session.getAttribute(name).toString();

    out.println( name + " = " + value+"<br>");

    System.out.println( name + " = " + value);

  }

%>

<form action="index.jsp" method="POST">

  名称:<input type=text size=20 name="dataName">

  <br>

  值:<input type=text size=20 name="dataValue">

  <br>

  <input type=submit>

</form>

</body>

</html>
web.xml
<?xml version="1.0" encoding="UTF-8"?>

<web-app xmlns="http://xmlns.jcp.org/xml/ns/javaee"

         xmlns:xsi="http://www.w3.org/2001/XMLSchema-instance"

         xsi:schemaLocation="http://xmlns.jcp.org/xml/ns/javaee http://xmlns.jcp.org/xml/ns/javaee/web-app_3_1.xsd"

         version="3.1">

    <distributable/>

</web-app>
三、参考扩展
http://blog.csdn.net/e421083458/article/details/30086413
nginx+tomcat实现负载均衡以及session共享(linux centos7环境)的更多相关文章
- haproxy+tomcat实现负载均衡以及session共享(linux centos7环境)
一.安装HAProxy 1.进入home目录,下载最新haproxy安装包. cd /home wget http://haproxy.1wt.eu/download/1.4/src/haproxy- ...
- nginx+tomcat+redis负载均衡及session共享
概述 本文档是用来详细描述 nginx+tomcat+redis负载均衡实现session共享 所需软件及下载地址 软件名称 下载地址 功能说明 Nginx-v1.6.0 http://nginx.o ...
- Nginx+Tomcat+memcached负载均衡实现session共享
http://blog.csdn.net/love_ubuntu/article/details/8464983 1. 安装各个软件不用说了. 2. 到tomcat的安装目录lib中,加入: me ...
- Nginx+Tomcat+Memcached负载均衡和session共享
1. 演示搭建 说明:本文参考网络日志http://blog.csdn.net/remote_roamer/article/details/51133790,结合实际操作,仅做个演示记录. 1.1. ...
- nginx之 nginx + tomcat + redis 负载均衡且session一致性
说明: 本文描述的是 nginx + tomcat + redis 实现应用负载均衡且满足session一致性,从安装到配置的全部过程,供大家学习!nginx 代理服务器ip: 10.219.24.2 ...
- Nginx+Tomcat+Memcache实现负载均衡及Session共享
第一部分 环境介绍 部署环境: Host1:Nginx.Memcached.Tomcat1 Host2:Tomcat2 Tomcat_version:8.0.38 第二部分 Nginx+Tomcat实 ...
- keepalived+nginx+tomcat+redis实现负载均衡和session共享(原创)
keepalived+nginx+tomcat+redis实现负载均衡和session共享 直接上链接,码了一天,就不再重写了,希望能帮到大家,有问题欢迎留言交流.
- Nginx+Tomcat8+Memcached实现负载均衡及session共享
1> 基础环境 简易拓扑图: 2> 部署Tomcat [root@node01 ~]# ll -h ~ |egrep 'jdk|tomcat'-rw-r--r-- 1 root root ...
- windows使用nginx+memcached实现负载均衡和session或者缓存共享
windows使用nginx+memcached实现负载均衡和session或者缓存共享 两台server server1:115.29.186.215 windows2008 64位操作系统 ser ...
随机推荐
- jQuery $.extend()使用方法
$.extend()使用方法总结. jQuery为开发插件提拱了两个方法,各自是: jQuery.fn.extend(object); jQuery.extend(object); jQuery.ex ...
- JavaScript——DOM或以树形展示的Web页面
Web网页的一般能够通过document以及document所相关的各种元素组成.当然我们也能够通过层次结构的树形结构在展现Web页面.假设要对一个网页进行改动的话,我们能够通过document对象. ...
- js左侧三级菜单导航实例代码
在左侧三级菜单导航想必大家都见到过吧,它的实现过程也并不复杂,下面有个不错的示例,感兴趣的朋友可以了解下 实例代码: <!DOCTYPE html PUBLIC "-//W3C// ...
- [na]小区网络-pppoe拨号认证原理及部署(panabit来管理)
以前搞网络时候,对小区宽带adsl上网(后ie中的pppoe拨号config)+对一坨人限速的系统(panabit)比较感兴趣,挺神秘. 以前写的,有些纰漏,抽时间我会陆陆续续补充下. PPPOE认证 ...
- 转:python常用运维脚本实例
python常用运维脚本实例 转载 file是一个类,使用file('file_name', 'r+')这种方式打开文件,返回一个file对象,以写模式打开文件不存在则会被创建.但是更推荐使用内置函 ...
- 每日英语:Mooncake Austerity Hits China's Mid-Autumn Festival
First baijiu, then red carpets, and now mooncakes. For Chinese government officials, the list of tab ...
- js修改input的type属性问题(兼容所有浏览器,主要用于密码类的默认有提示文字的效果)
<!DOCTYPE HTML PUBLIC "-//W3C//DTD HTML 4.01//EN" "http://www.w3.org/TR/html4/stri ...
- ssm项目开发通用base模块和工具
controller层日期转换通用类 package cn.itcast.jk.controller; import java.text.DateFormat; import java.text.Si ...
- LeetCode: Generate Parentheses 解题报告
Generate ParenthesesGiven n pairs of parentheses, write a function to generate all combinations of w ...
- C#中一道关于ADO.NET的基础练习题
在控制台程序中实现以下功能: 1. 构建3个表(程序启动时自动建立) (20分): 1) Employee 职工表 (工号.姓名.性别.年龄.部门) (Num.Name.Sex.Age.Depar ...