Ionic2 Tutorial
build your first app
Now that you have Ionic and its dependencies installed, you can build your first app! This section will guide you through the process of starting a new application, adding pages, navigating between those pages, and more. Let’s get started!
Starting a New Ionic 2 App
Let’s create a new app! Use the start command to initialize a new Ionic app. Specify that you want it to be an Ionic 2 app by passing in the –v2 option. We also specify that the tutorial template should be used. Ionic 2 applications are created as TypeScript.
$ ionic start MyIonic2Project tutorial --v2This will pull Ionic 2 down, install npm modules for the application, and get Cordova set up and ready to go.
Viewing the app in a browser
$ cd MyIonic2Project/

$ ionic serve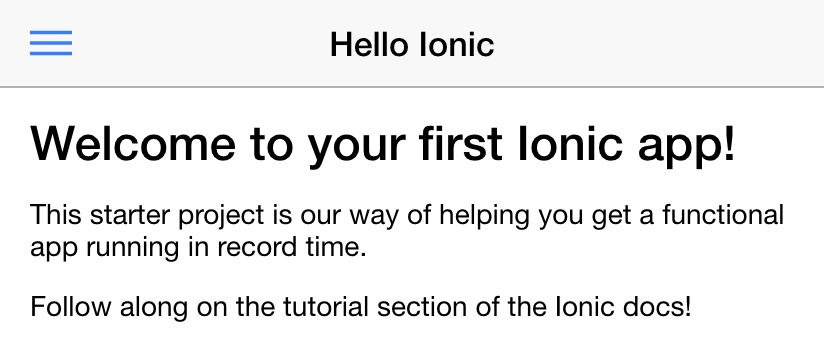
Project Structure
Let’s walk through the anatomy of an Ionic 2 app. Inside of the folder that was created, we have a typical Cordova project structure where we can install native plugins, and create platform-specific project files.
./www/index.html
www/index.html is the main entry point for the app, though its purpose is to set up script and CSS includes and bootstrap, or start running, our app. We won’t spend much of our time in this file.
For your app to function, Ionic looks for the tag in your HTML. In this example we have:
<ion-app></ion-app>And the following scripts near the bottom:
<script src="cordova.js"></script>

<script src="build/js/app.bundle.js"></script>
./app/app.ts
Inside of the app directory we find our pre-compiled code. This is where most of the work for an Ionic 2 app will take place. When we run ionic serve, our code inside of app/ is transpiled into the correct Javascript version that the browser understands (currently, ES5). That means we can work at a higher level using TypeScript and ES6+, but compile down to the older form of Javascript the browser needs.
app/app.ts is the entry point for our app.
Near the top of the file, we should see this:
@Component({

  templateUrl: 'build/app.html'

})

class MyApp {

  constructor() {

  }

}
ionicBootstrap(MyApp)
Every app has a root component that essentially controls the rest of the application. This is very similar to ng-app from Ionic and Angular 1. This is also where we bootstrap our app using ionicBootstrap.
In this component, we set the template to be the file at build/app.html, which is a compiled version of app/app.html, let’s take a look!
./app/app.html
Here’s the main template for the app in app/app.html:
<ion-menu [content]="content">

  <ion-toolbar>

    <ion-title>Pages</ion-title>

  </ion-toolbar>

  <ion-content>

    <ion-list>

      <button ion-item *ngFor="let p of pages" (click)="openPage(p)">

        {{p.title}}

      </button>

    </ion-list>

  </ion-content>

</ion-menu>

<ion-nav id="nav" [root]="rootPage" #content swipe-back-enabled="false"></ion-nav>
In this template, we set up an ion-menu to function as a side menu, and then an ion-nav component to act as the main content area. The ion-menu’s [content] property is bound to the local variable content from our ion-nav, so it knows where it should animate around.
Adding Pages
Now that we have a basic understanding of the layout of an Ionic 2 app, let’s walk through the process of creating and navigating to pages in our app.
Taking a look at app/app.html, we see this line near the bottom:
<ion-nav id="nav" [root]="rootPage" #content swipe-back-enabled="false"></ion-nav>Pay attention to the [root] property binding. This sets what is essentially the first, or “root” page for the ion-nav component. When ion-nav loads, the component referenced by the variable rootPage will be the root page.
In app/app.ts, the MyApp component specifies this in its constructor:
...

import {HelloIonicPage} from './pages/hello-ionic/hello-ionic';

...

class MyApp {

  ...

  constructor(app, platform, menu) {

    ...

    // make HelloIonicPage the root (or first) page

    this.rootPage = HelloIonicPage;

  }

  ...

}
Creating a Page
Next, let’s check out the HelloIonicPage that we are importing. Inside the app/pages/hello-ionic/ folder, go and open up hello-ionic.ts.
You may have noticed that each page has its own folder that is named after the page. Inside each folder, we also see a .html and a .scss file with the same name. For example, inside of hello-ionic/ we will find hello-ionic.ts, hello-ionic.html, and hello-ionic.scss. Although using this pattern is not required, it can be helpful to keep things organized.Below, we see the HelloIonicPage class. This creates a Page - an Angular component with all Ionic directives already provided, to be loaded using Ionic’s navigation system. Notice that because Pages are meant to be loaded dynamically, they don’t have a selector:
import {Component} from '@angular/core';

@Component({

  templateUrl: 'build/pages/hello-ionic/hello-ionic.html'

})

export class HelloIonicPage {}
All pages have both a class, and an associated template that’s being compiled as well. Let’s check out app/pages/hello-ionic/hello-ionic.html - the template file for this page:
<ion-navbar *navbar>

  <button menuToggle>

    <ion-icon name="menu"></ion-icon>

  </button>

  <ion-title>Hello Ionic</ion-title>

</ion-navbar>

<ion-content padding class="getting-started">

  <h3>Welcome to your first Ionic app!</h3>

  <p>

    This starter project is our way of helping you get a functional app running in record time.

  </p>

  <p>

    Follow along on the tutorial section of the Ionic docs!

  </p>

  <p>

    <button primary menuToggle>Toggle Menu</button>

  </p>

</ion-content>
The
import {Component} from "@angular/core";

import {NavController, NavParams} from 'ionic-angular';

import {ItemDetailsPage} from '../item-details/item-details';

@Component({

  templateUrl: 'build/pages/list/list.html'

})

export class ListPage {

  // provide Angular with metadata about things it should inject in the constructor

  static get parameters() {

    return [[NavController], [NavParams]];

  }

  constructor(nav, navParams) {

    this.nav = nav;

    // If we navigated to this page, we will have an item available as a nav param

    this.selectedItem = navParams.get('item');

    this.icons = ['flask', 'wifi', 'beer', 'football', 'basketball', 'paper-plane',

    'american-football', 'boat', 'bluetooth', 'build'];

    this.items = [];

    for(let i = 1; i < 11; i++) {

      this.items.push({

        title: 'Item ' + i,

        note: 'This is item #' + i,

        icon: this.icons[Math.floor(Math.random() * this.icons.length)]

      });

    }

  }

  itemTapped(event, item) {

     this.nav.push(ItemDetailsPage, {

       item: item

     });

  }

}
This page will create a basic list page containing a number of items.
Navigating to Pages
Recall from the previous section we had a function inside our ListPage class that looked something like this:
itemTapped(event, item) {

    this.nav.push(ItemDetailsPage, {

      item: item

    });

}
You might have noticed we are referencing ItemDetailsPage. This is a page included in the tutorial starter. Let’s import it in app/pages/list/list.js so we can use it:
...

import {ItemDetailsPage} from '../item-details/item-details';
After saving the file, you will notice the ionic serve process will recompile your app with the new changes, and reload the browser. Let’s revisit our app in the browser, and when we tap an item, it will navigate to the item details page! Notice that the menu-toggle is replaced with a back button instead. This is a native style that Ionic follows, but can be configured.
How It Works
Navigation in Ionic 2 works like a simple stack, where we push new pages onto the top of the stack, which takes us forwards in the app and shows a back button. To go backwards, we pop the top page off. Since we set this.nav in the constructor, we can call this.nav.push(), and pass it the page we want to navigate to. We can also pass it an object containing data we would like to pass to the page being navigated to. Using push to navigate to a new page is simple, but Ionic’s navigation system is very flexible. Check out the navigation docs to see more advanced navigation examples.
When it comes to URLs, Ionic 2 works a bit differently than Ionic 1. Instead of using URLs to navigate, we use them to make sure we can always come back to a page (on app launch, for example). This means we aren’t limited to using href to navigate around. However, we still have the option to use a URL to navigate to a page when necessary.
references
Tutorial - Getting Started with Ionic - Ionic Framework
effect
Ionic2 Tutorial的更多相关文章
- 浅谈angular2+ionic2
浅谈angular2+ionic2 前言: 不要用angular的语法去写angular2,有人说二者就像Java和JavaScript的区别. 1. 项目所用:angular2+ionic2 ...
- ionic2配置问题集
我在配置ionic2中遇到的问题,及我的解决方案. ionic start MyIonic2Project tutorial --v2 网络很坑爹,配置lantern后,也是多次尝试才下载成功. io ...
- ionic2新手入门整理,搭建环境,创建demo,打包apk,热更新,优化启动慢等避坑详解
onic官方文档链接:http://ionicframework.com/docs/ 如果是新的环境会有很多坑,主要是有墙,请仔细阅读每个步骤 文档包含以下内容: l 环境搭建 l 创建demo并 ...
- Ionic2+ 环境搭建
ionic2+官方guide 基础环境安装 nodejs安装 ionic,cordova安装 npm install -g ionic cordova 项目创建 ionic start MyIonic ...
- angular2+ionic2架构介绍
不要用angular的语法去写angular2,有人说二者就像Java和JavaScript的区别. 1. 项目所用:angular2+ionic2+typescript 2. 项目结构 3. S ...
- Ionic2开发环境搭建、项目创建调试与Android应用的打包、优化
Ionic2开发环境搭建.项目创建调试与Android应用的打包.优化. windows下ionic2开发环境配置步骤如下: 下载node.js环境,稳定版本:v6.9.5 下载android stu ...
- Ionic2开发环境搭建
关于网络环境:ionic开发环境不需要FQ.我这里没有设置FQ,亲测可行.但是angular2的开发环境搭建,则需要FQ网络,否则很多包会安装失败. 建议大家在搭建开发环境的时候,不要参考百度出来的各 ...
- Ionic2 自学须知的基本知识点
http://www.cnblogs.com/zsl123/p/5991336.html Ionic(ionicframework)一款接近原生的HTML5移动App开发框架. IONIC 是目前最有 ...
- 浅谈Ionic2
http://www.cnblogs.com/zhouming-web/p/6226323.html 前言: 不要用angular的语法去写angular2,有人说二者就像Java和JavaScrip ...
随机推荐
- linux 下 修改mysql账号密码
1.root用户登录到mysql数据库代码示例:/usr/local/mysql/bin/mysql -u root -p (输入密码进入mysql)2.进入mysql,输入:代码示例:use mys ...
- BZOJ 3270: 博物馆
Sol 期望DP+高斯消元. 根据本题题意列出期望方程\[E(i,j)=(1-p_i)(1-p_j)E(u,v)+(1-p_i)p_jE(u,j)+p_i(1-p_j)E(i,v)+p_ip_jE(i ...
- BZOJ 2685: Sgu385 highlander
Sol 期望DP. \(f[i][j][k]\) 表示已经确定了 \(i\) 个点, 最大环大小为 \(j\) ,个数为 \(k\) 的方案数. 转移非常复杂,因为细节特别多. \(f[i][j][1 ...
- 23 使用环境 UsageEnvironment——Live555源码阅读
23 使用环境 UsageEnvironment——Live555源码阅读(三)UsageEnvironment 23 使用环境 UsageEnvironment——Live555源码阅读(三)Usa ...
- COGS 2437 暗之链锁 II 题解
[题意] 给出一个有n个点的无向图,其中有n-1条主要边且这些主要边构成一棵树,此外还有m条其他边,求斩断原图的一条主要边和k条其他边使得图不连通的方案数mod109+7的值. 注意,就算你切断一条主 ...
- svn: E155004 'XX' is already locked
Error:svn: E155004: Run 'svn cleanup' to remove locks (type 'svn help cleanup' for details)svn: E155 ...
- mysql导入导出数据库命令
1.导出数据库:mysqldump -u 用户名 -p 数据库名 > 导出的文件名 如我输入的命令行: mysqldump -u root -p news > /home/jason/sq ...
- ubuntu下编码转换工具
ubuntu打开windows下的txt或者代码文件,经常会出现乱码, ubuntu自带一种转换工具,是命令行的,下面提供一种最简单的方法进行转换 比如要转换的文件为1.txt,进入1.txt的目录 ...
- ubuntu apt常用命令
apt-cache search packagename 搜索包 apt-cache show packagename 获取包的相关信息,如说明.大小.版本等 apt-get install pack ...
- How to mount a NFS share?
Assume you have a NFS share /data/shares/music, at server: 192.168.1.5 You can mount the NFS share f ...