Caffe参数交换源码分析
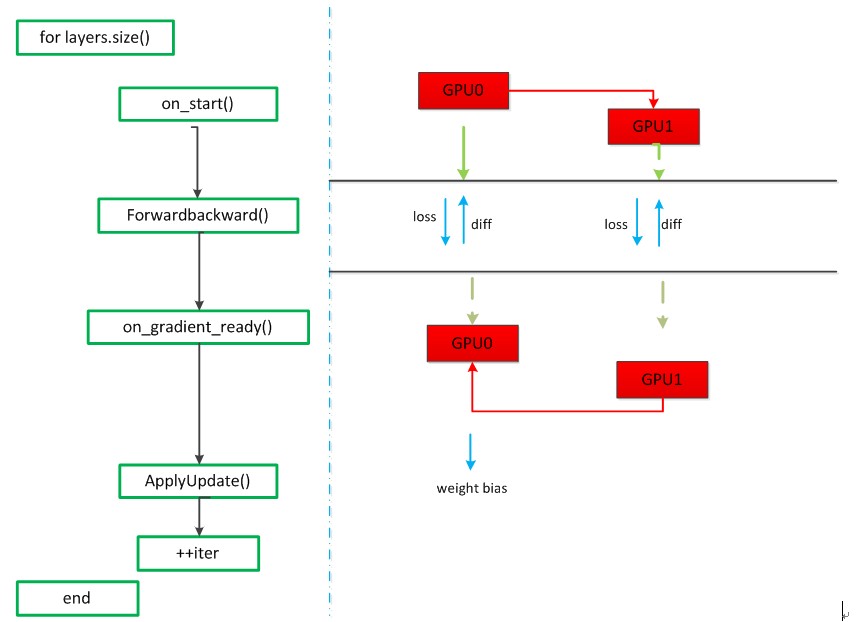
对境准备:对于多个GPU而言,一台机器2个GPU,参数交换的流程图:
参数交换从main()进入train()函数,在train函数中找到对应源码为:
 . . . . .

 if (gpus.size() > ) {

     caffe::P2PSync<float> sync(solver, NULL, solver->param());

     sync.run(gpus);

   } else {

     LOG(INFO) << "Starting Optimization";

     solver->Solve();

   }
因为GPU的个数>1,所以执行sync(solver, NULL, solver->param())和run()函数,首先会执行P2PSync类的构造函数,然后执行run()函数,run函数的代码如下:
 void P2PSync<Dtype>::run(const vector<int>& gpus) {

   vector<DevicePair> pairs;

   DevicePair::compute(gpus, &pairs);

   SolverParameter param(solver_->param());

   vector<shared_ptr<P2PSync<Dtype> > > syncs(gpus.size());

   // Build the GPU tree by finding the parent for each solver

   for (int attempts = ; attempts < pairs.size(); ++attempts) {. . . . . . .

   }

   for (int i = ; i < syncs.size(); ++i) {

 syncs[i]->StartInternalThread();

   }

   solver_->Solve();

   for (int i = ; i < syncs.size(); ++i) {

     syncs[i]->StopInternalThread();

   }

 }
在run()函数中,首先会执行compute()函数,该函数的作用是产生GPU Pairs,GPU Pairs的含义是[parent:child],对于2个GPU而言,GPU Pairs为[-1:0],[0:1],默认根GPU的parent是其本身。然后通过一个for循环构建GPU树,对于2个GPU而言,GPU树如下图所示:

接下来调用一个for循环为每个GPU开启一个线程,值得注意的是for循环是从i=1开始的,即为每个子GPU单独开启一个线程(这里为GPU1开启一个线程),也就是调用StartInternalThread()函数,该函数的代码如下:
 void InternalThread::StartInternalThread() {. . . . .

   try {

     thread_.reset(new boost::thread(&InternalThread::entry, this, device, mode,

           rand_seed, solver_count, root_solver));

   }. . . . . . .

 }
该函数接着会执行entry()函数,该函数代码如下:
 void InternalThread::entry(int device, Caffe::Brew mode, int rand_seed,

 int solver_count, bool root_solver) {

 . . . . . .

   InternalThreadEntry();

 }
该函数又会去调用InternalThreadEntry()函数,该函数是正式进入迭代运算的入口,代码如下:
 void P2PSync<Dtype>::InternalThreadEntry() {

   Caffe::SetDevice(solver_->param().device_id());

   CHECK(Caffe::root_solver());

   Caffe::set_root_solver(false);

   // See if there is a defined seed and reset random state if so

   if (solver_->param().random_seed() >= ) {

     Caffe::set_random_seed(

         solver_->param().random_seed() + solver_->param().device_id());

   }

   solver_->Step(solver_->param().max_iter() - initial_iter_);

 }
GPU1调用Step()函数,进入迭代过程,见如下源码:
 void Solver<Dtype>::Step(int iters) {

   . . . . . . . . . .

   while (iter_ < stop_iter) {

 . . . . . . . . . .

 for (int i = ; i < callbacks_.size(); ++i) {

       0_[i]->on_start();

     }

     const bool display = param_.display() && iter_ % param_.display() == ;

     net_->set_debug_info(display && param_.debug_info());

     // accumulate the loss and gradient

     Dtype loss = ;

     for (int i = ; i < param_.iter_size(); ++i) {

       loss += net_->ForwardBackward(bottom_vec);//计算loss,一次前后向

     }

     loss /= param_.iter_size();//loss归一化

     . . . . . . .

     for (int i = ; i < callbacks_.size(); ++i) {

       callbacks_[i]->on_gradients_ready();

     }

     ApplyUpdate();

     . . . . . . . . . .

     ++iter_;

   }

 }
整个Step函数的运行如上所示,首先根GPU(GPU0)有整个网络的网络参数,callbacks_.size()指的是GPU树的parent的个数(在这里是1),on_start()函数的作用就是把根GPU(GPU0)的网络参数分发到每一个子GPU(GPU1),GPU1会先进入这个函数,on_start()函数的部分代码如下:
 void P2PSync<Dtype>::on_start() {

   . . . . . . .

   // Wait for update from parent

   if (parent_) {

     P2PSync<Dtype> *parent = queue_.pop();//取队列中的第一个gpu节点为根gpu

     CHECK(parent == parent_);

   }

   . . . . . .
当执行到queue_.pop()时,会调用blocking_queue.cpp的pop()方法,pop()方法的内容如下:
 T BlockingQueue<T>::pop(const string& log_on_wait) {

   boost::mutex::scoped_lock lock(sync_->mutex_);

   while (queue_.empty()) {

     if (!log_on_wait.empty()) {

       LOG_EVERY_N(INFO, )<< log_on_wait;

     }

     sync_->condition_.wait(lock);//如果queue_为空,就一直阻塞。

   }
该方法内部有wait()函数,因为此时queue_为空,所以GPU1就会被堵塞,因为GPU0和GPU1是两个线程并行运行,所以GPU0会执行run()函数中的下一步,也就是solver_->Solve(),Solve()函数的代码如下:
 void Solver<Dtype>::Solve(const char* resume_file) {

   int start_iter = iter_;

 . . . . .

   //LOG(INFO) <<"This is the sign of the train begin?********Ni****Jian*********";  //test for nijian

   Step(param_.max_iter() - iter_);

   . . . . .

 }
Solve()函数会调用Step()函数进入迭代过程,当GPU0进入on_start()函数后,会把队列中的GPU0出队列,同时会激活被堵塞的GPU1,接下来的on_start()函数代码如下:
  . . . . .

 // Update children

   for (int i = children_.size() - ; i >= ; i--) {

     Dtype* src = data_;

     Dtype* dst = children_[i]->data_;

 #ifdef DEBUG

    . . . .

 #endif

     CUDA_CHECK(cudaMemcpyAsync(dst, src, size_ * sizeof(Dtype),

         cudaMemcpyDeviceToDevice, cudaStreamDefault));//每个子GPU把信息传入到根GPU,异步操作

     CUDA_CHECK(cudaStreamSynchronize(cudaStreamDefault));//根GPU把信息同步传到各个子GPU

     children_[i]->queue_.push(this);

   }

 #endif

 }
在该部分代码中,src指的是GPU0的data(网络参数),dst指的是GPU1的data(网络参数),通过调用cudaMemcpyAsync()函数来放置一个请求,表示在cudaStreamDefault流中执行一次内存复制操作,然后调用cudaStreamSynchronize()等待cudaStreamDefault流中的操作完成后实现流的同步。经过这两个函数后,GPU0完成了把网络参数分发给GPU1,然后children_[i]->queue_.push(this)被执行后,会调用block_queue.cpp文件中的push函数激活GPU0的子GPU,即GPU1,同时把GPU1压入队列,此时队列中只有GPU1。
 void BlockingQueue<T>::push(const T& t) {

   boost::mutex::scoped_lock lock(sync_->mutex_);

   queue_.push(t);

   lock.unlock();

   sync_->condition_.notify_one();

 }
此时,多个GPU的参数分发过程已经完成,接下来GPU0和GPU1并行执行Step()函数的下一步,即:ForwardBackward(),该函数的代码如下:
 Dtype ForwardBackward(const vector<Blob<Dtype>* > & bottom) {

     Dtype loss;

     Forward(bottom, &loss);

     Backward();

     return loss;

   }
该函数的主要作用就是就是计算出loss和梯度diff,然后再接着执行Step()函数中的下一步,即:on_gradients_ready()函数,该函数分为两个部分,第一部分是多个GPU的梯度加和,第二部分是将计算后的梯度传给根GPU(GPU0)。第一部分的代码如下:
 void P2PSync<Dtype>::on_gradients_ready() {. . . . . . . .

   // Sum children gradients as they appear in the queue

   for (int i = ; i < children_.size(); ++i) {

     P2PSync<Dtype> *child = queue_.pop();

     Dtype* src = child->parent_grads_;

     Dtype* dst = diff_;

 #ifdef DEBUG

     cudaPointerAttributes attributes;

     CUDA_CHECK(cudaPointerGetAttributes(&attributes, src));

     CHECK(attributes.device == device);

     CUDA_CHECK(cudaPointerGetAttributes(&attributes, dst));

     CHECK(attributes.device == device);

 #endif

     caffe_gpu_add(size_, src, dst, dst);

   }
第一部分是多个GPU的梯度加和,因为GPU0和GPU1是并行计算的,如果GPU0执行到这里时,会使队列中仅有的GPU1出队列,然后通过调用caffe_gpu_add()函数,将一个GPU的梯度diff直接传给另一个GPU,不需要经过CPU通信,即GPU1把其计算的diff传给GPU0。如果是GPU1执行到这里时,因为GPU1没有子GPU,所以会直接跳过这一部分。第二部分的代码如下:
   if (parent_) {

     Dtype* src = diff_;

     Dtype* dst = parent_grads_;

 #ifdef DEBUG

 #endif

     CUDA_CHECK(cudaMemcpyAsync(dst, src, size_ * sizeof(Dtype),  //

         cudaMemcpyDeviceToDevice, cudaStreamDefault));

     CUDA_CHECK(cudaStreamSynchronize(cudaStreamDefault));

     parent_->queue_.push(this);

   } else {

     // Loss functions divide gradients by the batch size, so to compensate

     // for split batch, the root solver divides by number of solvers.

     caffe_gpu_scal(size_, Dtype(1.0 / Caffe::solver_count()), diff_);

   }
如果是GPU0的话,会执行else,即caffe_gpu_scal(),该函数把得到的之前计算的梯度diff_和除以GPU的个数,来更新梯度。如果是GPU1的话,会执行if的语句,此时和on_start()函数分析类似,经过cudaMemcpyAsync()和cudaStreamSynchronize()函数操作之后,将GPU1中的梯度传送给GPU0,第二部分完成。
接下来根GPU(GPU0)会得到所有的参数信息,会执行Step()函数的下一步,即执行ApplyUpdate()函数,该函数中有一个程序:CHECK(Caffe::root_solver()),会在根GPU中利用梯度下降法更新权重,计算参数,到此为止一次迭代完成,再进入下一次迭代时,根GPU已经保存了所有的网络参数,再继续迭代循环,直至结束。
Caffe参数交换源码分析的更多相关文章
- 认识 Redis client-output-buffer-limit 参数与源码分析
概述 Redis 的 client-output-buffer-limit 可以用来强制断开无法足够快从 redis 服务器端读取数据的客户端.保护机制规则如下: [hard limit] 大小限制, ...
- caffe web demo运行+源码分析
caffe web demo学习 1.运行 安装好caffe后,进入/opt/caffe/examples/web_demo/的caffe web demo项目目录,查看一下app.py文件,这是一个 ...
- 详解SpringMVC中Controller的方法中参数的工作原理[附带源码分析]
目录 前言 现象 源码分析 HandlerMethodArgumentResolver与HandlerMethodReturnValueHandler接口介绍 HandlerMethodArgumen ...
- 性能测试分享: Jmeter的源码分析main函数参数
性能测试分享: Jmeter的源码分析main函数参数 poptest是国内唯一一家培养测试开发工程师的培训机构,以学员能胜任自动化测试,性能测试,测试工具开发等工作为目标.如果对课程感兴趣,请大 ...
- springMVC源码分析--RequestParamMethodArgumentResolver参数解析器(三)
之前两篇博客springMVC源码分析--HandlerMethodArgumentResolver参数解析器(一)和springMVC源码解析--HandlerMethodArgumentResol ...
- 【Spark篇】---Spark中资源和任务调度源码分析与资源配置参数应用
一.前述 Spark中资源调度是一个非常核心的模块,尤其对于我们提交参数来说,需要具体到某些配置,所以提交配置的参数于源码一一对应,掌握此节对于Spark在任务执行过程中的资源分配会更上一层楼.由于源 ...
- 开源网站流量统计系统Piwik源码分析——参数统计(一)
Piwik现已改名为Matomo,这是一套国外著名的开源网站统计系统,类似于百度统计.Google Analytics等系统.最大的区别就是可以看到其中的源码,这正合我意.因为我一直对统计的系统很好奇 ...
- springMVC源码分析--HttpMessageConverter参数read操作(二)
上一篇博客springMVC源码分析--HttpMessageConverter数据转化(一)中我们简单介绍了一下HttpMessageConverter接口提供的几个方法,主要有以下几个方法: (1 ...
- 【MVC - 参数原理】详解SpringMVC中Controller的方法中参数的工作原理[附带源码分析]
前言 SpringMVC是目前主流的Web MVC框架之一. 如果有同学对它不熟悉,那么请参考它的入门blog:http://www.cnblogs.com/fangjian0423/p/spring ...
随机推荐
- oracle数据的导入导出(两种方法三种方式)
大概了解数据库中数据的导入导出.在oracle中,导入导出数据的方法有两种,一种是使用cmd命令行的形式导入导出数据,另一种是使用PL/SQL工具导入导出数据. 1,使用cmd命令行导入导出数据 1. ...
- 34. Find First and Last Position of Element in Sorted Array (JAVA)
Given an array of integers nums sorted in ascending order, find the starting and ending position of ...
- AFNetworking2.0源码解析<四>
结构 AFURLResponseSerialization负责解析网络返回数据,检查数据是否合法,把NSData数据转成相应的对象,内置的转换器有json,xml,plist,image,用户可以很方 ...
- C++函数声明与定义
一个C++函数,如果没有函数声明而只有函数定义,程序照样运行,但要求这个函数定义必须放在main函数之前,否则编译按照从上到下的顺序扫描下来,就会出现编译器不认识它的情况. 如果一个程序同时有函数声明 ...
- Django【第28篇】:优化查询的方式
优化查询的方式 一.假设有三张表 Room id 1 2 .. 1000 User: id 1 .. 10000 Booking: user_id room_id time_id date 1 1 8 ...
- Java动手动脑02
一.平方数静方法: public class SquareInt { public static void main(String[] args) { int result; for (int x = ...
- HDU-4280-Island Transport(网络流,最大流, ISAP)
链接: https://vjudge.net/problem/HDU-4280 题意: In the vast waters far far away, there are many islands. ...
- MySQL数据库4Python操作mysql、索引、慢查询日志
目录 一.Python 操作 mysql 1.1python 操作 mysql 1.2查询数据 1.3增加(添加.更新)数据 1.4修改数据 1.5删除数据 1.6SQL注入问题 1.6.1问题的引入 ...
- Bugku 杂项 隐写
隐写 下载后打开压缩包发现是一张图片 用winhex打开 图中红色框内是PNG的PE头 在IHDR后面的八个字节(黄色框部分)为该图片的长度.宽度信息 将黄色框内最后一个字节由A4改为F4后另存为图片 ...
- luogu 4147 玉蟾宫 悬线DP
Code: #include<bits/stdc++.h> using namespace std; #define setIO(s) freopen(s".in",& ...