通过busybox制作根文件系统
通过busybox制作根文件系统可以自定义选项,在制作的根文件系统中添加需要的命令,指定生成的根文件系统到相应的目录下。
一. 根文件系统的获取方式--->官网:
https://busybox.net/downloads/
二. 使用busybox制作根文件系统
第一步 生成基本命令
1. 解压 【 tar -xvf busybox-1.30.0.tar.bz2 】
2. 配置交叉编译工具 打开busybox的顶层目录
(1) Vi Makefile
(2) 修改内容: (不修改内容编译时就要指定这两个变量的值,如 make ARCH=arm CROSS_COMPILE=arm-linux-)
164行 CROSS_COMPILE ?=  改为:CROSS_COMPILE ?= arm-linux-

190行 ARCH ?= $(SUBARCH) 改为:ARCH ?= arm
表示修改交叉工具链为arm-linux- 架构支持arm架构
3. 默认配置:导出配置文件【 make defconfig 】
或者指定输出目录 make defconfig O=../output 指定的输出目录output需要自己事先创建
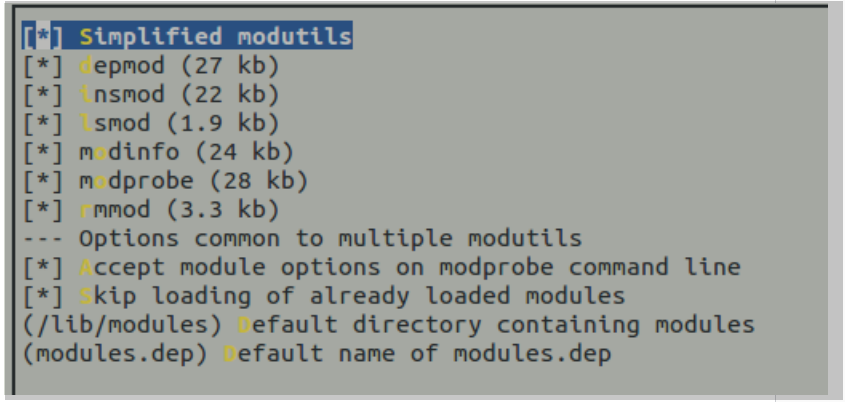
4. 自定义选项配置 图形化配置界面 启动命令:【 make menuconfig 】
(1)添加 insmod rmmod modinfo等命令,在配置界面中找到“Linux Module Utilities”然后选中相应的命令

(2) 配置工具生成到指定的目录
Busybox Setting -------->
Installation Options ("make install" behavior) --->
(./_install) BusyBox installation prefix
5. 编译
$ make 或者 make all -j4 V=1 PC机下linux中多核编译
$ make install
6. 清除编译过程的文件及配置
【make clean 】 清除 .o .bin 文件
【make mrproper】 清除 .o .bin 配置文件
【make distclean】 清除 .o .bin 配置文件
第二步 构建基础文件和目录 -- 根文件系统制作
- 通过 make install 命令把生成的根文件创建在顶层目录 _install下,如果是通过 make defconfig O=../output 导出配置的,则在相应的output目录下进入_install目录

2. 在_install目录下创建根文件系统所需要的目录: _install $ mkdir dev etc home lib mnt proc root sys tmp var -p
3. 在创建的根文件系统的 etc目录下创建inittab文件:_install $ touch etc/inittab
#this is run first except when booting in single-user mode.

::sysinit:/etc/init.d/rcS

# /bin/sh invocations on selected ttys

::respawn:-/bin/sh

# Start an "askfirst" shell on the console (whatever that may be)

::askfirst:-/bin/sh

# Stuff to do when restarting the init process

::restart:/sbin/init

# Stuff to do before rebooting

::ctrlaltdel:/sbin/reboot

::shutdown:/sbin/swapoff -a
4. 继续创建目录及文件如下:
(1) _install $ mkdir etc/init.d/ -p
(2) _install $ touch etc/init.d/rcS
(3) _install $ gedit etc/init.d/rcS 在此文件内添加内容如下
#!/bin/sh

#This is the first script called by init process

/bin/mount -a

echo /sbin/mdev>/proc/sys/kernel/hotplug

mdev -s
5. _install $ touch etc/fstab
_install $ gedit etc/fstab 文件中添加内容如下:
#device     mount-point     type         options       dump     fsck order

proc        /proc           proc         defaults

tmpfs       /tmp            tmpfs       defaults

sysfs       /sys            sysfs        defaults

tmpfs       /dev            tmpfs        defaults
6. _install $ touch etc/profile
_install $ gedit etc/profile 文件中添加内容如下:
#!/bin/sh

export HOSTNAME=farsight

export USER=root

export HOME=root

export PS1="[$USER@$HOSTNAME \W]\# "

#export PS1="[\[\033[01;32m\]$USER@\[\033[00m\]\[\033[01;34m\]$HOSTNAME\[\033[00m\ \W]\$ "

PATH=/bin:/sbin:/usr/bin:/usr/sbin

LD_LIBRARY_PATH=/lib:/usr/lib:$LD_LIBRARY_PATH

export PATH LD_LIBRARY_PATH
7. 添加动态库支持 // 查看命令在哪个目录下面 which arm-none-linux-gnueabi-gcc
(1) 查看命令依赖的库文件 :arm-none-linux-gnueabi-readelf -d /bin/ls
(2) _install $ cp /opt/gcc-4.9.4/arm-none-linux-gnueabi/sysroot/lib/* lib -ra 表示把相应目录下的所有文件拷贝到制作的根文件系统的 lib目录下

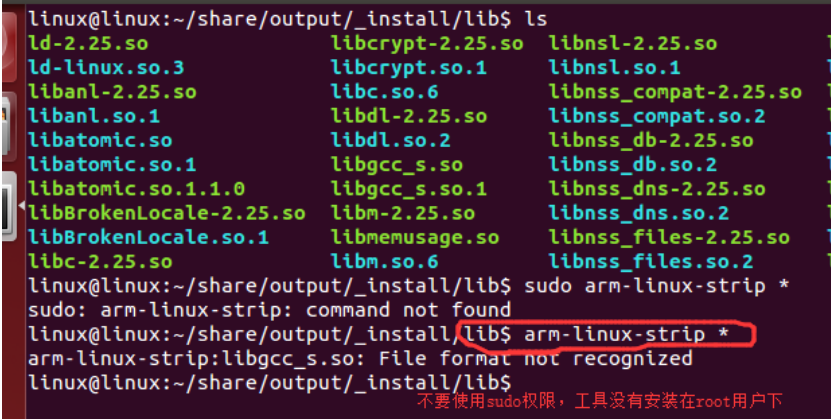
(3) 为了减少体积删除静态库 _install/lib $ rm lib/*.a
(4) 剥离动态库的调试信息,符号表等等 du -h 查看文件大小;瘦身_install/lib $ arm-linux-strip * 注意操作的目录;如果没有权限把所有的文件权限修改 chmod 777 *
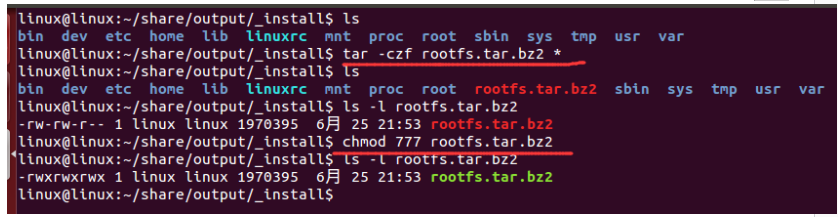
然后把制作的根文件系统目录压缩即可,并修改权限

8. 通过 eMMC 挂载根文件系统
首先(使用SD卡启动uboot)通过网络挂载根文件系统,通过tftp服务把uboot和linux内核镜像分别下载到内存0x41000000地址处然后通过mmc命令把uboot和linux内核镜像烧写到eMMC中,把剩余的部分分区设置为根文件系统使用。
Uboot下操作:基于s5p6818 移植
在uboot命令行下把tftp 0x41000000 win-uboot.bin ----> mmc dev 2----> mmc write 0x41000000 0 0x300 把0x41000000地址处写入eMMc中从第0块开始写,写入0x300块;接着在把内核镜像烧写到eMMC中,步骤如上,只是下载和烧写的是uImage。(dev 2表示切换到emmc下,dev 0 表示切换到SD下)
启动系统后操作:
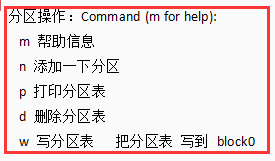
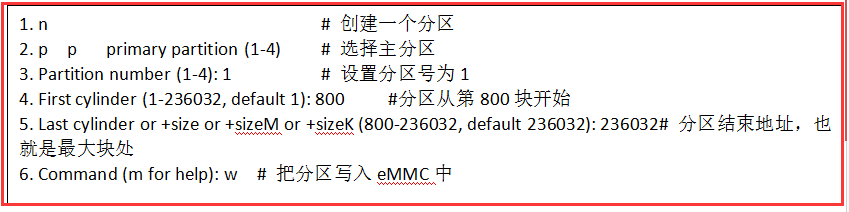
(1)先进入系统后使用分区命令: fdisk /dev/mmcblk0 表示把emmc分区
(2)格式化分区:mkfs.ext2 /dev/mmcblk0p1 # 格式化分区为ext2类型文件系统
(3)目标板挂载文件系统到 /mnt :mount -t ext2 /dev/mmcblk0p1 /mnt
(4)把制作的根文件系统拷到nfs目录下,然后在目标板上把制作的根文件系统压缩包拷贝到挂载点处
(5)解除挂载:umount /mnt
(6)设置uboot的bootargs启动参数
set bootargs “root=/dev/mmcblk0p1 rw rootfstype=ext2 init=/linuxrc console=ttySAC0,115200 ip=192.168.3.132” # 最后的ip为宿主机ip
(7)设置启动地址:
set bootcmd "mmc dev 2;mmc read 0x41000000 500 3000; bootm 0x41000000"
(8)启动开发板 挂载成功
****************************************************************************************************************************
*****************************************************************************************************************************
*****************************************************************************************************************************
ramdisk 制作cramfs (只读文件系统)
1. 按照给的 Makefile 文件制作 ramdisk.img
2. 修改内核配置 make menuconfig
Device Drivers --->
[*] Block devices --->
<*> RAM block device support
(16) Default number of RAM disks
(51200) Default RAM disk size (kbytes)
$ make uImage
$ cp arch/arm/boot/uImage ~/tftpboot
3. FS6818# set bootcmd "tftp 0x41000000 uImage;tftp 0x42000000 ramdisk.img; bootm 0x41000000 0x42000000"
FS6818# set bootargs "root=/dev/ram rw initrd=0x42000040,0x1000000 rootfstype=ext4 init=/linuxrc console=ttySAC0,115200"
通过 fatload 获取 uImage ramdisk.img
1. uboot 也支持文件系统 可以识别 vfat 文件系统
2. FS6818# set bootargs "root=/dev/ram rw initrd=0x42000040,0x1000000 rootfstype=ext4 init=/linuxrc console=ttySAC0,115200"
FS6818# set bootcmd "fatload mmc 0 0x41000000 uImage;fatload mmc 0 0x42000000 ramdisk.img; bootm 41000000 42000000"
1. 启动linux内核 进入命令行(正常挂载根文件系统)
2. fdisk /dev/mmcblk1 分区命令
3. Command (m for help): n
4. Partition number (1-4):
5. First cylinder (1-241152, default 1):
6. Last cylinder or +size or +sizeM or +sizeK (600-241152, default 241152): 241152
7. Command (m for help): w
8. mkfs.vfat /dev/mmcblk1p1
9. mount -t vfat /dev/mmcblk1p1 /mnt/
10. cp ramdisk.img uImage /mnt/
11. sync
12. umount /mnt/
以上 命令 都是在 开发板 linux 内核中 执行
1. 重启开发板 进入 uboot 命令行 配置uboot 环境变量
FS6818# set bootargs "root=/dev/ram rw initrd=0x42000040,0x1000000 rootfstype=ext4 init=/linuxrc console=ttySAC0,115200"
FS6818# set bootcmd "fatload mmc 0 0x41000000 uImage;fatload mmc 0 0x42000000 ramdisk.img; bootm 41000000 42000000"
2. 执行 boot 命令,开始解析 bootcmd 环境变量
FS6818# boot
通过busybox制作根文件系统的更多相关文章
- 通过busybox制作根文件系统详细过程
我在之前的uboot通过NFS挂载ubuntu根文件系统中也有实现过根文件系统的制作,那只是在ubuntu官网已经做好的根文件基础上安装一些自己所需的软解而已.而使用busybox制作根文件系统可以自 ...
- zju(4)使用busybox制作根文件系统
1.实验目的 1.学习和掌握busybox相关知识及应用: 2.学会使用交叉编译器定制一个busybox: 3.利用该busybox制作一个文件系统: 4.熟悉根文件系统组织结构: 5.定制.编译ra ...
- 利用busybox制作根文件系统
实际项目中可以使用Buildroot制作根文件系统 1.busybox源码下载及配置 https://busybox.net/downloads/ 1.1.修改Makefile (1) ARCH = ...
- 使用BusyBox制作根文件系统【转】
本文转载自:http://www.cnblogs.com/lidabo/p/5300180.html 1.BusyBox简介 BusyBox 是很多标准 Linux 工具的一个单个可执行实现.Busy ...
- 使用BusyBox制作根文件系统
1.BusyBox简介 BusyBox 是很多标准 Linux 工具的一个单个可执行实现.BusyBox 包含了一些简单的工具,例如 cat 和 echo,还包含了一些更大.更复杂的工具,例如 gre ...
- tiny4412 busybox制作根文件系统rootfs nfs 挂载 ubuntu 14.04
http://blog.csdn.net/liudijiang/article/details/50555429(转) 首先得要有制作好的uboot和linux内核镜像zImage,先烧录到sd卡里, ...
- Linux 利用busybox制作根文件系统
busybox版本:1.17.3 官网下载路径:https://busybox.net/downloads/ 网盘下载路径:https://pan.baidu.com/s/1nvrEa73 密码:7y ...
- 第4阶段——制作根文件系统之分析init进程(2)
本节目标: (1) 了解busybox(init进程和命令都放在busybox中) (2) 创建SI工程,分析busybox源码来知道init进程做了哪些事情 (3) 分析busybox中init进 ...
- Busybox构建根文件系统和制作Ramdisk
定制根文件系统的方法很多,最常用的是使用BusyBox来构建定制根文件系统.它集成压缩了Linux的许多工具和命令,可以使用户迅速方便地建立一套相对完整.功能丰富的文件系统,其中包括大量常用的应用 ...
随机推荐
- A Network in a Laptop: Rapid Prototyping for Software-Defined Networks
文章名称:A Network in a Laptop: Rapid Prototyping for Software-Defined Networks 文章来源:Lantz B , Heller B ...
- 进阶1:Linux 环境准备_ 设置网络IP_安装火狐浏览器
VM 已安装 centos6.5 Final 已安装 配置好了Linux IP ,并能ping 通 ,例如 : ping www.baidu.com 设置LINUX 网络IP: https://j ...
- php服务器环境安装及项目搭建
2安装运行环境及搭建项目2.1安装apache及测试1)安装apacheyum install httpd 启动apache systemctl start httpd.service 查看运行状态 ...
- Codeforces Round #369 (Div. 2) A. Bus to Udayland (水题)
Bus to Udayland 题目链接: http://codeforces.com/contest/711/problem/A Description ZS the Coder and Chris ...
- postgresql获取表最后更新时间(通过发布订阅机制将消息发送给应用程序)
一.创建测试表 CREATE TABLE weather( city ), temp_lo int, --最低温度 temp_hi int, --最高温度 prcp real, --湿度 date d ...
- 【转】C++ 模板类的声明与实现分离问题
链接如下: https://www.cnblogs.com/tonychen-tobeTopCoder/p/5199655.html
- tikz: keep in mind these
don't add % in title, xlabel, ylabel etc., use \%
- Free Pascal User’s Guide
https://www.freepascal.org/docs-html/current/user/user.html
- 【FICO系列】SAP 财务帐与后勤不一致情况
公众号:SAP Technical 本文作者:matinal 原文出处:http://www.cnblogs.com/SAPmatinal/ 原文链接:[FICO系列]SAP 财务帐与后勤不一致情况 ...
- tensorflow和pytorch的区别
pytorch是动态框架,tensorflow是静态框架 针对tensorflow,我们先构造了一个计算图,构建完之后,这个计算图就不能改变了,我们再开启会话,输入数据,进行计算.那么这个流程就是固定 ...