
Binding 中 Elementname,Source,RelativeSource 三种绑定的方式
在WPF应用的开发过程中Binding是一个非常重要的部分。
在实际开发过程中Binding的不同种写法达到的效果相同但事实是存在很大区别的。
这里将实际中碰到过的问题做下汇总记录和理解。
1. source = {binding} 和source = {binding RelativeSource={RelativeSource self},Path=DataContext}效果相同
理解:{binding} 不设定明确的绑定的source,这样binding就去从本控件类为开始根据可视树的层次结构自下而上查找不为空的Datacontext属性的值。
{binding RelativeSource={RelativeSource self},Path=DataContext}中RelativeSource self的含义为绑定的source为控件自身,这样binding 就绑定了自身控件的Datacontext。
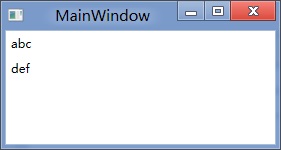
效果:
     <StackPanel DataContext="abc">

        <Label Content="{Binding}"></Label>

        <Label Content="{Binding RelativeSource={RelativeSource Self},Path=DataContext}"></Label>

    </StackPanel>

    <StackPanel DataContext="abc">

        <Label Content="{Binding}"></Label>

        <Label DataContext="def" Content="{Binding RelativeSource={RelativeSource Self},Path=DataContext}"></Label>

    </StackPanel>
2.在Template的Trigger中改变Template中某个样式控件的属性
    <Style TargetType="{x:Type Button}">

        <Setter Property="Template">

            <Setter.Value>

                <ControlTemplate TargetType="{x:Type Button}">

                    <Border>

                        <Label x:Name="PART_Label" Content="{TemplateBinding ContentA}" />

                    </Border>

                    <ControlTemplate.Triggers>

                        <Trigger Property="IsChecked" Value="True">

                        注:    <Setter TargetName="PART_Label" Property="Content" Value="{Binding Path=ContentB, RelativeSource={RelativeSource TemplatedParent}}" />

                        </Trigger>

                    </ControlTemplate.Triggers>

                </ControlTemplate>

            </Setter.Value>

        </Setter>

    </Style>
当然把注:的这句改成<Setter TargetName="PART_Label" Property="Content" Value="{Binding Path=ContentB, RelativeSource={RelativeSource AncestorType={x:Type Button}}}">效果一样。
当一个Binding有明确的数据来源时可以通过为Source或ElementName赋值的办法让Binding与之关联,有的时候由于不能确定Source的对象叫什么名字,但知道它与作为Binding目标的对象在UI布局上有相对关系,比如控件自己关联自己的某个数据、关联自己某级容器的数据,就要使用Binding的RelativeSource属性。RelativeSource属性的数据类型为RelativeSource类,通过这个类的几个静态或非静态属性可以控制它搜索相对数据源的方式。
我们来看一看Elementname,Source,RelativeSource 三种绑定的方式
1.ElementName顾名思义就是根据Ui元素的Name来进行绑定:
例子:
  <Window x:Name="MainWindow">

         <Grid>

               <Button Background=”{Binding ElementName=MainWindow, Path=Background}”/>

         </Grid>

  </Window>

效果等同于

<Window>

   <Grid>

      <Button Background=”{Binding RelativeSource={RelativeSource Mode=FindAncestor, AncestorType={x:Type Window},Path=Background}”/>

   </Grid>

</Window>
区别:
ElementName属性用于引用一个UI对象的名称,其的作用域在同一XAML文件内,不能引用另一XAML文件的某个Ui元素名。
2.Source属性用于指定对象绑定路径的引用。 其特点是:Source属性通常用于绑定设置的对象时,是已知的。
 <Window x:Name="MainWindow">

         <Grid>

               <Button Background=”{Binding Source={StaticResource ButtonStyle}}”/>

         </Grid>

</Window>
3.RelativeSource
在不确定绑定的Source时,但知道与绑定对象两者相对关系时就需要使用RelativeSource,这也是RelativeSource 与ElementName和Source的最大区别。
RelativeSource 的三种典型用法:
/1.UI元素的一个属性绑定在自身的另一个属性上
<Label Background = {Binding Path=Forgroud, RelativeSource={RelativeSource Self}} />
/2.UI元素的一个属性绑定在某个父元素的属性上
<Grid>

   <Label Background = {Binding Path=Background, RelativeSource={RelativeSource AncestorType={x:Type Grid}}}/>

</Grid>
/3.Template中的元素的属性绑定在Template使用者元素的属性上
{Binding Path=PathToProperty, RelativeSource={RelativeSource TemplatedParent}}
例子:
<Style TargetType="{x:Type local:NumericUpDown}">

  <Setter Property="HorizontalAlignment" Value="Center"/>

  <Setter Property="VerticalAlignment" Value="Center"/>

  <Setter Property="Template">

    <Setter.Value>

      <ControlTemplate TargetType="{x:Type local:NumericUpDown}">

        <Grid Margin="">

          <Grid.RowDefinitions>

            <RowDefinition/>

            <RowDefinition/>

          </Grid.RowDefinitions>

          <Grid.ColumnDefinitions>

            <ColumnDefinition/>

            <ColumnDefinition/>

          </Grid.ColumnDefinitions>

          <Border BorderThickness="" BorderBrush="Gray"

                  Margin="" Grid.RowSpan=""

                  VerticalAlignment="Center" HorizontalAlignment="Stretch">

            <TextBlock Text="{Binding RelativeSource={RelativeSource TemplatedParent}, Path=Value}"

                       Width="" TextAlignment="Right" Padding=""/>

          </Border>

        </Grid>

      </ControlTemplate>

    </Setter.Value>

  </Setter>

</Style>
利用TemplateBinding 绑定模板与原对象之间的属性
{TemplateBinding Path=PathToProperty}
例子:
 <ControlTemplate TargetType="{x:Type Button}"  x:Key="buttonTemp">

       <Border BorderThickness="" Background="{TemplateBinding Foreground}">

           <TextBlock Foreground="{TemplateBinding Background}"/>

        </Border>

 </ControlTemplate>
转载时,请注明本文来源:www.cnblogs.com/tmywu
Binding 中 Elementname,Source,RelativeSource 三种绑定的方式的更多相关文章
- javascript中var let const三种变量声明方式
javascript中var let const三种变量声明方式 1.var ①var表示声明了一个变量,并且可以同时初始化该变量. ②使用var语句声明的变量的作用域是当前执行位置的上下文:一个函 ...
- spring boot:thymeleaf模板中insert/include/replace三种引用fragment方式的区别(spring boot 2.3.3)
一,thymeleaf模板中insert/include/replace三种引用fragment方式的区别 insert: 把整个fragment(包括fragment的节点tag)插入到当前节点内部 ...
- 后台将数据传回前台的三种绑定的方式(Model,Map.ModelAndView)
//方式1:通过model 将数据绑定 @RequestMapping(value = "findByIdModel", method = RequestMethod.GET) p ...
- js this详解,事件的三种绑定方式
this,当前触发事件的标签 在绑定事件中的三种用法: a. 直接HTML中的标签里绑定 onclick="fun1()"; b. 先获取Dom对象,然后利用dom对象在js里绑定 ...
- Dom事件的三种绑定方式
1.事件 2. onclick, onblur, onfocus, 需求:请写出一个行为,样式,结构,相分离的页面. JS, CSS, HTML, 示例1,行为结构样式粘到一起的页面: & ...
- jQuery中detach&&remove&&empty三种方法的区别
jQuery中empty&&remove&&detach三种方法的区别 empty():移除指定元素内部的所有内容,但不包括它本身 remove():移除指定元素内部的 ...
- Hibernate中Java对象的三种状态
Hibernate中Java对象的三种 ...
- .NET中的三种接口实现方式
摘自:http://www.cnblogs.com/zhangronghua/archive/2009/11/25/1610713.html 一般来说.NET提供了三种不同的接口实现方式,分别为隐式接 ...
- C语言中最常用的三种输入输出函数scanf()、printf()、getchar()和putchar()
本文给大家介绍C语言中最常用的三种输入输出函数scanf().printf().getchar()和putchar(). 一.scanf()函数格式化输入函数scanf()的功能是从键盘上输入数据,该 ...
随机推荐
- SELECT /*!40001 SQL_NO_CACHE */ * INTO OUTFILE '/tmp/ClientActionTrack2015112511.txt' 不堵塞事务
mysql> insert into ClientActionTrack20151125(clientSn,ip,url,httpMethod,requestParams,requestHead ...
- 【2015年最新App Store退款流程详解】最详细AppStore退款流程图文教程
本帖最后由 想吐就吐出来 于 2015-7-1 14:25 编辑 如果你一不小心买错了iOS软件,从App Store上下载了游戏或软件后悔了,那怎么办?可以退款吗?答案是可以的!苹果这点还是很人性化 ...
- Translate one
打开一个新窗口并加载给定URL指定的文档. 导航应用程序窗口到指定的位置. 语法 var retval = window.open(url, name, features, replace); 参数 ...
- SQL中and与or优先级比较
刚刚在项目中遇到这样一个问题,SQL语句如下: select * from LOAN_BACK_LIBRARY where LIBRARY_ID=1 or LIB_ID=1 and STATUS=3 ...
- vs2010 更新jQuery智能提示包
vs2010 更新jQuery只能提示包时,可以直接在NuGet中更新 jquery-2.1.0-vsdoc.js jquery-2.1.0.js jquery-2.1.0.min.js jquery ...
- CC2530芯片介绍
CC2530,体积更小,功能全, C8051内核,使用起来跟平时的单片机没什么两样,就是程序复杂一些,需要一些时日才能看懂,吃透就更长了,而且对于CC2530TI公司提供了一套完整的解决方案,有布线图 ...
- [ZETCODE]wxWidgets教程五:布局管理
本教程原文链接:http://zetcode.com/gui/wxwidgets/layoutmanagement/ 翻译:瓶哥 日期:2013年12月4日星期三 邮箱:414236069@qq.co ...
- 使用aespython进行ECB加解密示例
CBC示例: from aespython import cbc_mode, key_expander, aes_cipher key = 'MluJMEZegVmrnWDaBiG1j7lqpkxNH ...
- JQ绑定事件(1.9已经废除了live()等绑定事件方法,on()方法是官方推荐的绑定事件的一个方法)
本文来源:http://www.cnblogs.com/leejersey/p/3545372.html jQuery on()方法是官方推荐的绑定事件的一个方法. $(selector).on(ev ...
- 搜索算法:深度优先搜索(DFS)
关于深搜的介绍,在网上有很多,不再赘述.主要以题目形式实例讲解. POJ - 1321 (http://poj.org/problem?id=1321) 题目大意:给出一个棋盘,棋子不能同行同列,求放 ...