SprimgMVC学习笔记(二)—— 整合Mybatis
一、整合思路
1.1 Dao层
- SqlMapConfig.xml:空文件即可,但是需要文件头。
applicationContext-dao.xml
数据库连接池
SqlSessionFactory对象,需要spring和mybatis整合包下的。
配置mapper文件扫描器。
1.2 Service层
- applicationContext-service.xml:包扫描器,扫描@service注解的类。
- applicationContext-trans.xml:配置事务。
1.3 Controller层
Springmvc.xml:
- 包扫描器,扫描@Controller注解的类。
配置注解驱动
配置视图解析器
- Web.xml文件:
配置监听器读取applicationContext.xml上下文
配置前端控制器读取springmvc.xml
- 配置POST提交乱码过滤器
二、整合步骤
2.1 创建动态web工程
2.2 导入jar包
spring(包括springmvc)
mybatis
mybatis-spring整合包
数据库驱动
第三方连接池。
Json依赖包Jackson

2.3 加入配置文件
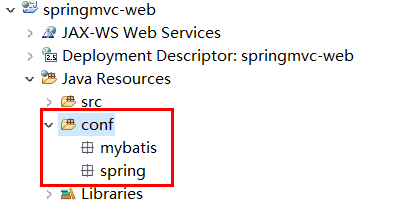
创建资源文件夹config,在其下创建mybatis和spring文件夹,用来存放配置文件,如下图:
【SqlMapConfig.xml】
使用逆向工程来生成Mapper相关代码,不需要配置别名。在config/mybatis下创建SqlMapConfig.xml
<?xml version="1.0" encoding="UTF-8"?>

<!DOCTYPE configuration

PUBLIC "-//mybatis.org//DTD Config 3.0//EN"

"http://mybatis.org/dtd/mybatis-3-config.dtd">

<configuration>

</configuration>
【applicationContext-dao.xml】
配置数据源、配置SqlSessionFactory、mapper扫描器。
<?xml version="1.0" encoding="UTF-8"?>

<beans xmlns="http://www.springframework.org/schema/beans"

    xmlns:context="http://www.springframework.org/schema/context" xmlns:p="http://www.springframework.org/schema/p"

    xmlns:aop="http://www.springframework.org/schema/aop" xmlns:tx="http://www.springframework.org/schema/tx"

    xmlns:xsi="http://www.w3.org/2001/XMLSchema-instance"

    xsi:schemaLocation="http://www.springframework.org/schema/beans http://www.springframework.org/schema/beans/spring-beans-4.0.xsd

    http://www.springframework.org/schema/context http://www.springframework.org/schema/context/spring-context-4.0.xsd

    http://www.springframework.org/schema/aop http://www.springframework.org/schema/aop/spring-aop-4.0.xsd http://www.springframework.org/schema/tx http://www.springframework.org/schema/tx/spring-tx-4.0.xsd

    http://www.springframework.org/schema/util http://www.springframework.org/schema/util/spring-util-4.0.xsd">

    <!-- 加载配置文件 -->

    <context:property-placeholder location="classpath:db.properties"/>

    <!-- 数据库连接池 -->

    <!-- destroy-method="close"的作用是当数据库连接不使用的时候,就把该连接重新放到数据池中,方便下次使用调用. -->

    <bean id="dataSource" class=" org.apache.commons.dbcp.BasicDataSource" destroy-method="close">

        <property name="driverClassName" value="${jdbc.driver}" />

        <property name="url" value="${jdbc.url}" />

        <property name="username" value="${jdbc.username}" />

        <property name="password" value="${jdbc.password}" />

        <property name="maxActive" value="10" />

        <property name="maxIdle" value="5" />

    </bean>

    <!-- 配置SqlSessionFactory -->

    <bean id="sqlSessionFactory" class="org.mybatis.spring.SqlSessionFactoryBean">

        <!-- 数据库连接池 -->

        <property name="dataSource" ref="dataSource"/>

        <!-- 加载mybatis的全局配置文件 -->

        <property name="configLocation" value="classpath:mybatis/SqlMapConfig.xml"/>

    </bean>

    <!-- 配置Mapper扫描 -->

    <bean class="org.mybatis.spring.mapper.MapperScannerConfigurer">

        <!-- 配置Mapper扫描包 -->

        <property name="basePackage" value="cn.itcast.ssm.mapper"></property>

    </bean>

</beans>
【db.properties】
jdbc.driver=com.mysql.jdbc.Driver

jdbc.url=jdbc:mysql://localhost:3306/springmvc?characterEncoding=utf-8

jdbc.username=root

jdbc.password=root
【applicationContext-service.xml】
<?xml version="1.0" encoding="UTF-8"?>

<beans xmlns="http://www.springframework.org/schema/beans"

    xmlns:context="http://www.springframework.org/schema/context" xmlns:p="http://www.springframework.org/schema/p"

    xmlns:aop="http://www.springframework.org/schema/aop" xmlns:tx="http://www.springframework.org/schema/tx"

    xmlns:xsi="http://www.w3.org/2001/XMLSchema-instance"

    xsi:schemaLocation="http://www.springframework.org/schema/beans http://www.springframework.org/schema/beans/spring-beans-4.0.xsd

    http://www.springframework.org/schema/context http://www.springframework.org/schema/context/spring-context-4.0.xsd

    http://www.springframework.org/schema/aop http://www.springframework.org/schema/aop/spring-aop-4.0.xsd http://www.springframework.org/schema/tx http://www.springframework.org/schema/tx/spring-tx-4.0.xsd

    http://www.springframework.org/schema/util http://www.springframework.org/schema/util/spring-util-4.0.xsd">

    <!-- 配置service扫描 -->

    <context:component-scan base-package="cn.itcast.ssm.service" />

</beans>
【applicationContext-trans.xml】
<?xml version="1.0" encoding="UTF-8"?>

<beans xmlns="http://www.springframework.org/schema/beans"

    xmlns:context="http://www.springframework.org/schema/context" xmlns:p="http://www.springframework.org/schema/p"

    xmlns:aop="http://www.springframework.org/schema/aop" xmlns:tx="http://www.springframework.org/schema/tx"

    xmlns:xsi="http://www.w3.org/2001/XMLSchema-instance"

    xsi:schemaLocation="http://www.springframework.org/schema/beans http://www.springframework.org/schema/beans/spring-beans-4.0.xsd

    http://www.springframework.org/schema/context http://www.springframework.org/schema/context/spring-context-4.0.xsd

    http://www.springframework.org/schema/aop http://www.springframework.org/schema/aop/spring-aop-4.0.xsd http://www.springframework.org/schema/tx http://www.springframework.org/schema/tx/spring-tx-4.0.xsd

    http://www.springframework.org/schema/util http://www.springframework.org/schema/util/spring-util-4.0.xsd">

    <!-- 事务管理器 -->

    <bean id="transactionManager"

        class="org.springframework.jdbc.datasource.DataSourceTransactionManager">

        <!-- 数据源 -->

        <property name="dataSource" ref="dataSource" />

    </bean>

    <!-- 通知 -->

    <tx:advice id="txAdvice" transaction-manager="transactionManager">

        <tx:attributes>

            <!-- 传播行为 -->

            <tx:method name="save*" propagation="REQUIRED" />

            <tx:method name="insert*" propagation="REQUIRED" />

            <tx:method name="delete*" propagation="REQUIRED" />

            <tx:method name="update*" propagation="REQUIRED" />

            <tx:method name="find*" propagation="SUPPORTS" read-only="true" />

            <tx:method name="get*" propagation="SUPPORTS" read-only="true" />

            <tx:method name="query*" propagation="SUPPORTS" read-only="true" />

        </tx:attributes>

    </tx:advice>

    <!-- 切面 -->

    <aop:config>

        <aop:advisor advice-ref="txAdvice"

            pointcut="execution(* cn.itcast.ssm.service.*.*(..))" />

    </aop:config>

</beans>
【springmvc.xml】
<?xml version="1.0" encoding="UTF-8"?>

<beans xmlns="http://www.springframework.org/schema/beans"

    xmlns:xsi="http://www.w3.org/2001/XMLSchema-instance" xmlns:p="http://www.springframework.org/schema/p"

    xmlns:context="http://www.springframework.org/schema/context"

    xmlns:mvc="http://www.springframework.org/schema/mvc"

    xsi:schemaLocation="http://www.springframework.org/schema/beans http://www.springframework.org/schema/beans/spring-beans-4.0.xsd

        http://www.springframework.org/schema/mvc http://www.springframework.org/schema/mvc/spring-mvc-4.0.xsd

        http://www.springframework.org/schema/context http://www.springframework.org/schema/context/spring-context-4.0.xsd">

    <!-- 配置controller扫描包 -->

    <context:component-scan base-package="cn.itcast.ssm.controller" />

    <!-- 注解驱动 -->

    <mvc:annotation-driven />

    <!-- Example: prefix="/WEB-INF/jsp/", suffix=".jsp", viewname="test" ->

        "/WEB-INF/jsp/test.jsp" -->

    <!-- 配置视图解析器 -->

    <bean

        class="org.springframework.web.servlet.view.InternalResourceViewResolver">

        <!-- 配置逻辑视图的前缀 -->

        <property name="prefix" value="/WEB-INF/jsp/" />

        <!-- 配置逻辑视图的后缀 -->

        <property name="suffix" value=".jsp" />

    </bean>

</beans>
【web.xml】
<?xml version="1.0" encoding="UTF-8"?>

<web-app xmlns:xsi="http://www.w3.org/2001/XMLSchema-instance"

    xmlns="http://java.sun.com/xml/ns/javaee"

    xsi:schemaLocation="http://java.sun.com/xml/ns/javaee http://java.sun.com/xml/ns/javaee/web-app_2_5.xsd"

    id="WebApp_ID" version="2.5">

    <display-name>springmvc-web</display-name>

    <welcome-file-list>

        <welcome-file>index.html</welcome-file>

        <welcome-file>index.htm</welcome-file>

        <welcome-file>index.jsp</welcome-file>

        <welcome-file>default.html</welcome-file>

        <welcome-file>default.htm</welcome-file>

        <welcome-file>default.jsp</welcome-file>

    </welcome-file-list>

    <!-- 配置spring -->

    <context-param>

        <param-name>contextConfigLocation</param-name>

        <param-value>classpath:spring/applicationContext*.xml</param-value>

    </context-param>

    <!-- 使用监听器加载spring配置文件 -->

    <listener>

        <listener-class>org.springframework.web.context.ContextLoaderListener</listener-class>

    </listener>

    <!-- 配置SrpingMVC的前端控制器 -->

    <servlet>

        <servlet-name>springmvc-web</servlet-name>

        <servlet-class>org.springframework.web.servlet.DispatcherServlet</servlet-class>

        <init-param>

            <param-name>contextConfigLocation</param-name>

            <param-value>classpath:spring/springmvc.xml</param-value>

        </init-param>

    </servlet>

    <servlet-mapping>

        <servlet-name>springmvc-web</servlet-name>

        <!-- 配置所有以action结尾的请求进入SpringMVC -->

        <url-pattern>*.action</url-pattern>

    </servlet-mapping>

</web-app>
2.4 加入jsp页面
将itemList.jsp放到WEB-INF/jsp目录下
<%@ page language="java" contentType="text/html; charset=UTF-8"

    pageEncoding="UTF-8"%>

<%@ taglib uri="http://java.sun.com/jsp/jstl/core" prefix="c" %>

<%@ taglib uri="http://java.sun.com/jsp/jstl/fmt"  prefix="fmt"%>

<!DOCTYPE html PUBLIC "-//W3C//DTD HTML 4.01 Transitional//EN" "http://www.w3.org/TR/html4/loose.dtd">

<html>

<head>

<meta http-equiv="Content-Type" content="text/html; charset=UTF-8">

<title>查询商品列表</title>

</head>

<body>

<form action="${pageContext.request.contextPath }/item/queryitem.action" method="post">

查询条件:

<table width="100%" border=1>

<tr>

<td><input type="submit" value="查询"/></td>

</tr>

</table>

商品列表:

<table width="100%" border=1>

<tr>

    <td>商品名称</td>

    <td>商品价格</td>

    <td>生产日期</td>

    <td>商品描述</td>

    <td>操作</td>

</tr>

<c:forEach items="${itemList }" var="item">

<tr>

    <td>${item.name }</td>

    <td>${item.price }</td>

    <td><fmt:formatDate value="${item.createtime}" pattern="yyyy-MM-dd HH:mm:ss"/></td>

    <td>${item.detail }</td>

    <td><a href="${pageContext.request.contextPath }/itemEdit.action?id=${item.id}">修改</a></td>

</tr>

</c:forEach>

</table>

</form>

</body>

</html>
三、实现商品列表显示
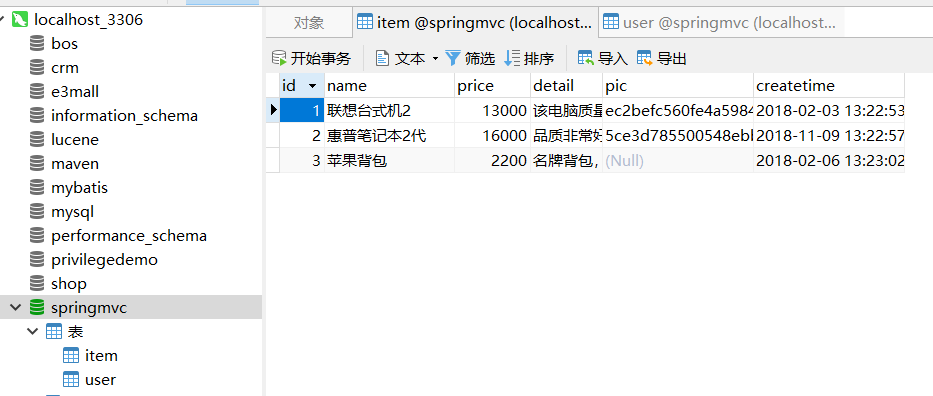
3.1 需求
实现商品查询列表,从mysql数据库查询商品信息。
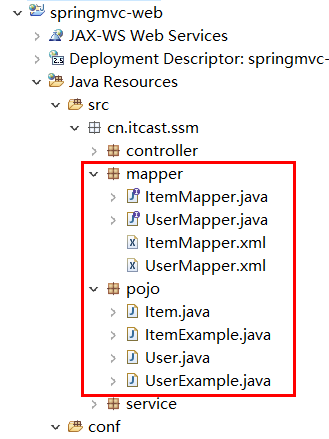
3.2 Dao开发
使用逆向工程,生成代码(注意修改逆向工程的配置文件)
3.3 ItemService接口
public interface ItemService {

    /**

     * 查询商品列表

     *

     * @return

     */

    List<Item> queryItemList();

}
3.4 ItemServiceImpl实现类
@Service

public class ItemServiceImpl implements ItemService {

    @Autowired

    private ItemMapper itemMapper;

    @Override

    public List<Item> queryItemList() {

        // 从数据库查询商品数据

        List<Item> list = this.itemMapper.selectByExample(null);

        return list;

    }

}
3.5 ItemController
@Controller

public class ItemController {

    @Autowired

    private ItemService itemService;

    /**

     * 显示商品列表

     *

     * @return

     */

    @RequestMapping("/itemList")

    public ModelAndView queryItemList() {

        // 获取商品数据

        List<Item> list = this.itemService.queryItemList();

        ModelAndView modelAndView = new ModelAndView();

        // 把商品数据放到模型中

        modelAndView.addObject("itemList", list);

        // 设置逻辑视图

        modelAndView.setViewName("itemList");

        return modelAndView;

    }

}
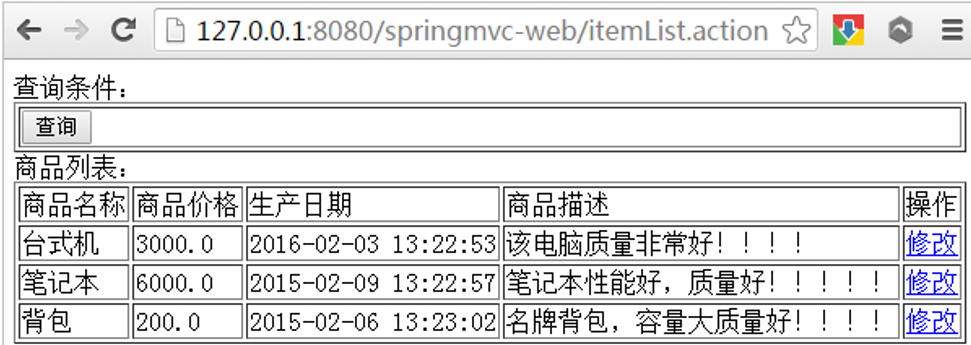
3.6 测试
SprimgMVC学习笔记(二)—— 整合Mybatis的更多相关文章
- MyBatis学习笔记(二)——使用MyBatis对表执行CRUD操作
转自孤傲苍狼的博客:http://www.cnblogs.com/xdp-gacl/p/4262895.html 上一篇博文MyBatis学习总结(一)——MyBatis快速入门中我们讲了如何使用My ...
- Java学习笔记-spring整合mybatis
这个项目就是一个例子,只有添加图书的功能: 项目架构: resource: 整合流程: 1.pom文件节点,这两个是整合用的,其他节点不再赘述: <!-- https://mvnreposito ...
- Spring Boot学习笔记(五)整合mybatis
pom文件里添加依赖 <!-- 数据库需要的依赖 --> <dependency> <groupId>org.mybatis.spring.boot</gro ...
- Spring Boot 学习笔记(六) 整合 RESTful 参数传递
Spring Boot 学习笔记 源码地址 Spring Boot 学习笔记(一) hello world Spring Boot 学习笔记(二) 整合 log4j2 Spring Boot 学习笔记 ...
- WPF的Binding学习笔记(二)
原文: http://www.cnblogs.com/pasoraku/archive/2012/10/25/2738428.htmlWPF的Binding学习笔记(二) 上次学了点点Binding的 ...
- AJax 学习笔记二(onreadystatechange的作用)
AJax 学习笔记二(onreadystatechange的作用) 当发送一个请求后,客户端无法确定什么时候会完成这个请求,所以需要用事件机制来捕获请求的状态XMLHttpRequest对象提供了on ...
- [Firefly引擎][学习笔记二][已完结]卡牌游戏开发模型的设计
源地址:http://bbs.9miao.com/thread-44603-1-1.html 在此补充一下Socket的验证机制:socket登陆验证.会采用session会话超时的机制做心跳接口验证 ...
- JMX学习笔记(二)-Notification
Notification通知,也可理解为消息,有通知,必然有发送通知的广播,JMX这里采用了一种订阅的方式,类似于观察者模式,注册一个观察者到广播里,当有通知时,广播通过调用观察者,逐一通知. 这里写 ...
- 【转】MyBatis学习总结(二)——使用MyBatis对表执行CRUD操作
[转]MyBatis学习总结(二)——使用MyBatis对表执行CRUD操作 上一篇博文MyBatis学习总结(一)——MyBatis快速入门中我们讲了如何使用Mybatis查询users表中的数据, ...
- java之jvm学习笔记二(类装载器的体系结构)
java的class只在需要的时候才内转载入内存,并由java虚拟机的执行引擎来执行,而执行引擎从总的来说主要的执行方式分为四种, 第一种,一次性解释代码,也就是当字节码转载到内存后,每次需要都会重新 ...
随机推荐
- vmstat详细说明
下面是关于Unix下vmstat命令的详细介绍,收录在这里,以备日后参考 vmstat是用来实时查看内存使用情况,反映的情况比用top直观一些.作为一个CPU监视器,vmstat命令比iostat命令 ...
- day35-hibernate映射 04-Hibernate的一级缓存:一级缓存的存在
数据源:文件和数据库.从内存中获取,不用去数据库发送SQL语句查询了.缓存技术是hibernate的一个优化的手段.Session结束了,一级缓存就没了,就销毁了.SeesionFactory没了,二 ...
- [hdu2255]奔小康赚大钱(二分图最优匹配、KM算法)
题目大意:求二分图的最优匹配(首先数目最大, 其次权值最大). 解题关键:KM算法 复杂度:$O(n^3)$ #include<cstdio> #include<cstring> ...
- 分布式锁2 Java非常用技术方案探讨之ZooKeeper 【转载】
前言: 由于在平时的工作中,线上服务器是分布式多台部署的,经常会面临解决分布式场景下数据一致性的问题,那么就要利用分布式锁来解决这些问题.以自己结合实际工作中的一些经验和网上看到的一些资料 ...
- Struts2框架06 ValueStack
原文地址:点击前往 1 什么是ValueStack 称为值栈,Struts提供的共享数据的数据结构 2 为什么要使用ValueStack 从控制器向浏览器传递数据 存储与请求相关的对象信息(sessi ...
- 03 MD5加密、Base64处理
1 什么是MD5 信息摘要算法,可以将字符进行加密,每个加密对象在进行加密后都是等长的 应用场景:将用户密码经过MD5加密后再存储到数据库中,这样即使是超级管理员也没有能力知道用户的具体密码是多少:因 ...
- css 层叠式样式表(1)
实用css有三种格式:内嵌:内联:外部: 分类:内联:写在标记的属性位置,优先级最高,重用性最差内嵌:写在页面的head中,优先级第二,重用性一般外部:写在一个以css结尾的文件中,通过引用来建立文件 ...
- JAVA面向接口的编程思想与具体实现
面向对象设计里有一点大家已基本形成共识,就是面向接口编程,我想大多数人对这个是没有什么觉得需要怀疑的. 问题是在实际的项目开发中我们是怎么体现的呢? 难道就是每一个实现都提供一个接口就了 ...
- tar打包tar.gz文件
命令格式: tar zcvf dir.tar.gz ./dir 压缩后的文件解压出来会是dir这个文件夹
- Python 网络爬虫 001 (科普) 网络爬虫简介
Python 网络爬虫 001 (科普) 网络爬虫简介 1. 网络爬虫是干什么的 我举几个生活中的例子: 例子一: 我平时会将 学到的知识 和 积累的经验 写成博客发送到CSDN博客网站上,那么对于我 ...