
2.Netty的粘包、拆包(一)
Netty粘包、拆包
1.什么是拆包、粘包
(1)拆包、粘包介绍
TCP是个“流”协议,所谓流,就是没有界限的一串数据。大家可以想想河里的流水,是连成一片的,其间并没有分界线。TCP底层并不了解上层业务数据的具体含义,它会根据TCP缓冲区的实际情况进行包的划分,所以在业务上认为,一个完整的包可能会被TCP拆分成多个包进行发送,也有可能把多个小的包封装成一个大的数据包发送,这就是所谓的TCP粘包和拆包问题。
(2)图解
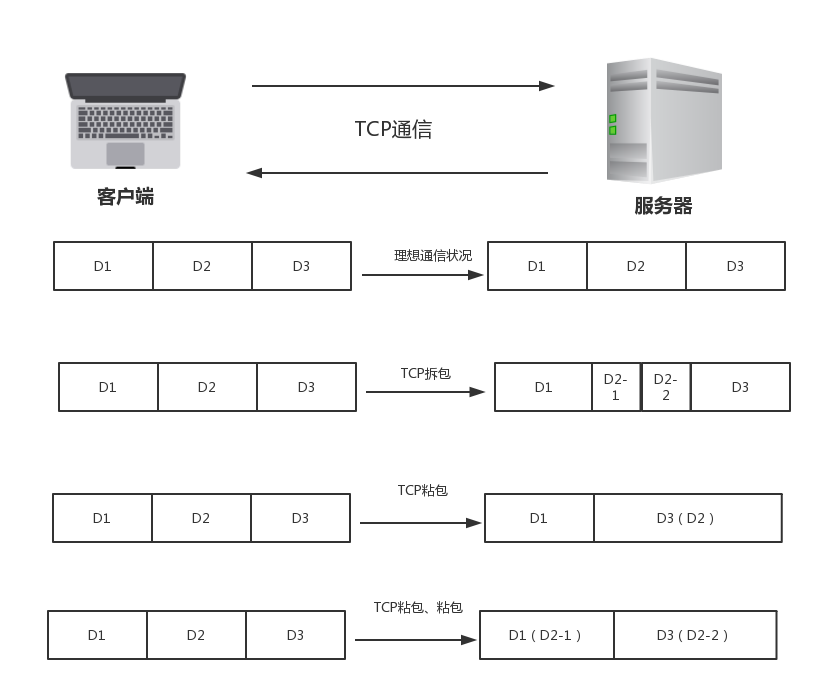
(3)代码模拟
服务端Server
package com.xm.netty.demo02;

import java.net.InetSocketAddress;

import io.netty.bootstrap.ServerBootstrap;

import io.netty.channel.Channel;

import io.netty.channel.ChannelFuture;

import io.netty.channel.ChannelInitializer;

import io.netty.channel.EventLoopGroup;

import io.netty.channel.nio.NioEventLoopGroup;

import io.netty.channel.socket.nio.NioServerSocketChannel;

public class Server {

	private final int port;

	public Server(int port) {

		this.port = port;

	}

	public static void main(String[] args) {

		int port = 8989;

		try {

			new Server(port).start();

		} catch (InterruptedException e) {

			// TODO Auto-generated catch block

			e.printStackTrace();

		}

	}

	private void start() throws InterruptedException {

		EventLoopGroup g1 = new NioEventLoopGroup();

		EventLoopGroup g2 = new NioEventLoopGroup();

		try {

			ServerBootstrap bootstrap = new ServerBootstrap();

			 bootstrap

			 		.group(g1,g2)

			 		.channel(NioServerSocketChannel.class)

			 		.localAddress(new InetSocketAddress( port))

			 		.childHandler(new ChannelInitializer() {

			 			@Override

			 			protected void initChannel(Channel ch) throws Exception {

			 				ch.pipeline().addLast(new ServerHandler());

			 			}

					});

			 ChannelFuture future = bootstrap.bind().sync();

			 future.channel().closeFuture().sync();

		} finally {

			g1.shutdownGracefully().sync();

			g2.shutdownGracefully().sync();

		}

	}

}
服务端ServerHandler
package com.xm.netty.demo02;

import java.time.LocalDateTime;

import java.time.format.DateTimeFormatter;

import io.netty.buffer.ByteBuf;

import io.netty.buffer.Unpooled;

import io.netty.channel.ChannelHandlerAdapter;

import io.netty.channel.ChannelHandlerContext;

import io.netty.util.CharsetUtil;

public class ServerHandler extends ChannelHandlerAdapter {

	@Override

	public void channelRead(ChannelHandlerContext ctx, Object msg) throws Exception {

		ByteBuf in = (ByteBuf) msg;

		String str = in.toString(CharsetUtil.UTF_8);

		System.out.println("Server:"+str);

		str = "服务器返回--->"+ str;

		ctx.writeAndFlush(Unpooled.copiedBuffer(str.getBytes()));

	}

	@Override

	public void exceptionCaught(ChannelHandlerContext ctx, Throwable cause) throws Exception {

		cause.printStackTrace();

		ctx.close();

	}

	@Override

	public void channelActive(ChannelHandlerContext ctx) throws Exception {

		System.out.println(DateTimeFormatter.ISO_LOCAL_DATE_TIME.format(LocalDateTime.now())+"一个客户端连接!");

	}

}
客户端Client
package com.xm.netty.demo02;

import java.time.LocalDateTime;

import java.time.format.DateTimeFormatter;

import io.netty.bootstrap.Bootstrap;

import io.netty.buffer.Unpooled;

import io.netty.channel.ChannelFuture;

import io.netty.channel.ChannelInitializer;

import io.netty.channel.EventLoopGroup;

import io.netty.channel.nio.NioEventLoopGroup;

import io.netty.channel.socket.SocketChannel;

import io.netty.channel.socket.nio.NioSocketChannel;

public class Client {

	private final int port;

	private final String host;

	public Client(int port, String host) {

		this.port = port;

		this.host = host;

	}

	public static void main(String[] args) {

		String host = "127.0.0.1";

		int port = 8989;

		try {

			new Client(port, host).start();

		} catch (InterruptedException e) {

			// TODO Auto-generated catch block

			e.printStackTrace();

		}

	}

	private void start() throws InterruptedException {

		EventLoopGroup group = new NioEventLoopGroup();

		try {

			Bootstrap bootstrap = new Bootstrap();

			bootstrap

					.group(group)

					.channel(NioSocketChannel.class)

					.remoteAddress(host, port)

					.handler(new ChannelInitializer<SocketChannel>() {

						@Override

						protected void initChannel(SocketChannel ch) throws Exception {

							ch.pipeline().addLast(new ClientHandler());

						}

					});

			ChannelFuture future = bootstrap.connect().sync();

			for(int i=10;i<20;i++) {

				String str = DateTimeFormatter.ISO_LOCAL_DATE_TIME.format(LocalDateTime.now()) + "---- " +i+"<<<";

				future.channel().writeAndFlush(Unpooled.copiedBuffer(str.getBytes()));

			}

			future.channel().closeFuture().sync();

		} finally {

			group.shutdownGracefully().sync();

		}

	}

}
客户端ClientHandler
package com.xm.netty.demo02;

import java.time.LocalDateTime;

import java.time.format.DateTimeFormatter;

import io.netty.buffer.ByteBuf;

import io.netty.buffer.Unpooled;

import io.netty.channel.ChannelHandlerAdapter;

import io.netty.channel.ChannelHandlerContext;

import io.netty.util.CharsetUtil;

import io.netty.util.ReferenceCountUtil;

public class ClientHandler extends ChannelHandlerAdapter {

	@Override

	public void channelRead(ChannelHandlerContext ctx, Object msg) throws Exception {

		try {

			ByteBuf in = (ByteBuf) msg;

			String str = in.toString(CharsetUtil.UTF_8);

			System.out.println("Client:"+str);

		} finally {

			ReferenceCountUtil.release(msg);

		}

	}

	@Override

	public void exceptionCaught(ChannelHandlerContext ctx, Throwable cause) throws Exception {

		cause.printStackTrace();

		ctx.close();

	}

	@Override

	public void channelActive(ChannelHandlerContext ctx) throws Exception {

		System.out.println(DateTimeFormatter.ISO_LOCAL_DATE_TIME.format(LocalDateTime.now())+"  已连接上服务器!");

	}

}
添加依赖
<project xmlns="http://maven.apache.org/POM/4.0.0" xmlns:xsi="http://www.w3.org/2001/XMLSchema-instance" xsi:schemaLocation="http://maven.apache.org/POM/4.0.0 http://maven.apache.org/xsd/maven-4.0.0.xsd">

  <modelVersion>4.0.0</modelVersion>

  <groupId>com.xm</groupId>

  <artifactId>netty</artifactId>

  <version>0.0.1-SNAPSHOT</version>

  <dependencies>

	  <dependency>

	    <groupId>io.netty</groupId>

	    <artifactId>netty-all</artifactId>

	    <version>5.0.0.Alpha2</version>

	</dependency>

  </dependencies>

</project>
预期结果
1)服务器
2018-10-11T18:37:19.857一个客户端连接!
Server:2018-10-11T18:37:19.855---- 10<<<
Server:2018-10-11T18:37:20.377---- 11<<<
Server:2018-10-11T18:37:20.877---- 12<<<
Server:2018-10-11T18:37:21.378---- 13<<<
Server:2018-10-11T18:37:21.879---- 14<<<
Server:2018-10-11T18:37:22.379---- 15<<<
Server:2018-10-11T18:37:22.879---- 16<<<
Server:2018-10-11T18:37:23.38---- 17<<<
Server:2018-10-11T18:37:23.881---- 18<<<
Server:2018-10-11T18:37:24.382---- 19<<<
(2)客户端
2018-10-11T18:37:19.855 已连接上服务器!
Client:服务器返回--->2018-10-11T18:37:19.855---- 10<<<
Client:服务器返回--->2018-10-11T18:37:20.377---- 11<<<
Client:服务器返回--->2018-10-11T18:37:20.877---- 12<<<
Client:服务器返回--->2018-10-11T18:37:21.378---- 13<<<
Client:服务器返回--->2018-10-11T18:37:21.879---- 14<<<
Client:服务器返回--->2018-10-11T18:37:22.379---- 15<<<
Client:服务器返回--->2018-10-11T18:37:22.879---- 16<<<
Client:服务器返回--->2018-10-11T18:37:23.38---- 17<<<
Client:服务器返回--->2018-10-11T18:37:23.881---- 18<<<
Client:服务器返回--->2018-10-11T18:37:24.382---- 19<<<
实际结果
(1)服务器
2018-10-11T18:35:40.988一个客户端连接!
Server:2018-10-11T18:35:40.986---- 10<<<2018-10-11T18:35:41.01---- 11<<<2018-10-11T18:35:41.01---- 12<<<2018-10-11T18:35:41.01---- 13<<<2018-10-11T18:35:41.01---- 14<<<2018-10-11T18:35:41.01---- 15<<<2018-10-11T18:35:41.01---- 16<<<2018-10-11T18:35:41.01---- 17<<<2018-10-11T18:35:41.01---- 18<<<2018-10-11T18:35:41.01---- 19<<<(2)客户端
2018-10-11T18:35:40.986 已连接上服务器!
Client:服务器返回--->2018-10-11T18:35:40.986---- 10<<<2018-10-11T18:35:41.01---- 11<<<2018-10-11T18:35:41.01---- 12<<<2018-10-11T18:35:41.01---- 13<<<2018-10-11T18:35:41.01---- 14<<<2018-10-11T18:35:41.01---- 15<<<2018-10-11T18:35:41.01---- 16<<<2018-10-11T18:35:41.01---- 17<<<2018-10-11T18:35:41.01---- 18<<<2018-10-11T18:35:41.01---- 19<<<
2.Netty的粘包、拆包(一)的更多相关文章
- netty 解决粘包拆包问题
netty server TimeServer package com.zhaowb.netty.ch4_3; import io.netty.bootstrap.ServerBootstrap; i ...
- Netty TCP粘包/拆包问题《二》
1.DelimiterBasedFrameDecoder:是以分隔符作为结束标志进行解决粘包/拆包问题 代码: EchoClient:客户端 /* * Copyright 2012 The Netty ...
- Netty TCP粘包/拆包问题《一》
1.使用LineBasedFrameDecoder,StringDecoder解析器进行解决TCP粘包/拆包问题 2.代码搞起: TimeClient:客户端 /* * Copyright 2013- ...
- netty: 解决粘包拆包: 分隔符DelimiterBasedFrameDecoder,定长消息FixedLengthFrameDecoder
DelimiterBasedFrameDecoder 自定义分隔符 给Server发送多条信息,但是server会讲多条信息合并为一条.这时候我们需要对发生的消息指定分割,让client和server ...
- Netty入门系列(2) --使用Netty解决粘包和拆包问题
前言 上一篇我们介绍了如果使用Netty来开发一个简单的服务端和客户端,接下来我们来讨论如何使用解码器来解决TCP的粘包和拆包问题 TCP为什么会粘包/拆包 我们知道,TCP是以一种流的方式来进行网络 ...
- Netty(三)TCP粘包拆包处理
tcp是一个“流”的协议,一个完整的包可能会被TCP拆分成多个包进行发送,也可能把小的封装成一个大的数据包发送,这就是所谓的TCP粘包和拆包问题. 粘包.拆包问题说明 假设客户端分别发送数据包D1和D ...
- 1. Netty解决Tcp粘包拆包
一. TCP粘包问题 实际发送的消息, 可能会被TCP拆分成很多数据包发送, 也可能把很多消息组合成一个数据包发送 粘包拆包发生的原因 (1) 应用程序一次写的字节大小超过socket发送缓冲区大小 ...
- Netty(二)——TCP粘包/拆包
转载请注明出处:http://www.cnblogs.com/Joanna-Yan/p/7814644.html 前面讲到:Netty(一)--Netty入门程序 主要内容: TCP粘包/拆包的基础知 ...
- Netty解决粘包和拆包问题的四种方案
在RPC框架中,粘包和拆包问题是必须解决一个问题,因为RPC框架中,各个微服务相互之间都是维系了一个TCP长连接,比如dubbo就是一个全双工的长连接.由于微服务往对方发送信息的时候,所有的请求都是使 ...
- Netty 粘包 & 拆包 & 编码 & 解码 & 序列化 介绍
目录: 粘包 & 拆包及解决方案 ByteToMessageDecoder 基于长度编解码器 基于分割符的编解码器 google 的 Protobuf 序列化介绍 其他的 前言 Netty 作 ...
随机推荐
- 在IE8下background-image不显示的解决方法
刚写一个页面,在chrome,FF里调试完后,忽然想起ie来,放到Ie里其它还好了,但是有个背景图片显示不出来. 调试N遍后,只好上stackoverflow去找一下,果然找到了. 最初是这样写的: ...
- Linux pid与tgid概念
在Linux操作系统层面,线程其实只是特殊的进程,最特殊之处在于跟其他“线程进程“共享内存(包括代码段.数据段等,但不共享栈). 这两天看书老是看到线程组(thread group),但是线程组是什么 ...
- [一点一滴.NET]前台线程和后台线程
前台线程和后台线程就是通过线程实例的属性IsBackground=true or false来区分的. 新建一个线程是默认是后台线程. 前台线程全部执行完之后,才退出进程. 进程退出,所有的后台线程全 ...
- jQuery OCUpload一键上传文件
1 引入相关的js文件 <!--引入OCUpload的js文件,之前需要引入jQuery的js文件 --> <script type="text/javascript&qu ...
- http学习笔记(三):报文
三.报文 目录: 3.1方法 1.get 2.head 3.put 4.post 5.trace 6.options 7.delete 3.2状态码 ...
- POJ 3694——Network——————【连通图,LCA求桥】
Network Time Limit:5000MS Memory Limit:65536KB 64bit IO Format:%I64d & %I64u Submit Stat ...
- c++隐式类型转换和explicit
什么是隐式转换? 众所周知,C++的基本类型中并非完全的对立,部分数据类型之间是可以进行隐式转换的. 所谓隐式转换,是指不需要用户干预,编译器私下进行的类型转换行为.很多时候用户可能都不知道进行了哪些 ...
- scrollHieght、offsetHeight、clientHeight、width、height
1.scroll滚动(scrollTop.Left.Height.Width) scroll()当用户滚动指定的元素时,会发生 scroll 滚动事件: scrollWidth.scrollHeigh ...
- java中关于冒泡排序算法的学习。
在编程语言的学习中,排序算法在学习过程中是必须要掌握的,特别在新手的学习中,我们应该学会这些算法,本篇先介绍冒泡算法. 冒泡排序 设有一组待排序的数据: 3 2 4 5 7 1 我们需要使用冒泡排序来 ...
- EF Core 2.1 +数据库视图
1.参考文档 https://stackoverflow.com/questions/36012616/working-with-sql-views-in-entity-framework-core ...