
Spring Boot 集成RabbitMQ
在Spring Boot中整合RabbitMQ是非常容易的,通过在Spring Boot应用中整合RabbitMQ,实现一个简单的发送、接收消息的例子。
首先需要启动RabbitMQ服务,并且add一个账户lg或使用guest账户
1. 创建一个Spring Boot项目,pom如下
<?xml version="1.0" encoding="UTF-8"?>

<project xmlns="http://maven.apache.org/POM/4.0.0"

         xmlns:xsi="http://www.w3.org/2001/XMLSchema-instance"

         xsi:schemaLocation="http://maven.apache.org/POM/4.0.0 http://maven.apache.org/xsd/maven-4.0.0.xsd">

    <groupId>com.luangeng</groupId>

    <artifactId>boot</artifactId>

    <packaging>pom</packaging>

    <version>1.0-SNAPSHOT</version>

    <parent>

        <groupId>org.springframework.boot</groupId>

        <artifactId>spring-boot-starter-parent</artifactId>

        <version>1.5.2.RELEASE</version>

    </parent>

    <properties>

        <java.version>1.8</java.version>

        <project.build.sourceEncoding>UTF-8</project.build.sourceEncoding>

    </properties>

    <dependencies>

        <dependency>

            <groupId>org.springframework.boot</groupId>

            <artifactId>spring-boot-starter-amqp</artifactId>

        </dependency>

        <dependency>

            <groupId>org.springframework.boot</groupId>

            <artifactId>spring-boot-starter-web</artifactId>

        </dependency>

        <!-- TEST -->

        <dependency>

            <groupId>org.springframework.boot</groupId>

            <artifactId>spring-boot-starter-test</artifactId>

            <scope>test</scope>

        </dependency>

    </dependencies>

    <build>

        <plugins>

            <plugin>

                <groupId>org.springframework.boot</groupId>

                <artifactId>spring-boot-maven-plugin</artifactId>

            </plugin>

        </plugins>

    </build>

</project>
2.配置文件
spring.application.name=rabbitmq

spring.rabbitmq.host=localhost

spring.rabbitmq.port=5672

spring.rabbitmq.username=lg

spring.rabbitmq.password=lg
3.新增类Sender, 发送方,使用RabbitTemplate发送消息
@Component

public class Sender {

    @Autowired

    private AmqpTemplate rabbitTemplate;

    private static AtomicInteger count = new AtomicInteger(1);

    public void send() {

        String msg = "msg" + count.getAndIncrement() + " at " + new Date();

        System.out.println("Sender : " + msg);

        this.rabbitTemplate.convertAndSend(RabbitConfig.queueName, msg);

    }

}
4.新增类Receive, 消息接受方,使用@RabbitListener包装一个Queue
import org.springframework.amqp.rabbit.annotation.RabbitHandler;

import org.springframework.amqp.rabbit.annotation.RabbitListener;

import org.springframework.stereotype.Component;

@Component

@RabbitListener(queues = RabbitConfig.queueName)

public class Receiver {

    @RabbitHandler

    public void process(String msg) {

        System.out.println("Receiver : " + msg);

    }

}
5.Rabbit配置类,作用是初始化Queue和Exchange等
import org.springframework.amqp.core.*;

import org.springframework.context.annotation.Bean;

import org.springframework.context.annotation.Configuration;

@Configuration

public class RabbitConfig {

    public final static String queueName = "myQueue";

    //注入queue

    @Bean

    Queue queue() {

        return new Queue(queueName, false);

    }

    //注入exchange

    @Bean

    Exchange exchange() {

        //return new FanoutExchange("fanout-exchange");

        //return new DirectExchange("direct-exchange");

        //return new HeadersExchange("headers-exchange");

        return new TopicExchange("topic-exchange");

    }

    //绑定exchange和queue

    @Bean

    Binding binding(Queue queue, TopicExchange exchange) {

        return BindingBuilder.bind(queue).to(exchange).with(queueName);

    }

}
6.主类
@SpringBootApplication

public class Application {

    public static void main(String[] args) {

        SpringApplication.run(Application.class, args);

    }

}
7.测试类
@RunWith(SpringJUnit4ClassRunner.class)

@SpringBootTest(classes = Application.class)

public class ApplicationTest {

    @Autowired

    private Sender sender;

    @Test

    public void hello() throws Exception {

        while(true) {

            sender.send();

            Thread.sleep(1000);

        }

    }

}
---
运行测试类,控制台输出如下:
Receiver : msg514 at Sun Aug 06 11:21:03 CST 2017
Sender : msg515 at Sun Aug 06 11:21:04 CST 2017
Receiver : msg515 at Sun Aug 06 11:21:04 CST 2017
Sender : msg516 at Sun Aug 06 11:21:05 CST 2017
Receiver : msg516 at Sun Aug 06 11:21:05 CST 2017
Sender : msg517 at Sun Aug 06 11:21:06 CST 2017
Receiver : msg517 at Sun Aug 06 11:21:06 CST 2017
Sender : msg518 at Sun Aug 06 11:21:07 CST 2017
Receiver : msg518 at Sun Aug 06 11:21:07 CST 2017
此时Rabbit管理页面显示:
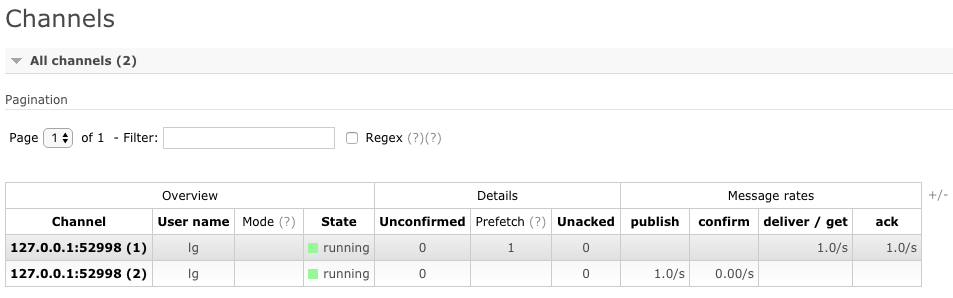
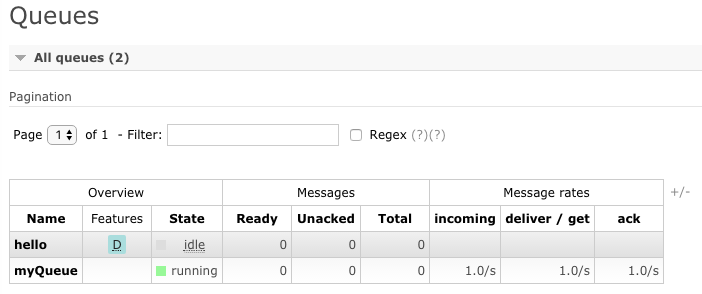
说明消息通过RabbitMQ发送接收成功。
end
Spring Boot 集成RabbitMQ的更多相关文章
- Spring Boot 集成 RabbitMQ 实战
Spring Boot 集成 RabbitMQ 实战 特别说明: 本文主要参考了程序员 DD 的博客文章<Spring Boot中使用RabbitMQ>,在此向原作者表示感谢. Mac 上 ...
- Spring boot集成RabbitMQ(山东数漫江湖)
RabbitMQ简介 RabbitMQ是一个在AMQP基础上完整的,可复用的企业消息系统 MQ全称为Message Queue, 消息队列(MQ)是一种应用程序对应用程序的通信方法.应用程序通过读写出 ...
- 85. Spring Boot集成RabbitMQ【从零开始学Spring Boot】
这一节我们介绍下Spring Boot整合RabbitMQ,对于RabbitMQ这里不过多的介绍,大家可以参考网络上的资源进行安装配置,本节重点是告诉大家如何在Spring Boot中使用Rabbit ...
- RabbitMQ(3) Spring boot集成RabbitMQ
springboot集成RabbitMQ非常简单,如果只是简单的使用配置非常少,springboot提供了spring-boot-starter-amqp项目对消息各种支持. 资源代码:练习用的代码. ...
- spring boot集成RabbitMQ
原文:https://www.jianshu.com/p/e1258c004314 RabbitMQ作为AMQP的代表性产品,在项目中大量使用.结合现在主流的spring boot,极大简化了开发过程 ...
- spring boot 集成 rabbitmq 指南
先决条件 rabbitmq server 安装参考 一个添加了 web 依赖的 spring boot 项目 我的版本是 2.5.2 添加 maven 依赖 <dependency> &l ...
- spring boot 集成 rabbitmq
1.使用默认的AmqpTemplate生产消费pojo时,pojo需要implement Serializable,否则会抛出org.springframework.amqp.AmqpExceptio ...
- spring boot 集成RabbitMQ的异常
com.rabbitmq.client.ShutdownSignalException: channel error; protocol method: #method<channel.clos ...
- Spring boot集成Rabbit MQ使用初体验
Spring boot集成Rabbit MQ使用初体验 1.rabbit mq基本特性 首先介绍一下rabbitMQ的几个特性 Asynchronous Messaging Supports mult ...
随机推荐
- 数据结构与算法分析:C语言描述(原书第2版 简体中文版!!!) PDF+源代码+习题答案
转自:http://www.linuxidc.com/Linux/2014-04/99735.htm 数据结构与算法分析:C语言描述(原书第2版中文版!!!) PDF+源代码+习题答案 数据结构与算法 ...
- vRA7 Software Component
将自定义Property传递给Software Component 示例: vRA7 支持 Software Components,并且还可以在用户的申请页面中,做一个下拉菜单,让用户选择需要安装的S ...
- 语义web基础知识学习
最近找了一本书,<语义web技术基础>----Pascal Hitzler等编著的.因为最近在看关于自然语言处理的一些东西,就顺带翻了一下,做一点学习笔记,方便以后查看. 本书的作者 Pa ...
- Eclipse常用快捷键(转帖)
Ctrl+1 快速修复(最经典的快捷键,就不用多说了) Ctrl+D: 删除当前行 Ctrl+Alt+↓ 复制当前行到下一行(复制增加) Ctrl+Alt+↑ 复制当前行到上一行(复制增加) Alt+ ...
- ADO.Net连接Mysql
首先下载一个mysql.data.dll拷贝到bin下面并引用一下 using MySql.Data.MySqlClient; class Program { static void Main(str ...
- python机器学习——分词
使用jieba库进行分词 安装jieba就不说了,自行百度! import jieba 将标题分词,并转为list seg_list = list(jieba.cut(result.get(" ...
- 和BEM的战斗:10个常见问题及如何避免
原文链接: https://segmentfault.com/a/1190000006135647 无论你是刚刚发现BEM或者已经是个中熟手(作为web术语来说),你可能已经意识到它是一种有用的方法. ...
- 手动用maven安装jar的命令
手动用maven安装jar的命令: mvn install:install-file -DgroupId=com.oracle.jdbc -DartifactId=ojdbc5 -Dversion=1 ...
- BZOJ 1941 kd-tree
模板题 题意说的可能有点不清楚 一开始的点必须在给定的n个点里面 所以枚举点 然后ask最大和最小值 估价函数中 最大值的写法和最小值不同 全部取max 而最小值在估价时 如果在某个点管辖的空间里 就 ...
- 汇编笔记 RETF
assume cs:code stack segment db 16 dup(0) stack ends code segment start: mov ax,stack;将定义字形数据送入AX mo ...