SpringCloud与微服务Ⅹ --- SpringCloud Config分布式配置中心
一.SpringCloud Config是什么
分布式系统面临的问题 --- 配置问题
微服务意味着要将单体应用中的业务拆分成一个个子服务,每个服务的粒度相对较小,因此系统中会出现大量的服务。由于每个服务都需要必要的配置信息才能运行,所以一套集中式的、动态的配置管理设施是必不可少的。SpringCloud提供了ConfigServer来解决这个问题,我们每一个微服务自己带着一个application.yml,上百个配置文件的管理。
SpringCloud Config是什么
SpringCloud Config可以从github上获取配置服务信息,为微服务架构中的微服务提供集中化的外部配置支持,配置服务器为各个不同微服务应用的所有环境提供了一个中心化的外部配置。
二.SpringCloud Config的工作原理
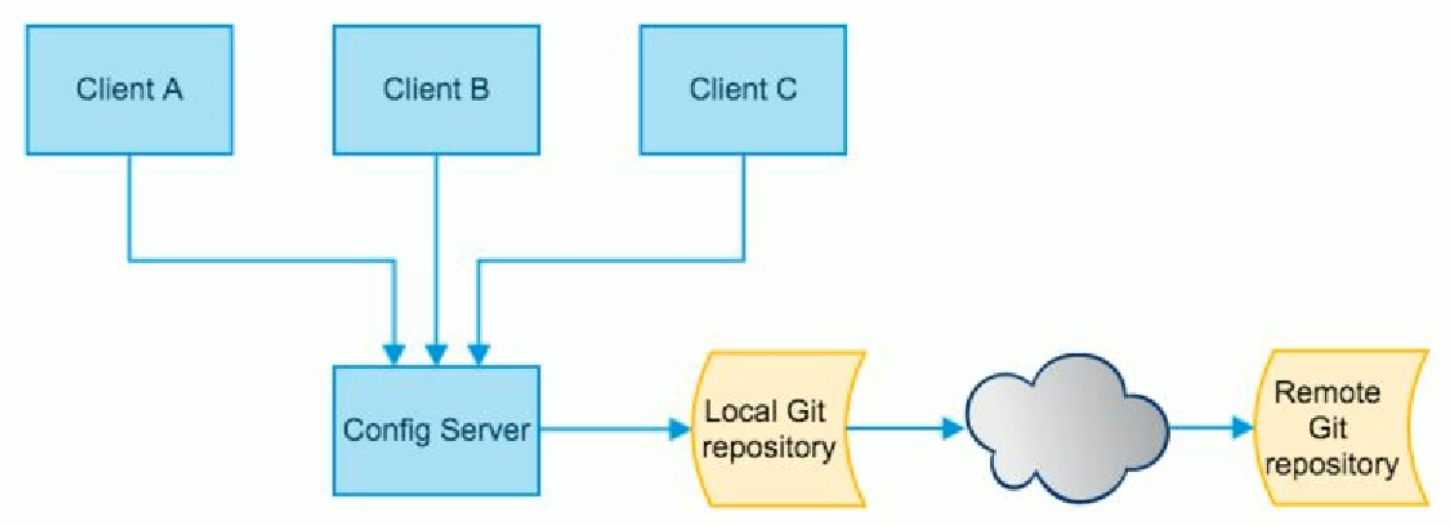
SpringCloud Config分为服务端和客户端两部分。
服务端也称为分布式配置中心,它是一个独立的微服务应用,用来连接配置服务器并为客户端提供获取配置信息,加密/解密信息等访问接口。
客户端则是通过指定的配置中心来管理应用资源,以及业务相关的配置内容,并在启动的时候从配置中心获取和加载配置信息配置服务器默认采用git来存储配置信息,这样就有助于对环境配置进行版本管理,并且可以通过git客户端工具来方便的管理和访问配置内容。
三.SpringCloud Config能做什么
1.集中管理配置文件
2.不同环境不同配置,动态化的配置更新,分环境部署比如dev/test/prod/beta/release
3.运行期间动态调整配置,不再需要每个服务部署的机器上编写配置文件,服务会向配置中心统一拉取配置自己的信息。
4.当配置发生变动时,服务不需要重启即可感知到配置的变化并应用新的配置
5.将配置信息以REST接口的形式暴露
由于SpringCloud Config默认使用GIT来存储配置文件(也支持SVN和本地文件),但最推荐的还是git,而且使用http/https访问的形式。
四.SpringCloud Config 服务端
1.在github上新建一个仓库microservice-config
2.在本地拉取该项目,使用 git clone git@github.com:SillyBoy007/microservice-config.git
3.在该项目里新建一个application.yml
4.编写yml文件,并保存为UTF-8格式
spring:

  profiles:

    active:

      - dev

---

spring:

  profiles: dev  #开发环境

  application:

    name: microservice-config-wang-dev

---

spring:

  profiles: test  #测试环境

  application:

    name: microservice-config-wang-test
5.上传yml文件到github
查看github的Code发现上面已经有了该文件。那么我们该如何读取github上的文件配置信息呢?
搭建ConfigServer
创建一个模块microservice-config-3344。
pom文件
<project xmlns="http://maven.apache.org/POM/4.0.0" xmlns:xsi="http://www.w3.org/2001/XMLSchema-instance"

         xsi:schemaLocation="http://maven.apache.org/POM/4.0.0 http://maven.apache.org/xsd/maven-4.0.0.xsd">

    <modelVersion>4.0.0</modelVersion>

    <parent>

        <groupId>com.wang.springcloud</groupId>

        <artifactId>microservice</artifactId>

        <version>1.0-SNAPSHOT</version>

    </parent>

    <artifactId>microservice-config-3344</artifactId>

    <dependencies>

        <!-- springCloud Config -->

        <dependency>

            <groupId>org.springframework.cloud</groupId>

            <artifactId>spring-cloud-config-server</artifactId>

        </dependency>

        <!-- 避免Config的Git插件报错:org/eclipse/jgit/api/TransportConfigCallback -->

        <dependency>

            <groupId>org.eclipse.jgit</groupId>

            <artifactId>org.eclipse.jgit</artifactId>

            <version>4.10.0.201712302008-r</version>

        </dependency>

        <!-- 图形化监控 -->

        <dependency>

            <groupId>org.springframework.boot</groupId>

            <artifactId>spring-boot-starter-actuator</artifactId>

        </dependency>

        <!-- 熔断 -->

        <dependency>

            <groupId>org.springframework.cloud</groupId>

            <artifactId>spring-cloud-starter-hystrix</artifactId>

        </dependency>

        <dependency>

            <groupId>org.springframework.cloud</groupId>

            <artifactId>spring-cloud-starter-eureka</artifactId>

        </dependency>

        <dependency>

            <groupId>org.springframework.cloud</groupId>

            <artifactId>spring-cloud-starter-config</artifactId>

        </dependency>

        <dependency>

            <groupId>org.springframework.boot</groupId>

            <artifactId>spring-boot-starter-jetty</artifactId>

        </dependency>

        <dependency>

            <groupId>org.springframework.boot</groupId>

            <artifactId>spring-boot-starter-web</artifactId>

        </dependency>

        <dependency>

            <groupId>org.springframework.boot</groupId>

            <artifactId>spring-boot-starter-test</artifactId>

        </dependency>

        <!-- 热部署插件 -->

        <dependency>

            <groupId>org.springframework</groupId>

            <artifactId>springloaded</artifactId>

        </dependency>

        <dependency>

            <groupId>org.springframework.boot</groupId>

            <artifactId>spring-boot-devtools</artifactId>

        </dependency>

    </dependencies>

</project>
yml文件配置
server:
  port: 3344

spring:
  application:
    name: microservice-config
  cloud:
    config:
      server:
        git:
          uri: git@github.com:SillyBoy007/microservice-config.git #git仓库地址
          search-paths: microservice-config-learn #git项目的目录
主启动类注解
@SpringBootApplication

@EnableConfigServer

public class SpringCloudConfig3344 {

    public static void main(String[] args) {

        SpringApplication.run(SpringCloudConfig3344.class,args);

    }

}
修改系统host文件,增加映射
127.0.0.1 config3344.com
测试通过microservice-config-3344是否可以从github上获取配置内容
启动microservice-config-3344项目,分别访问下列的地址
http://config3344.com:3344/application-dev.yml
http://config3344.com:3344/application-test.yml
http://config3344.com:3344/application-dasdd.yml
配置读取规则
1./{application}-{profile}.yml
http://config3344.com:3344/application-dev.yml
2./{application}/{profile}[/{label}]
http://config3344.com:3344/applicaiton/test/master
3./label/{application}-{profile}.yml
http://config3344.com:3344/master/application-test.yml
五.SpringCloud Config 客户端
1.在microservice-config项目下新建一个microservice-config-client.yml文件(以UTF-8格式保存)。
spring:

  profiles:

    active:

    - dev

---

server:

  port: 8201

spring:

  profiles: dev

  application:

    name: microservice-config-client

eureka:

  client:

    service-url:

      defaultZone: http://eureka-dev.com:7001/eureka/

---

server:

  port: 8202

spring:

  profiles: test

  application:

    name: microservice-config-client

eureka:

  client:

    service-url:

      defaultZone: http://eureka-test.com:7001/eureka/
2.将上述的文件上传到github上。
3.新建microservice-config-client-3355项目
pom文件:
<project xmlns="http://maven.apache.org/POM/4.0.0" xmlns:xsi="http://www.w3.org/2001/XMLSchema-instance"

         xsi:schemaLocation="http://maven.apache.org/POM/4.0.0 http://maven.apache.org/xsd/maven-4.0.0.xsd">

    <modelVersion>4.0.0</modelVersion>

    <parent>

        <groupId>com.wang.springcloud</groupId>

        <artifactId>microservice</artifactId>

        <version>1.0-SNAPSHOT</version>

    </parent>

    <artifactId>microservice-config-client-3355</artifactId>

    <dependencies>

        <!-- SpringCloud Config客户端 -->

        <dependency>

            <groupId>org.springframework.cloud</groupId>

            <artifactId>spring-cloud-starter-config</artifactId>

        </dependency>

        <dependency>

            <groupId>org.springframework.boot</groupId>

            <artifactId>spring-boot-starter-actuator</artifactId>

        </dependency>

        <dependency>

            <groupId>org.springframework.cloud</groupId>

            <artifactId>spring-cloud-starter-hystrix</artifactId>

        </dependency>

        <dependency>

            <groupId>org.springframework.cloud</groupId>

            <artifactId>spring-cloud-starter-eureka</artifactId>

        </dependency>

        <dependency>

            <groupId>org.springframework.cloud</groupId>

            <artifactId>spring-cloud-starter-config</artifactId>

        </dependency>

        <dependency>

            <groupId>org.springframework.boot</groupId>

            <artifactId>spring-boot-starter-jetty</artifactId>

        </dependency>

        <dependency>

            <groupId>org.springframework.boot</groupId>

            <artifactId>spring-boot-starter-web</artifactId>

        </dependency>

        <dependency>

            <groupId>org.springframework.boot</groupId>

            <artifactId>spring-boot-starter-test</artifactId>

        </dependency>

        <dependency>

            <groupId>org.springframework</groupId>

            <artifactId>springloaded</artifactId>

        </dependency>

        <dependency>

            <groupId>org.springframework.boot</groupId>

            <artifactId>spring-boot-devtools</artifactId>

        </dependency>

    </dependencies>

</project>
新建bootstrap.yml
application.yml是用户级的资源配置项
bootstrap.yml是系统级的,优先级更高
SpringCloud会创建一个‘BootStrap Context’,作为Spring应用的Application Context的父上下文。初始化的时候‘BootStrap Context’负责从外部源加载配置属性并解析配置。这两个上下文共享一个从外部获取的'Environment'。'BootStrap'属性有高优先级,默认情况下,它们不会被本地配置覆盖。'BootStrap context'和'Application Context'有着不同的约定, 所以新增了一个'bootstrap.yml'文件,保证'BootStrap Context'和'Application Context'配置的分离。
spring:

  cloud:

    config:

      name: microservice-config-client #需要从github上读取的资源名称,没有yml后缀名

      profile: dev

      label: master

      uri: http://config3344.com:3344 #本微服务启动后先去找3344号服务,通过SpringCloud Config获取GitHub的服务地址
新建application.yml
spring:

  application:

    name: microservice-config-client
host域名映射
127.0.0.1 client-config.com
主启动类
package com.wang.springcloud;

import org.springframework.boot.SpringApplication;

import org.springframework.boot.autoconfigure.SpringBootApplication;

@SpringBootApplication

public class ConfigClient3355 {

    public static void main(String[] args) {

        SpringApplication.run(ConfigClient3355.class,args);

    }

}
新建RestController类测试
package com.wang.springcloud.controller;

import org.springframework.beans.factory.annotation.Value;

import org.springframework.web.bind.annotation.RequestMapping;

import org.springframework.web.bind.annotation.RestController;

@RestController

public class ConfigClientRestController {

    @Value("${spring.application.name}")

    private String applicationName;

    @Value("${eureka.client.service-url.defaultZone}")

    private String eurekaServers;

    @Value("${server.port}")

    private String port;

    @RequestMapping

    public String getConfig(){

        return "applicationName:"+applicationName+"\t eurekaServers:"+eurekaServers+"\t port:"+port;

    }

}
启动测试:
1.先启动microservice-config-3344项目,再启动microservice-config-client-3355项目。
2.访问http://client-config.com:8201/,http://client-config.com:8201/config
3.修改bootstrap.yml,将环境profile切换为test
4.访问http://client-config.com:8202/ , http://client-config.com:8202/config
六.SpringCloud Config 实际应用
修改microservice-config项目
1.新建microservice-config-eureka-client.yml
spring:
profiles:
active:
- dev
---
server:
port: 7001
spring:
profiles: dev
application:
name: microservice-config-eureka-client
eureka:
instance:
hostname: eureka7001.com #eureka实例的主机名
client:
register-with-eureka: false #不把自己注册到eureka上
fetch-registry: false #不从eureka上来获取服务的注册信息
service-url:
defaultZone: http://eureka7001.com:7001/eureka/
---
server:
port: 7001
spring:
profiles: test
application:
name: microservice-config-eureka-client
eureka:
instance:
hostname: eureka7001.com #eureka实例的主机名
client:
register-with-eureka: false #不把自己注册到eureka上
fetch-registry: false #不从eureka上来获取服务的注册信息
service-url:
defaultZone: http://eureka7001.com:7001/eureka/
2.新建microservice-config-dept-client.yml
spring:

  profiles:

    active:

    - dev

---

server:

  port: 8001

spring:

  profiles: dev

  application:

    name: microservice-config-dept-client

  datasource:

    type: com.alibaba.druid.pool.DruidDataSource  #数据源类型

    driver-class-name: org.gjt.mm.mysql.Driver #数据库驱动

    url: jdbc:mysql://localhost:3306/cloudDB01  #数据库url

    username: root

    password: 123456

    dbcp2:

      min-idle: 5 #数据库连接池的最小维持连接数

      initial-size: 5 #初始化连接数

      max-total: 5  #最大连接数

      max-wait-millis: 200 #等待连接获取的最大超时时间

mybatis:

  config-location: classpath:mybatis/mybatis.cfg.xml #mybatis配置文件所在路径

  type-aliases-package: com.wang.springcloud.entities #所有entity别名类所在包

  mapper-locations: classpath:mybatis/mapper/**/*.xml #mapper映射文件

eureka:

  client:

    service-url:

      defaultZone: http://eureka7001.com:7001/eureka

---

server:

  port: 8002

spring:

  profiles: test

  application:

    name: microservice-config-dept-client

  datasource:

    type: com.alibaba.druid.pool.DruidDataSource  #数据源类型

    driver-class-name: org.gjt.mm.mysql.Driver #数据库驱动

    url: jdbc:mysql://localhost:3306/cloudDB02  #数据库url

    username: root

    password: 123456

    dbcp2:

      min-idle: 5 #数据库连接池的最小维持连接数

      initial-size: 5 #初始化连接数

      max-total: 5  #最大连接数

      max-wait-millis: 200 #等待连接获取的最大超时时间

mybatis:

  config-location: classpath:mybatis/mybatis.cfg.xml #mybatis配置文件所在路径

  type-aliases-package: com.wang.springcloud.entities #所有entity别名类所在包

  mapper-locations: classpath:mybatis/mapper/**/*.xml #mapper映射文件

eureka:

  client:

    service-url:

      defaultZone: http://eureka7001.com:7001/eureka
3.上传上述两个新文件到github
4.新建microservice-config-eureka-server-7001项目
pom文件
<project xmlns="http://maven.apache.org/POM/4.0.0" xmlns:xsi="http://www.w3.org/2001/XMLSchema-instance"

         xsi:schemaLocation="http://maven.apache.org/POM/4.0.0 http://maven.apache.org/xsd/maven-4.0.0.xsd">

    <modelVersion>4.0.0</modelVersion>

    <parent>

        <groupId>com.wang.springcloud</groupId>

        <artifactId>microservice</artifactId>

        <version>1.0-SNAPSHOT</version>

    </parent>

    <artifactId>microservice-config-eureka-server-7001</artifactId>

    <dependencies>

        <!-- SpringCloudConfig配置 -->

        <dependency>

            <groupId>org.springframework.cloud</groupId>

            <artifactId>spring-cloud-starter-config</artifactId>

        </dependency>

        <dependency>

            <groupId>org.springframework.cloud</groupId>

            <artifactId>spring-cloud-starter-eureka-server</artifactId>

        </dependency>

        <!-- 热部署插件 -->

        <dependency>

            <groupId>org.springframework</groupId>

            <artifactId>springloaded</artifactId>

        </dependency>

        <dependency>

            <groupId>org.springframework.boot</groupId>

            <artifactId>spring-boot-devtools</artifactId>

        </dependency>

    </dependencies>

</project>
bootstrap.yml
spring:

  cloud:

    config:

      name: microservice-config-eureka-server

      profile: dev

      label: master

      uri: http://config3344.com:3344 #本微服务启动后先去找3344号服务,通过SpringCloud Config获取GitHub的服务地址
application.yml
spring:

  application:

    name: microservice-config-eureka-server
主启动类
package com.wang.springcloud;

import org.springframework.boot.SpringApplication;

import org.springframework.boot.autoconfigure.SpringBootApplication;

import org.springframework.cloud.netflix.eureka.server.EnableEurekaServer;

@SpringBootApplication

@EnableEurekaServer

public class ConfigEurekaServer7001 {

    public static void main(String[] args) {

        SpringApplication.run(ConfigEurekaServer7001.class,args);

    }

}
4.新建microservice-config-dept-client-8001项目
pom文件
<project xmlns="http://maven.apache.org/POM/4.0.0" xmlns:xsi="http://www.w3.org/2001/XMLSchema-instance"

         xsi:schemaLocation="http://maven.apache.org/POM/4.0.0 http://maven.apache.org/xsd/maven-4.0.0.xsd">

    <modelVersion>4.0.0</modelVersion>

    <parent>

        <groupId>com.wang.springcloud</groupId>

        <artifactId>microservice</artifactId>

        <version>1.0-SNAPSHOT</version>

    </parent>

    <artifactId>microservice-config-dept-client-8001</artifactId>

    <dependencies>

        <!-- SpringCloudConfig配置 -->

        <dependency>

            <groupId>org.springframework.cloud</groupId>

            <artifactId>spring-cloud-starter-config</artifactId>

        </dependency>

        <dependency>

            <groupId>org.springframework.boot</groupId>

            <artifactId>spring-boot-starter-actuator</artifactId>

        </dependency>

        <dependency>

            <groupId>org.springframework.cloud</groupId>

            <artifactId>spring-cloud-starter-eureka</artifactId>

        </dependency>

        <dependency>

            <groupId>com.wang.springcloud</groupId>

            <artifactId>microservice-api</artifactId>

            <version>${project.version}</version>

        </dependency>

        <dependency>

            <groupId>junit</groupId>

            <artifactId>junit</artifactId>

        </dependency>

        <dependency>

            <groupId>mysql</groupId>

            <artifactId>mysql-connector-java</artifactId>

        </dependency>

        <dependency>

            <groupId>com.alibaba</groupId>

            <artifactId>druid</artifactId>

        </dependency>

        <dependency>

            <groupId>ch.qos.logback</groupId>

            <artifactId>logback-core</artifactId>

        </dependency>

        <dependency>

            <groupId>org.mybatis.spring.boot</groupId>

            <artifactId>mybatis-spring-boot-starter</artifactId>

        </dependency>

        <dependency>

            <groupId>org.springframework.boot</groupId>

            <artifactId>spring-boot-starter-jetty</artifactId>

        </dependency>

        <dependency>

            <groupId>org.springframework.boot</groupId>

            <artifactId>spring-boot-starter-web</artifactId>

        </dependency>

        <dependency>

            <groupId>org.springframework.boot</groupId>

            <artifactId>spring-boot-starter-test</artifactId>

        </dependency>

        <dependency>

            <groupId>org.springframework</groupId>

            <artifactId>springloaded</artifactId>

        </dependency>

        <dependency>

            <groupId>org.springframework.boot</groupId>

            <artifactId>spring-boot-devtools</artifactId>

        </dependency>

    </dependencies>

</project>
bootstrap.yml
spring:

  cloud:

    config:

      name: microservice-config-dept-client #需要从github上读取的资源名称,注意没有yml后缀名

      #profile配置是什么就取什么配置dev or test

      profile: dev    #配置环境

      #profile: test

      label: master

      uri: http://config3344.com:3344  #SpringCloudConfig获取的服务地址
application.yml
spring:

  application:

    name: microservice-config-dept-client
4.拷贝microservice-provider-dept-8001项目的mybatis资源文件以及mapper、service业务代码
5.启动测试
先启动microservice-config-3344,然后启动microservice-config-eureka-client,最后启动microservice-config-dept-client-8001,访问http://localhost:7001/,可以看到8001服务已经注册到eureka中了,访问http://localhost:8001/dept/get/1 , 然后切换test环境,访问http://localhost:8002/dept/get/1,可以看到数据的来源也切换了。
SpringCloud与微服务Ⅹ --- SpringCloud Config分布式配置中心的更多相关文章
- SpringCloud学习笔记《---06 Config 分布式配置中心---》基础篇
- java框架之SpringCloud(7)-Config分布式配置中心
前言 分布式系统面临的配置问题 微服务意味着要将单体应用中的业务拆分成一个个子服务,每个服务的粒度相对较小,因此系统中标会出现大量的服务.由于每个服务都需要必要的配置信息才能运行,所以一套集中式的.动 ...
- SpringCloud学习笔记(九):SpringCloud Config 分布式配置中心
概述 分布式系统面临的-配置问题 微服务意味着要将单体应用中的业务拆分成一个个子服务,每个服务的粒度相对较小,因此系统中会出现大量的服务.由于每个服务都需要必要的配置信息才能运行,所以一套集中式的.动 ...
- SpringCloud Alibaba实战(10:分布式配置中心)
源码地址:https://gitee.com/fighter3/eshop-project.git 持续更新中-- 在我们前面介绍Nacos的时候,说到,Nacos除了可以作为注册中心,还可以作为配置 ...
- SpringCloud与微服务Ⅲ --- SpringCloud入门概述
一. 什么是SpringCloud SpringCloud基于SpringBoot提供了一套微服务解决方案,包括服务注册与发现,配置中心,全链路监控,服务网关,负载均衡,熔断器等组件,除了基于NetF ...
- SpringCloud第六步:搭建分布式配置中心
什么是配置中心 在分布式系统中,由于服务数量巨多,为了方便服务配置文件统一管理,实时更新,所以需要分布式配置中心组件.在Spring Cloud中,有分布式配置中心组件spring cloud con ...
- Spring Cloud Config 分布式配置中心【Finchley 版】
一. 介绍 1,为什么需要配置中心? 当服务部署的越来越多,规模越来越大,对应的机器数量也越来越庞大,靠人工来管理和维护服务的配置信息,变得困难,容易出错. 因此,需要一个能够动态注册和获取服务信息的 ...
- SrpingCloud 之SrpingCloud config分布式配置中心
Config架构 当一个系统中的配置文件发生改变的时候,我们需要重新启动该服务,才能使得新的配置文件生效,spring cloud config可以实现微服务中的所有系统的配置文件的统一管理,而且还可 ...
- SrpingCloud 之SrpingCloud config分布式配置中心实时刷新
默认情况下是不能及时获取变更的配置文件信息 Spring Cloud分布式配置中心可以采用手动或者自动刷新 1.手动需要人工调用接口 监控中心 2.消息总线实时通知 springbus 动态刷新 ...
随机推荐
- 35.python之事件驱动模型
转载:https://www.cnblogs.com/yuanchenqi/articles/5722574.html 事件驱动模型 上节的问题: 协程:遇到IO操作就切换. 但什么时候切回去呢?怎么 ...
- 记一次linux磁盘清理 - 已经删除的文件占用了大量磁盘空间
今天开发环境磁盘占满了,导致开发环境上的 nginx .redis 等组件总是报异常. 跳到系统根目录下 cd / 检查磁盘占用情况 df -h 哇,40G硬盘全用完了.看看是哪些文件占了那么多内存. ...
- 0006 列表(ul、ol、dl)
1. 列表标签(重点) 学习目标 理解 无序列表的应用场景 自定义列表的应用场景 应用 无序列表语法 自定义列表语法 问? 前面我们知道表格一般用于数据展示的,但是网页中还是有很多跟表格类似的布局,如 ...
- 从头学pytorch(十一):自定义层
自定义layer https://www.cnblogs.com/sdu20112013/p/12132786.html一文里说了怎么写自定义的模型.本篇说怎么自定义层. 分两种: 不含模型参数的la ...
- $Noip2011/Luogu1311$ 选择客栈
$Luogu$ $Sol$ 暴力十分显然叭.正解不是很好想. 我最开始想维护所有色调的客栈的前缀和后缀,然后每扫到一个最低消费合法的就统计一次答案.但是这样会重复计数,两个合法客栈之间有几个消费合法的 ...
- 从桌面到 Web - 二十几天学 ASP.NETCore 1
这么多年一直从事桌面开发,一直没有时间好好学学 web 开发.感觉自己就像从石器时代走来的古代类人猿.由于工作的调整,现在终于有时间学习一下 Web 开发.出于对技术和框架的熟悉和继承,决定还是学习 ...
- C#反射与特性(二):探究反射
目录 1,反射的使用概述 2,获取 Type 在上一章中,我们探究了 C# 引入程序集的各种方法,这一章节笔者将探究 C# 中使用反射的各种操作和代码实践. 1,反射的使用概述 1.1 什么是反射 & ...
- 大数据学习之路-hdfs
1.什么是hadoop hadoop中有3个核心组件: 分布式文件系统:HDFS —— 实现将文件分布式存储在很多的服务器上 分布式运算编程框架:MAPREDUCE —— 实现在很多机器上分布式并行运 ...
- MicroPython TPYBoard v702实现HTTP应用功能
[Micropython]TPYBoard v702 HTTP应用功能 转载请注明文章来源,更多教程可自助参考docs.tpyboard.com,QQ技术交流群:157816561,公众号:Micro ...
- MAVEN配置及Spring Tool Suite的Maven配置
1.下载Maven http://maven.apache.org/download.cgi 如图点击下载即可 2.Maven配置 2.1配置本地仓库 创建目录maven-repository如图所示 ...