【Springboot】注解@ConfigurationProperties让配置整齐而简单
1 简介
前面我们用一篇文章《【Spring】只想用一篇文章记录@Value的使用,不想再找其它了(附思维导图)》
详细讲解了在Spring中如何使用@Value来实现我们对配置的需求,它功能强大、使用方便。但它也是有它的局限性的,比如对于邮件服务,我们配置有:
mail.hostname=smtp.qq.com

mail.username=larry@qq.com

mail.password=123456

mail.to=to@163.com

mail.cc=cc@gmail.com
使用@Value,我们需要5个注解及5个独立的变量:
@Value("${mail.hostname}")

private String hostname;

@Value("${mail.username}")

private String username;

@Value("${mail.password}")

private String password;

@Value("${mail.to}")

private List<String> to;

@Value("${mail.cc}")

private List<String> cc;
这样非常不方便,容易出错,较难维护,不好传递。如果能把相同功能的配置组合起来,那配置就不会这么乱了。而Springboot为我们提供了注解@ConfigurationProperties完美解决了这个问题。现在我们来深入了解一下这个注解的强大之处。
2 启动注解的三种方式
启动@ConfigurationProperties有三种方式,分别是:
(1)属性类@ConfigurationProperties+属性类@Component
@Component

@ConfigurationProperties(prefix = "pkslow")

public class PkslowProperties {

    private String name;

    private List<String> emails;

    private Map<String, Integer> price;

  //getter and setter

}
在属性配置类上加注解@ConfigurationProperties是三种方式都需要的,第一种方式通过@Component声明为一个可用的Bean。实际不一定是@Component,@Service等也是可以的。
(2)属性类@ConfigurationProperties+配置类@Bean
在配置类中通过@Bean声明:
@Configuration

public class Config {

    @Bean

    public PkslowProperties pkslowProperties(){

        return new PkslowProperties();

    }

}
(3)属性类@ConfigurationProperties+配置类@EnableConfigurationProperties
我们可以在Springboot启动类中加上注解@EnableConfigurationProperties来声明:
@SpringBootApplication

@EnableConfigurationProperties(PkslowProperties.class)

public class ConfigurationPropertiesDemoApplication {

	public static void main(String[] args) {

		SpringApplication.run(ConfigurationPropertiesDemoApplication.class, args);

	}

}
3 两大优点
3.1 宽松的绑定规则
支持宽松的绑定规则,以下格式都可以识别为accountType属性:
pkslow.accountType=QQ

pkslow.accounttype=QQ

pkslow.account_type=QQ

pkslow.account-type=QQ

pkslow.ACCOUNT_TYPE=QQ
3.2 支持多种属性类型
支持多种属性类型,Java类如下:
@Component

@ConfigurationProperties(prefix = "pkslow")

@Data

public class PkslowProperties {

    private String name;

    private List<String> emails;

    private Map<String, Integer> price;

    private Account mainAccount;

    private List<Account> emailAccounts;

    private Map<String, Account> friendAccounts;

    private Duration activeTime;

    private DataSize appFileSize;

}
配置如下:
#普通类型

pkslow.name=Larry

#List

pkslow.emails[0]=larry@qq.com

pkslow.emails[1]=larry@gmail.com

#Map

pkslow.price.shoe=200

pkslow.price.pen=10

pkslow.price.book=43

#Object

pkslow.mainAccount.username=larry

pkslow.mainAccount.password=123456

pkslow.mainAccount.accountType=Main

#List<Object>

pkslow.emailAccounts[0].username=larry

pkslow.emailAccounts[0].password=******

pkslow.emailAccounts[0].accounttype=QQ

pkslow.emailAccounts[1].username=larry

pkslow.emailAccounts[1].password=xxxxxx

pkslow.emailAccounts[1].account_type=Gmail

pkslow.emailAccounts[2].username=larry

pkslow.emailAccounts[2].password=xxxxxx

pkslow.emailAccounts[2].account-type=163

pkslow.emailAccounts[3].username=larry

pkslow.emailAccounts[3].password=xxxxxx

pkslow.emailAccounts[3].ACCOUNT_TYPE=Apple

#Map<String, Object>

pkslow.friendAccounts.JJ.username=JJ

pkslow.friendAccounts.JJ.password=******

pkslow.friendAccounts.JJ.accountType=QQ

pkslow.friendAccounts.Larry.username=Larry

pkslow.friendAccounts.Larry.password=******

pkslow.friendAccounts.Larry.accountType=QQ

#Duration

pkslow.activeTime=30d

#DataSize

pkslow.appFileSize=10KB
Duration为持续时间属性,可支持的单位有:
ns:nanosecond,纳秒
us:microsecond,微秒
ms:millisecond,毫秒
s:second,秒
m :minute,分
h:hour,小时
d :day,天
不写默认为毫秒,也可以通过注解@DurationUnit来指定单位。
@DurationUnit(ChronoUnit.DAYS)

private Duration timeInDays;
DataSize类似,用来表示文件大小,支持的单位有:B/KB/MB/GB/TB。默认单位为B,可以用@DataSizeUnit指定单位。
4 属性转换失败处理
4.1 无法转换的类型
有时配置错误,就会无法转换成正常的类型,例如属性为布尔类型,却定义为pkslow.enabled=open,那肯定是无法转换的。默认会启动失败,并抛出异常。
Description:

Failed to bind properties under 'pkslow.enabled' to boolean:

    Property: pkslow.enabled

    Value: open

    Origin: class path resource [application.properties]:46:16

    Reason: failed to convert java.lang.String to boolean

Action:

Update your application's configuration
但如果我们并不想影响Springboot的启动,可以通过设置 ignoreInvalidFields 属性为 true (默认为 false),就会忽略错误的属性。
@Component

@ConfigurationProperties(prefix = "pkslow", ignoreInvalidFields = true)

public class PkslowProperties {

}
设置之后,错误的属性就会取默认值,如null或false。
4.2 未知的属性
如果写错的不是配置的值,而是配置的项,会发生什么呢?
#Java类没有该属性myAppName

pkslow.myAppName=pkslow
结果是什么也不会发生。
因为在默认情况下,Springboot 会忽略那些不能识别的字段。如果你希望它在这种情况下启动失败,可以配置ignoreUnknownFields为false,默认是为true的。这样你就必须要删除这个配置错误的属性了。
@Component

@ConfigurationProperties(prefix = "pkslow", ignoreUnknownFields = false)

public class PkslowProperties {

}
有两点需要注意:
(1)如果设置ignoreInvalidFields为true,则ignoreUnknownFields不起作用;
(2)带有 @ConfigurationProperties 的不同的类不要使用相同的前缀(命名空间),容易造成冲突,如某个属性一个可用,一个不可用。
5 自定义转换器
如前面讲解的Duration和DataSize,都是比较特殊的属性。实际上我们还可以自定义属性,并自定义转换器来实现属性绑定。
配置如下:
pkslow.convertAccount=Larry:123456:QQ
对应的属性为:
private Account convertAccount;
其中Account类如下:
@Data

@NoArgsConstructor

@AllArgsConstructor

public class Account {

    private String username;

    private String password;

    private String accountType;

}
通过实现Converter接口自定义转换器如下:
public class AccountConverter implements Converter<String, Account> {

    @Override

    public Account convert(String s) {

        String[] strings = s.split(":");

        return new Account(strings[0], strings[1], strings[2]);

    }

}
通过注解@ConfigurationPropertiesBinding声明启用该转换器:
@Configuration

public class Config {

    @Bean

    @ConfigurationPropertiesBinding

    public AccountConverter accountConverter() {

        return new AccountConverter();

    }

}
完成以上,就可以使用自定义的属性和配置了。
6 使用Spring Boot Configuration Processor
自定义的属性在IDE中是有告警的,无法被识别成合法的配置。通过引入Springboot Configuration Processor可以解决这个问题,并且IDE还能启动自动补全功能。
引入:
<dependency>

  <groupId>org.springframework.boot</groupId>

  <artifactId>spring-boot-configuration-processor</artifactId>

  <optional>true</optional>

</dependency>
6.1 完成自动补全
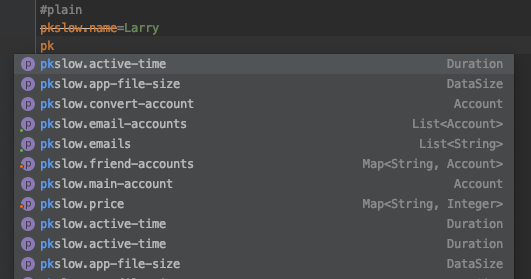
引入依赖后,重新build一下project就可以了。它会为我们创建一个Json格式的文件:

6.2 标记配置属性为 Deprecated
把注解@DeprecatedConfigurationProperty放在getter方法,该属性还会被显示为Deprecated:
@Component

@ConfigurationProperties(prefix = "pkslow")

public class PkslowProperties {

    private String name;

    @DeprecatedConfigurationProperty

    public String getName() {

        return name;

    }

}
自动补全和Deprecated的效果如下:
7 总结
本文通过代码案例详细讲解了@ConfigurationProperties的使用,demo的代码可关注公众号后台回复”ConfigurationProperties“获取。
欢迎关注公众号<南瓜慢说>,将持续为你更新...

多读书,多分享;多写作,多整理。
【Springboot】注解@ConfigurationProperties让配置整齐而简单的更多相关文章
- springboot 使用@ConfigurationProperties注入配置属性
导入依赖,让springboot支持@ConfigurationProperties 注解 <!-- 支持 @ConfigurationProperties 注解 --> <depe ...
- 转-spring-boot 注解配置mybatis+druid(新手上路)-http://blog.csdn.net/sinat_36203615/article/details/53759935
spring-boot 注解配置mybatis+druid(新手上路) 转载 2016年12月20日 10:17:17 标签: sprinb-boot / mybatis / druid 10475 ...
- 【SpringBoot实战】核心配置和注解
前言 SpringBoot核心配置在springboot中有非常重要的作用,我们可是使用核心配置文件进行一些基础功能的定义,属性值的注入等.springboot支持两种格式的核心配置文件,一种是pro ...
- SpringBoot集成Mybatis(0配置注解版)
Mybatis初期使用比较麻烦,需要各种配置文件.实体类.dao层映射关联.还有一大推其它配置.当然Mybatis也发现了这种弊端,初期开发了generator可以根据表结构自动生成实体类.配置文件和 ...
- Spring注解@PropertySource加载配置文件和SpringBoot注解@Value、@ConfigurationProperties进行属性映射
SpringBoot的配置文件 位置:resources目录下 配置文件的作用: (1).SpringBoot是基于约定的,所以很多配置都有默认值,但如果想使用自己的配置替换默认配置的话,就可以使用a ...
- springboot注解之@Import @Conditional @ImportResource @ConfigurationProperties @EnableConfigurationProperties
1.包结构 2.主程序类 1 @SpringBootApplication(scanBasePackages={"com.atguigu"}) 2 public class Mai ...
- springboot用@Autowired和@PostConstruct注解把config配置读取到bean变成静态方法
springboot用@Autowired和@PostConstruct注解把config配置读取到bean变成静态方法 @SpringBootApplication public class Sen ...
- springboot 入门二- 读取配置信息一
在上篇入门中简单介绍下springboot启动使用了大量的默认配置,在实际开发过程中,经常需要启动多个服务,那端口如何手动修改呢? 此篇就是简单介绍相关的配置文件信息. Spring Boot允许外部 ...
- springboot注解使用说明
springboot注解 @RestController和@RequestMapping注解 我们的Example类上使用的第一个注解是 @RestController .这被称为一个构造型(ster ...
随机推荐
- wpf 登录时显示状态动态图
下面的示例演示了如何在登录过程时,界面上显示状态图标,登录完成后隐藏图标: public partial class MainWindow : Window { public MainWindow() ...
- H3C ISDN DCC备份配置示例
- 【转载】.NET中使用Redis
Redis是一个用的比较广泛的Key/Value的内存数据库,新浪微博.Github.StackOverflow 等大型应用中都用其作为缓存,Redis的官网为http://redis.io/. 最近 ...
- Vue的Router路由传参
一.文件结构 二.vue.js 打开此链接 https://cdn.bootcss.com/vue/2.6.10/vue.js 复制粘贴页面的所有内容 三.vue-router.js 打开此链接 h ...
- Python--day40--datetime,socketserver,Threading模块分别是哪些模块的高层模块
- P1111 朋友关系判定
题目描述 有n个人和m对关系,这n个人的编号从1到n. 而m对关系中,每对关系都包含两个人的编号A和B(1<=A,B<=n),用于表示A和B是好友关系. 如果两个数A和B不在好友关系中,则 ...
- BoundsChecker下载
首先,单独的BoundsChecker已经没了,被收购了,整合进了DevPartner 其次,DevPartner是收费软件,属于Borland的.官方地址:http://www.borland.co ...
- 2019-10-18-WPF-高速书写-StylusPlugIn-原理
title author date CreateTime categories WPF 高速书写 StylusPlugIn 原理 lindexi 2019-10-18 21:23:46 +0800 2 ...
- 【HTML/CSS】BFC
块格式化上下文(Block formatting contexts) BFC是什么? 是Web页面中盒模型布局的CSS渲染模式.它的定位体系属于常规文档流. 至少满足条件之一: float 的值不为 ...
- 手把手教你基于koa2,mongoose实现增删改查
初始化项目 npm init -y 先安装一波乱七八糟的依赖插件(需要具备一定的koa2知识,至于mongoDB自行百度安装教程),模板引擎我使用的是art-template(据说是性能最好的,而且是 ...